# Plugins — full documentation
> Single-file Markdown export for building plugins with skills, MCP servers, and optional UI.
Curated index: https://developers.openai.com/plugins/llms.txt
# Plugin guidelines
These guidelines cover the MCP server and optional UI in a plugin. For the
complete submission flow, including skills, portal steps, review, approval,
and publishing, see
[Submit plugins](https://developers.openai.com/plugins/deploy/submission).
## Overview
The plugin ecosystem is built on trust. People come to ChatGPT and Codex
expecting experiences that are safe, useful, and respectful of their privacy.
Developers expect a fair and transparent process. These developer guidelines
set the policies every builder is expected to review and follow.
Before getting into specifics, review the
[optional UI guidelines](https://developers.openai.com/plugins/concepts/ui-guidelines) for interaction,
layout, and design patterns that help plugin UI feel intuitive, trustworthy,
and consistent within ChatGPT.
You can also read the principles in [what makes a great experience in ChatGPT](https://developers.openai.com/blog/what-makes-a-great-chatgpt-app/).
The guidelines below outline the minimum standard a published plugin must meet
to remain available in the universal directory shared by ChatGPT and Codex.
Plugins that demonstrate strong real-world utility and high user satisfaction
may be eligible for enhanced distribution opportunities, such as directory
placement or proactive suggestions.
## Plugin fundamentals
### Purpose and originality
Plugins should serve a clear purpose and reliably do what they promise. In
particular, they should provide functionality or workflows that are not
natively supported by the products' built-in capabilities and that meaningfully
help satisfy common user intents expressed in conversation.
Only use intellectual property that you own or have permission to use. Do not
engage in misleading or copycat designs, impersonation, spam, or static frames
with no meaningful interaction. Plugins should not imply that they are made or
endorsed by OpenAI.
### Quality and reliability
Plugins must behave predictably and reliably. Results should be accurate and
relevant to user input. Errors, including unexpected ones, must be handled with
clear messaging or fallback behaviors.
Before submitting a plugin, thoroughly test its MCP server, tools, and optional
UI across a wide range of scenarios. Plugins should be stable, responsive, and
complete. Trial or demo plugins will not be accepted.
### Plugin name, description, and optional screenshots
Plugin names and descriptions must be clear, accurate, and straightforward.
Avoid overly generic names, especially single-word dictionary terms that aren't
explicitly tied to your brand. Screenshots are optional for plugins with UI.
Don't submit screenshots for plugins without UI. If you include screenshots,
they must accurately represent the plugin's functionality and comply with the
required dimensions.
### Tools
MCP tools tell ChatGPT and Codex how to use your server's capabilities. Clear,
accurate tool definitions make the plugin safer, easier for the model to
understand, and easier for users to trust.
#### Clear and accurate tool names
Tool names should be human-readable, specific, and descriptive of what the tool actually does.
- Tool names must be unique within your MCP server.
- Use plain language that directly reflects the action, ideally as a verb (for example, `get_order_status`).
- Avoid misleading, overly promotional, or comparative language (for example, `pick_me`, `best`, `official`).
#### Descriptions that match behavior
Each tool must include a description that explains its purpose explicitly and accurately.
- The description should describe what the tool does.
- Descriptions must not favor or disparage other plugins or services or attempt
to influence the model to select them over another plugin's tools.
- Descriptions must not recommend overly broad triggering beyond the explicit
user intent and purpose the plugin fulfills.
- If a tool's behavior is unclear or incomplete from its description, the
plugin may be rejected.
#### Correct annotation
[Tool annotations](https://developers.openai.com/plugins/reference#annotations) must be correctly set so
that the model and users understand whether an action is safe or requires extra
caution.
- You should label a tool with the `readOnlyHint` annotation if it only retrieves
or lists data and does not change anything outside the conversation.
- Write or destructive tools (for example, creating, updating, deleting, posting, sending) must be explicitly marked using the `readOnlyHint` and `destructiveHint`.
- Tools that interact with external systems, accounts, public platforms, or create publicly-visible content must be explicitly labeled using the `openWorldHint` annotation.
- Incorrect or missing action labels are a common cause of rejection. Double-check that the `readOnlyHint`, `openWorldHint`, and `destructiveHint` annotations are correctly set, and provide a detailed justification for each when submitting the plugin.
#### Minimal and purpose-driven inputs
Tools should request the minimum information necessary to complete their task.
- Input fields must be directly related to the tool’s stated purpose.
- Do not request the full conversation history, raw chat transcripts, or broad contextual fields “just in case.” A tool may request a _brief, task-specific_ user intent field only when it meaningfully improves execution and does not expand data collection beyond what is reasonably necessary to respond to the user’s request and for the purposes described in your privacy policy.
- If needed, rely on the coarse geographic location shared by the system. Do not request precise user location data (for example, GPS coordinates or addresses).
#### Predictable, auditable behavior
Tools should behave exactly as their names, descriptions, and inputs indicate.
- Side effects should never be hidden or implicit.
- If a tool sends data outside the current environment (for example, posting content, sending messages), this must be clear from the tool definition.
- Tools should be safe to retry where possible, or explicitly indicate when retries may cause repeated effects.
Carefully designed tools help reduce surprises, protect users, and speed up the review process.
### Authentication and permissions
If your MCP server requires authentication, the flow must be transparent and
explicit. Users must be informed of all requested permissions, and those
requests must be limited to what is necessary for the plugin to function.
#### Test credentials
When submitting a plugin with an authenticated MCP server, provide a login and
password for a fully featured demo account that includes sample data. Plugins
that require additional login steps, such as a new account sign-up or 2FA
through an inaccessible account, will be rejected.
## Commerce and monetization
{/* vale off */}
Currently, plugins may conduct commerce **only for physical goods**. Selling digital products or services—including subscriptions, digital content, tokens, or credits—is not allowed, whether offered directly or indirectly (for example, through freemium upsells).
Users may sign in to an existing paid account and access features already included in their subscription. Plugins must not display subscription plans, initiate new subscriptions, or promote upgrades.
If a certain plugin feature requires a different plan or entitlement (e.g., a different subscription tier or additional credits) than the user's, the plugin may explain that. This information should help users understand why the feature is unavailable, and should not initiate a checkout or transaction flow.
Specifically, plugins may:
- Explain that a certain feature is not available with the user’s current plan or entitlement.
- Link to an informational page describing available plans or entitlement options.
Plugins may not:
- Link directly to a checkout or other transactional page.
- Link to a page that explicitly initiates the process to upgrade, subscribe, or complete a purchase.
Plugins should provide a high quality experience in ChatGPT. If the same feature in your plugin is also available through your external website or application, you must not provide a worse version through your plugin. Plugins must not apply ChatGPT-specific fees, surcharges, or other pricing that penalizes users for accessing a service through ChatGPT. Temporary discounts and promotional offers on other platforms are permitted.
In addition, plugins may not be used to sell, promote, facilitate, or meaningfully enable the following goods or services:
#### **Prohibited goods**
- **Adult content & sexual services**
- Pornography, explicit sexual media, live-cam services, adult subscriptions
- Sex toys, sex dolls, BDSM gear, fetish products
- **Gambling**
- Real-money gambling services, casino credits, sportsbook wagers, crypto-casino tokens
- **Illegal or regulated drugs**
- Marijuana/THC products, psilocybin, illegal substances
- CBD products exceeding legal THC limits
- **Drug paraphernalia**
- Bongs, dab rigs, drug-use scales, cannabis grow equipment marketed for drugs
- **Prescription & age-restricted medications**
- Prescription-only drugs (for example, insulin, antibiotics, Ozempic, opioids)
- Age-restricted Rx products (for example, testosterone, HGH, fertility hormones)
- **Illicit goods**
- Counterfeit or replica products
- Stolen goods or items without clear provenance
- Financial-fraud tools (skimmers, fake POS devices)
- Piracy tools or cracked software
- Wildlife or environmental contraband (ivory, endangered species products)
- **Malware, spyware & surveillance**
- Malware, ransomware, keyloggers, stalkerware
- Covert surveillance devices (spy cameras, IMSI catchers, hidden trackers)
- **Tobacco & nicotine**
- Tobacco products
- Nicotine products (vapes, e-liquids, nicotine pouches)
- **Weapons & harmful materials**
- Firearms, ammunition, firearm parts
- Explosives, fireworks, bomb-making materials
- Illegal or age-restricted weapons (switchblades, brass knuckles, crossbows where banned)
- Self-defense weapons (pepper spray, stun guns, tasers)
- Extremist merchandise or propaganda
#### **Prohibited fraudulent, deceptive, or high-risk services**
- Fake IDs, forged documents, or document falsification services
- Debt relief, credit repair, or credit-score manipulation schemes
- Unregulated, deceptive, or abusive financial services
- Lending, advance-fee, or credit-building schemes designed to exploit users
- Crypto or NFT offerings involving speculation, consumer deception, or financial abuse
- Execution of money transfers, crypto transfers, or investment trades
- Government-service abuse, impersonation, or benefit manipulation
- Identity theft, impersonation, or identity-monitoring services that enable misuse
- Certain legal or quasi-legal services that facilitate fraud, evasion, or misrepresentation
- Negative-option billing, telemarketing, or consent-bypass schemes
- High-chargeback, fraud-prone, or abusive travel services
### Checkout
Plugins should use external checkout, directing users to complete purchases on your own domain.
Instant Checkout, which is currently in beta, is currently available only to select marketplace partners and may expand to additional marketplaces and retailers over time.
Until then, standard external checkout is the required approach. No other third-party checkout solutions may be embedded or hosted within the plugin UI. To learn more, see our [docs on Agentic Commerce](https://developers.openai.com/commerce/).
{/* vale on */}
### Advertising
Plugins must not serve advertisements and must not exist primarily as an
advertising vehicle. Every plugin must deliver clear, legitimate functionality
that provides standalone value to users.
## Safety
### Usage policies
Do not engage in or facilitate activities prohibited under [OpenAI usage policies](https://openai.com/policies/usage-policies/). Plugins must avoid high-risk behaviors that could expose users to harm, fraud, or misuse.
Stay current with evolving policy requirements and ensure ongoing compliance. Previously approved plugins that are later found in violation may be removed.
### Appropriateness
Plugins must be suitable for general audiences, including users aged 13–17.
Plugins may not explicitly target children under 13. Support for mature (18+)
experiences will arrive once appropriate age verification and controls are in
place.
### Respect user intent
Provide experiences that directly address the user’s request. Do not insert unrelated content, attempt to redirect the interaction, or collect data beyond what is reasonably necessary to fulfill the user’s request and what is consistent with your privacy policy.
### Fair play
Plugins must not include descriptions, titles, tool annotations, or other
model-readable fields, at either the tool or plugin level, that manipulate how
the model selects or uses other plugins or their tools (for example,
instructing the model to prefer one plugin over others) or interfere with fair
discovery. All descriptions must accurately reflect the plugin's value without
disparaging alternatives.
### Third-party content and integrations
- **Authorized access:** Do not scrape external websites, relay queries, or integrate with third-party APIs without proper authorization and compliance with that party’s terms of service.
- **Unofficial connectors:** We cannot approve plugins that primarily function as unofficial connectors to third-party services, including pass-through intermediary software layers.
- **Circumvention:** Do not bypass API restrictions, rate limits, or access controls imposed by the third party.
### Iframes and embedded pages
Plugins with UI can opt in to iframe usage by setting `frameDomains` in the
resource CSP (`_meta.ui.csp.frameDomains`), but we strongly encourage you to
build the UI without this pattern. If you choose to use `frameDomains`, be
aware that:
- It is only intended for cases where embedding a third-party experience is essential (for example, a notebook, IDE, or similar environment).
- Those plugins receive extra manual review and are often not approved for broad distribution.
- During development, any developer can test `frameDomains` in developer mode, but approval for public listing is limited to trusted scenarios.
## Privacy
### Privacy policy
Plugin submissions must include a clear, published privacy policy explaining, at minimum, the categories of personal data collected, the purposes of use, the categories of recipients, data retention timelines, and any controls offered to your users. Follow this policy at all times. Users can review your privacy policy before installing the plugin.
### Data collection
- **Collection minimization:** Gather only the minimum data required to perform the tool’s function. Inputs should be specific, narrowly scoped, and explicitly linked to the task. Avoid “just in case” fields or broad profile data. Design the input schema to limit data collection by default, rather than a funnel for optional context.
- **Response minimization:** Tool responses must return only data that is directly relevant to the user’s request and the tool’s stated purpose. Do not include diagnostic, telemetry, or internal identifiers—such as session IDs, trace IDs, request IDs, timestamps, or logging metadata—unless they are strictly required to fulfill the user’s query.
- **Restricted data:** Do not collect, solicit, or process the following categories of Restricted Data:
- Information subject to Payment Card Information Data Security Standards (PCI DSS)
- Protected health information (PHI)
- Government identifiers (such as social security numbers)
- Access credentials and authentication secrets (such as API keys, MFA/OTP codes, or passwords).
- **Regulated Sensitive Data:** Do not collect personal data considered “sensitive” or “special category” in the jurisdiction in which the data is collected unless collection is strictly necessary to perform the tool’s stated function; the user has provided legally adequate consent; and the collection and use is explicitly and prominently disclosed at or before the point of collection.
- **Data boundaries:**
- Avoid requesting raw location fields (for example, city or coordinates) in your input schema. When location is needed, obtain it through the client’s controlled side channel (such as environment metadata or a referenced resource) so appropriate policy and consent controls can be applied. This reduces accidental PII capture, enforces least-privilege access, and keeps location handling auditable and revocable.
- Your MCP server must not pull, reconstruct, or infer the full chat log from the client or elsewhere. Operate only on the explicit snippets and resources the client or model chooses to send. This separation can help prevent covert data expansion and keep analysis limited to intentionally shared content.
### Transparency and user control
- **Data practices:** Do not engage in surveillance, tracking, or behavioral profiling—including metadata collection such as timestamps, IP addresses, or query patterns—unless explicitly disclosed, narrowly scoped, subject to meaningful user control, and aligned with [OpenAI’s usage policies](https://openai.com/policies/usage-policies/).
- **Accurate action labels:** Mark any tool that changes external state (create, modify, delete) as a write action. You should only mark a tool as a read-only action if it is side-effect-free and safe to retry. Destructive actions require clear labels and friction (for example, confirmation) so clients can enforce guardrails, approvals, confirmations, or prompts before execution.
- **Preventing data exfiltration:** Any action that sends data outside the current boundary (for example, posting messages, sending emails, or uploading files) must be surfaced to the client as a write action so it can require user confirmation or run in preview mode. This reduces unintentional data leakage and aligns server behavior with client-side security expectations.
## Developer verification
### Verification
All plugin submissions must come from verified individuals or organizations. Inside the [OpenAI Platform Dashboard general settings](https://platform.openai.com/settings/organization/general), we provide a way to confirm your identity and affiliation with any business you wish to publish on behalf of. Misrepresentation, hidden behavior, or attempts to game the system may result in removal from the program.
### Support contact details
You must provide customer support contact details where end users can reach you for help. Keep this information accurate and up to date.
---
# Add UI to your MCP server
## Overview
Custom UI is optional. Add it when a plugin use case requires people to
inspect, compare, edit, confirm, or navigate structured information. Keep the
MCP tools useful without a component so ChatGPT and Codex can complete the
workflow without UI.
The MCP server returns UI resources for selected tools. Components run inside
an iframe in ChatGPT, communicate with the host through the MCP Apps bridge
(JSON-RPC over `postMessage`), and render alongside the conversation. The open
MCP Apps standard lets the UI run across compatible hosts.
## Start with MCP Apps
ChatGPT implements the open [MCP Apps
standard](https://modelcontextprotocol.io/docs/extensions/apps) for UI returned
by an MCP server. MCP Apps defines how your server associates tools with UI
resources and how the iframe communicates with its host.
For new UI:
1. Declare the UI resource with `_meta.ui.resourceUri`.
2. Use the `ui/*` JSON-RPC bridge over `postMessage` for initialization,
notifications, tool calls, messages, and model-visible context.
3. Keep tools useful without UI so the model can complete the workflow in
clients that do not render components.
This standards-first foundation lets the same UI run in ChatGPT and other
compatible MCP Apps hosts.
When you're ready to implement the standard, use the [MCP Apps
specification](https://modelcontextprotocol.io/docs/extensions/apps).
## Layer on ChatGPT extensions
After the MCP Apps flow works, use `window.openai` only for capabilities that
the shared specification does not cover. These optional extensions can improve
the experience in ChatGPT without making them part of the portable UI
foundation.
### Prefer shared fields and methods
Use the MCP Apps field or method whenever the shared specification covers the
capability:
| Goal | MCP Apps standard | ChatGPT compatibility alias |
| ---------------------------- | ----------------------------------------------- | ----------------------------------- |
| Link a tool to a UI resource | `_meta.ui.resourceUri` | `_meta["openai/outputTemplate"]` |
| Receive tool input | `ui/initialize` + `ui/notifications/tool-input` | `window.openai.toolInput` |
| Receive tool results | `ui/notifications/tool-result` | `window.openai.toolOutput` |
| Call a tool from the UI | `tools/call` | `window.openai.callTool` |
| Send a follow-up message | `ui/message` | `window.openai.sendFollowUpMessage` |
The compatibility aliases remain available for existing integrations. New UI
should use the shared fields and bridge methods in the middle column.
Examples include:
- Instant Checkout with `window.openai.requestCheckout`.
- ChatGPT file handling with `window.openai.uploadFile`,
`window.openai.selectFiles`, and `window.openai.getFileDownloadUrl`.
- Host-controlled modals with `window.openai.requestModal`.
- Widget-state persistence with `window.openai.widgetState` and
`window.openai.setWidgetState`.
Feature-detect each extension and provide a fallback when practical:
```js
const openai = typeof window !== "undefined" ? window.openai : undefined;
if (openai?.requestModal) {
await openai.requestModal({
/* ... */
});
} else {
// Fallback behavior for hosts without this extension.
}
```
Avoid branching on a host or product name. Test for the capability your UI
needs.
For extension signatures and examples, see the [`window.openai` component
bridge reference](https://developers.openai.com/plugins/reference#windowopenai-component-bridge).
### Optional OpenAI component library
The
[`@openai/apps-sdk-ui`](https://openai.github.io/apps-sdk-ui/) component
library provides ready-made buttons, cards, input controls, and layout
primitives that match ChatGPT's container. Use it when you want consistent
styling without rebuilding base components.
You can also explore the [UI examples repository on
GitHub](https://github.com/openai/openai-apps-sdk-examples).
## Choose a presentation
Start with inline UI and request more space only when the workflow needs it.
Choose the smallest presentation that lets people understand the result or
complete the task.
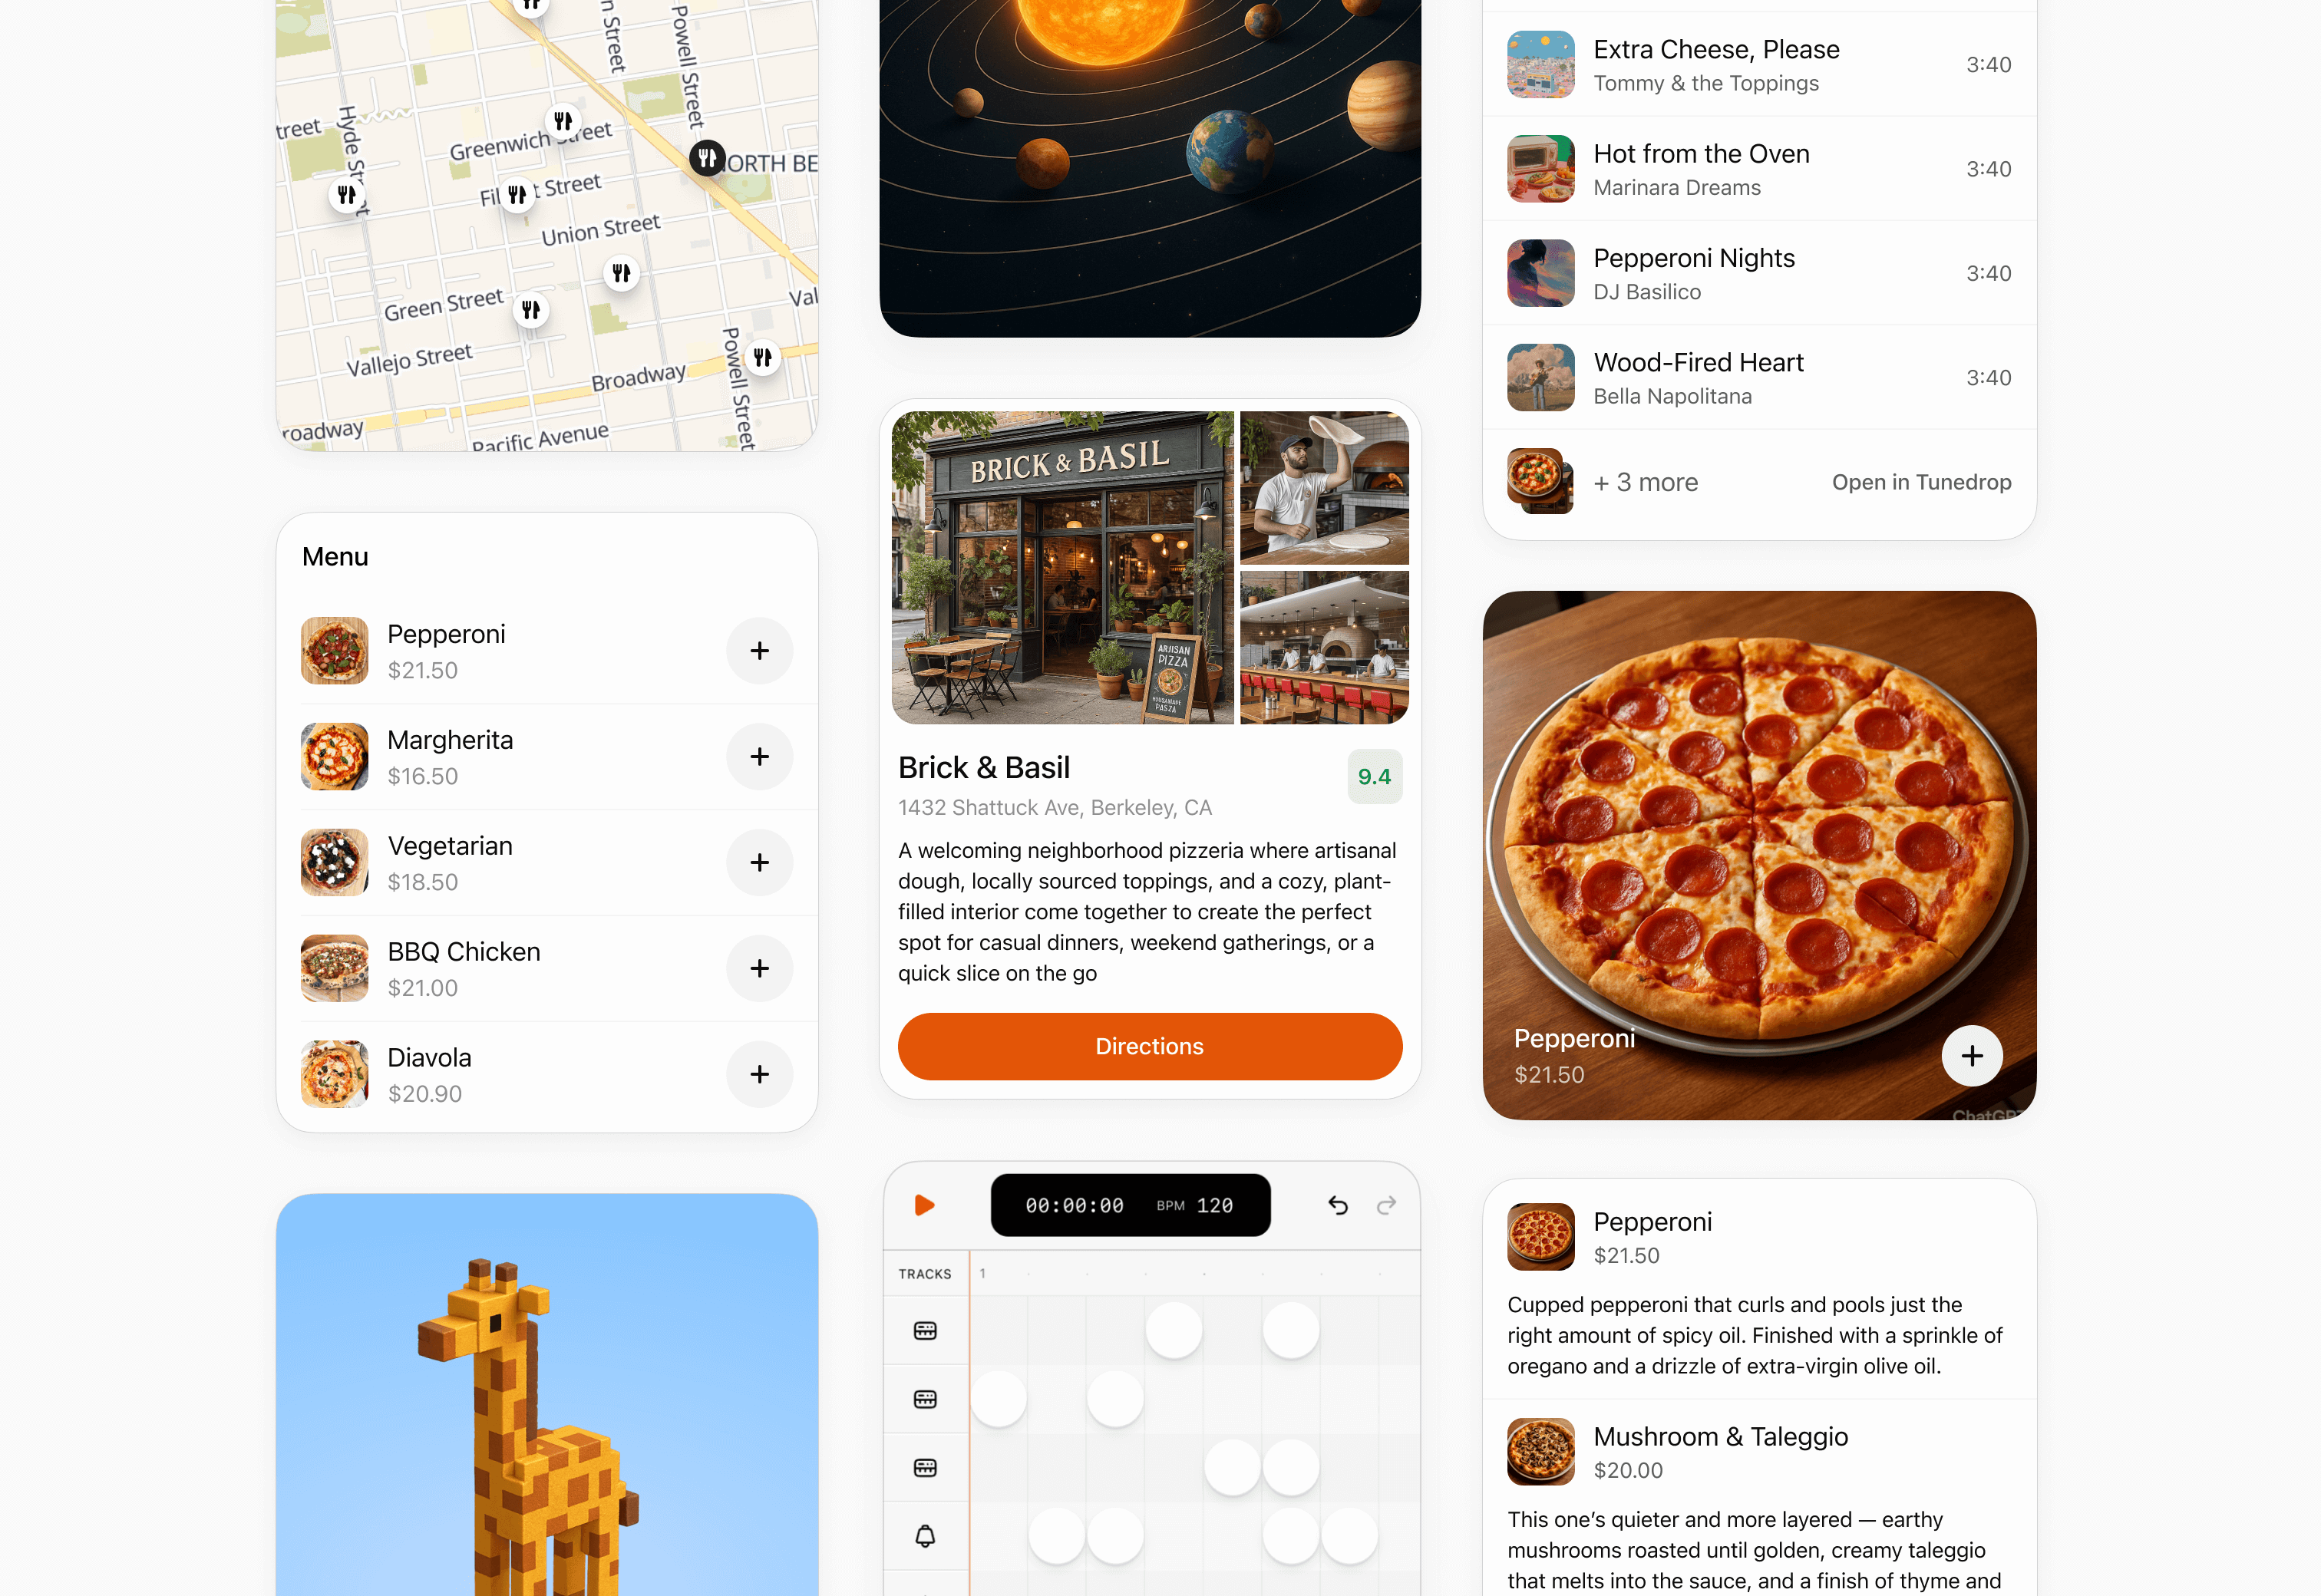
### Inline card
Use an inline card for a focused result, confirmation, or small set of actions.
Keep it self-contained and avoid deep navigation.
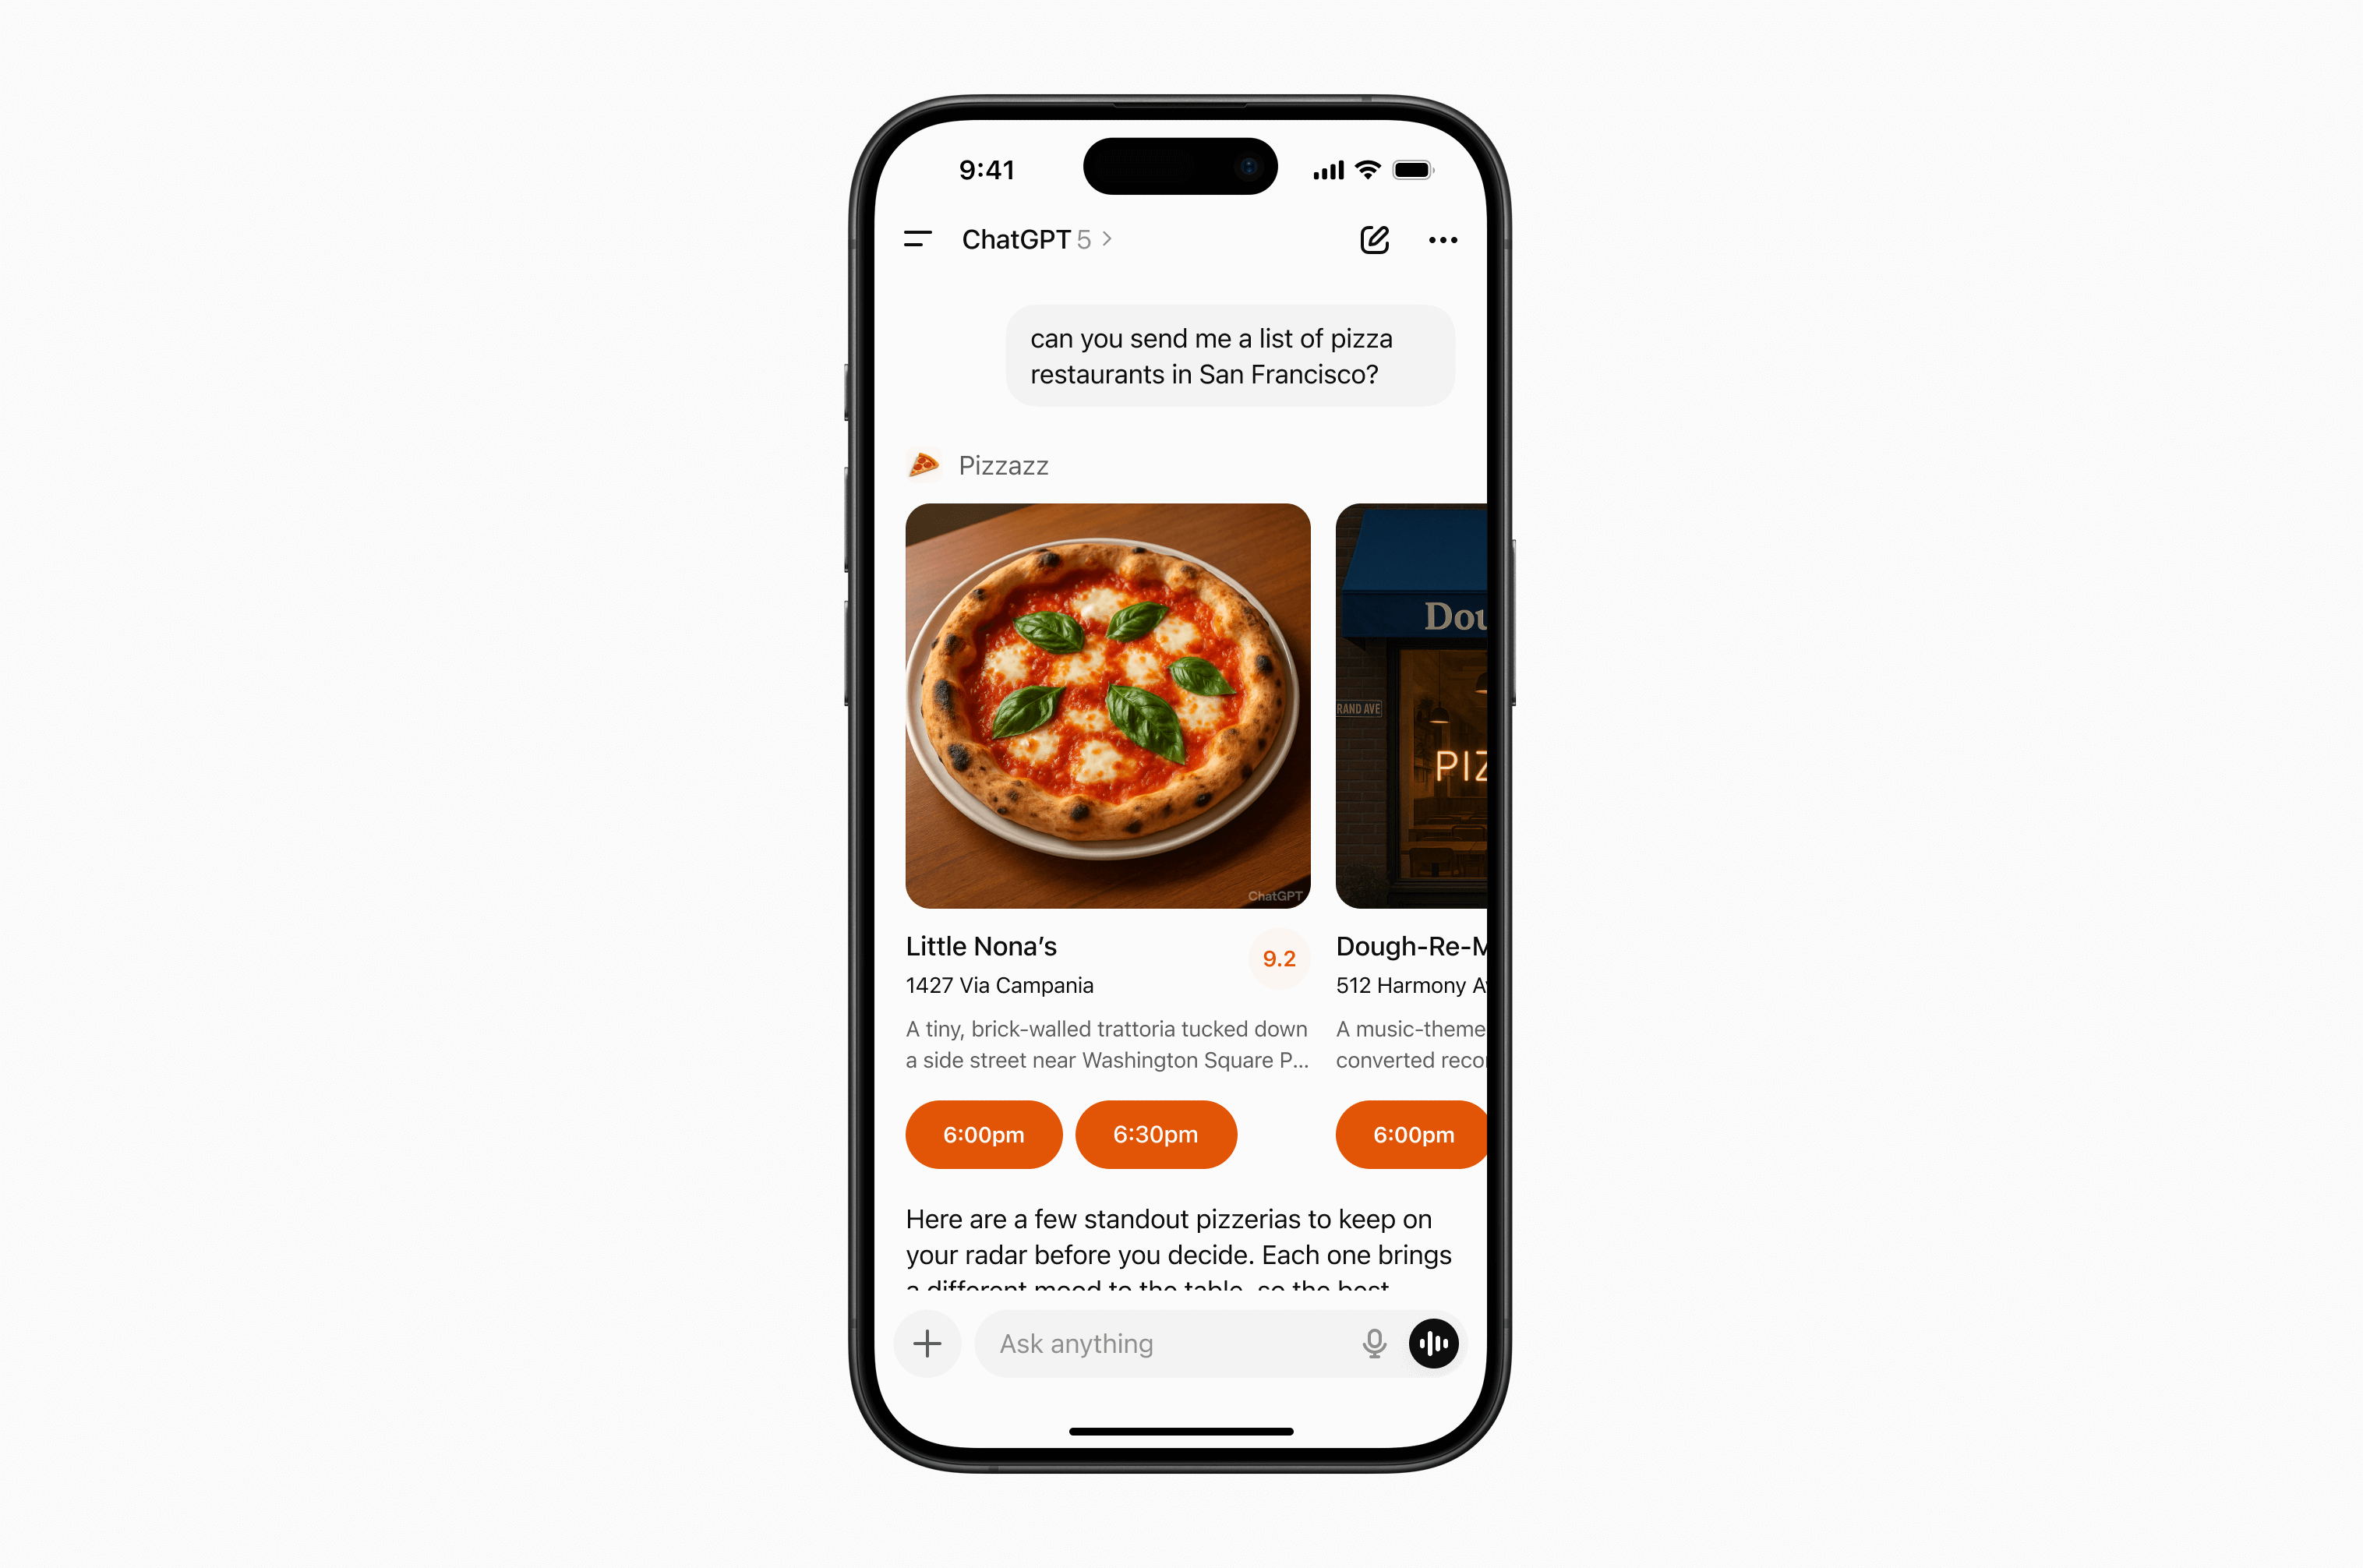
### Inline carousel
Use an inline carousel when people need to scan and choose from a small set of
similar, visually rich options.
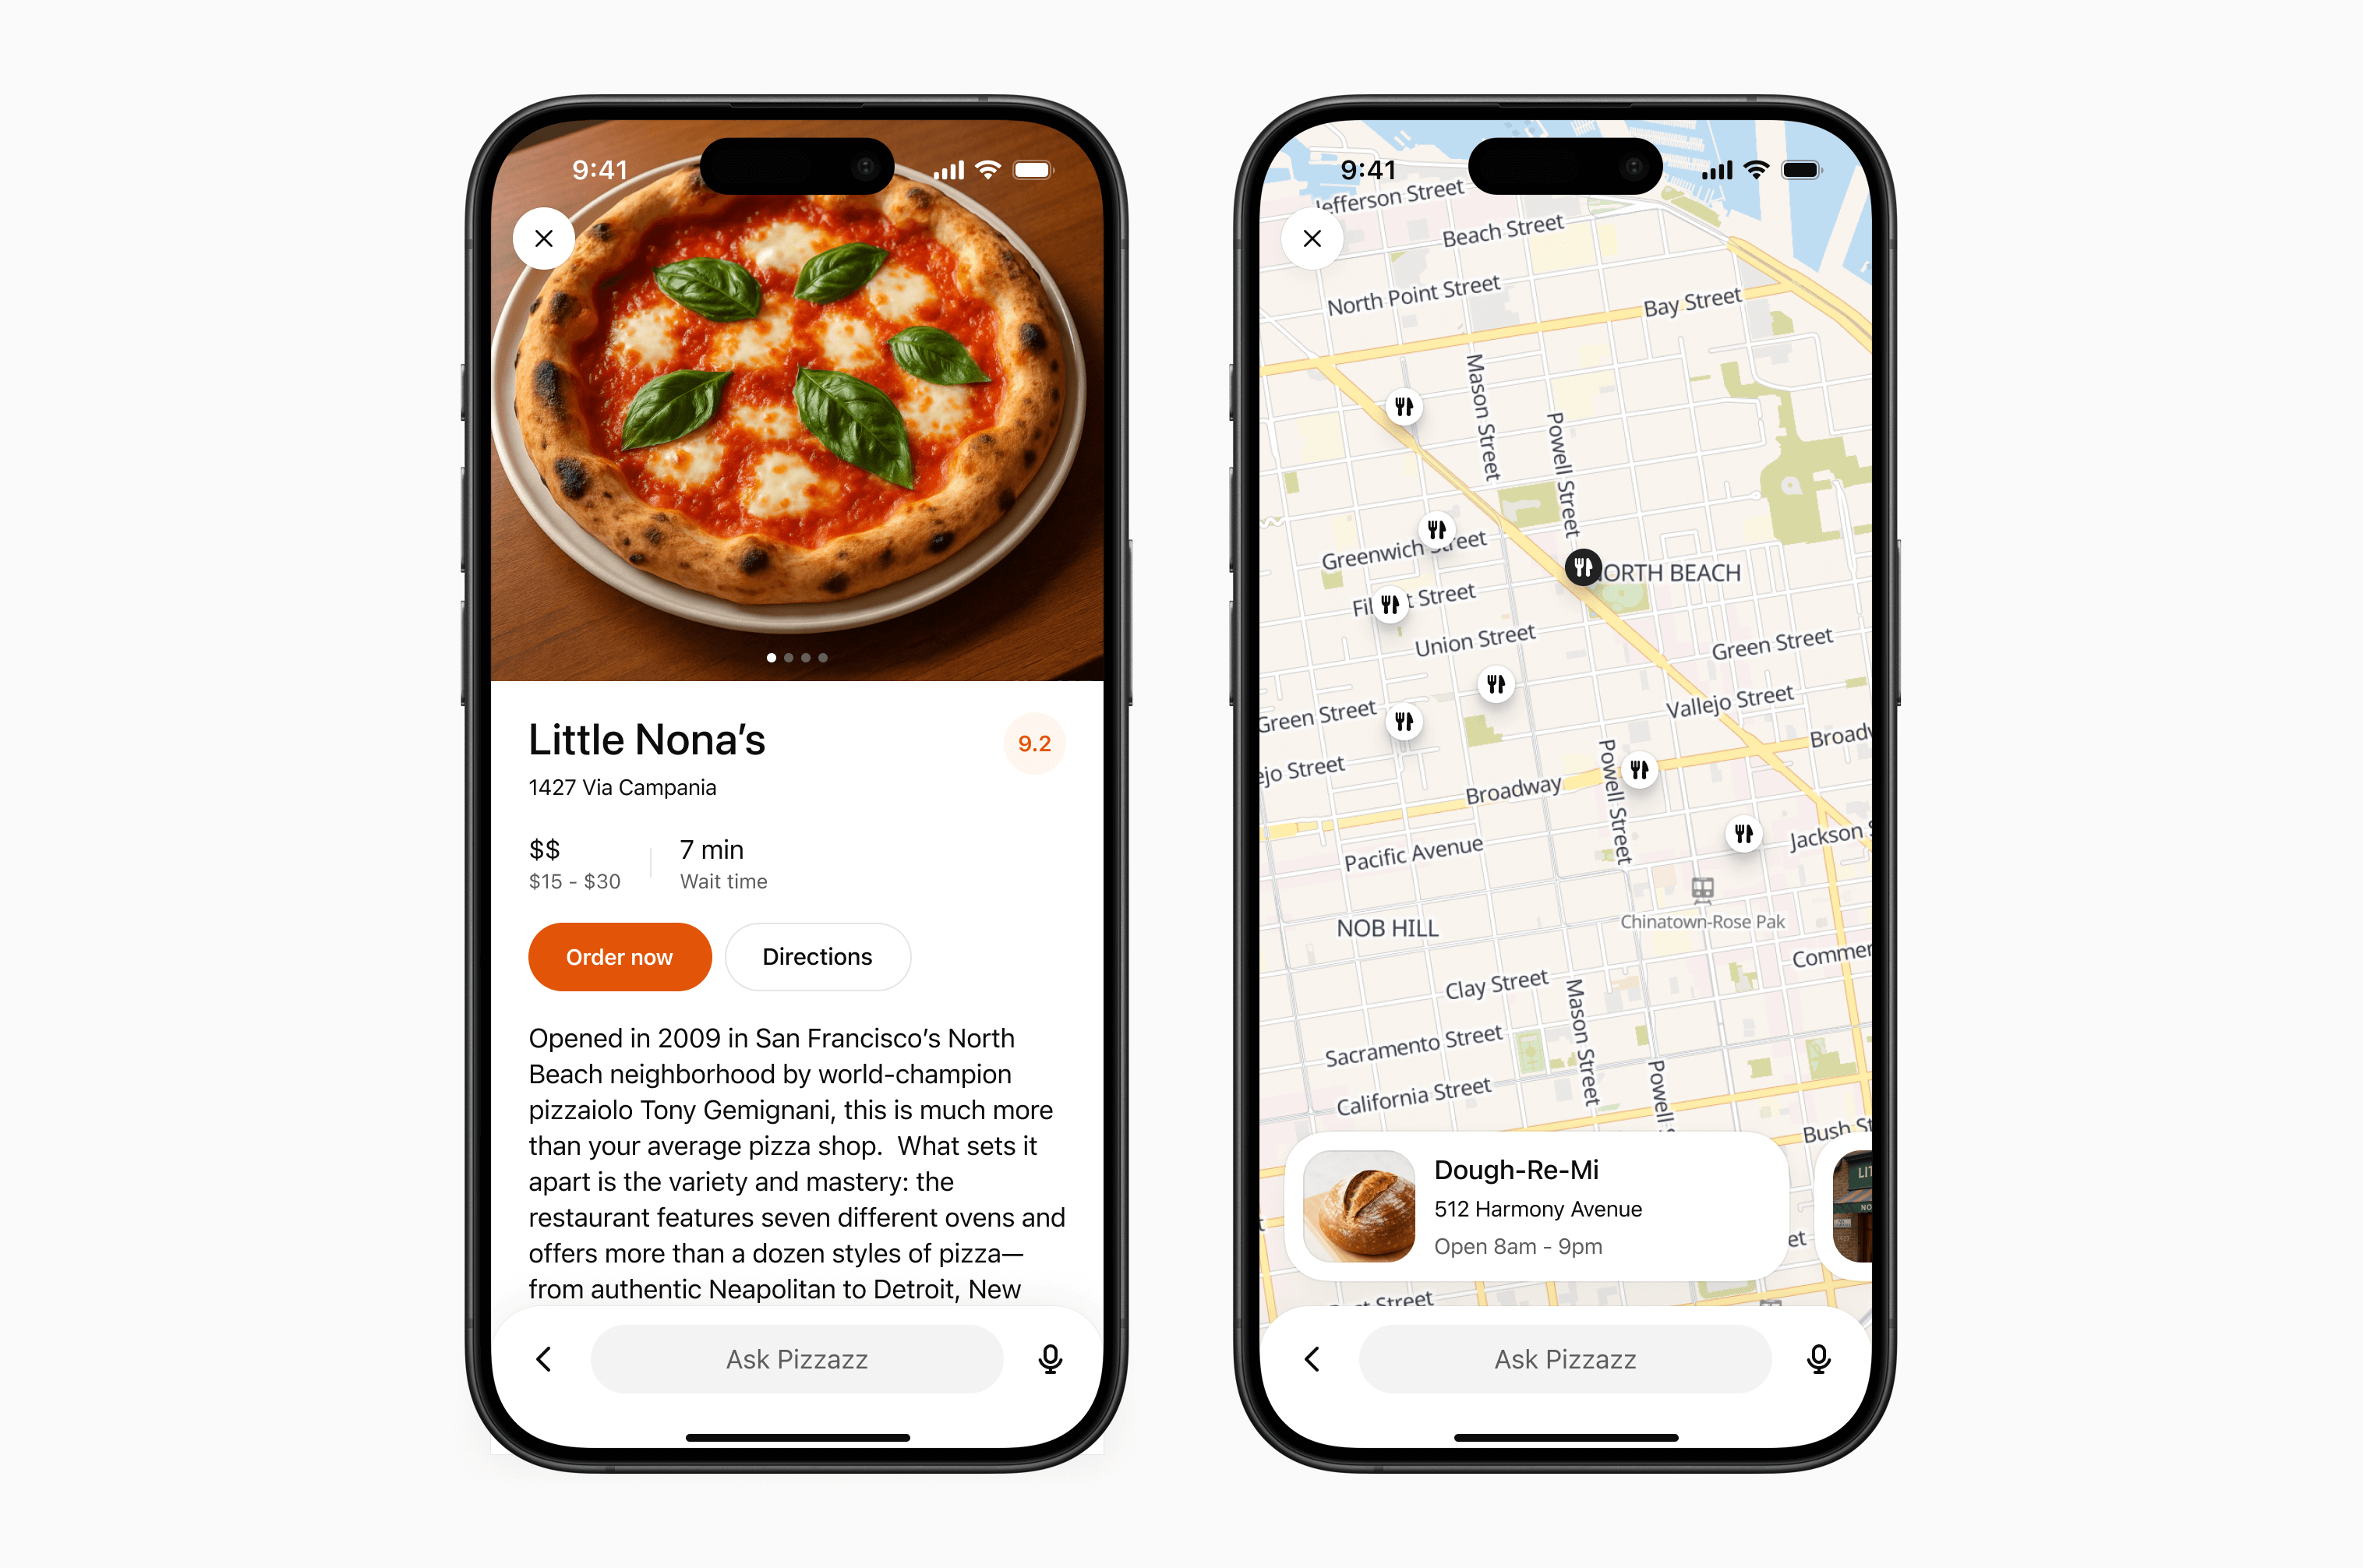
### fullscreen
Use fullscreen for rich tasks that need more room, such as maps, editing
canvases, or detailed browsing. Design the experience to work with ChatGPT's
composer, which remains available in fullscreen.
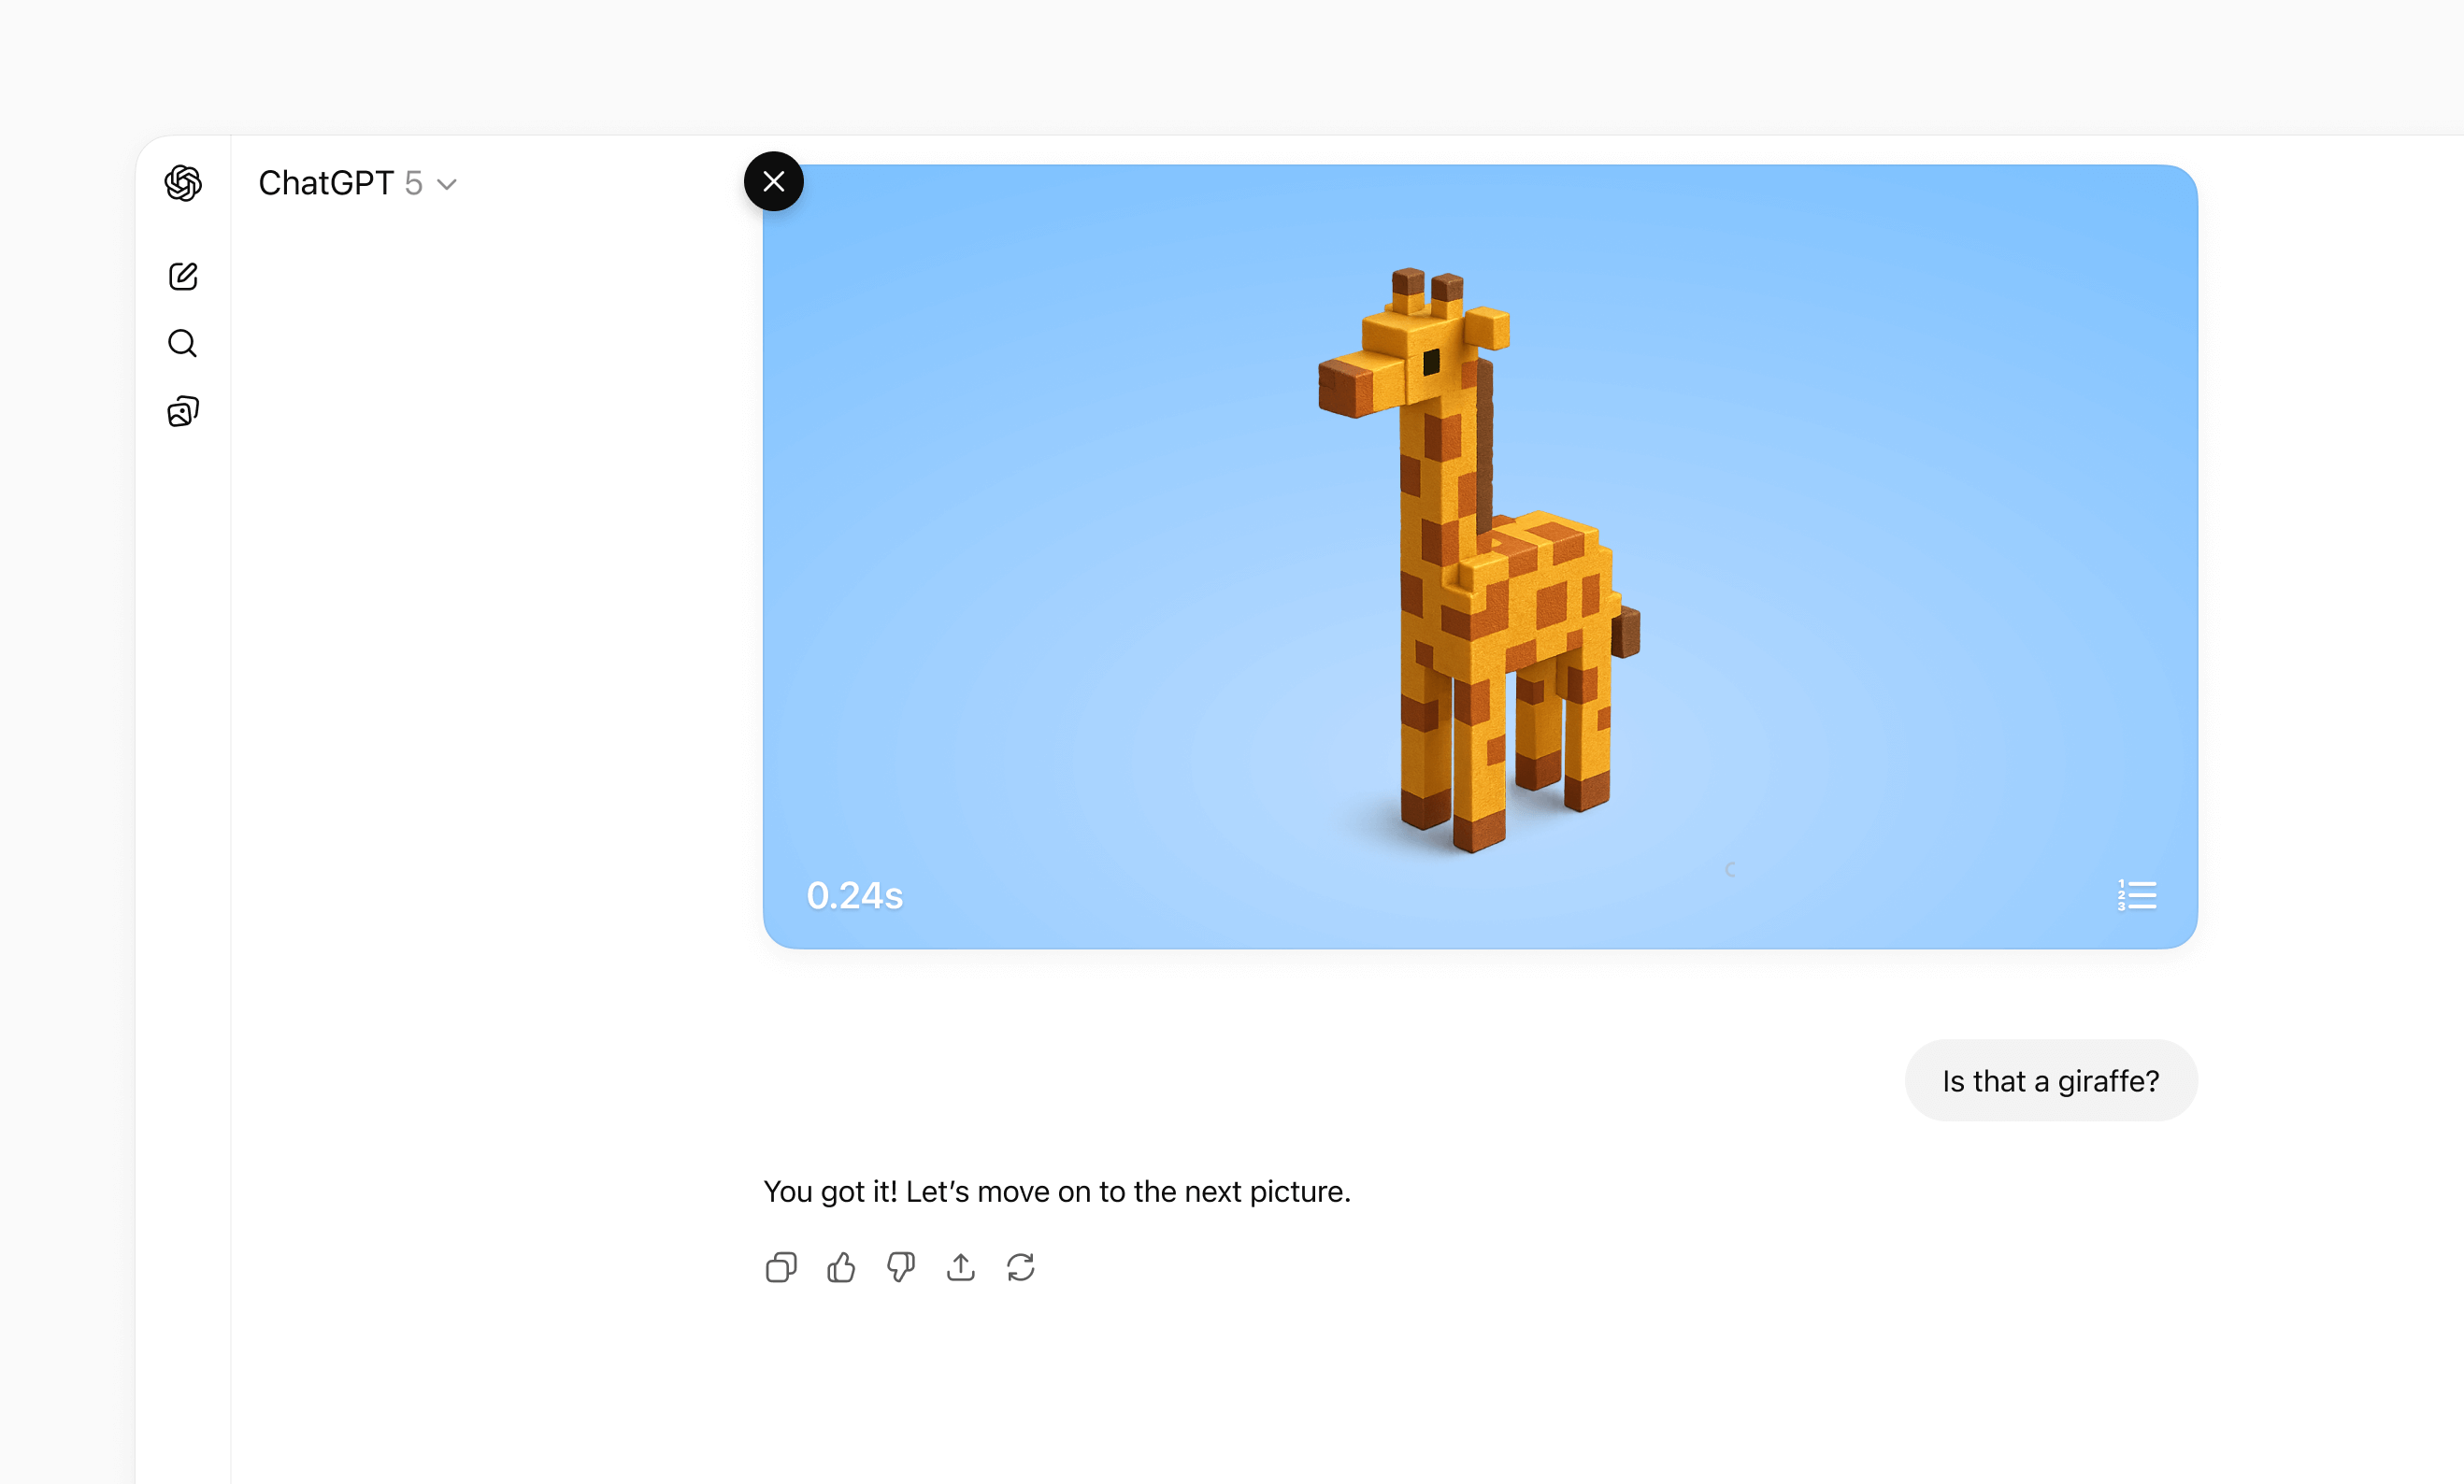
### Picture-in-picture
Use picture-in-picture for an ongoing activity that should remain visible while
the conversation continues, such as a live session, game, or video.
For detailed layout, interaction, visual design, and accessibility guidance,
see [UI guidelines](https://developers.openai.com/plugins/concepts/ui-guidelines).
## Separate data processing from UI rendering
### Decoupled pattern
If you attach a widget template to every tool call, ChatGPT can re-render your
iframe too often. A better pattern is to separate data-processing tools from
render tools:
- **Data tools** fetch, compute, or mutate data and return only tool results.
- **Render tools** take final data and return the widget template.
This allows the model to apply its intelligence to data it fetched before
choosing to render UI to the user, making it much more likely that it will
accomplish the user's specific expressed goal.
This pattern is part of the MCP Apps architecture.
In practice, many UI integrations use this split:
- **Search/fetch tools (data-first):** Return IDs plus metadata with no widget
template attached.
- **Render tools (for example, `render_listings_widget`):** Take a prepared list
of IDs and render the widget.
Only the render tool should include `_meta.ui.resourceUri`.
### Decoupled call flow
Recommended call flow:
1. The model calls the data tool (for example, `roll_dice`).
2. The model receives `structuredContent` from the data tool.
3. The model calls the render tool with that data.
4. The widget renders once with final, model-checked context.
### Example: Real estate follow-up queries
Suppose your plugin shows listing cards and a map, but your server-side `search` tool
only supports broad filters (city, price, beds, baths) and cannot filter by
school zone.
If a user asks, “Which of these are in the Richmond Primary School zone?”
decoupling helps:
1. `search` runs broadly and returns candidate listing IDs plus metadata.
2. The model refines that candidate set for the follow-up question.
3. The model calls `render_listings_widget` with only the filtered IDs.
4. The widget renders the final filtered set.
Best practices:
- Keep data tools reusable. Return complete `structuredContent` for chaining.
- Keep render tools focused on presentation. Don't mix business logic into the
render handler.
- State the dependency in the render tool description (for example, “Always
call `roll_dice` first”).
- Keep reruns intentional. Let the UI call data tools directly for local
interactions like “Re-roll,” without remounting the widget.
### Decoupled example
Example (decoupled dice tools):
```ts
const TEMPLATE_URI = "ui://widget/dice.html";
const server = new McpServer(
{ name: "Decoupled dice", version: "1.0.0" },
{ capabilities: { tools: {} } }
);
// The widget only renders the latest tool result.
// Re-roll calls the data tool directly to avoid remounting the widget.
const widgetHtml = `
Result: —
`.trim();
server.registerResource("dice-widget", TEMPLATE_URI, {}, async () => ({
contents: [
{
uri: TEMPLATE_URI,
mimeType: "text/html;profile=mcp-app",
text: widgetHtml,
_meta: { ui: { prefersBorder: true } },
},
],
}));
// 1) Data tool: no output template, returns chainable structuredContent.
server.registerTool(
"roll_dice",
{
title: "Roll dice",
description: "Roll an N-sided die and return { sides, value }.",
inputSchema: { sides: z.number().int().min(2) },
outputSchema: {
sides: z.number().int().min(2),
value: z.number().int().min(1),
},
_meta: {
"openai/toolInvocation/invoking": "Rolling…",
"openai/toolInvocation/invoked": "Rolled.",
},
},
async ({ sides }) => {
const value = 1 + Math.floor(Math.random() * sides);
return {
structuredContent: { sides, value },
content: [{ type: "text", text: `Rolled ${value} on ${sides} sides.` }],
};
}
);
// 2) Render tool: owns the template and requires data from roll_dice.
server.registerTool(
"render_dice_widget",
{
title: "Render dice widget",
description:
"Render the dice widget from roll data. First call roll_dice, then pass its sides and value to this tool.",
inputSchema: {
sides: z.number().int().min(2),
value: z.number().int().min(1),
},
outputSchema: {
sides: z.number().int().min(2),
value: z.number().int().min(1),
},
_meta: {
ui: { resourceUri: TEMPLATE_URI },
"openai/toolInvocation/invoking": "Rendering…",
"openai/toolInvocation/invoked": "Rendered.",
},
},
async ({ sides, value }) => ({
structuredContent: { sides, value },
content: [
{
type: "text",
text: `Showing a ${sides}-sided roll: ${value}.`,
},
],
})
);
export default server;
```
## Manage state
UI from an MCP server works with three kinds of state:
| State type | Owner | Lifetime | Examples |
| --------------------------------- | ------------------------------ | ------------------------------------ | ---------------------------------------- |
| **Business data (authoritative)** | MCP server or external service | Long-lived | Tasks, tickets, documents |
| **UI state (ephemeral)** | UI instance | Active UI instance | Selected row, expanded panel, sort order |
| **Cross-session state (durable)** | Storage you control | Cross-session and cross-conversation | Saved filters, view mode, workspace |
Keep each value with the system that owns it. The UI should render
authoritative data from tool results and layer temporary presentation state on
top.
```text
MCP server or external service
│
├── Authoritative business data
│
▼
UI
│
├── Ephemeral presentation state
│
└── Rendered view = business data + UI state
```
### Keep business data on the server
Business data is the source of truth. Do not store it only in the UI. When a
user takes an action:
1. The UI calls an MCP tool.
2. The server validates the request and updates the data.
3. The server returns the updated authoritative snapshot.
4. The UI renders the snapshot while preserving compatible presentation
state.
Return enough structured content for both the model and UI to understand the
new state. This also lets the conversation remain useful if the UI cannot
load.
### Keep temporary UI state in the UI
Use framework state for values that only affect presentation, such as a
selected item, open panel, or draft filter. Each rendered UI instance has its
own state.
When the model needs to know about a selection or staged edit, send that
information through `ui/update-model-context`. This is the portable MCP Apps
mechanism for updating model-visible context.
ChatGPT also provides optional widget-scoped persistence:
- Read the current snapshot from `window.openai.widgetState`.
- Write a new snapshot with `window.openai.setWidgetState(state)`.
`setWidgetState` is synchronous. Call it after each meaningful UI-state change;
there is nothing to `await`.
```tsx
export function TaskList({ tasks }) {
const [state, setState] = useState(
window.openai?.widgetState ?? { selectedId: null }
);
function selectTask(selectedId) {
const nextState = { ...state, selectedId };
setState(nextState);
window.openai?.setWidgetState?.(nextState);
}
return (
{tasks.map((task) => (
))}
);
}
```
Widget state belongs to one rendered UI instance. Do not use it as the source
of truth for business data or as durable storage.
#### Make images visible to the model
For UI that works with images, use the structured widget-state shape:
- `modelContent`: Text or JSON the model should see.
- `privateContent`: UI-only state the model should not see.
- `imageIds`: File IDs the model should receive on later turns.
```tsx
window.openai.setWidgetState({
modelContent: "Review the currently selected images.",
privateContent: {
currentView: "image-viewer",
filters: ["crop", "sharpen"],
},
imageIds: ["file_123", "file_456"],
});
```
Only include file IDs uploaded with `window.openai.uploadFile`, selected with
`window.openai.selectFiles`, received through tool input file parameters, or
returned through tool result file references.
### Store cross-session state on your server
Store preferences and data that must survive across conversations, devices, or
sessions in storage you control. Authenticate the user so the MCP server can
map each request to the correct account.
When you add durable storage:
- Keep latency low enough for interactive UI.
- Protect private data with server-side authorization.
- Plan for data residency and compliance requirements.
- Apply rate limits to traffic from retries or concurrent UI instances.
- Version stored objects so you can migrate them without breaking existing
conversations.
Avoid `localStorage` for core state. UI runs in an isolated iframe, and browser
storage does not provide a reliable cross-device or cross-session data layer.
## Scaffold the component project
Now that you understand the MCP Apps bridge (and optional ChatGPT extensions),
it’s time to scaffold your component project.
As best practice, keep the component code separate from your server logic. A common layout is:
```
plugin-ui/
server/ # MCP server (Python or Node)
web/ # Component bundle source
package.json
tsconfig.json
src/component.tsx
dist/component.js # Build output
```
Create the project and install dependencies (Node 18+ recommended):
```bash
cd plugin-ui/web
npm init -y
npm install react@^18 react-dom@^18
npm install -D typescript esbuild
```
If your component requires drag-and-drop, charts, or other libraries, add them now. Keep the dependency set lean to reduce bundle size.
## Author the React component
Your entry file should mount a component into a `root` element and render from
the latest tool result delivered over the MCP Apps bridge (for example,
`ui/notifications/tool-result`).
The [examples page](https://developers.openai.com/plugins/build/examples) includes sample UI, such as the Pizzaz list of
pizza restaurants.
### Explore the Pizzaz component gallery
The [UI examples](https://developers.openai.com/plugins/build/examples) include example components. Treat them as blueprints when shaping your own UI:
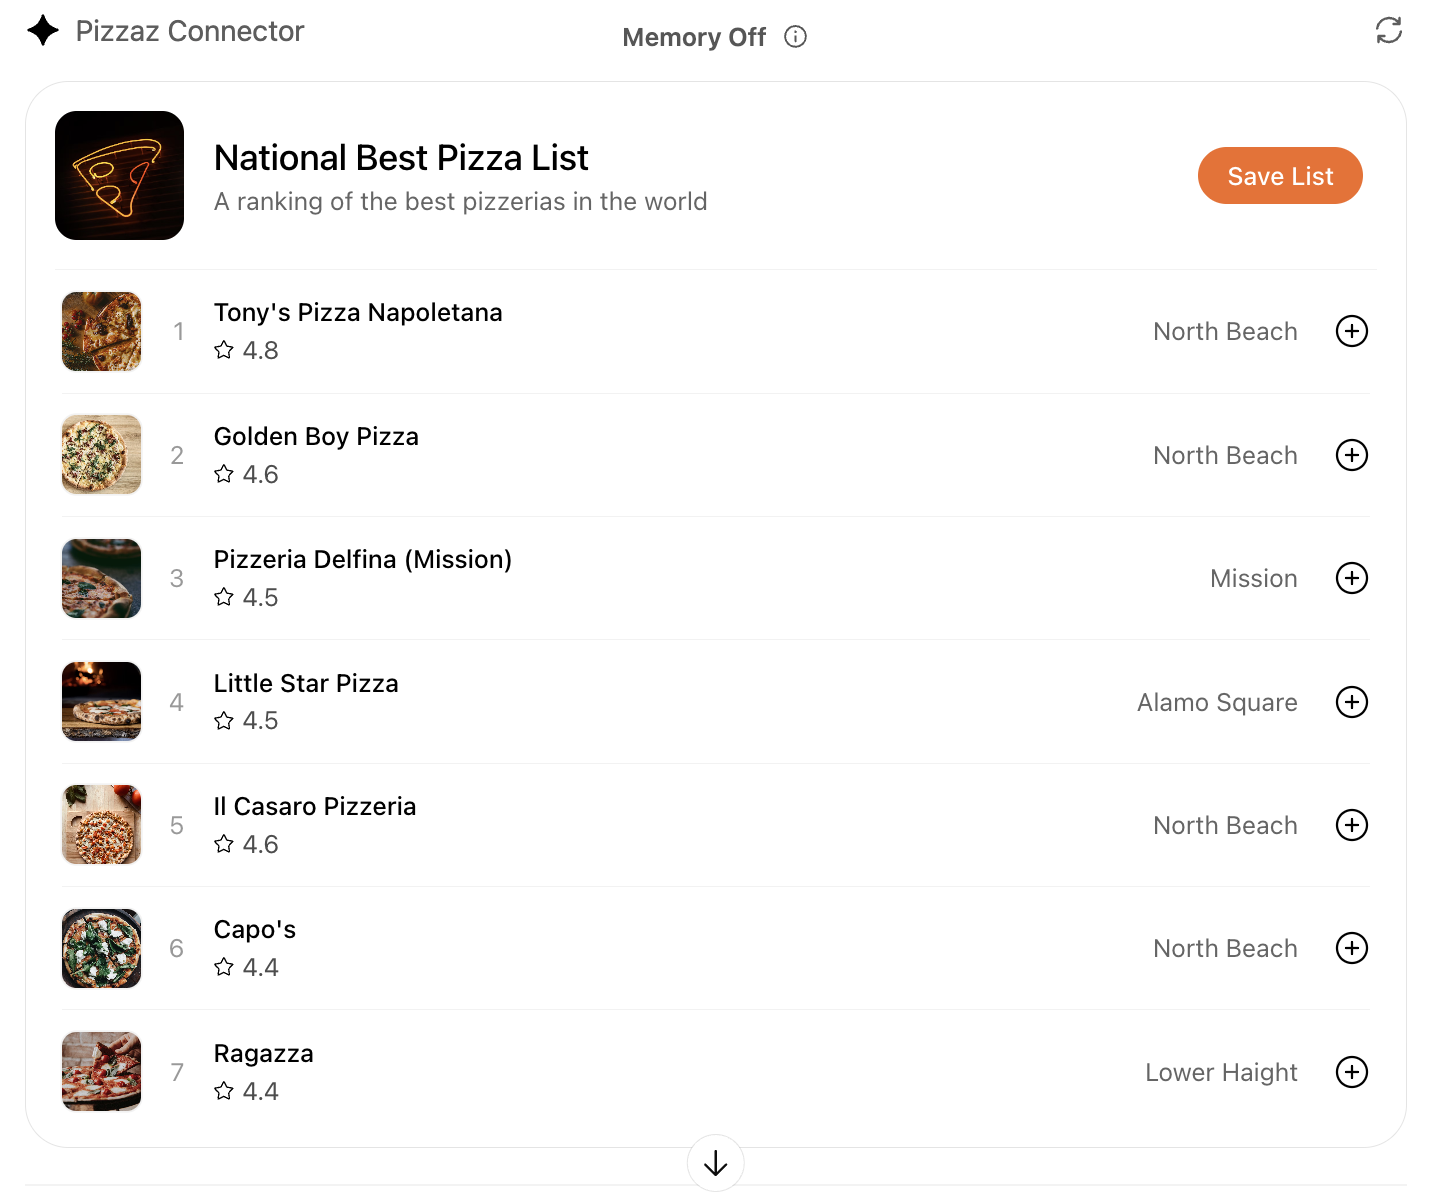
- **Pizzaz List:** Ranked card list with favorites and call-to-action buttons.
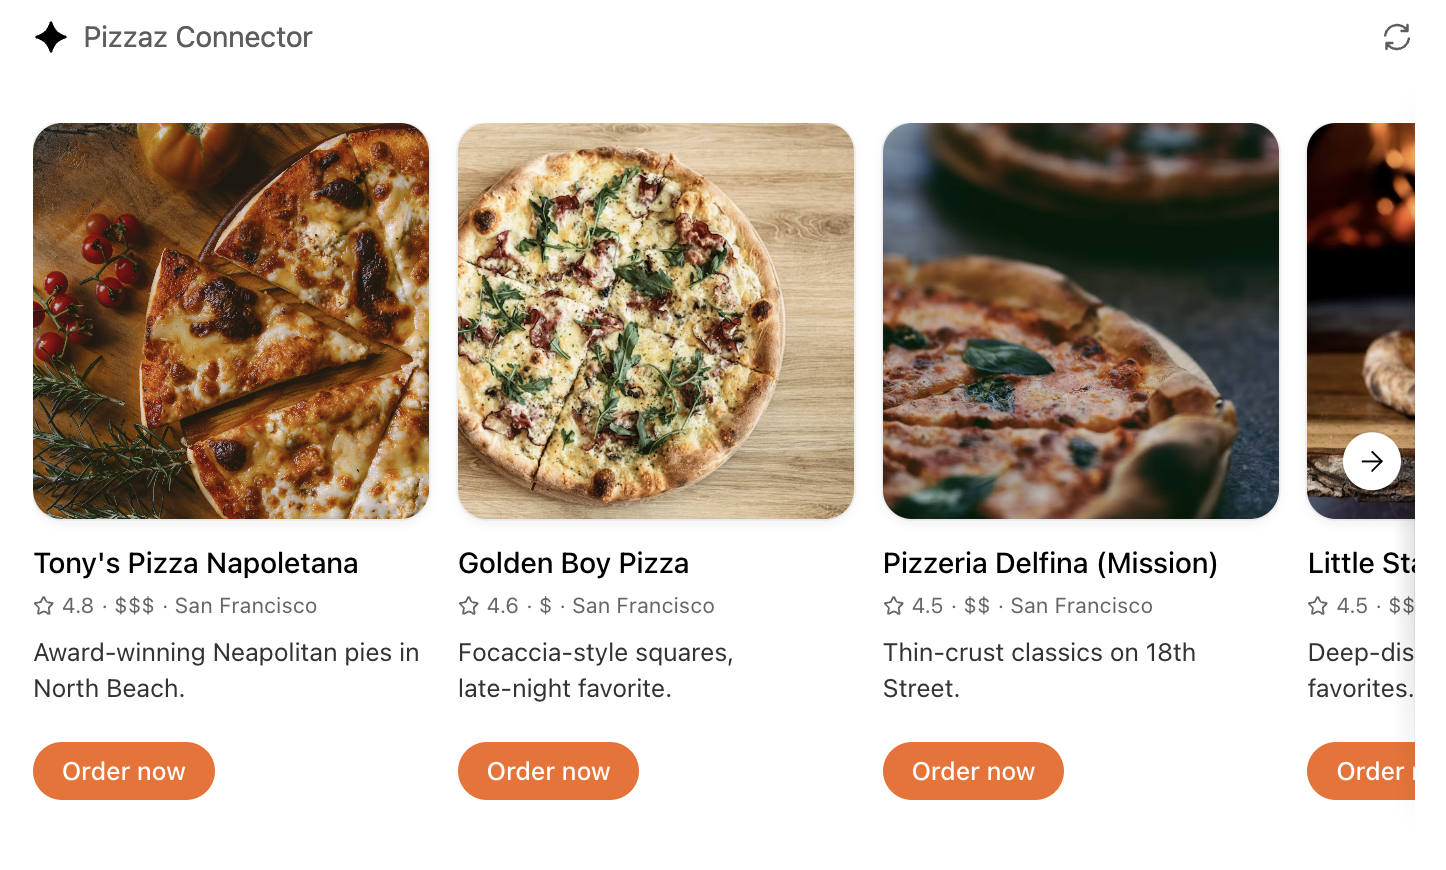
- **Pizzaz Carousel:** Embla-powered horizontal scroller that demonstrates media-heavy layouts.
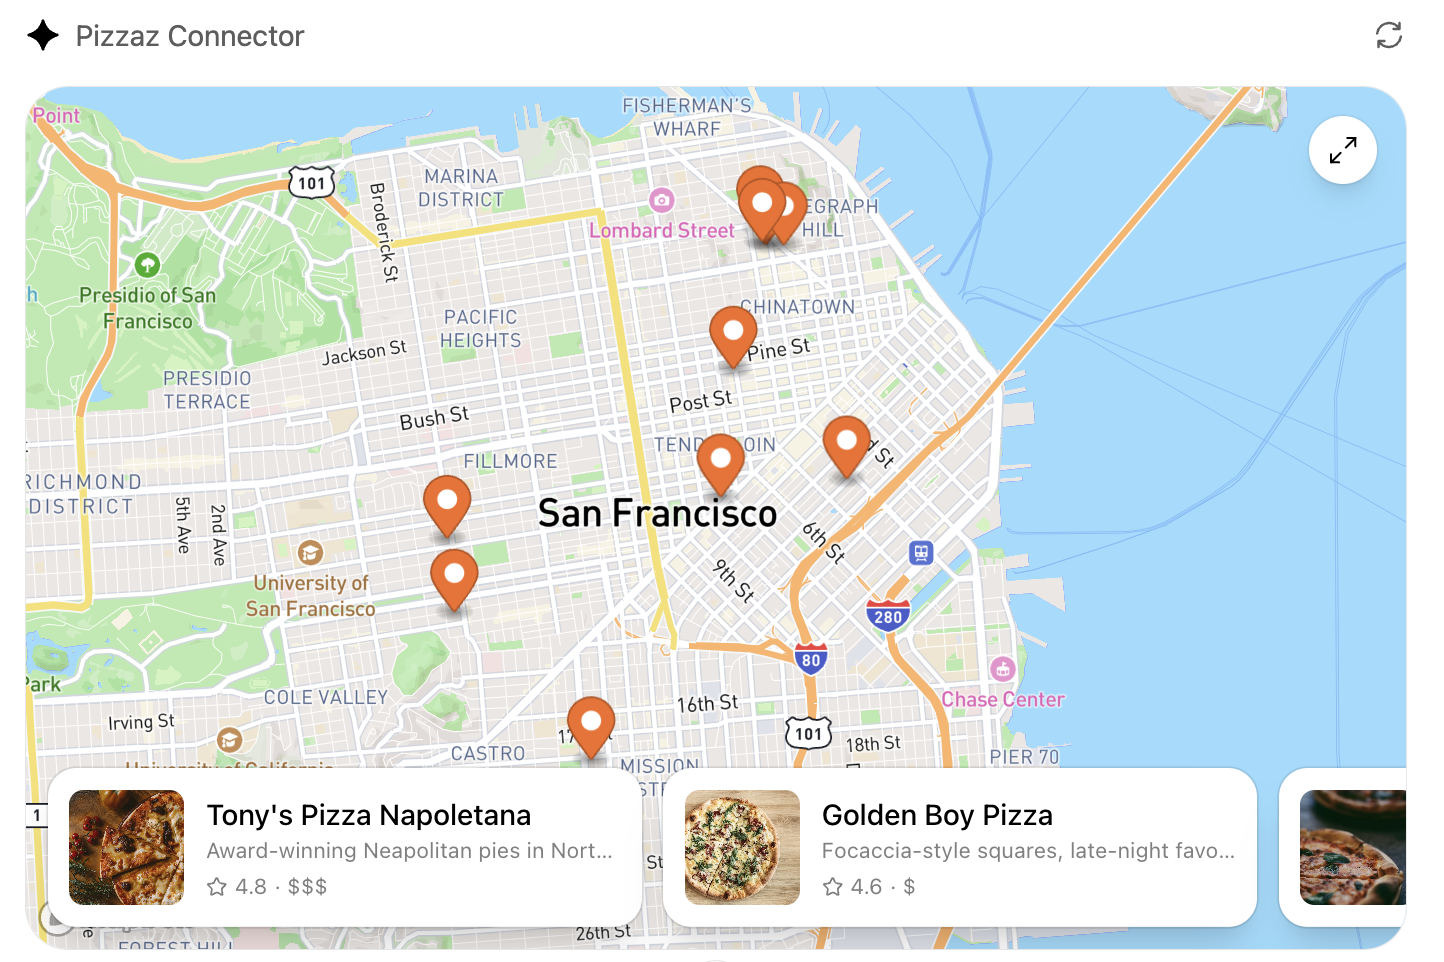
- **Pizzaz Map:** Mapbox integration with fullscreen inspector and host state sync.
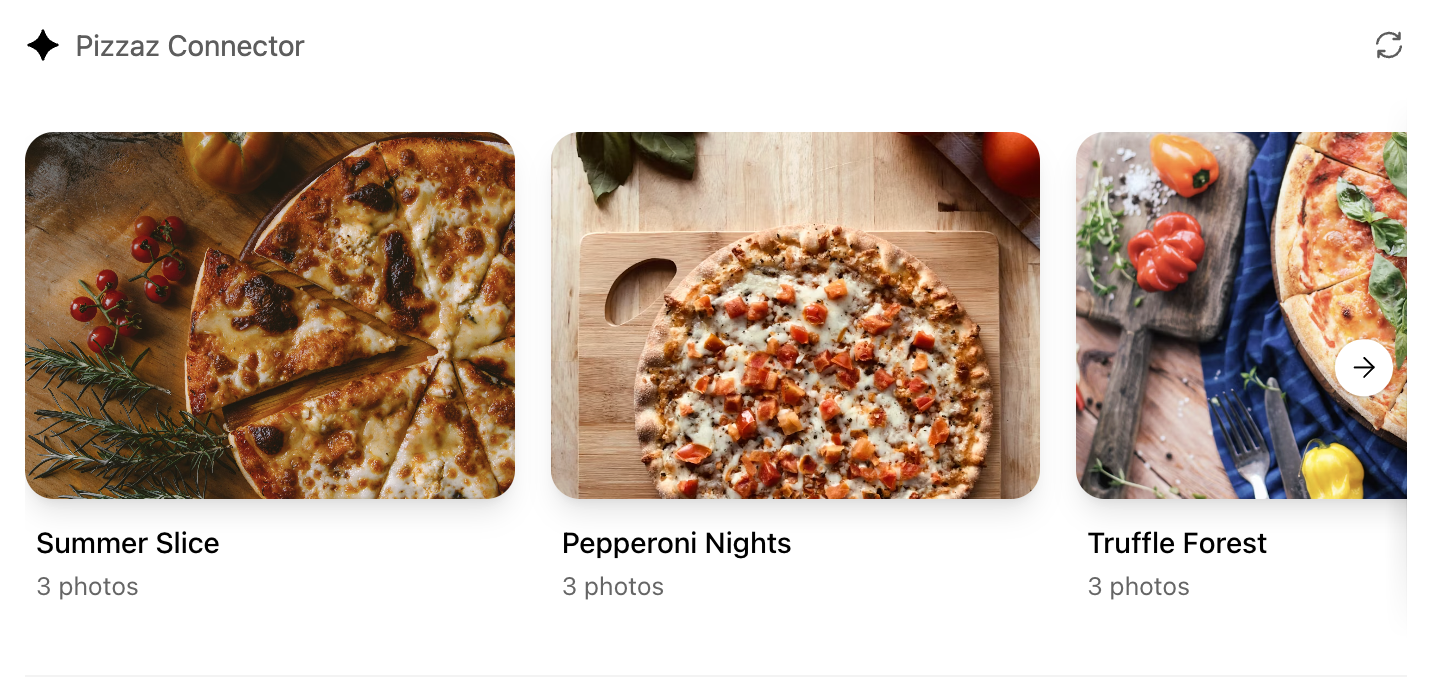
- **Pizzaz Album:** Stacked gallery view built for deep dives on a single place.
- **Pizzaz Video:** Scripted player with overlays and fullscreen controls.
Each example shows how to bundle assets, wire host APIs, and structure state for real conversations. Copy the one closest to your use case and adapt the data layer for your tool responses.
### React helper hooks
A small helper to subscribe to `ui/notifications/tool-result`:
```tsx
type ToolResult = { structuredContent?: unknown } | null;
export function useToolResult() {
const [toolResult, setToolResult] = useState(null);
useEffect(() => {
const onMessage = (event: MessageEvent) => {
if (event.source !== window.parent) return;
const message = event.data;
if (!message || message.jsonrpc !== "2.0") return;
if (message.method !== "ui/notifications/tool-result") return;
setToolResult(message.params ?? null);
};
window.addEventListener("message", onMessage, { passive: true });
return () => window.removeEventListener("message", onMessage);
}, []);
return toolResult;
}
```
Render from `toolResult?.structuredContent`, and treat it as untrusted input.
## Widget localization
The host mirrors the locale to `document.documentElement.lang`. Use that locale
to load translations and format dates/numbers. A common pattern with
`react-intl`:
```tsx
const messages: Record> = {
"en-US": en,
"es-ES": es,
};
export function PluginUI() {
const locale = document.documentElement.lang || "en-US";
return (
{/* Render UI with or useIntl() */}
);
}
```
## Bundle for the iframe
Once you finish writing your React component, you can build it into a single JavaScript module that the server can inline:
```json
// package.json
{
"scripts": {
"build": "esbuild src/component.tsx --bundle --format=esm --outfile=dist/component.js"
}
}
```
Run `npm run build` to produce `dist/component.js`. If esbuild complains about missing dependencies, confirm you ran `npm install` in the `web/` directory and that your imports match installed package names (for example, `@react-dnd/html5-server-side` vs `react-dnd-html5-server-side`).
## Embed the component in the server response
Expose the component as an MCP resource with the MCP Apps UI MIME type
(`text/html;profile=mcp-app`). If you use
`@modelcontextprotocol/ext-apps/server`, prefer `RESOURCE_MIME_TYPE` instead of
embedding the string:
```ts
const component = readFileSync("web/dist/component.js", "utf8");
registerAppResource(
server,
"project-board",
"ui://project-board/v1.html",
{},
async () => ({
contents: [
{
uri: "ui://project-board/v1.html",
mimeType: RESOURCE_MIME_TYPE,
text: ``,
_meta: {
ui: {
prefersBorder: true,
domain: "https://example.com",
csp: {
connectDomains: ["https://api.example.com"],
resourceDomains: ["https://static.example.com"],
},
},
},
},
],
})
);
```
Associate the resource URI with only the tools that should render the
component. For broader MCP Apps compatibility, use `_meta.ui.resourceUri`.
ChatGPT also honors `_meta["openai/outputTemplate"]` as a compatibility alias.
Treat the resource URI as a cache key. When you make a breaking change to the
HTML, JavaScript, or CSS, publish a new URI and update every tool that
references it.
### Content security policy (CSP)
Declare the exact domains the component connects to or loads resources from:
- `connectDomains` for API requests.
- `resourceDomains` for scripts, styles, images, and other assets.
- `frameDomains` only when the component must embed specific iframe origins.
Nested frames are blocked by default. Keep each allowlist as narrow as possible.
The plugin review process checks the declared policy against the UI behavior.
Component UI templates are the recommended path for production.
During development you can rebuild the component bundle whenever your React code changes and hot-reload the server.
## Offer checkout in your UI
If you want to offer users the ability to check out through your plugin's UI
flows, use the component to present products, prices, terms, and payment choices
before confirmation. Keep the underlying catalog and order tools useful without
UI, then choose an external checkout flow or, when available, an embedded
payment option.
### Use external checkout by default
External checkout is the recommended and generally available approach. Link
from the component to a merchant-hosted checkout flow on your own domain,
where you handle:
- Pricing and payment collection.
- Taxes, discounts, and fees.
- Shipping and fulfillment.
- Refunds, support, and compliance.
Current approval is limited to plugins for physical-goods purchases. Do not
offer other commerce categories unless OpenAI has explicitly enabled them for
your plugin.
### Use saved payment methods
For eligible physical-goods purchases, optional UI can let customers select a
payment method they previously saved with your service. This flow can display
eligible saved methods but cannot collect new payment credentials. Your MCP
server processes the purchase and returns the authoritative order result.
### Use the ChatGPT payment sheet
Embedded checkout with the ChatGPT payment sheet is in private beta for select
marketplaces and is not available to all developers or users.
For enabled integrations, `window.openai.requestCheckout` opens the ChatGPT
payment sheet:
```tsx
const order = await window.openai.requestCheckout(checkoutSession);
```
The checkout flow has four parts:
1. An MCP tool returns a checkout session in `structuredContent`.
2. The component displays the line items, totals, terms, and fulfillment
choices.
3. The component calls `requestCheckout(checkoutSession)` after the user
chooses to pay.
4. ChatGPT sends the selected payment token to the MCP server's
`complete_checkout` tool, which charges the payment method and returns the
completed order.
The checkout session must include:
- A unique session ID.
- Line items and quantities.
- Totals in integer minor currency units.
- Payment-provider and merchant metadata.
- Required legal, privacy, refund, and support links.
Treat the server as the source of truth for prices and order status. Verify the
payment token, make the operation idempotent, persist the order, and return an
authoritative receipt. Never trust totals calculated only in the component.
Use `payment_mode: "test"` to exercise the end-to-end flow without moving real
funds. Handle cancellation, declined payments, and payment-provider errors in
the component.
For complete checkout-session fields, payment-provider behavior, the
`complete_checkout` result shape, and delegated-payment requirements, see the
[checkout API reference](https://developers.openai.com/plugins/build/monetization).
---
# Authentication
## Authenticate your users
Many plugin MCP servers can operate in a read-only, anonymous mode, but
anything that exposes customer-specific data or write actions should
authenticate users.
Published plugins can run in ChatGPT and Codex. The MCP authorization contract
applies across both products; this guide calls out ChatGPT-specific client
details when a callback, metadata document, or linking interface differs by
surface.
You can integrate with your own authorization server when you need to connect
to an existing server-side application or share data between users.
## Custom auth with OAuth 2.1
For an authenticated MCP server, you are expected to implement an OAuth 2.1 flow that conforms to the [MCP authorization spec](https://modelcontextprotocol.io/specification/2025-11-25/basic/authorization).
### Components
- **Resource server:** Your MCP server, which exposes tools and verifies access tokens on each request.
- **Authorization server:** Your identity provider or custom implementation that issues tokens and publishes discovery metadata.
- **Client:** The OpenAI host, such as ChatGPT or Codex, acting on behalf of the
user. Supported clients use Client ID Metadata Documents (CIMD), dynamic
client registration (DCR), predefined OAuth clients, and PKCE.
### MCP authorization spec requirements
- Host protected resource metadata on your MCP server
- Publish OAuth metadata from your authorization server
- Echo the `resource` parameter throughout the OAuth flow
- Choose how the OpenAI host identifies or registers its OAuth client: CIMD,
DCR, or a predefined OAuth client
- Publish the token endpoint authentication methods your authorization server accepts
Here is what the spec expects, in plain language.
#### Host protected resource metadata on your MCP server
- You need an HTTPS endpoint such as `GET https://your-mcp.example.com/.well-known/oauth-protected-resource` (or advertise the same URL in a `WWW-Authenticate` header on `401 Unauthorized` responses) so ChatGPT knows where to fetch your metadata.
- That endpoint returns a JSON document describing the resource server and its available authorization servers:
```json
{
"resource": "https://your-mcp.example.com",
"authorization_servers": ["https://auth.yourcompany.com"],
"scopes_supported": ["files:read", "files:write"],
"resource_documentation": "https://yourcompany.com/docs/mcp"
}
```
- Key fields you must populate:
- `resource`: the canonical HTTPS identifier for your MCP server. ChatGPT sends this exact value as the `resource` query parameter during OAuth.
- `authorization_servers`: one or more issuer base URLs that point to your identity provider. ChatGPT will try each to find OAuth metadata.
- `scopes_supported`: optional list that helps ChatGPT explain the permissions it is going to ask the user for.
- Optional extras from [RFC 9728](https://datatracker.ietf.org/doc/html/rfc9728) such as `resource_documentation`, `resource_policy_uri`, or `resource_tos_uri` make it easier for clients and admins to understand your setup.
When you block a request because it is unauthenticated, return a challenge like:
```http
HTTP/1.1 401 Unauthorized
WWW-Authenticate: Bearer resource_metadata="https://your-mcp.example.com/.well-known/oauth-protected-resource",
scope="files:read"
```
That single header lets ChatGPT discover the metadata URL even if it has not seen it before.
#### Publish OAuth metadata from your authorization server
- Your identity provider must expose one of the well-known discovery documents so ChatGPT can read its configuration:
- OAuth 2.0 metadata at `https://auth.yourcompany.com/.well-known/oauth-authorization-server`
- OpenID Connect metadata at `https://auth.yourcompany.com/.well-known/openid-configuration`
- Each document answers three big questions for the OpenAI host: where to send
the user, how to exchange codes, and how to identify itself. A typical
response looks like:
```json
{
"issuer": "https://auth.yourcompany.com",
"authorization_response_iss_parameter_supported": true,
"authorization_endpoint": "https://auth.yourcompany.com/oauth2/v1/authorize",
"token_endpoint": "https://auth.yourcompany.com/oauth2/v1/token",
"client_id_metadata_document_supported": true,
"token_endpoint_auth_methods_supported": ["none", "private_key_jwt"],
"registration_endpoint": "https://auth.yourcompany.com/oauth2/v1/register",
"code_challenge_methods_supported": ["S256"],
"scopes_supported": ["files:read", "files:write"]
}
```
- Fields that must be correct:
- `issuer`: the canonical authorization server identifier. Use this exact
value in the protected resource metadata `authorization_servers` list.
- `authorization_response_iss_parameter_supported`: set this to `true`
only when your authorization server returns an `iss` parameter in every
authorization response, including error responses.
- `authorization_endpoint`, `token_endpoint`: the URLs ChatGPT needs to run the OAuth authorization-code + PKCE flow end to end.
- `client_id_metadata_document_supported`: set to `true` when you want ChatGPT to use CIMD for client registration. ChatGPT prioritizes CIMD when it is available, but the plugin builder can choose DCR when both CIMD and DCR are available.
- `token_endpoint_auth_methods_supported`: include the token endpoint authentication methods your authorization server accepts. This applies to CIMD, DCR, and predefined OAuth clients. For CIMD, ChatGPT supports `none` for public-client token exchange and `private_key_jwt` for signed client assertion token exchange. Other OAuth clients commonly use `none`, `client_secret_post`, or `client_secret_basic`.
- `registration_endpoint`: include this when you support dynamic client registration (DCR), which lets ChatGPT create and reuse a dedicated `client_id` for the connector instance.
- `code_challenge_methods_supported`: must include `S256`. MCP servers are
unsupported when their authorization server metadata omits this field or
does not advertise `S256`, as required by the
[MCP authorization specification](https://modelcontextprotocol.io/specification/2025-11-25/basic/authorization#authorization-code-protection).
- Optional fields follow [RFC 8414](https://datatracker.ietf.org/doc/html/rfc8414) / [OpenID Discovery](https://openid.net/specs/openid-connect-discovery-1_0.html); include whatever helps your administrators configure policies.
#### OIDC scopes
- If your provider advertises OIDC scopes (for example, `openid`, `email`, `profile`) in `scopes_supported` of its `.well-known/oauth-authorization-server` or `.well-known/openid-configuration` document, ChatGPT requests those scopes by default during the OAuth flow.
- Some identity providers may not enable advertised OIDC scopes by default. Check your provider's configuration settings and make sure every advertised scope is enabled for the OAuth client, whether it uses CIMD, was created manually, or was created through DCR.
#### Support workspace domain restrictions
ChatGPT Enterprise workspaces can verify ownership of email domains. When an
OAuth-linked plugin provides the user's verified email address, ChatGPT can use
the email domain to prevent that corporate identity from linking the plugin in
a personal workspace or another workspace outside the organization.
To support this protection, configure your authorization server to:
- Publish OpenID Connect discovery metadata.
- Advertise and enable the `openid` and `email` scopes.
- Advertise a UserInfo Endpoint that returns the user's `email` claim and
`email_verified: true`.
You can also return these claims in an ID token during the OAuth flow, but the
UserInfo Endpoint is required for workspace domain restrictions.
The Enterprise workspace must also verify its domain. Your authorization server
provides the user identity that ChatGPT compares with verified domains
configured for the workspace; it does not verify workspace ownership of a
domain.
#### Preserve login context during reauthorization
When ChatGPT reauthorizes an existing link, including to request additional OAuth scopes, it may include the prior OIDC ID token in the authorization request as the standard `id_token_hint` parameter. To let users grant additional scopes without starting login from scratch, configure your authorization server to issue an ID token during the original OAuth flow and honor `id_token_hint` during authorization.
This optimization is optional. Reauthorization still works when an ID token is unavailable or your authorization server does not use the hint.
#### Protect callbacks with issuer identification
OpenAI hosts use [RFC 9207 issuer
identification](https://www.rfc-editor.org/rfc/rfc9207#section-2.4) to protect
OAuth callbacks against authorization server mix-up attacks. To let ChatGPT
and Codex use a stable redirect URI when creating an eligible OAuth client:
- Set `authorization_response_iss_parameter_supported: true` in your
[authorization server
metadata](https://www.rfc-editor.org/rfc/rfc9207#section-3).
- Use the same exact issuer identifier in the metadata `issuer` field and
the protected resource metadata `authorization_servers` list.
- Return `iss` in every successful and error authorization response. Its value
must exactly match the metadata `issuer`; clients use exact string
comparison and do not normalize trailing slashes, paths, ports, or casing.
ChatGPT and Codex record the selected metadata `issuer` before redirecting
the user and check the returned `iss` before exchanging the authorization
code. If the server advertises issuer identification but omits `iss` or
returns a mismatch, ChatGPT and Codex reject the response. These requirements
follow the [MCP authorization response validation
rules](https://modelcontextprotocol.io/specification/2026-07-28/basic/authorization#authorization-response-validation).
#### Redirect URL
Copy the exact production redirect URI shown in the app management page into
your authorization server's allowlist.
- If your authorization server does not meet the issuer identification
requirements above, ChatGPT uses the callback-ID-specific redirect URI
`https://chatgpt.com/connector/oauth/{callback_id}`.
- If your authorization server meets those requirements, ChatGPT uses the
stable redirect URI
`https://chatgpt.com/connector_platform_oauth_redirect`.
Apps published before ChatGPT introduced callback-ID-specific redirects also
continue to use the stable redirect URI.
#### Echo the `resource` parameter throughout the OAuth flow
- Expect ChatGPT to append `resource=https%3A%2F%2Fyour-mcp.example.com` to both the authorization and token requests. This ties the token back to the protected resource metadata shown above.
- Configure your authorization server to copy that value into the access token (commonly the `aud` claim) so your MCP server can verify the token was minted for it and nobody else.
- If a token arrives without the expected audience or scopes, reject it and rely on the `WWW-Authenticate` challenge to prompt ChatGPT to re-authorize with the correct parameters.
#### Support the authorization-code flow
- ChatGPT, acting as the MCP client, performs the authorization-code flow with PKCE using the `S256` code challenge so intercepted authorization codes cannot be replayed by an attacker.
- Your authorization server must publish `code_challenge_methods_supported` with `S256` so clients can confirm PKCE support from metadata.
### OAuth flow
Provided that you have implemented the MCP authorization spec delineated above, the OAuth flow will be as follows:
1. ChatGPT queries your MCP server for protected resource metadata.
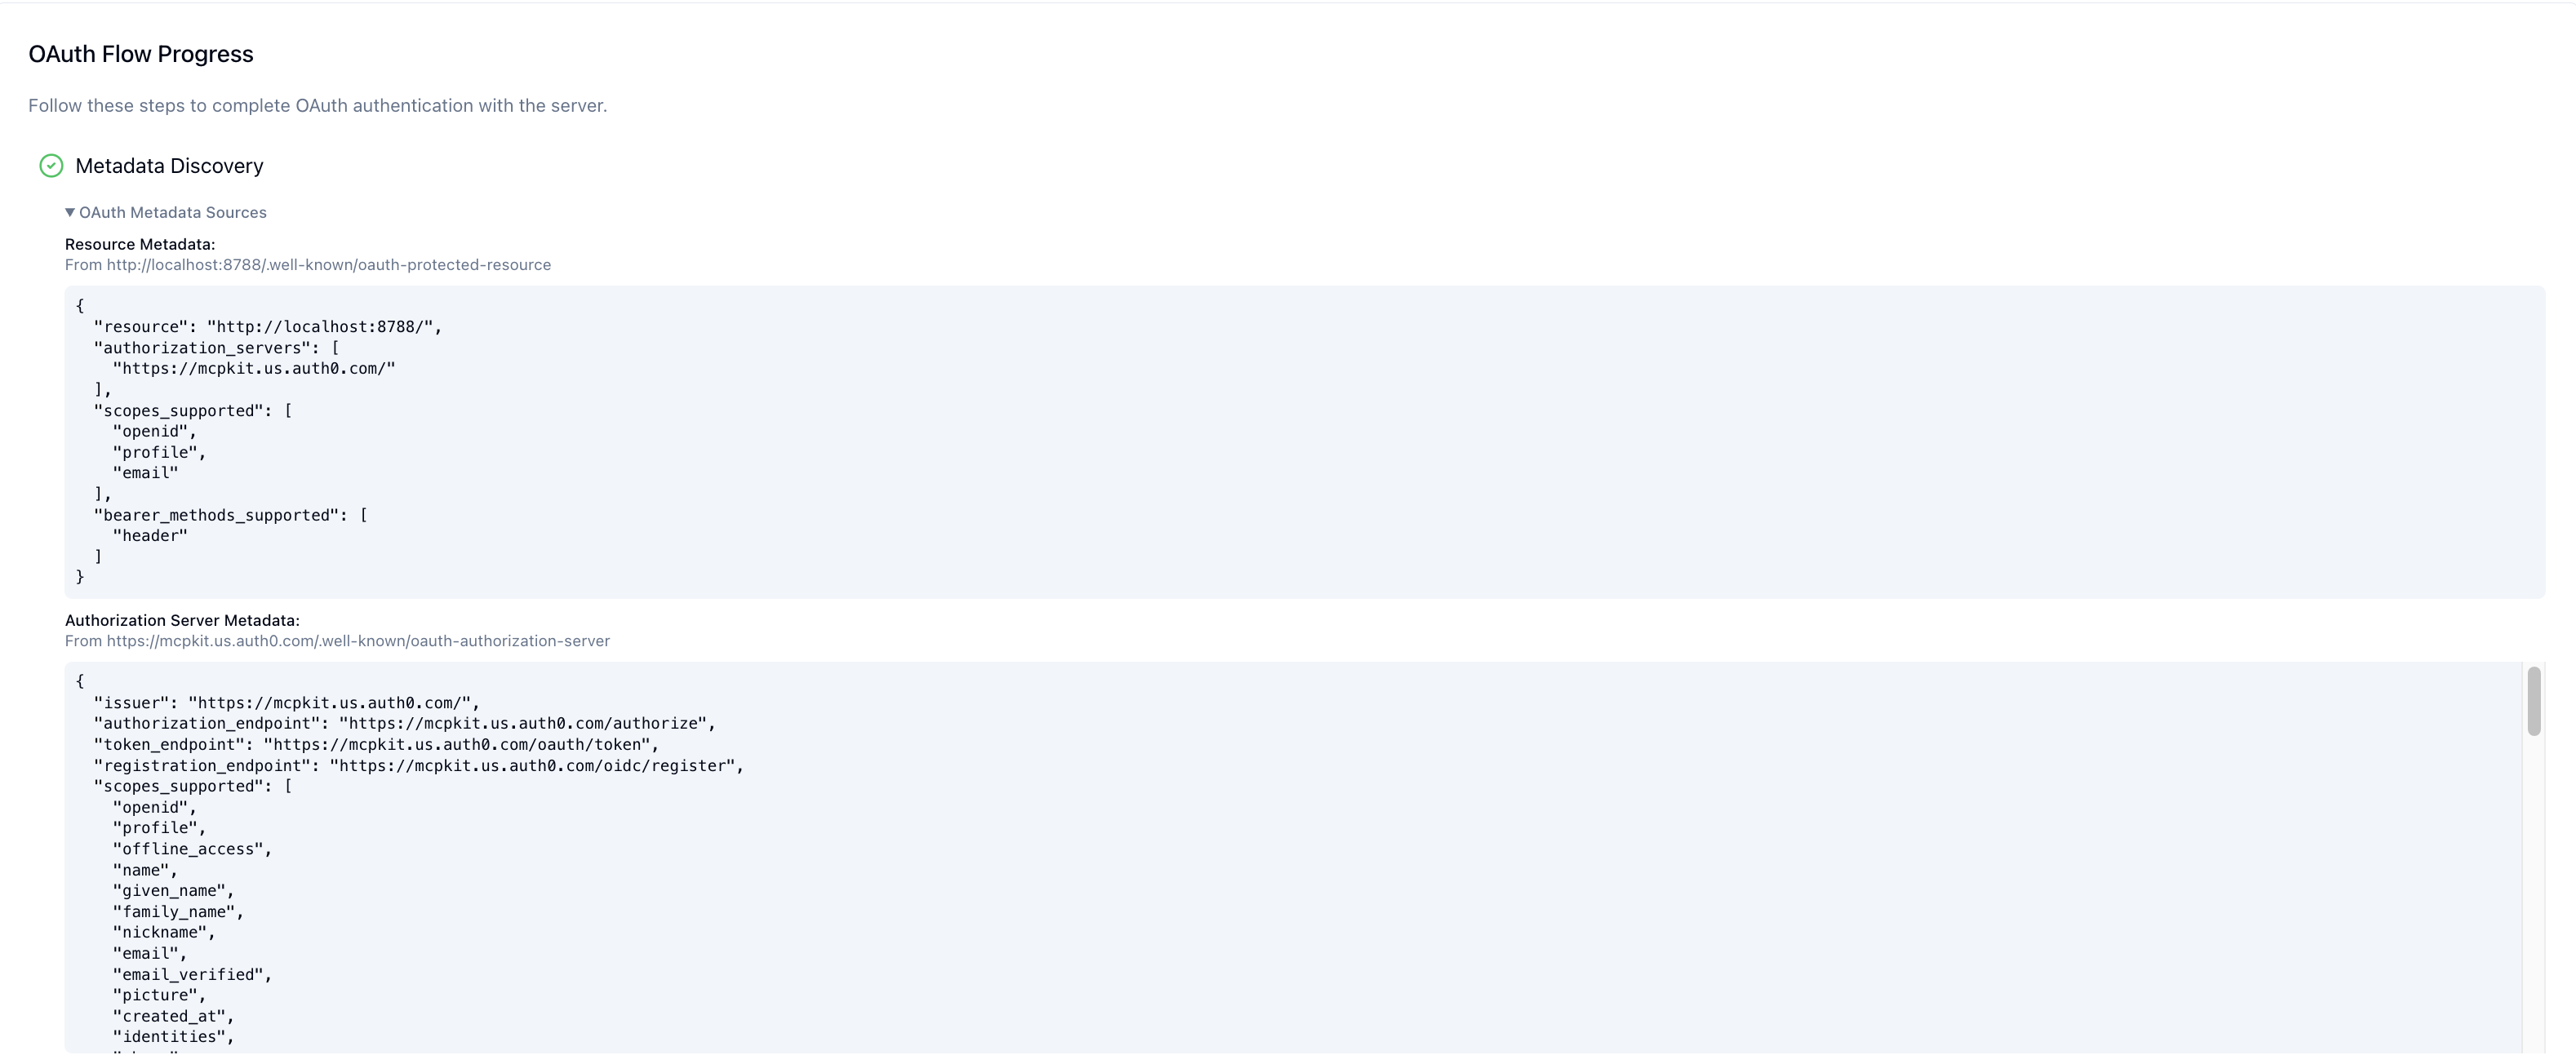
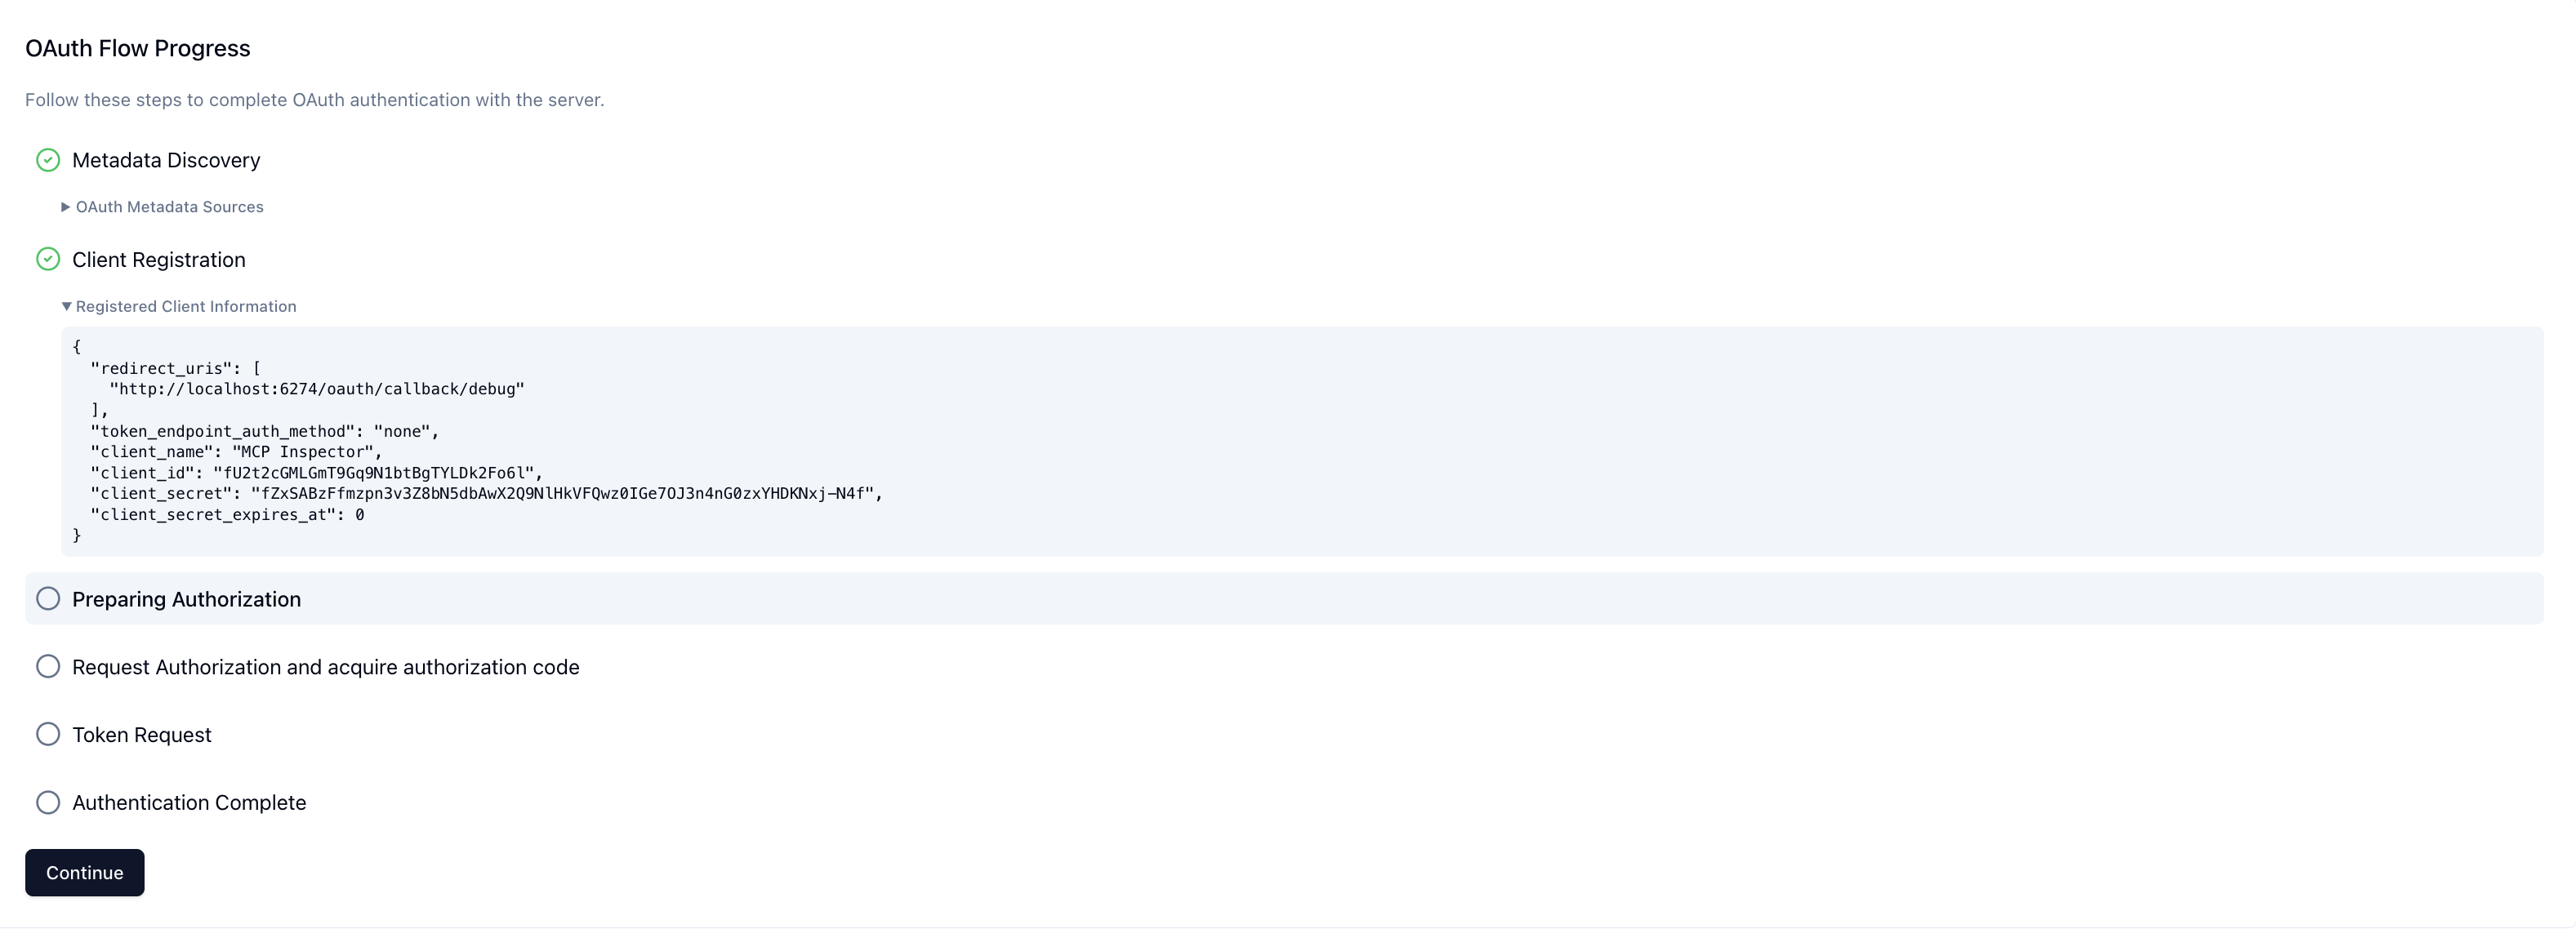
2. ChatGPT identifies itself as the OAuth client. When the connector uses CIMD, ChatGPT skips dynamic client registration and sends a CIMD document URL as the `client_id`. For authorization servers that meet the issuer identification requirements above, ChatGPT uses the stable `https://chatgpt.com/oauth/client.json`; for other servers, it uses the callback-ID-specific `https://chatgpt.com/oauth/{callback_id}/client.json`. The app management page shows the exact client metadata document and redirect URI for the connector's callback mode. When the connector uses DCR, ChatGPT calls your authorization server's `registration_endpoint` once for the connector instance, receives a generated `client_id`, and reuses that client for the instance.
When using CIMD, there is no client registration step. The following screen shows the DCR path:
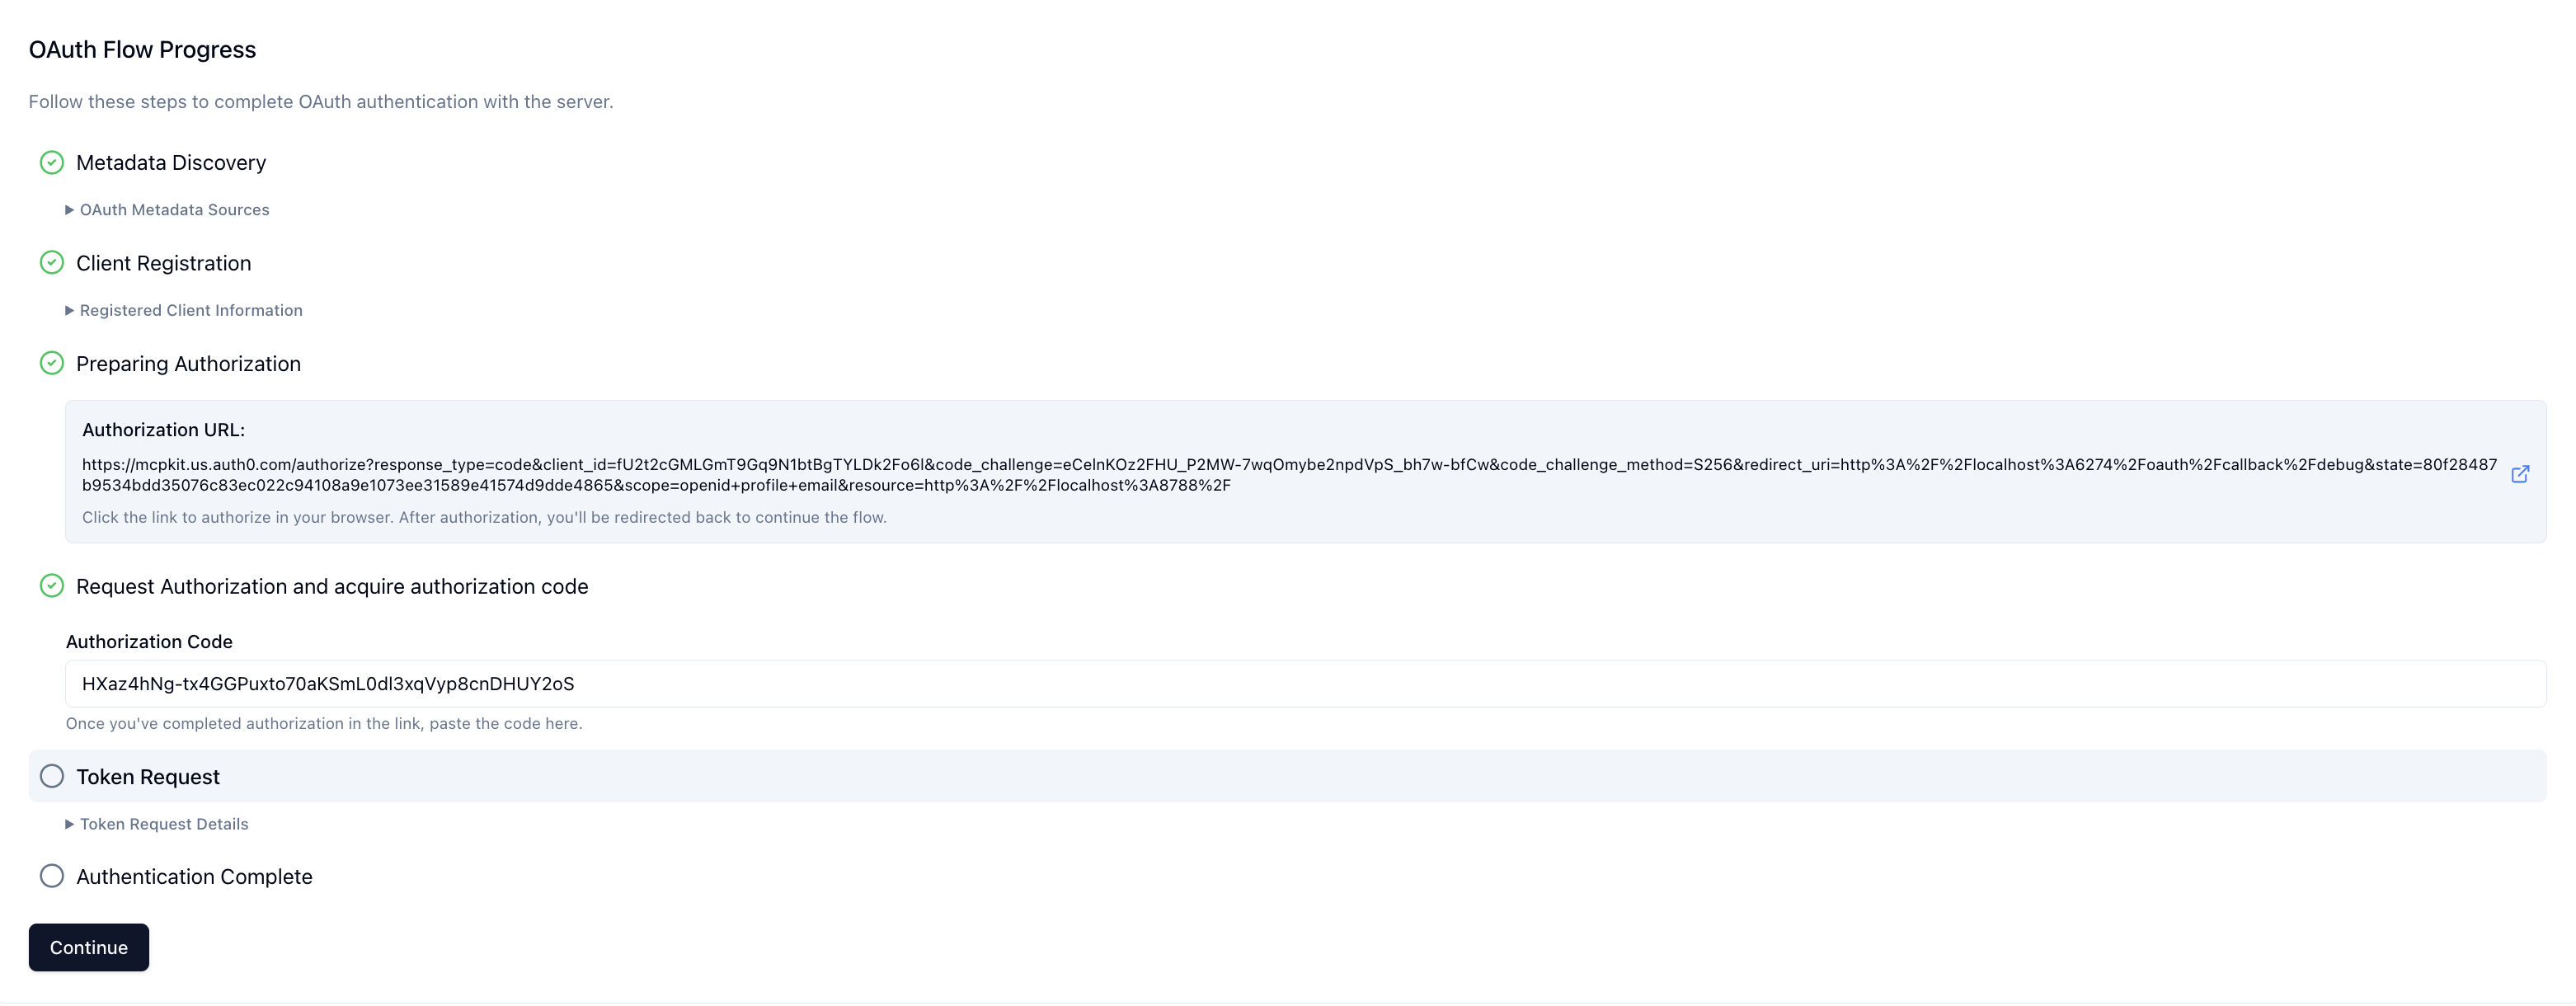
3. When the user first invokes a tool, the ChatGPT client launches the OAuth authorization code + PKCE flow. The user authenticates and consents to the requested scopes.
4. ChatGPT exchanges the authorization code for an access token and attaches it to subsequent MCP requests (`Authorization: Bearer `).
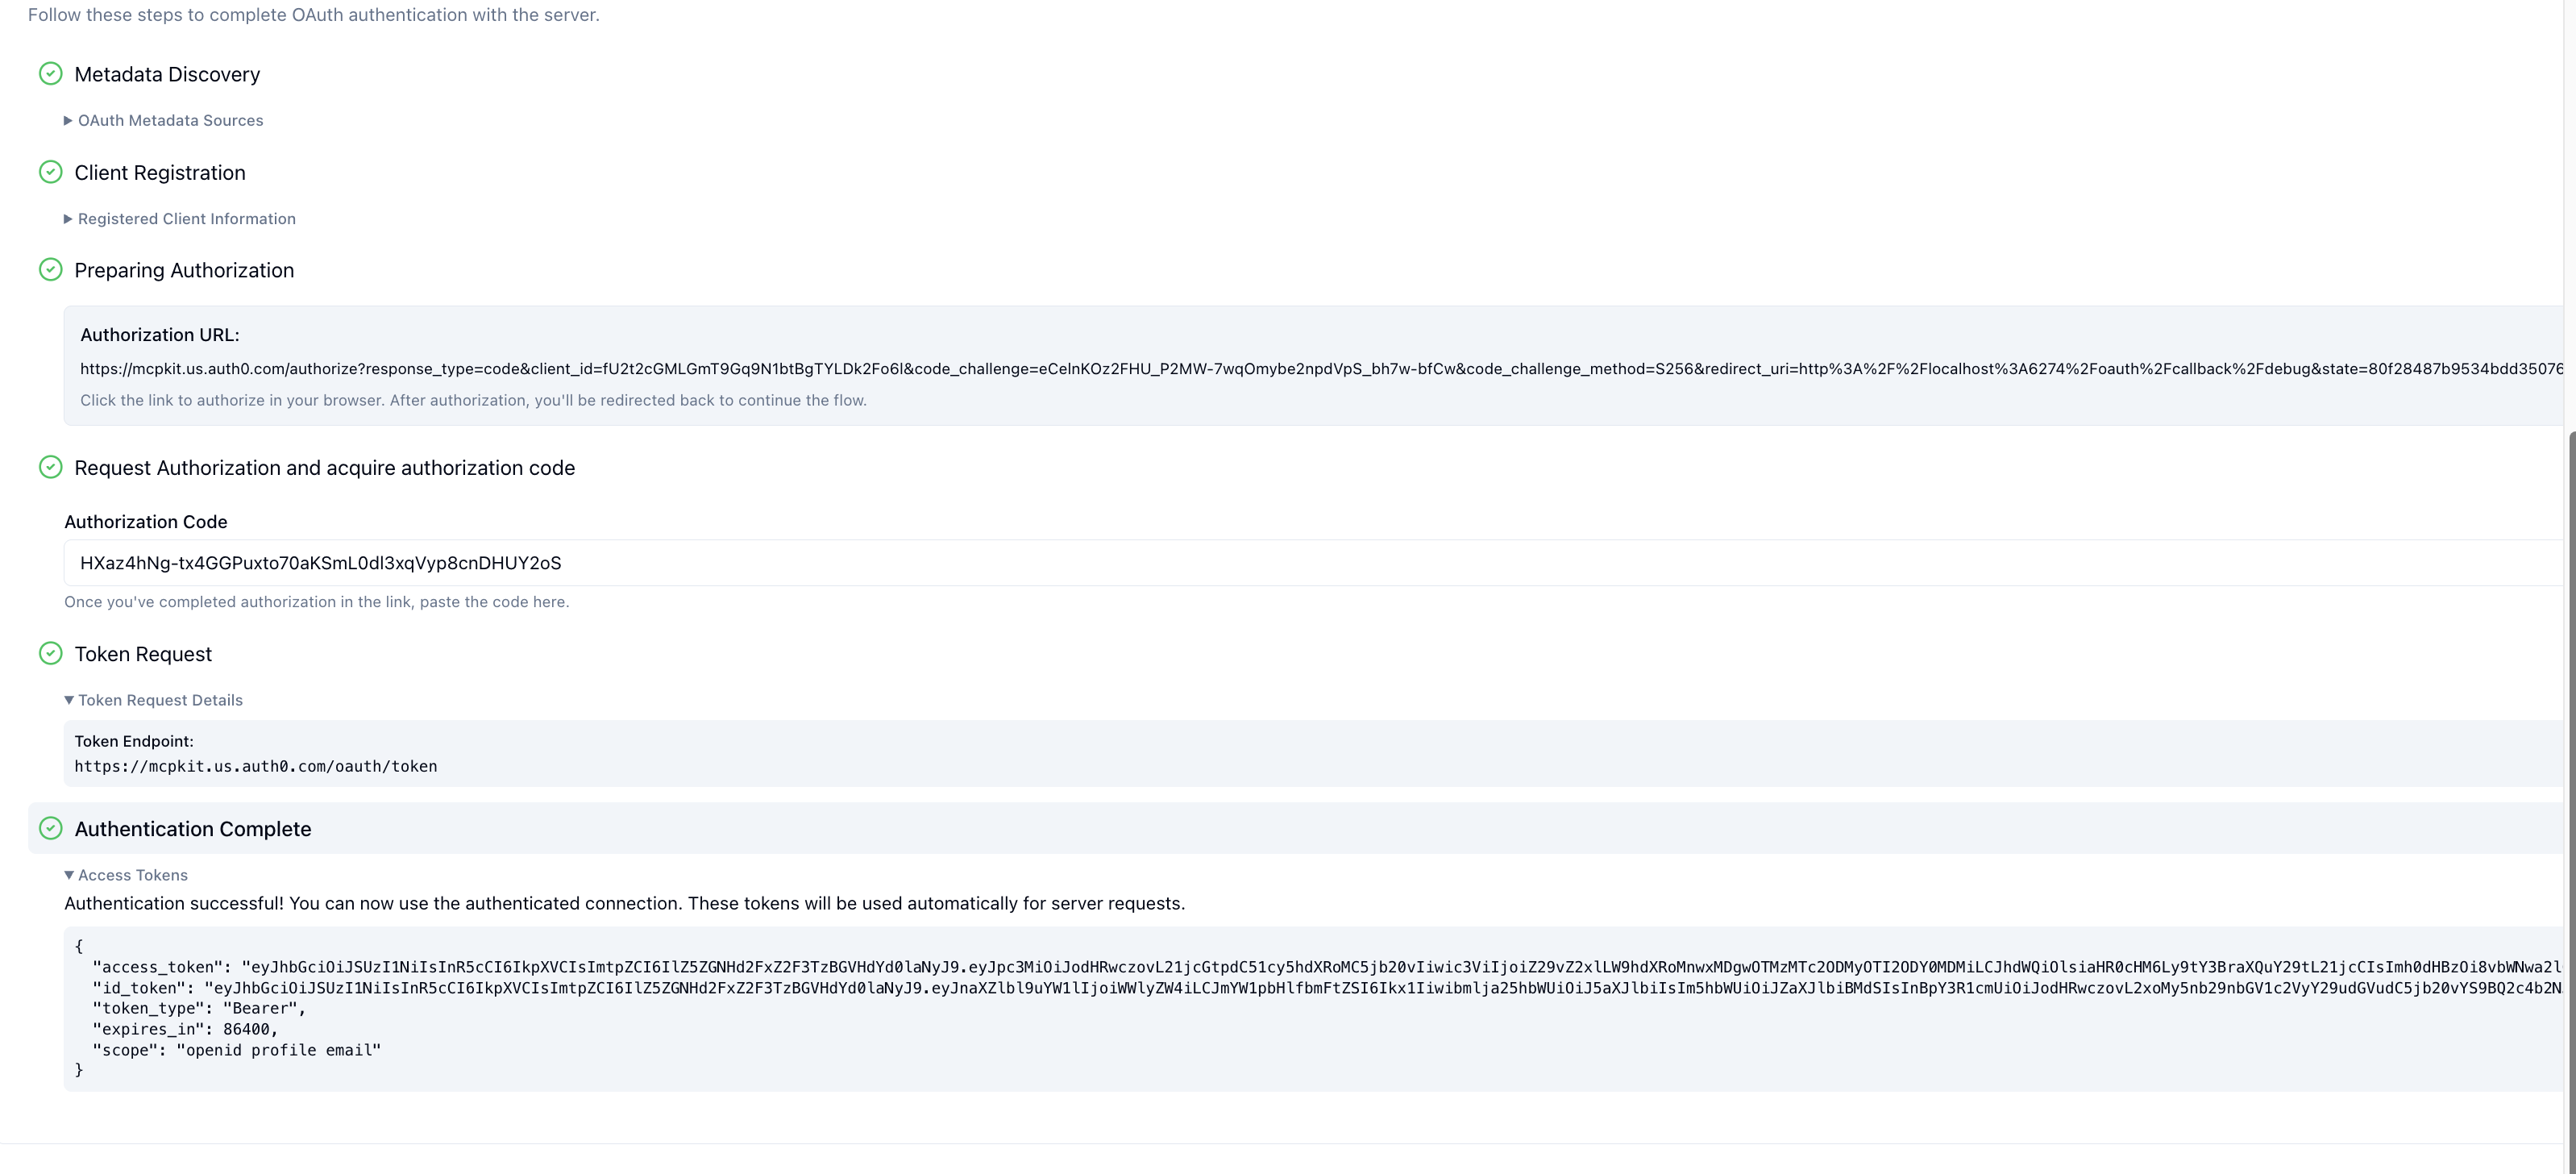
5. Your server verifies the token on each request (issuer, audience, expiration, scopes) before executing the tool.
### Client registration
Use [Client ID Metadata Documents (CIMD)](https://modelcontextprotocol.io/specification/2025-11-25/basic/authorization#client-id-metadata-documents) as the preferred client registration method when your authorization server supports it and the plugin builder chooses it. With CIMD, ChatGPT uses an HTTPS metadata document URL as its `client_id`. Your authorization server fetches that document, validates the published client metadata and redirect resource identifiers, and treats the URL as ChatGPT's stable client identity.
If you support CIMD, set `client_id_metadata_document_supported: true` in your authorization server metadata. This lets ChatGPT use one stable client identity for connectors that choose CIMD, which your authorization server can use for redirect URI allowlists, rate limits, and other policies.
ChatGPT is adopting the CIMD transition proposed in
[MCP SEP-3149](https://github.com/modelcontextprotocol/modelcontextprotocol/pull/3149).
Its production CIMD document publishes
`token_endpoint_auth_methods_supported` as an array of methods that ChatGPT
can use, with no preference order. During the transition, it also publishes
the legacy singular `token_endpoint_auth_method` as a preference:
```json
{
"token_endpoint_auth_methods_supported": ["none", "private_key_jwt"],
"token_endpoint_auth_method": "private_key_jwt"
}
```
The plural field has different perspectives in the two documents:
authorization server metadata lists the methods your token endpoint accepts,
while ChatGPT's CIMD document lists the methods ChatGPT can use. ChatGPT
selects a method from the intersection of those sets. When the singular legacy
preference is in the intersection, ChatGPT uses it for compatibility with
authorization servers that still treat the singular field as binding.
Otherwise, ChatGPT can use another method in the intersection.
Authorization servers that read the plural CIMD field should accept any method
in the intersection unless local security policy disallows that method for the
client. They must reject methods outside the intersection. The `client_id` URL
stays stable and does not use query parameters to select a method-specific
document.
The supported methods are:
- `none`: use this public-client flow when your token endpoint supports PKCE-based authorization-code exchange without client authentication. ChatGPT does not store a per-client secret.
- `private_key_jwt`: use this signed client assertion flow when your token endpoint requires client authentication. ChatGPT publishes a public JWKS URL in its CIMD metadata. The JWKS is served from `/oauth/jwks.json` on the metadata origin. ChatGPT signs token requests server-side with a managed private key and `kid`; your authorization server verifies the assertion against the public JWKS.
DCR is still supported. If you include `registration_endpoint`, ChatGPT can register dynamically when the plugin builder chooses DCR or CIMD is not available. ChatGPT runs DCR once per MCP server connection, then keeps and reuses the registered OAuth client for that connection. DCR can still create many registered clients across many separate connections, so CIMD is usually easier to administer at scale.
Keep the registered OAuth client and any client secret valid while the connector is in use. If your authorization server expires, deletes, or replaces either credential, users and reviewers may receive an `invalid_client` error when they connect. Access and refresh tokens can still expire or rotate normally.
### Client identification
A frequent question is how your MCP server can confirm that a request actually comes from ChatGPT. ChatGPT presents an OpenAI-managed client certificate when connecting to MCP servers, so you can verify the client at the transport layer with mTLS. You can also allowlist ChatGPT’s [published egress IP ranges](https://developers.openai.com/api/docs/guides/ip-addresses). ChatGPT does **not** support machine-to-machine OAuth grants such as client credentials, service accounts, or JWT bearer assertions, nor can it present custom API keys or customer-provided mTLS certificates.
CIMD further strengthens client identification by giving your authorization server a stable, HTTPS-hosted declaration of ChatGPT’s identity. When you use `private_key_jwt`, verify ChatGPT's token endpoint client assertion against the public JWKS published in the CIMD metadata.
### Mutual TLS (mTLS)
ChatGPT now presents an OpenAI-managed client certificate when establishing TLS connections to MCP servers. If your application validates client certificates, configure it to trust the OpenAI certificate chain below.
- [Download OpenAI Root CA](https://developers.openai.com/plugins/mtls/openai-root-ca.pem)
- [Download OpenAI Connectors mTLS intermediate CA](https://developers.openai.com/plugins/mtls/openai-connectors-mtls-ca.pem)
To validate the client certificate when establishing the TLS connection to your MCP server:
- Verify a leaf certificate is present and chains to the OpenAI Connectors mTLS intermediate CA.
- Verify the leaf certificate is valid for client authentication.
- Verify the leaf certificate’s SAN `dnsName` is `mtls.prod.connectors.openai.com`.
- Avoid pinning a leaf certificate fingerprint; OpenAI may rotate the leaf certificate while keeping it under the published CA chain.
Use mTLS to authenticate ChatGPT as the MCP client. Continue to use OAuth 2.1 to authenticate the end user and authorize tool access.
### Choosing an identity provider
Most OAuth 2.1 identity providers can satisfy the MCP authorization requirements once they expose a discovery document, support CIMD with `none` or `private_key_jwt`, support DCR when needed, and echo the `resource` parameter into issued tokens. Prefer providers that support CIMD for client registration.
We _strongly_ recommend that you use an existing established identity provider rather than implementing authentication from scratch yourself.
Here are instructions for some popular identity providers.
#### Auth0
Auth0 enables MCP clients to securely connect to MCP servers by providing metadata discovery, CIMD registration, API security, and token exchange for first- and third-party tool calls.
- [Guide to configuring Auth0 for MCP authorization](https://github.com/openai/openai-mcpkit/blob/main/python-authenticated-mcp-server-scaffold/README.md#2-configure-auth0-authentication)
- [Auth0 securing MCP servers overview](https://auth0.com/ai/docs/mcp/intro/overview)
- [Auth0 securing MCP servers quickstart guides](https://auth0.com/ai/docs/mcp/get-started/overview)
#### Hosted provider example
- [Provider guide to MCP authorization](https://stytch.com/docs/guides/connected-apps/mcp-server-overview)
- [MCP authorization overview](https://stytch.com/blog/MCP-authentication-and-authorization-guide/)
- [Authentication guide for ChatGPT UI](https://stytch.com/blog/guide-to-authentication-for-the-openai-apps-sdk/)
### Implementing token verification
When the OAuth flow finishes, ChatGPT directly attaches the access token it received to subsequent MCP requests (`Authorization: Bearer …`). Once a request reaches your MCP server you must assume the token is untrusted and perform the full set of resource-server checks yourself—signature validation, issuer and audience matching, expiry, replay considerations, and scope enforcement. That responsibility sits with you, not with ChatGPT.
In practice you should:
- Fetch the signing keys published by your authorization server (usually via JWKS) and verify the token’s signature and `iss`.
- Deny tokens that have expired or have not yet become valid (`exp`/`nbf`).
- Confirm the token was minted for your server (`aud` or the `resource` claim) and contains the scopes you marked as required.
- Run any app-specific policy checks, then either attach the resolved identity to the request context or return a `401` with a `WWW-Authenticate` challenge.
If verification fails, respond with `401 Unauthorized` and a `WWW-Authenticate` header that points back to your protected-resource metadata. This tells the client to run the OAuth flow again.
#### SDK token verification primitives
Both Python and TypeScript MCP software development kits include helpers so you do not have to wire this from scratch.
- [Python](https://github.com/modelcontextprotocol/python-sdk?tab=readme-ov-file#authentication)
- [TypeScript](https://github.com/modelcontextprotocol/typescript-sdk?tab=readme-ov-file#proxy-authorization-requests-upstream)
## Testing and rollout
- **Local testing:** Start with a development tenant that issues short-lived tokens so you can iterate quickly.
- **Dogfood:** Once authentication works, gate access to trusted testers before rolling out broadly. You can require linking for specific tools or the entire connector.
- **Rotation:** Plan for token revocation, refresh, and scope changes. Your server should treat missing or stale tokens as unauthenticated and return a helpful error message.
- **OAuth debugging:** Use the [MCP Inspector](https://modelcontextprotocol.io/docs/tools/inspector) Auth settings to walk through each OAuth step and pinpoint where the flow breaks before you ship.
With authentication in place, you can expose user-specific data and write
actions to ChatGPT and Codex users.
## Triggering authentication UI
ChatGPT only surfaces its OAuth linking UI when your MCP server signals that OAuth is available or necessary.
Triggering the tool-level OAuth flow requires both metadata (`securitySchemes` and the resource metadata document) **and** runtime errors that carry `_meta["mcp/www_authenticate"]`. Without both halves ChatGPT will not show the linking UI for that tool.
1. **Publish resource metadata.** The MCP server must expose its OAuth configuration at a well-known URL such as `https://your-mcp.example.com/.well-known/oauth-protected-resource`.
2. **Describe each tool’s auth policy with `securitySchemes`.** Declaring `securitySchemes` per tool tells ChatGPT which tools require OAuth versus which can run anonymously. Stick to per-tool declarations even if the entire server uses the same policy; server-level defaults make it difficult to evolve individual tools later.
Two scheme types are available today, and you can list more than one to express optional auth:
- `noauth`: The tool is callable anonymously; ChatGPT can run it immediately.
- `oauth2`: The tool needs an OAuth 2.0 access token; include the scopes you will request so the consent screen is accurate.
If you omit the array entirely, the tool inherits whatever default the server advertises. Declaring both `noauth` and `oauth2` tells ChatGPT it can start with anonymous calls but that linking unlocks privileged behavior. Regardless of what you signal to the client, your server must still verify the token, scopes, and audience on every invocation.
Example (public + optional auth)—TypeScript SDK
```ts
declare const server: McpServer;
server.registerTool(
"search",
{
title: "Public Search",
description: "Search public documents.",
inputSchema: {
q: z.string(),
},
outputSchema: {},
securitySchemes: [
{ type: "noauth" },
{ type: "oauth2", scopes: ["search.read"] },
],
},
async ({ q }) => {
return {
content: [{ type: "text", text: `Results for ${q}` }],
structuredContent: {},
};
}
);
```
Example (auth required)—TypeScript SDK
```ts
declare const server: McpServer;
server.registerTool(
"create_doc",
{
title: "Create Document",
description: "Make a new doc in your account.",
inputSchema: {
title: z.string(),
},
outputSchema: {},
securitySchemes: [{ type: "oauth2", scopes: ["docs.write"] }],
},
async ({ title }) => {
return {
content: [{ type: "text", text: `Created doc: ${title}` }],
structuredContent: {},
};
}
);
```
3. **Check tokens inside the tool handler and emit `_meta["mcp/www_authenticate"]`** when you want ChatGPT to trigger the authentication UI. Inspect the token and verify issuer, audience, expiry, and scopes. If no valid token is present, return an error result that includes `_meta["mcp/www_authenticate"]` and make sure the value contains both an `error` and `error_description` parameter. This `WWW-Authenticate` payload is what actually triggers the tool-level OAuth UI once steps 1 and 2 are in place. When a challenge prompts reauthorization, your provider can [preserve the user's existing login context](#preserve-login-context-during-reauthorization) during that flow.
Example
```json
{
"jsonrpc": "2.0",
"id": 4,
"result": {
"content": [
{
"type": "text",
"text": "Authentication required: no access token provided."
}
],
"_meta": {
"mcp/www_authenticate": [
"'Bearer resource_metadata=\"https://your-mcp.example.com/.well-known/oauth-protected-resource\", error=\"insufficient_scope\", error_description=\"You need to login to continue\"'"
]
},
"isError": true
}
}
```
---
# Build an MCP server
Add an MCP server when a plugin use case needs live data, authentication,
controlled actions, or code that runs on infrastructure you operate. The
server defines the tools available to ChatGPT and Codex. It does not need to
return custom UI.
Start from the supported goals in your
[use-case inventory](https://developers.openai.com/plugins/plan/use-case). Each tool should help complete a
recognizable user goal and should expose only the data and actions required for
that goal.
Build the tools first. After the server works without custom UI, you can [add
UI to the MCP server](https://developers.openai.com/plugins/build/chatgpt-ui) for workflows that need
visual interaction.
## Choose an MCP software development kit
The official software development kits provide schema helpers, server scaffolding, and streamable
HTTP transport:
- [TypeScript SDK](https://github.com/modelcontextprotocol/typescript-sdk),
published as `@modelcontextprotocol/sdk`.
- [Python SDK](https://github.com/modelcontextprotocol/python-sdk), published
as `mcp`.
Install the SDK that matches your server stack:
```bash
# TypeScript
npm install @modelcontextprotocol/sdk zod
# Python
pip install mcp
```
## Create the server
Create an MCP server with a stable name and version:
```ts
const server = new McpServer({
name: "acme-projects",
version: "1.0.0",
});
```
MCP servers can also return an
[`instructions` field](https://modelcontextprotocol.io/specification/2025-06-18/basic/lifecycle#initialization)
during initialization. ChatGPT and Codex use these instructions alongside tool
metadata.
Use server instructions for guidance that applies across tools, such as
required tool sequences or shared rate limits. Keep the most important details
in the first 512 characters. Do not repeat every tool description or try to
change the model's personality.
```ts
const server = new McpServer(
{ name: "acme-projects", version: "1.0.0" },
{
instructions:
"Before updating a project, call get_project to confirm its ID and current status.",
}
);
```
## Define tools from user goals
Create one tool for each distinct action the plugin must support. Prefer
focused operations such as `list_projects`, `get_project`, and
`update_project` over one tool with many unrelated modes.
Each tool needs:
- An action-oriented name and human-readable title.
- A description that explains when to use it.
- An explicit input schema.
- An output schema when the tool returns structured data.
- Accurate safety annotations.
- A handler that authorizes the request and performs the operation.
The model uses this metadata to decide whether and how to call the tool. Treat
names, descriptions, schemas, and annotations as part of the plugin's
user-facing behavior.
```ts
server.registerTool(
"list_projects",
{
title: "List projects",
description:
"Use this when the user wants to find or review projects in their Acme workspace.",
inputSchema: {
status: z.enum(["active", "archived"]).optional(),
},
outputSchema: {
projects: z.array(
z.object({
id: z.string(),
name: z.string(),
status: z.string(),
})
),
},
annotations: {
readOnlyHint: true,
openWorldHint: false,
destructiveHint: false,
},
},
async ({ status }) => {
const projects = await listProjects({ status });
return {
structuredContent: { projects },
content: [
{
type: "text",
text: `Found ${projects.length} projects.`,
},
],
};
}
);
```
## Return useful results without UI
A tool result can include:
- `structuredContent`: concise data the model can inspect and use in later
calls.
- `content`: text or other MCP content that helps the model answer the user.
- `_meta`: client-specific data hidden from the model.
Return enough information for the model to complete the workflow without a
component. Use stable identifiers in structured results so later tools can
refer to the same records.
Do not put secrets, access tokens, or unnecessary personal data in tool
results. Treat `_meta` as hidden from the model, not as a substitute for
authorization or secure storage.
## Import skills from the MCP server
Configure the MCP server to supply skills when you want to version and deploy
their instructions and supporting files with the server. During plugin
submission, **Scan Tools** imports a static snapshot of those skills into the
draft.
OpenAI currently supports a bounded, static subset of the
[draft SEP-2640 Skills extension](https://github.com/modelcontextprotocol/modelcontextprotocol/pull/2640).
This proposal is not yet part of the stable MCP specification.
### Advertise the extension
Declare `io.modelcontextprotocol/skills` in the server's initialization
capabilities:
```json
{
"capabilities": {
"extensions": {
"io.modelcontextprotocol/skills": {}
}
}
}
```
The declaration must be under `capabilities.extensions`. OpenAI does not
recognize the earlier `experimental` declaration.
### List the skills and their resources
Support the paginated `skills/list` method. Each entry must include:
- A `uri` that points to the skill's `SKILL.md`.
- `frontmatter` containing every entry from the parsed `SKILL.md` front matter.
Include the `name` and `description` entries.
- A complete `resources` list containing `SKILL.md` and every supporting file.
- A SHA-256 digest for each resource in the form
`sha256:<64 lowercase hexadecimal characters>`.
Use the `skill://` URI convention. The directory containing `SKILL.md` must
match the skill name. For example:
```json
{
"skills": [
{
"uri": "skill://dice-roller/tabletop-dice/SKILL.md",
"frontmatter": {
"name": "tabletop-dice",
"description": "Roll one or more dice and report each result and the total."
},
"resources": [
{
"uri": "skill://dice-roller/tabletop-dice/SKILL.md",
"digest": "sha256:0123456789abcdef0123456789abcdef0123456789abcdef0123456789abcdef"
},
{
"uri": "skill://dice-roller/tabletop-dice/references/notation.md",
"digest": "sha256:abcdef0123456789abcdef0123456789abcdef0123456789abcdef0123456789"
}
]
}
],
"nextCursor": "optional-next-page-cursor"
}
```
The example digests show the required format. For a text resource, hash the
UTF-8 bytes of `content.text`. For a blob resource, base64-decode
`content.blob`, then hash the decoded bytes.
Also support `skills/get` for each listed `SKILL.md` URI. Return a `skill` object
with the same complete entry shape as `skills/list`.
Use these request parameters:
- For the first `skills/list` request, accept an empty object (`{}`).
- For each later `skills/list` request, accept the returned cursor, such as
`{ "cursor": "next-page-cursor" }`.
- For `skills/get`, accept the catalog URI, such as
`{ "uri": "skill://dice-roller/tabletop-dice/SKILL.md" }`.
### Return every listed resource
Support `resources/read` for every URI in the manifest. Return exactly one
content item whose URI matches the request. OpenAI accepts UTF-8 text or a
base64-encoded blob.
During import, OpenAI verifies that:
- OpenAI can fetch every listed resource and confirm its digest.
- The fetched `SKILL.md` front matter exactly matches the catalog entry.
- Resource paths are safe, unique, and free of normalization conflicts.
- The complete skill fits the import limits.
The importer accepts up to five uniquely named skills across 10 catalog pages.
Each skill can contain up to 100 files, with these size limits:
| Content | Limit |
| ------------------------------------- | ------- |
| `SKILL.md` | 256 KiB |
| Each supporting file | 1 MiB |
| All resources for one skill | 5 MiB |
| Generated skill archives for one scan | 8 MiB |
The combined archive limit includes ZIP packaging overhead.
If any entry fails validation or exceeds a limit, **Scan Tools** still returns
the server's tools but does not update the draft's imported skills. Fix the
server and scan again.
Skills imported from MCP are submission-time snapshots, not live runtime
resources. After changing a skill, run **Scan Tools** again, review the imported
skills, and submit a new plugin version. See
[Submit plugins](https://developers.openai.com/plugins/deploy/submission#mcp) for the complete flow.
## Authenticate and authorize requests
Add authentication when a tool reads private data or takes action for a user.
Enforce authorization in the MCP server for every request; never rely on the
model to decide whether a user has access.
See [Authenticate users](https://developers.openai.com/plugins/build/auth) for OAuth discovery, security
schemes, and authorization challenges.
## Tool annotations and elicitation
Set annotations according to actual behavior:
- `readOnlyHint`: `true` only when the tool cannot change state.
- `destructiveHint`: `true` when a tool can cause irreversible or difficult to
reverse outcomes.
- `openWorldHint`: `true` when a tool can affect public or external systems.
Annotations help ChatGPT and Codex choose appropriate confirmation and safety
behavior. They do not replace authorization, validation, or confirmation in
your server.
Use MCP elicitation when the server needs structured information that was not
provided in the original tool call. Keep elicitation focused on information
the user can reasonably supply. Do not use it to collect secrets or bypass
normal authentication.
## Company knowledge compatibility
Company knowledge can use read-only tools from your MCP server. To make a
plugin eligible as a company knowledge source, implement the standard
`search` and `fetch` tool input schemas and mark other read-only tools with
`readOnlyHint: true`.
Return absolute, user-openable URLs for sources that the model should cite. Keep
internal document identifiers in the result's `id` field. For the required
schemas and result shapes, see
[Building MCP servers for ChatGPT and API integrations](https://platform.openai.com/docs/mcp).
## Run and test locally
Expose a streamable HTTP endpoint, typically at `/mcp`, then inspect it with
[MCP Inspector](https://modelcontextprotocol.io/docs/tools/inspector):
```bash
npx @modelcontextprotocol/inspector
```
In the Inspector UI, select **Streamable HTTP** and enter
`http://localhost:3000/mcp`.
Use the inspector to:
1. Confirm that initialization succeeds.
2. Review server instructions and the advertised tool list.
3. Call every tool with representative and invalid inputs.
4. Verify schemas, results, errors, and annotations.
5. Confirm that authorization is enforced for private data and write actions.
Then connect the server to ChatGPT in
[developer mode](https://developers.openai.com/plugins/deploy/connect-chatgpt) and run the direct,
indirect, edge-case, and out-of-scope requests from your use-case inventory.
## Deploy the endpoint
For public plugin submission, deploy the MCP server at a stable, publicly
reachable HTTPS endpoint. [Secure MCP Tunnel](https://developers.openai.com/api/docs/guides/secure-mcp-tunnels)
can connect a private MCP server in developer mode, but it does not satisfy
public submission requirements.
The production endpoint must:
- Support the MCP streamable HTTP transport.
- Respond at a stable URL, typically ending in `/mcp`.
- Meet the latency and availability needs of the plugin's workflows.
- Reach required services and data stores.
- Preserve authentication and authorization boundaries.
- Produce logs and metrics for failed initialization and tool calls.
If the MCP server must remain private, deploy a public HTTPS proxy that forwards
MCP requests to the private server. Use
[OpenAI-managed mTLS](https://developers.openai.com/plugins/build/auth#mutual-tls-mtls) to authenticate
ChatGPT as the MCP client, and use [OAuth 2.1](https://developers.openai.com/plugins/build/auth) when your
plugin requires user authentication. If your network requires an IP allowlist,
use the published [ChatGPT connectors IP ranges](https://developers.openai.com/api/docs/guides/ip-addresses)
and update the allowlist automatically. An IP allowlist does not replace
authentication or authorization.
The public endpoint must remain reachable for plugin review and
[domain verification](https://developers.openai.com/plugins/deploy/submission#domain-verification). Do not
use Secure MCP Tunnel alone, a temporary tunnel, or a local endpoint for public
submission.
### Choose infrastructure
You can deploy the MCP server to serverless, container, edge, or traditional
application infrastructure. Choose a platform based on:
- Runtime and dependency support.
- Streaming response behavior.
- Cold-start and request latency.
- Network access to required services.
- Data residency and compliance requirements.
- Secret management.
- Logging, tracing, and alerting.
- Rollback and versioning support.
If the server also hosts optional UI assets, deploy those assets at stable
origins allowed by the component's
[content security policy](https://developers.openai.com/plugins/build/chatgpt-ui#content-security-policy-csp).
### Configure the production endpoint
Before deployment:
1. Set production credentials through the host's secret-management system.
2. Configure the authorization server and allowed redirect behavior.
3. Apply timeouts and rate limits to expensive or externally visible tools.
4. Remove debug responses and unnecessary personal data.
5. Confirm that logs do not contain access tokens or sensitive tool results.
After deployment, call the production endpoint with
[MCP Inspector](https://modelcontextprotocol.io/docs/tools/inspector). Verify
initialization, server instructions, tools, schemas, annotations,
authentication, results, and errors.
### Plan for updates
Keep published tool names and schemas backward compatible. Add fields or tools
without breaking existing contracts. If metadata changes, refresh the
developer-mode connection and rerun the evaluation set before submission.
For optional UI, version resource identifiers when HTML, JavaScript, or CSS
changes in a way that could break a cached component.
## Add optional UI
After tools work end to end, decide whether any use case needs visual
interaction. A table, map, editable schedule, or comparison view may benefit
from UI. A lookup, status check, or background action often does not.
Continue with [Add UI to your MCP server](https://developers.openai.com/plugins/build/chatgpt-ui) to
register an MCP Apps resource and associate it with selected tools.
## Security reminders
- Treat every tool input as untrusted.
- Validate parameters and enforce authorization on the server.
- Require confirmation for consequential write actions.
- Keep secrets and sensitive data out of tool metadata and results.
- Log enough context to investigate failures without logging credentials or
unnecessary personal data.
- Rate-limit expensive or externally visible actions.
---
# Build skills
A skill complements your MCP server by teaching ChatGPT and Codex how to use
its tools in a repeatable workflow. Use the server for live data,
authentication, authorization, and controlled actions. Use the skill for tool
sequences, decision points, output requirements, examples, templates, and
other reusable guidance.
A plugin can contain one skill or a group of related skills. Keep every skill
focused on a recognizable user goal from your
[use-case inventory](https://developers.openai.com/plugins/plan/use-case). A skill can also work without an
MCP server when the workflow needs only packaged instructions and resources.
## Create a skill
The fastest way to start is with the built-in skill creator. Describe the user
goal and the MCP tools that support it:
```text
@skill-creator Create a skill named tabletop-dice that understands dice
notation such as 3d6, calls roll_dice once for each die, and reports every
roll and the total.
```
In Codex, invoke the same creator as `$skill-creator`.
You can also create the files manually. Each skill lives in its own directory
and requires a `SKILL.md` file:
## Write `SKILL.md`
Start the file with a name and a description, followed by the instructions:
```md
---
name: tabletop-dice
description: Roll one or more dice for tabletop games and report each result and the total.
---
Use this skill when the user asks to roll dice.
1. Parse requests written as `NdS` as N dice with S sides. For example, `3d6`
means three six-sided dice.
2. Call `roll_dice` once for each requested die and pass S as `sides`.
3. Report each tool result in order.
4. When the user requests multiple dice, add the results and report the total.
Do not invent, replace, or reroll a result unless the user asks you to.
```
The description determines when the model considers the skill. State the
workflow and the conditions that should trigger it. Put detailed procedure,
format, and safety instructions in the body.
## Define the workflow boundary
Connect every skill to one or more use cases. The instructions should make the
following clear:
- What input the workflow expects.
- Which steps the model should follow.
- What output the user should receive.
- Which facts the model must not infer.
- When the workflow should ask a question, stop, or decline.
- Which supporting files the model should consult.
Prefer one focused skill over a large collection of loosely related
instructions. Split workflows when they have different triggers, inputs, or
success criteria.
## Add supporting resources
Keep `SKILL.md` concise and place detailed material next to it:
- Use `references/` for policies, schemas, examples, and background material.
- Use `assets/` for templates or files the workflow should copy or transform.
- Use `scripts/` when the workflow needs deterministic computation or file
processing.
Reference supporting files from `SKILL.md` and explain when to load or run
them. Do not add a script when instructions and existing tools can complete the
task reliably.
## Connect skills to MCP tools
A skill can guide the model through tools exposed by the plugin's MCP server.
Use the skill for workflow instructions and the server for live data,
authorization, and controlled actions.
If a skill requires an MCP server, declare the dependency in
`agents/openai.yaml`:
```yaml
dependencies:
tools:
- type: "mcp"
value: "dice-roller"
description: "Roll an N-sided die"
transport: "streamable_http"
url: "https://tinymcp.dev/api/moldy-aloof-zettabyte/mcp"
```
A dependency makes the required tool available; it does not replace clear
workflow instructions. Tell the model which tools to use, in what order, and
how to handle missing or ambiguous results.
## Import a skill from MCP
You can upload a packaged skill during submission or import it from the
plugin's MCP server. The MCP option keeps the skill's instructions and
supporting files with the server deployment.
OpenAI imports skills from MCP when you select **Scan Tools** in the plugin
submission portal. The imported files become a snapshot in the draft; ChatGPT
and Codex do not fetch them from your MCP server at runtime. After changing the
skill, deploy the server and scan it again before submitting a new plugin
version.
For the capability declaration, discovery methods, resource manifest, and
import limits, see
[Import skills from the MCP server](https://developers.openai.com/plugins/build/mcp-server#import-skills-from-the-mcp-server).
## Test the skill
Test with representative requests from the use-case inventory:
1. Direct requests that should activate the skill.
2. Indirect requests that express the same goal.
3. Incomplete inputs that should trigger a follow-up question.
4. Requests that should not activate the skill.
5. Edge cases where the skill must avoid inventing information or taking an
unsupported action.
Review both activation and output quality. Refine the description when the
skill activates at the wrong time. Refine the instructions when it chooses the
right workflow but produces an inconsistent result.
## Package the skill
Point the plugin manifest at the skills directory:
```json
{
"name": "dice-roller",
"version": "1.0.0",
"description": "Roll dice for tabletop games",
"skills": "./skills/",
"apps": "./.app.json"
}
```
See [Package your plugin](https://developers.openai.com/plugins/build/plugins) for the complete manifest,
MCP server mapping, local testing, and distribution flow.
---
# Checkout API reference
## Overview
Plugin developers are responsible for choosing how to monetize their experience. Today, the **recommended** and **generally available** approach is to use **external checkout**, where users complete purchases on the developer’s own domain. While current approval is limited to plugins for physical goods purchases, we are actively working to support a wider range of commerce use cases.
We’re also enabling **embedded checkout with the ChatGPT payment sheet** for
select marketplace partners (beta), with plans to extend access to more
marketplaces and physical-goods retailers over time. Until then, we recommend
routing purchase flows to your standard external checkout.
## Recommended Monetization Approach
### ✅ External Checkout (recommended)
**External checkout** means directing users from ChatGPT to a **merchant-hosted checkout flow** on your own website or application, where you handle pricing, payments, shipping, and fulfillment for eligible physical goods.
This is the recommended approach for most plugin developers.
#### How it works
1. A user interacts with your plugin UI in ChatGPT.
2. Your plugin UI presents eligible physical goods (for example, with a “Buy now” action).
3. When the user decides to purchase, your plugin UI links or redirects them out of ChatGPT and to your external checkout flow.
4. Payment, billing, taxes, refunds, and compliance are handled entirely on your domain.
5. After purchase, the user can return to ChatGPT with order confirmation or tracking details.
### Checkout with saved payment methods
Plugin developers can build a checkout flow in optional UI that allows customers to use payment methods already saved with the merchant. This flow can only display saved payment methods and cannot collect new payment method credentials from customers.
In this approach, the customer does not need to be redirected to another surface outside ChatGPT to complete the purchase.
#### How it works
1. A user interacts with your plugin UI in ChatGPT.
2. Your plugin UI presents eligible physical goods with the relevant totals.
3. Your plugin UI displays eligible payment methods that the customer has already saved with you.
4. The customer selects a saved payment method and confirms the purchase in ChatGPT.
5. Your server processes the purchase with the saved payment method and returns confirmation to the plugin.
### Checkout with the ChatGPT payment sheet (private beta)
Checkout with the ChatGPT payment sheet is limited to select marketplaces
today and is not available to all users.
To collect new payment methods within the checkout flow, plugin developers must
use the ChatGPT payment sheet. Call `requestCheckout` with checkout session data
(line items, totals, saved payment methods) to open the sheet. When the user
selects buy, ChatGPT sends a token representing the selected payment method to
your MCP server through the `complete_checkout` tool call. Use your PSP
integration to collect payment with this token, then return finalized order
details from `complete_checkout`.
### Flow at a glance
1. **Server prepares session**: An MCP tool returns checkout session data (session id, line items, totals, payment provider) in `structuredContent`.
2. **Widget previews cart**: The widget renders line items and totals so the user can confirm.
3. **Widget calls `requestCheckout`**: The widget invokes `requestCheckout(session_data)`. ChatGPT opens the payment sheet, displays the amount to charge, and displays various payment methods.
4. **Server finalizes**: Once the user clicks the pay button, the widget calls back to your MCP via the `complete_checkout` tool call. The MCP tool returns the completed order, which will be returned back to widget as a response to `requestCheckout`.
## Checkout session
You are responsible for constructing the checkout session payload that the host will render. The exact values for certain fields such as `id` and `payment_provider` depend on your payment service provider and commerce system. In practice, your MCP tool should return:
- Line items and quantities the user is purchasing.
- Totals (subtotal, tax, discounts, fees, total) that match your server calculations.
- Provider metadata required by your PSP integration.
- Legal and policy links (terms, refund policy, etc.).
## Widget: Call `requestCheckout`
The host provides `window.openai.requestCheckout`. Use it to open the ChatGPT payment sheet when the user initiates a purchase:
Example:
{/* vale off */}
```tsx
async function handleCheckout(sessionJson: string) {
const session = JSON.parse(sessionJson);
if (!window.openai?.requestCheckout) {
throw new Error("requestCheckout is not available in this host");
}
// Host opens the ChatGPT payment sheet.
const order = await window.openai.requestCheckout({
...session,
id: String(checkout_session_id), // Use a unique ID for every checkout session.
});
return order; // Host returns the order payload.
}
```
{/* vale on */}
In your component, you might initiate this in a button click:
```tsx
{
setIsLoading(true);
try {
const orderResponse = await handleCheckout(checkoutSessionJson);
setOrder(orderResponse);
} catch (error) {
console.error(error);
} finally {
setIsLoading(false);
}
}}
>
{isLoading ? "Loading..." : "Checkout"}
```
Here is a complete checkout session example that your widget can pass to the
host. Your plugin supplies the checkout session fields below. ChatGPT adds
host-owned fields such as `merchant`, `logo_url`, `conversation_id`,
`connector_id`, and `ecosystem_app_uri`. Populate the `merchant_id` field with
the value specified by your PSP:
```tsx
const checkoutRequest = {
id: "checkout_session_123",
payment_provider: {
provider: "stripe",
merchant_id: "merchant_123",
supported_payment_methods: [
{
type: "card",
allowed_card_brands: ["visa", "mastercard"],
},
{ type: "apple_pay" },
{ type: "google_pay" },
],
managed_payment_methods: [
{
type: "card",
id: "pm_123",
display_name: "Visa ending in 4242",
display_last4: "4242",
display_brand: "visa",
},
],
},
payment_mode: "live",
status: "ready_for_payment",
currency: "USD",
metadata: {
cart_id: "cart_123",
merchant_order_reference: "order_ref_123",
},
line_items: [
{
id: "line_item_123",
item: {
id: "item_123",
quantity: 1,
},
name: "Canvas backpack",
description: "A weather-resistant everyday backpack.",
images: ["https://merchant.example.com/images/canvas-backpack.png"],
base_amount: 3000,
discount: 0,
subtotal: 3000,
tax: 300,
total: 3300,
},
],
totals: [
{
type: "items_base_amount",
display_text: "Items subtotal",
amount: 3000,
},
{
type: "subtotal",
display_text: "Subtotal",
amount: 3000,
},
{
type: "fulfillment",
display_text: "Shipping",
amount: 550,
},
{
type: "tax",
display_text: "Tax",
amount: 300,
},
{
type: "total",
display_text: "Total",
amount: 3850,
},
],
fulfillment_options: [
{
id: "standard_shipping",
type: "shipping",
title: "Standard shipping",
subtitle: "Arrives in 3-5 business days",
carrier: "USPS",
earliest_delivery_time: "2027-01-15T15:00:00Z",
latest_delivery_time: "2027-01-19T18:00:00Z",
subtotal: 500,
tax: 50,
total: 550,
},
],
fulfillment_option_id: "standard_shipping",
fulfillment_address: {
name: "Jane Customer",
line_one: "123 Main St",
line_two: "Apt 4B",
city: "San Francisco",
state: "CA",
country: "US",
postal_code: "94107",
phone_number: "+14155550123",
},
messages: [
{
type: "info",
param: "fulfillment_address",
content_type: "plain",
content: "Free returns within 30 days.",
},
],
links: [
{ type: "terms_of_use", url: "https://merchant.example.com/terms" },
{ type: "privacy_policy", url: "https://merchant.example.com/privacy" },
{ type: "support_url", url: "https://merchant.example.com/support" },
],
};
const response = await window.openai.requestCheckout(checkoutRequest);
```
Key points:
- `window.openai.requestCheckout(session)` opens the host checkout UI.
- The promise resolves with the order result or rejects on error/cancel.
- Render the session JSON so users can review what they’re paying for.
- Use integer minor currency units for all amount fields.
- Use `payment_provider.managed_payment_methods` for payment methods the customer has already saved with your merchant.
- Keep `metadata` values as strings.
- Use the PSP slug required by your integration for `provider`, and consult your PSP to get its `merchant_id` value.
## MCP server: Expose the `complete_checkout` tool
You can mirror this pattern and swap in your logic:
For direct `CallToolResult` returns, the Python MCP SDK uses the `Annotated`
return type below to declare the tool `outputSchema` for `structuredContent`.
```py
from typing import Annotated, Any
from pydantic import BaseModel
class CompleteCheckoutOutput(BaseModel):
id: str
status: str
currency: str
line_items: list[dict[str, Any]]
fulfillment_address: dict[str, Any]
fulfillment_options: list[dict[str, Any]]
fulfillment_option_id: str
totals: list[dict[str, Any]]
order: dict[str, Any]
@tool(description="")
async def complete_checkout(
self,
checkout_session_id: str,
buyer: Buyer,
payment_data: PaymentData,
) -> Annotated[types.CallToolResult, CompleteCheckoutOutput]:
return types.CallToolResult(
content=[],
structuredContent={
"id": checkout_session_id,
"status": "completed",
"currency": "USD",
"line_items": [
{
"id": "line_item_1",
"item": {
"id": "item_1",
"quantity": 1,
},
"base_amount": 3000,
"discount": 0,
"subtotal": 3000,
"tax": 300,
"total": 3300,
},
],
"fulfillment_address": {
"name": "Jane Customer",
"line_one": "123 Main St",
"line_two": "Apt 4B",
"city": "San Francisco",
"state": "CA",
"country": "US",
"postal_code": "94107",
"phone_number": "+1 (555) 555-5555",
},
"fulfillment_options": [
{
"id": "fulfillment_option_1",
"type": "shipping",
"title": "Standard shipping",
"subtitle": "3-5 business days",
"carrier": "USPS",
"earliest_delivery_time": "2026-02-24T15:00:00Z",
"latest_delivery_time": "2026-02-28T18:00:00Z",
"subtotal": 0,
"tax": 0,
"total": 0,
},
],
"fulfillment_option_id": "fulfillment_option_1",
"totals": [
{
"type": "items_base_amount",
"display_text": "Items subtotal",
"amount": 3000,
},
{
"type": "subtotal",
"display_text": "Subtotal",
"amount": 3000,
},
{
"type": "tax",
"display_text": "Tax",
"amount": 300,
},
{
"type": "total",
"display_text": "Total",
"amount": 3300,
},
],
"order": {
"id": "order_id_123",
"checkout_session_id": checkout_session_id,
"permalink_url": "",
},
},
_meta={META_SESSION_ID: "checkout-flow"},
isError=False,
)
```
Adapt this to:
- Integrate with your payment service provider to charge the payment method
within `payment_data`.
- Persist the order in your system.
- Return authoritative order/receipt data.
- Include `_meta.ui.resourceUri` if you want to render a confirmation widget (ChatGPT honors `_meta["openai/outputTemplate"]` as an optional compatibility alias).
The following payment service providers support processing for the ChatGPT
payment sheet:
{/* vale off */}
- [Adyen](https://docs.adyen.com/online-payments/agentic-commerce)
- [Checkout.com](https://api-reference.checkout.com/tag/Agentic-Commerce-Protocol/)
- Fiserv
- [PayPal](https://docs.paypal.ai/growth/agentic-commerce/agent-ready)
- [Stripe](https://docs.stripe.com/agentic-commerce/apps)
- [Worldpay](https://docs.worldpay.com/access/products/ai/acp)
## Optional: Receive Raw Payment Methods
If you are a merchant with a PCI DSS Level 1 certificate, you can receive raw payment methods directly by implementing the Agentic Commerce Protocol Delegate Payment endpoint. The delegated payment request will include the full payment method details your payment flow requires, including the raw card number, expiration date, CVC, billing address, allowance constraints, risk signals, and metadata.
{/* vale on */}
For example, a raw card payment method request is as follows:
```json
{
"payment_method": {
"type": "card",
"card_number_type": "fpan",
"number": "4242424242424242",
"exp_month": "11",
"exp_year": "2026",
"name": "Jane Doe",
"cvc": "223",
"checks_performed": ["avs", "cvv"],
"iin": "424242",
"display_card_funding_type": "credit",
"display_brand": "visa",
"display_last4": "4242",
"metadata": {}
},
"allowance": {
"reason": "one_time",
"max_amount": 5000,
"currency": "usd",
"checkout_session_id": "cs_01HV3P3ABC123",
"merchant_id": "acme_corp",
"expires_at": "2026-02-13T12:00:00Z"
},
"billing_address": {
"name": "Jane Doe",
"line_one": "185 Berry Street",
"line_two": "Suite 550",
"city": "San Francisco",
"state": "CA",
"country": "US",
"postal_code": "94107"
},
"risk_signals": [
{
"type": "card_testing",
"score": 5,
"action": "authorized"
}
],
"metadata": {
"session_id": "sess_abc123",
"user_agent": "ChatGPT/2.0"
}
}
```
The corresponding response should return an id representing the payment method. This id will be passed to `complete_checkout` as part of `payment_data`.
```json
{
"id": "vt_01J8Z3WXYZ9ABC123",
"created": "2026-02-12T14:30:00Z",
"metadata": {
"source": "agent_checkout",
"merchant_id": "acme_corp",
"idempotency_key": "idem_xyz789"
}
}
```
## Error Handling
The `complete_checkout` tool call can send back messages of type `error`. Error messages with `code` set to `payment_declined` or `requires_3ds` will be displayed on the ChatGPT payment sheet. All other error messages will be sent back to the widget as a response to `requestCheckout`. The widget can display the error as desired.
## Test payment mode
You can set the value of the `payment_mode` field to `test` in the call to `requestCheckout`. This will present a ChatGPT payment sheet that accepts test cards (such as the 4242 test card). The resulting `token` within `payment_data` that is passed to the `complete_checkout` tool can be processed in the staging environment of your PSP. This allows you to test end-to-end flows without moving real funds.
Note that in test payment mode, you might have to set a different value for
`merchant_id`. Refer to your payment provider's monetization guide for more
details.
## Implementation checklist
1. **Define your checkout session model**: Include IDs, the payment provider
object, line items, totals, and legal links.
2. **Return the session from your MCP tool** in `structuredContent` alongside your widget template.
3. **Render the session in the widget** so users can review items, totals, and terms.
4. **Call `requestCheckout(session_data)`** on user action; handle the resolved order or error.
5. **Charge the user** by implementing the `complete_checkout` MCP tool which
returns a response that follows the checkout spec.
6. **Test end-to-end** with realistic amounts, taxes, and discounts to ensure the host renders the totals you expect.
---
# Examples
## Overview
The Pizzaz demo bundles several UI components so you can see the full tool
surface area end to end. The following sections walk through the MCP server and
the component implementations that power those tools.
You can find Pizzaz and other examples in our
[examples repository on GitHub](https://github.com/openai/openai-apps-sdk-examples).
Use these examples as blueprints when you assemble your plugin's MCP server and
optional UI.
---
# MCP server and UI quickstart
## Introduction
Plugins use the [Model Context Protocol
(MCP)](https://developers.openai.com/plugins/concepts/mcp-server) to expose server-backed capabilities to
ChatGPT and Codex. This tutorial uses:
1. An MCP server that defines tools and exposes them to ChatGPT and Codex.
2. An optional web component, rendered in an iframe inside ChatGPT.
ChatGPT implements the open MCP Apps UI standard so you can build your UI once
and run it across MCP Apps-compatible hosts.
In this quickstart, we'll build a basic to-do workflow with UI contained in a
single HTML file that keeps the markup, CSS, and JavaScript together.
To see more advanced examples using React, see the [examples repository on GitHub](https://github.com/openai/openai-apps-sdk-examples).
## Build a web component
This step is optional. If you only need tools and no ChatGPT UI, skip to
[Build an MCP server](#build-an-mcp-server) and do not register a UI resource.
Start by creating a file called `public/todo-widget.html` in a new directory.
ChatGPT will render this UI when the associated MCP tool returns it.
This file will contain the web component that will be rendered in the ChatGPT interface.
Add the following content:
```html
Todo list
Todo list
```
### Use MCP Apps in your web component
For new UI, use the MCP Apps host bridge: JSON-RPC over `postMessage`
with `ui/*` notifications and methods such as `tools/call`.
After the shared MCP Apps flow works, add optional ChatGPT extensions through
`window.openai` only when you need capabilities the standard does not cover.
For details, see [Add UI to your MCP
server](https://developers.openai.com/plugins/build/chatgpt-ui#layer-on-chatgpt-extensions).
## Build an MCP server
Install the official Python or Node MCP SDK to create a server and expose a `/mcp` endpoint.
In this quickstart, we'll use the [Node SDK](https://github.com/modelcontextprotocol/typescript-sdk).
If you're using Python, refer to our [examples repository on GitHub](https://github.com/openai/openai-apps-sdk-examples) to see an example MCP server with the Python SDK.
Install the Node SDK, MCP Apps helpers, and the `zod` package with:
```bash
npm install @modelcontextprotocol/sdk @modelcontextprotocol/ext-apps zod
```
### MCP server with UI resources
Register a resource for your component bundle and the tools the model can call (for example, `add_todo` and `complete_todo`) so ChatGPT can drive the UI.
Create a file named `server.js` and paste the following example that uses the Node SDK:
```js
const todoHtml = readFileSync("public/todo-widget.html", "utf8");
const addTodoInputSchema = {
title: z.string().min(1),
};
const completeTodoInputSchema = {
id: z.string().min(1),
};
const todoOutputSchema = {
tasks: z.array(
z.object({
id: z.string(),
title: z.string(),
completed: z.boolean(),
})
),
};
let todos = [];
let nextId = 1;
const replyWithTodos = (message) => ({
content: message ? [{ type: "text", text: message }] : [],
structuredContent: { tasks: todos },
});
function createTodoServer() {
const server = new McpServer({
name: "todo-plugin-server",
version: "0.1.0",
});
registerAppResource(
server,
"todo-widget",
"ui://widget/todo.html",
{},
async () => ({
contents: [
{
uri: "ui://widget/todo.html",
mimeType: RESOURCE_MIME_TYPE,
text: todoHtml,
},
],
})
);
registerAppTool(
server,
"add_todo",
{
title: "Add todo",
description: "Creates a todo item with the given title.",
inputSchema: addTodoInputSchema,
outputSchema: todoOutputSchema,
_meta: {
ui: { resourceUri: "ui://widget/todo.html" },
},
},
async (args) => {
const title = args?.title?.trim?.() ?? "";
if (!title) return replyWithTodos("Missing title.");
const todo = { id: `todo-${nextId++}`, title, completed: false };
todos = [...todos, todo];
return replyWithTodos(`Added "${todo.title}".`);
}
);
registerAppTool(
server,
"complete_todo",
{
title: "Complete todo",
description: "Marks a todo as done by id.",
inputSchema: completeTodoInputSchema,
outputSchema: todoOutputSchema,
_meta: {
ui: { resourceUri: "ui://widget/todo.html" },
},
},
async (args) => {
const id = args?.id;
if (!id) return replyWithTodos("Missing todo id.");
const todo = todos.find((task) => task.id === id);
if (!todo) {
return replyWithTodos(`Todo ${id} was not found.`);
}
todos = todos.map((task) =>
task.id === id ? { ...task, completed: true } : task
);
return replyWithTodos(`Completed "${todo.title}".`);
}
);
return server;
}
const port = Number(process.env.PORT ?? 8787);
const MCP_PATH = "/mcp";
const httpServer = createServer(async (req, res) => {
if (!req.url) {
res.writeHead(400).end("Missing URL");
return;
}
const url = new URL(req.url, `http://${req.headers.host ?? "localhost"}`);
if (req.method === "OPTIONS" && url.pathname === MCP_PATH) {
res.writeHead(204, {
"Access-Control-Allow-Origin": "*",
"Access-Control-Allow-Methods": "POST, GET, OPTIONS",
"Access-Control-Allow-Headers": "content-type, mcp-session-id",
"Access-Control-Expose-Headers": "Mcp-Session-Id",
});
res.end();
return;
}
if (req.method === "GET" && url.pathname === "/") {
res.writeHead(200, { "content-type": "text/plain" }).end("Todo MCP server");
return;
}
const MCP_METHODS = new Set(["POST", "GET", "DELETE"]);
if (url.pathname === MCP_PATH && req.method && MCP_METHODS.has(req.method)) {
res.setHeader("Access-Control-Allow-Origin", "*");
res.setHeader("Access-Control-Expose-Headers", "Mcp-Session-Id");
const server = createTodoServer();
const transport = new StreamableHTTPServerTransport({
sessionIdGenerator: undefined, // stateless mode
enableJsonResponse: true,
});
res.on("close", () => {
transport.close();
server.close();
});
try {
await server.connect(transport);
await transport.handleRequest(req, res);
} catch (error) {
console.error("Error handling MCP request:", error);
if (!res.headersSent) {
res.writeHead(500).end("Internal server error");
}
}
return;
}
res.writeHead(404).end("Not Found");
});
httpServer.listen(port, () => {
console.log(
`Todo MCP server listening on http://localhost:${port}${MCP_PATH}`
);
});
```
This snippet also responds to `GET /` for health checks, handles CORS preflight for `/mcp`, and returns `404 Not Found` for OAuth discovery routes you are not using yet. That keeps ChatGPT from surfacing 502 errors while you iterate without authentication.
## Run locally
If you're using a web framework like React, build your component into static assets so the HTML template can inline them.
Usually, you can run a build command such as `npm run build` to produce a `dist` directory with your compiled assets.
In this quickstart, since we're using vanilla HTML, no build step is required.
Start the MCP server on `http://localhost:/mcp` from the directory that contains `server.js` (or `server.ts`).
Make sure you have `"type": "module"` in your `package.json` file:
```json
{
"type": "module",
"dependencies": {
"@modelcontextprotocol/sdk": "^1.20.2",
"@modelcontextprotocol/ext-apps": "^1.0.1",
"zod": "^3.25.76"
}
}
```
Then run the server with the following command:
```bash
node server.js
```
The server should print `Todo MCP server listening on http://localhost:8787/mcp` once it is ready.
### Test with MCP Inspector
You can use the [MCP Inspector](https://modelcontextprotocol.io/docs/tools/inspector) to test your server locally.
```bash
npx @modelcontextprotocol/inspector@latest
```
This opens the MCP Inspector interface. Select **Streamable HTTP**, enter
`http://localhost:8787/mcp`, and connect to test your server and inspect its
tool responses.
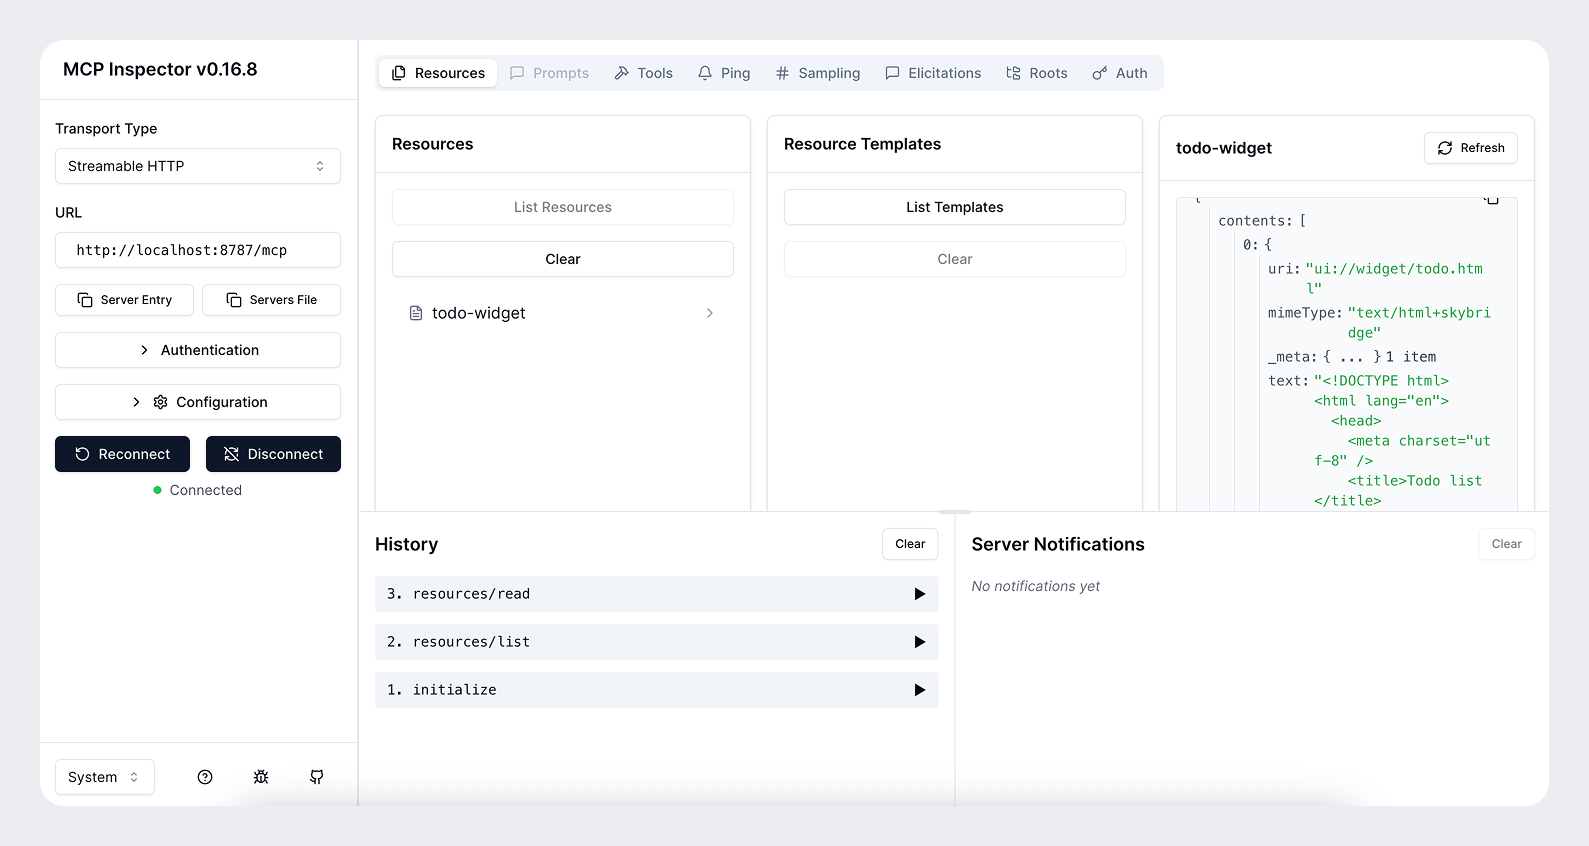
### Expose your server to the public internet
For ChatGPT to access your server during development, you need to expose it to the public internet. You can use a tool such as [ngrok](https://ngrok.com/) to open a tunnel to your local server.
```bash
ngrok http
```
This will give you a public URL like `https://.ngrok.app` that you can use to access your server from ChatGPT.
When you connect your MCP server in developer mode, provide the public URL with
the `/mcp` path (for example, `https://.ngrok.app/mcp`).
## Connect your MCP server in ChatGPT
Once your MCP server and web component work locally, connect the server in
ChatGPT:
1. In [ChatGPT](https://chatgpt.com), open **Settings → Security and login** and turn on **Developer mode**.
2. Go to [ChatGPT Plugins](https://chatgpt.com/plugins) and select the plus button.
3. Paste the HTTPS + `/mcp` URL from your tunnel or deployment (for example, `https://.ngrok.app/mcp`), name the connection, provide a short description, and click **Create**.
4. Open a new chat, select the plugin from the **More** menu (accessible after clicking the **+** button), and prompt the model (for example, “Add a new task to read my book”). ChatGPT will stream tool payloads so you can confirm inputs and outputs.
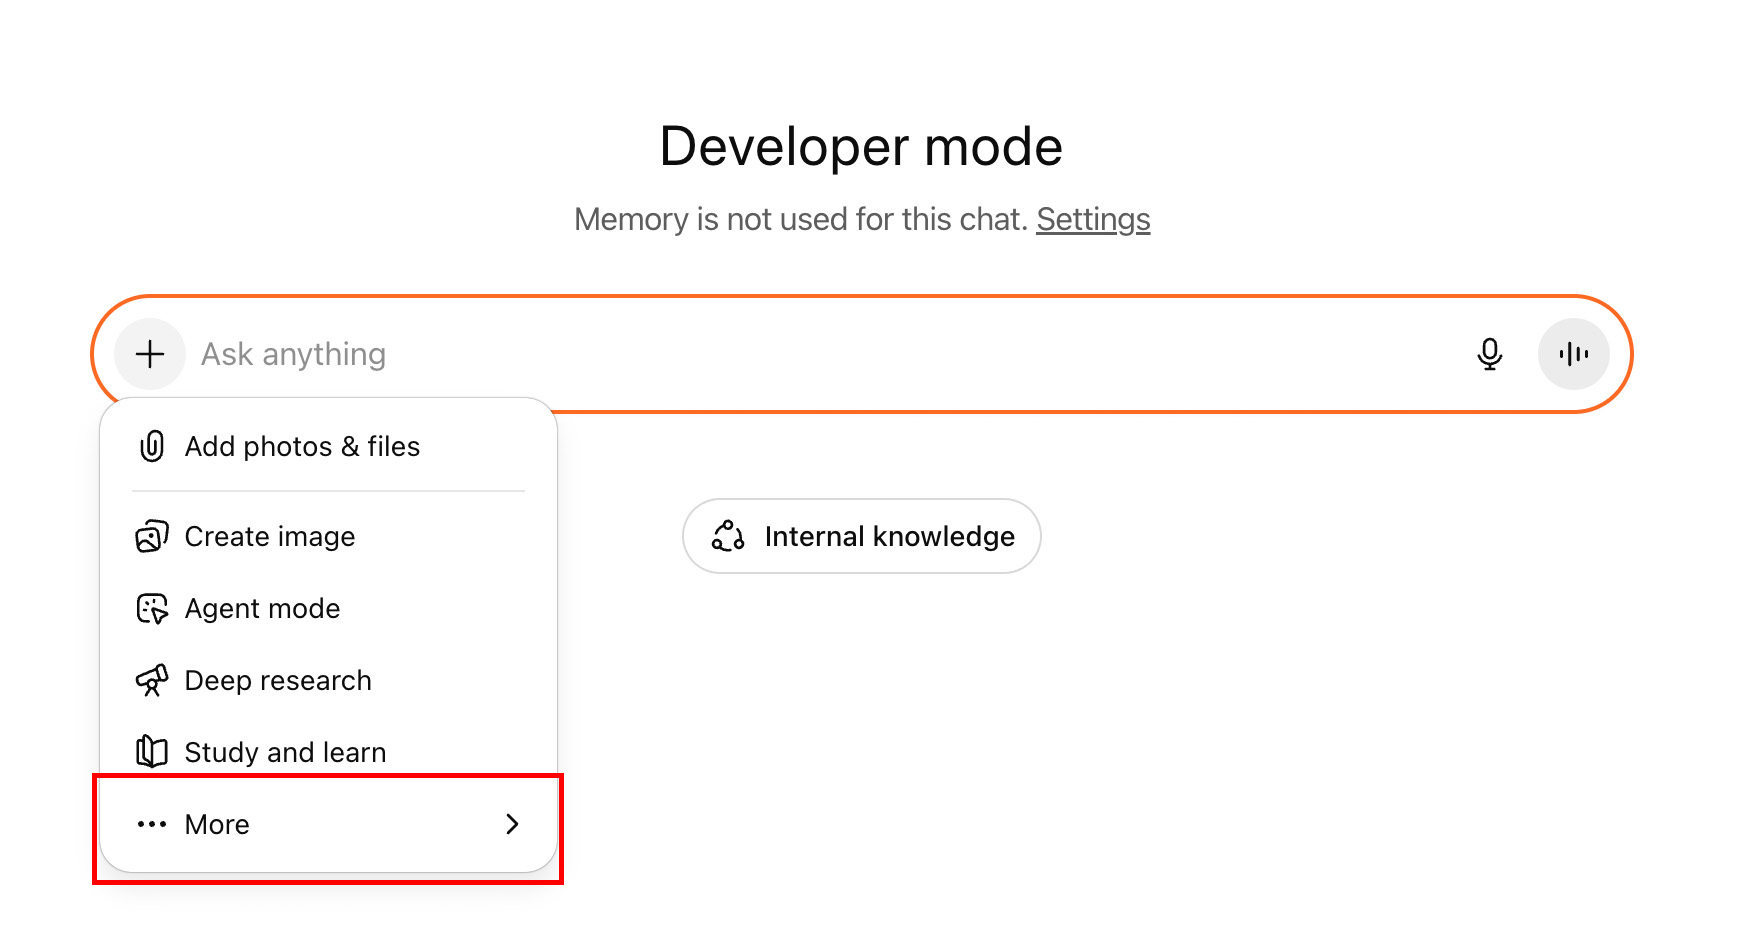
## Next steps
From there, you can iterate on the UI/UX, prompts, tool metadata, and the overall experience.
Refresh the plugin connection after each change to the MCP server (tools,
metadata, and related configuration). You can do this from the detail page at
[chatgpt.com/plugins](https://chatgpt.com/plugins).
When you're preparing for public distribution, review
[Submit plugins](https://developers.openai.com/plugins/deploy/submission), the
[Plugin guidelines](https://developers.openai.com/plugins/app-guidelines), and
[Brainstorm plugin use cases](https://developers.openai.com/plugins/plan/use-case). If you're building a UI, you
can also review the [UI guidelines](https://developers.openai.com/plugins/concepts/ui-guidelines).
Once you understand the basics, you can
[build richer UI](https://developers.openai.com/plugins/build/chatgpt-ui), [authenticate
users](https://developers.openai.com/plugins/build/auth) when needed, and
[manage state](https://developers.openai.com/plugins/build/chatgpt-ui#manage-state).
---
# Package your plugin
After building your [skills](https://developers.openai.com/plugins/build/skills) and, when needed, an
[MCP server](https://developers.openai.com/plugins/build/mcp-server), assemble those parts into the plugin
people will install. Packaging gives the plugin a stable identity and tells
ChatGPT and Codex which skills, MCP server connections, and other resources
belong together.
Every plugin has a `.codex-plugin/plugin.json` manifest. Depending on the
plugin's architecture, its folder can also include:
- A `skills/` directory containing the workflows you built.
- An `.app.json` file that references a registered MCP server connection. The
filename is a compatibility identifier; the underlying primitive is the MCP
server.
- An `.mcp.json` file for an MCP server distributed with the plugin.
- Optional assets and lifecycle hooks.
UI and authentication remain part of the MCP server integration you built in
the preceding steps; the plugin manifest connects that integration to the rest
of the package.
Public plugins are published once to the universal plugin directory shared by
ChatGPT and Codex. Local and repo marketplaces are separate authoring, testing,
and team-distribution sources, and their availability can vary by surface.
Use `@plugin-creator` for the fastest path, or create the manifest and folder
structure manually. Both approaches produce the same plugin structure.
For complete public examples, inspect
[Figma](https://github.com/openai/plugins/tree/main/plugins/figma),
[Notion](https://github.com/openai/plugins/tree/main/plugins/notion), and
[Build web apps](https://github.com/openai/plugins/tree/main/plugins/build-web-apps).
## Package with `@plugin-creator`
For the fastest setup, use the built-in `@plugin-creator` skill.
It scaffolds the required `.codex-plugin/plugin.json` manifest and can also
generate a local marketplace entry for testing. If you already have a plugin
folder, you can still use `@plugin-creator` to wire it into a local
marketplace.
### Create and test a plugin locally with an MCP server
You can also use the plugin-creator skill to test a plugin that includes an MCP
server. The plugin still needs a local folder and manifest, and you first
register the MCP server connection in ChatGPT developer mode.
First, enable developer mode in ChatGPT:
1. Open [ChatGPT](https://chatgpt.com).
2. Open **Settings**.
3. Select **Security and login**.
4. Turn on **Developer mode**.
Then register the MCP server in developer mode:
1. Go to [ChatGPT Plugins](https://chatgpt.com/plugins).
2. Select the plus button.
3. Complete the modal with your MCP server URL and connection details.
4. After ChatGPT creates the connection, copy its technical ID from the browser
URL. It starts with `plugin_asdk_app`.
Give that `plugin_asdk_app...` ID to `@plugin-creator` in Work mode in ChatGPT
or `$plugin-creator` in Codex. For example, in Work mode:
Plugin Creator prompt
`{`@plugin-creator create a plugin for ChatGPT and Codex using my MCP server.
Use plugin_asdk_app_6a4c0062f3b88191855c0a80eac5d53d and name it Acme Support.
Include a personal marketplace entry so I can test it locally.`}`
The plugin-creator skill will create the plugin folder, create the required
`.codex-plugin/plugin.json`, and add MCP server wiring for the plugin. If you ask
it to create a personal marketplace entry, the plugin appears under your local
source in the Plugins Directory for testing.
After the plugin-creator skill creates the plugin:
1. Review `.app.json` and confirm the registered MCP server mapping points at
the correct `plugin_asdk_app...` ID.
2. Review `.codex-plugin/plugin.json` and make sure its compatibility `apps`
field points to `./.app.json`.
3. Add any bundled skills under `skills/` if the plugin should include
repeatable workflows alongside the MCP server.
4. If the skill created a personal marketplace entry, refresh ChatGPT
and install the plugin from your local source in the Plugins Directory. Then
test it in a new chat.
For the manifest shape and file layout, see [Plugin structure](#plugin-structure)
and [Path rules](#path-rules).
### Build your own curated plugin list
A marketplace is a JSON catalog of plugins. `@plugin-creator` can generate one
for a single plugin, and you can keep adding entries to that same marketplace
to build your own curated list for a repo, team, or personal workflow.
In Work mode or Codex in the ChatGPT desktop app, each marketplace appears as a
selectable source in the Plugins Directory. Use
`$REPO_ROOT/.agents/plugins/marketplace.json` for a repo-scoped list or
`~/.agents/plugins/marketplace.json` for a personal list. Add one entry per
plugin under `plugins[]`, point each `source.path` at the plugin folder with a
`./`-prefixed path relative to the marketplace root, and set
`interface.displayName` to the label you want the plugin to show in the marketplace
picker. Then restart the ChatGPT desktop app. After that, open the Plugins
Directory, choose your marketplace, and browse or install the plugins in that
curated list.
You don't need a separate marketplace per plugin. One marketplace can expose a
single plugin while you are testing, then grow into a larger curated catalog as
you add more plugins.
### Add a marketplace from the CLI
Use `codex plugin marketplace add` to add and track a marketplace source instead
of editing `config.toml` by hand. These commands support plugin authoring and
catalog setup. Use the ChatGPT desktop app to install and test a local plugin.
```bash
codex plugin marketplace add owner/repo
codex plugin marketplace add owner/repo --ref main
codex plugin marketplace add https://github.com/example/plugins.git --sparse .agents/plugins
codex plugin marketplace add ./local-marketplace-root
```
Marketplace sources can be GitHub shorthand (`owner/repo` or
`owner/repo@ref`), HTTP or HTTPS Git URLs, SSH Git URLs, or local marketplace root
directories. Use `--ref` to pin a Git ref, and repeat `--sparse PATH` to use a
sparse checkout for Git-backed marketplace repos. `--sparse` is valid only for
Git marketplace sources.
To inspect, refresh, or remove configured marketplaces:
```bash
codex plugin marketplace list
codex plugin marketplace upgrade
codex plugin marketplace upgrade marketplace-name
codex plugin marketplace remove marketplace-name
```
`codex plugin marketplace list` prints each marketplace Codex is considering
and the root path it resolves from, including local default marketplaces and
configured marketplace snapshots.
### Create a plugin manually
Start with a minimal plugin that packages one skill.
1. Create a plugin folder with a manifest at `.codex-plugin/plugin.json`.
```bash
mkdir -p my-first-plugin/.codex-plugin
```
`my-first-plugin/.codex-plugin/plugin.json`
```json
{
"name": "my-first-plugin",
"version": "1.0.0",
"description": "Reusable greeting workflow",
"skills": "./skills/"
}
```
Use a stable plugin `name` in kebab-case. Plugin hosts use it as the plugin
identifier and component namespace.
2. Add a skill under `skills//SKILL.md`.
```bash
mkdir -p my-first-plugin/skills/hello
```
`my-first-plugin/skills/hello/SKILL.md`
```md
---
name: hello
description: Greet the user with a friendly message.
---
Greet the user warmly and ask how you can help.
```
3. Add the plugin to a marketplace. Use `@plugin-creator` to generate one, or
follow [Build your own curated plugin list](#build-your-own-curated-plugin-list)
to wire the plugin into a local marketplace manually.
From there, you can add MCP server configuration or marketplace metadata
as needed.
### Install a local plugin manually
Use a repo marketplace or a personal marketplace, depending on who should be
able to access the plugin or curated list.
Add a marketplace file at `$REPO_ROOT/.agents/plugins/marketplace.json`
and store your plugins under `$REPO_ROOT/plugins/`.
**Repo marketplace example**
Step 1: Copy the plugin folder into `$REPO_ROOT/plugins/my-plugin`.
```bash
mkdir -p ./plugins
cp -R /absolute/path/to/my-plugin ./plugins/my-plugin
```
Step 2: Add or update `$REPO_ROOT/.agents/plugins/marketplace.json` so
that `source.path` points to that plugin directory with a `./`-prefixed
relative path:
```json
{
"name": "local-repo",
"plugins": [
{
"name": "my-plugin",
"source": {
"source": "local",
"path": "./plugins/my-plugin"
},
"policy": {
"installation": "AVAILABLE",
"authentication": "ON_INSTALL"
},
"category": "Productivity"
}
]
}
```
Step 3: Restart the ChatGPT desktop app and verify that the plugin appears.
Add a marketplace file at `~/.agents/plugins/marketplace.json` and store
your plugins under `~/.codex/plugins/`.
**Personal marketplace example**
Step 1: Copy the plugin folder into `~/.codex/plugins/my-plugin`.
```bash
mkdir -p ~/.codex/plugins
cp -R /absolute/path/to/my-plugin ~/.codex/plugins/my-plugin
```
Step 2: Add or update `~/.agents/plugins/marketplace.json` so that the
plugin entry's `source.path` points to that directory.
Step 3: Restart the ChatGPT desktop app and verify that the plugin appears.
The marketplace file points to the plugin location, so those directories are
examples rather than fixed requirements. Codex resolves `source.path` relative
to the marketplace root, not relative to the `.agents/plugins/` folder. See
[Marketplace metadata](#marketplace-metadata) for the file format.
After you change the plugin, update the plugin directory that your marketplace
entry points to and restart the ChatGPT desktop app so the local install picks
up the new files.
### Publish a local plugin to your workspace
You must be a workspace admin to publish a plugin to your workspace.
After you create and add a plugin, you can publish it to your ChatGPT workspace:
1. Go to [ChatGPT Plugins](https://chatgpt.com/plugins).
2. Select **Personal**.
3. Find the plugin you want to publish and open its three-dot menu.
4. Select **Publish**.
5. Specify the workspace roles that should have access to the plugin.
Publishing a local plugin to your workspace doesn't publish it to the universal
public Plugins Directory shared by ChatGPT and Codex. Workspace-published
plugins stay within your workspace and organization boundary; accounts that
aren't signed in to that workspace can't access them. Use a marketplace for
repo or CLI distribution, and publish to your workspace when you want to make a
plugin available to selected roles.
Workspace admins can disable workspace plugin publishing through cloud-managed
requirements by adding `features.plugin_sharing = false` to `requirements.toml`:
```toml
features.plugin_sharing = false
```
### Marketplace metadata
If you maintain a repo marketplace, define it in
`$REPO_ROOT/.agents/plugins/marketplace.json`. For a personal marketplace, use
`~/.agents/plugins/marketplace.json`. A marketplace file controls plugin
ordering and install policies in the ChatGPT desktop app. It can represent one
plugin while you are testing or a curated list of plugins that you want ChatGPT
to show together under one marketplace name. Before you add a plugin to a
marketplace, make sure its `version`, publisher metadata, and install-surface
copy are ready for other developers to see.
```json
{
"name": "local-example-plugins",
"interface": {
"displayName": "Local Example Plugins"
},
"plugins": [
{
"name": "my-plugin",
"source": {
"source": "local",
"path": "./plugins/my-plugin"
},
"policy": {
"installation": "AVAILABLE",
"authentication": "ON_INSTALL"
},
"category": "Productivity"
},
{
"name": "research-helper",
"source": {
"source": "local",
"path": "./plugins/research-helper"
},
"policy": {
"installation": "AVAILABLE",
"authentication": "ON_INSTALL"
},
"category": "Productivity"
}
]
}
```
- Use top-level `name` to identify the marketplace.
- Use `interface.displayName` for the marketplace title shown in the ChatGPT
desktop app.
- Add one object per plugin under `plugins` to build a curated list that ChatGPT
shows under that marketplace title.
- Point each plugin entry's `source.path` at the plugin directory you want the
local host to load. For repo installs, that often lives under `./plugins/`.
For personal installs, a common pattern is
`./.codex/plugins/`.
- Keep `source.path` relative to the marketplace root, start it with `./`, and
keep it inside that root.
- For local entries, `source` can also be a plain string path such as
`"./plugins/my-plugin"`.
- Always include `policy.installation`, `policy.authentication`, and
`category` on each plugin entry.
- Use `policy.installation` values such as `AVAILABLE`,
`INSTALLED_BY_DEFAULT`, or `NOT_AVAILABLE`.
- Use `policy.authentication` to decide whether auth happens on install or
first use.
The marketplace controls where the local host loads the plugin from. A local
`source.path` can point somewhere else if your plugin lives outside those
example directories. A marketplace file can live in the repo where you are
developing the plugin or in a separate marketplace repo, and one marketplace
file can point to one plugin or many.
Marketplace entries can also point at Git-backed plugin sources. Use
`"source": "url"` when the plugin lives at the repository root, or
`"source": "git-subdir"` when the plugin lives in a subdirectory:
```json
{
"name": "remote-helper",
"source": {
"source": "git-subdir",
"url": "https://github.com/example/codex-plugins.git",
"path": "./plugins/remote-helper",
"ref": "main"
},
"policy": {
"installation": "AVAILABLE",
"authentication": "ON_INSTALL"
},
"category": "Productivity"
}
```
Git-backed entries may use `ref` or `sha` selectors. If Codex can't resolve a
marketplace entry's source, it skips that plugin entry instead of failing the
whole marketplace.
Marketplace entries can also install a plugin from a JavaScript package registry:
```json
{
"name": "npm-helper",
"source": {
"source": "npm",
"package": "@example/codex-plugin",
"version": "^1.2.0",
"registry": "https://registry.npmjs.org"
},
"policy": {
"installation": "AVAILABLE",
"authentication": "ON_INSTALL"
},
"category": "Productivity"
}
```
`package` is required and can include a registry scope. `version` is optional
and accepts package versions, distribution tags, and version ranges, but not
path or URL selectors.
`registry` is optional and must be an HTTPS URL without embedded credentials,
a query, or a fragment. Codex downloads the package without running lifecycle
scripts. The `npm` CLI must be installed, and registry authentication comes
from its configuration.
### How local marketplaces work
A plugin marketplace is a JSON catalog of plugins. These local sources are
separate from the universal public directory and support authoring, testing,
and private distribution.
The ChatGPT desktop app can read marketplace files from:
- a repo marketplace at `$REPO_ROOT/.agents/plugins/marketplace.json`
- a legacy-compatible marketplace at `$REPO_ROOT/.claude-plugin/marketplace.json`
- a personal marketplace at `~/.agents/plugins/marketplace.json`
You can install any plugin exposed through a marketplace. ChatGPT installs
plugins into
`~/.codex/plugins/cache/$MARKETPLACE_NAME/$PLUGIN_NAME/$VERSION/`. For local
plugins, `$VERSION` is `local`, and ChatGPT loads the installed copy from that
cache path rather than directly from the marketplace entry.
You can enable or disable each plugin individually. ChatGPT stores each
plugin's on or off state in `~/.codex/config.toml`.
## Package and distribute plugins
### Plugin structure
Every plugin has a manifest at `.codex-plugin/plugin.json`. It can also include
a `skills/` directory, a `hooks/` directory for lifecycle hooks, an `.app.json`
file that maps registered MCP server connections, an `.mcp.json` file that
configures bundled MCP servers, and assets used to present the plugin across
supported surfaces.
Only `plugin.json` belongs in `.codex-plugin/`. Keep `skills/`, `hooks/`,
`assets/`, `.mcp.json`, and `.app.json` at the plugin root.
Published plugins typically use a richer manifest than the minimal example that
appears in quick-start scaffolds. The manifest has three jobs:
- Identify the plugin.
- Point to bundled components such as skills, MCP servers, or hooks.
- Provide install-surface metadata such as descriptions, icons, and legal
links.
Here's a complete manifest example:
```json
{
"name": "my-plugin",
"version": "0.1.0",
"description": "Bundle reusable skills and MCP servers.",
"author": {
"name": "Your team",
"email": "team@example.com",
"url": "https://example.com"
},
"homepage": "https://example.com/plugins/my-plugin",
"repository": "https://github.com/example/my-plugin",
"license": "MIT",
"keywords": ["research", "crm"],
"skills": "./skills/",
"mcpServers": "./.mcp.json",
"apps": "./.app.json",
"hooks": "./hooks/hooks.json",
"interface": {
"displayName": "My Plugin",
"shortDescription": "Reusable skills and MCP servers",
"longDescription": "Distribute skills and MCP servers together.",
"developerName": "Your team",
"category": "Productivity",
"capabilities": ["Read", "Write"],
"websiteURL": "https://example.com",
"privacyPolicyURL": "https://example.com/privacy",
"termsOfServiceURL": "https://example.com/terms",
"defaultPrompt": [
"Use My Plugin to summarize new CRM notes.",
"Use My Plugin to triage new customer follow-ups."
],
"brandColor": "#10A37F",
"composerIcon": "./assets/icon.png",
"logo": "./assets/logo.png",
"screenshots": ["./assets/screenshot-1.png"]
}
}
```
`.codex-plugin/plugin.json` is the required entry point. The other manifest
fields are optional, but published plugins commonly use them.
### Manifest fields
Use the top-level fields to define package metadata and point to bundled
components:
- `name`, `version`, and `description` identify the plugin.
- `author`, `homepage`, `repository`, `license`, and `keywords` provide
publisher and discovery metadata.
- `skills`, `mcpServers`, and `hooks` point to bundled components relative to
the plugin root. The compatibility `apps` field points to registered MCP
server mappings.
- `interface` controls how install surfaces present the plugin.
Use the `interface` object for install-surface metadata:
- `displayName`, `shortDescription`, and `longDescription` control the title
and descriptive copy.
- `developerName`, `category`, and `capabilities` add publisher and capability
metadata.
- `websiteURL`, `privacyPolicyURL`, and `termsOfServiceURL` provide external
links.
- `defaultPrompt`, `brandColor`, `composerIcon`, `logo`, and `screenshots`
control starter prompts and visual presentation.
### Path rules
- Keep manifest paths relative to the plugin root and start them with `./`.
- Store visual assets such as `composerIcon`, `logo`, and `screenshots` under
`./assets/` when possible.
- Use `skills` for bundled skill folders, `mcpServers` for `.mcp.json`, and
`hooks` for lifecycle hooks. Use the compatibility `apps` field only for
registered MCP server mappings in `.app.json`.
- Enabled plugins can include lifecycle hooks alongside skills and MCP servers.
- If your plugin stores hooks at `./hooks/hooks.json`, you don't need a
`hooks` entry in `.codex-plugin/plugin.json`; Codex checks that default file
automatically.
### Bundled MCP servers and lifecycle hooks
`mcpServers` can point to an `.mcp.json` file that contains either a direct
server map or a wrapped `mcp_servers` object.
Direct server map:
```json
{
"docs": {
"command": "docs-mcp",
"args": ["--stdio"]
}
}
```
Wrapped server map:
```json
{
"mcp_servers": {
"docs": {
"command": "docs-mcp",
"args": ["--stdio"]
}
}
}
```
After installation, users can enable or disable a bundled MCP server and tune
tool approval policy from their Codex config without editing the plugin. Use
`plugins..mcp_servers.` for plugin-scoped MCP server policy:
```toml
[plugins."my-plugin".mcp_servers.docs]
enabled = true
default_tools_approval_mode = "prompt"
enabled_tools = ["search"]
[plugins."my-plugin".mcp_servers.docs.tools.search]
approval_mode = "approve"
```
When your plugin is enabled, Codex can load lifecycle hooks from your plugin
alongside user, project, and managed hooks.
Installing or enabling a plugin doesn't automatically trust its hooks.
Plugin-bundled hooks are non-managed hooks, so Codex skips them until the user
reviews and trusts the current hook definition.
The default plugin hook file is `hooks/hooks.json`:
```json
{
"hooks": {
"SessionStart": [
{
"hooks": [
{
"type": "command",
"command": "python3 ${PLUGIN_ROOT}/hooks/session_start.py",
"statusMessage": "Loading plugin context"
}
]
}
]
}
}
```
If you define `hooks` in `.codex-plugin/plugin.json`, Codex uses that manifest
entry instead of the default `hooks/hooks.json`. The manifest field can be a
single path, an array of paths, an inline hooks object, or an array of inline
hooks objects.
```json
{
"name": "repo-policy",
"hooks": ["./hooks/session.json", "./hooks/tools.json"]
}
```
Hook paths follow the same manifest path rules as `skills`, `apps`, and
`mcpServers`: start with `./`, resolve relative to the plugin root, and stay
inside the plugin root.
Plugin hook commands receive the Codex-specific environment variables
`PLUGIN_ROOT` and `PLUGIN_DATA`. `PLUGIN_ROOT` points to the installed plugin
root, and `PLUGIN_DATA` points to the plugin's writable data directory. Codex
also sets `CLAUDE_PLUGIN_ROOT` and `CLAUDE_PLUGIN_DATA` for compatibility with
existing plugin hooks.
Plugin hooks use the same event schema as regular hooks. See
[Hooks on Learn](https://learn.chatgpt.com/docs/hooks) for supported events,
inputs, outputs, trust review, and current limitations.
## Publish official public plugins
To publish a plugin for public use, submit it through the plugin submission
portal. After publication, the plugin is listed in the universal directory
shared by ChatGPT and Codex. See
[Submit plugins](https://developers.openai.com/plugins/deploy/submission) for the full review and publishing
process.
---
# MCP server
The [Model Context Protocol](https://modelcontextprotocol.io/) (MCP) is an open
specification for connecting AI clients to external tools and data. A plugin
can include an MCP server when it needs to read live information, take actions,
or integrate with another service.
The MCP server is optional. A plugin that only provides instructions and
resources can consist of [skills](https://developers.openai.com/plugins/concepts/skills) alone.
## What an MCP server provides
An MCP server can expose:
- **Tools:** Functions the model can call with structured inputs.
- **Resources:** Data or content the client can read.
- **Prompts:** Reusable prompt templates.
- **Instructions:** Server-wide guidance for using its capabilities.
Plugins primarily use tools. Each tool has a name, description, input schema,
and optional output schema. These fields help the model decide when to call the
tool and how to use its result.
## How tool calls work
When a user asks for something that matches a tool:
1. The client discovers the tools exposed by the MCP server.
2. The model selects a tool and supplies arguments that match its input schema.
3. The server validates the request, performs the operation, and returns a
result.
4. The model uses the result to continue the conversation.
Tool results should work without custom UI. Return concise text or structured
content that gives the model enough information to answer the user. An MCP
server can also return an optional UI resource for clients that support
[MCP Apps](https://developers.openai.com/plugins/build/chatgpt-ui#start-with-mcp-apps).
## Transport and authorization
Deploy production MCP servers at stable HTTPS endpoints using the streamable
HTTP transport. If tools access private data or perform actions for a user,
protect the server with the authorization flow defined by the MCP
specification.
For protocol details, see the
[MCP specification](https://modelcontextprotocol.io/specification). The
[Python](https://github.com/modelcontextprotocol/python-sdk) and
[TypeScript](https://github.com/modelcontextprotocol/typescript-sdk) software
development kits provide server implementations and helpers.
## Next step
After defining the tools your plugin needs,
[build the MCP server](https://developers.openai.com/plugins/build/mcp-server).
---
# Plugin architecture
Plugins are the packages people discover, install, share, and publish in
ChatGPT and Codex. A plugin can contain:
- **Skills** that give the model instructions and resources for repeatable
workflows.
- **An MCP server** that exposes tools and connects to external systems.
- **Both skills and an MCP server** when the model needs workflow guidance and
server-backed capabilities.
ChatGPT and Codex share one universal plugin directory. When you publish a
public plugin, people can discover the same listing from supported surfaces in
either product. Individual capabilities can still be surface-specific; for
example, a plugin can include hooks that run only in Codex.
An MCP server can return structured data and model-readable text without
custom UI. When a task benefits from visual interaction, the server can also
return a UI resource.
```text
Plugin
├── Skills
└── MCP server (optional)
├── Tools and structured results
└── UI resources (optional)
```
Start with the smallest shape that supports your use cases. You can add an MCP
server or UI later without changing the plugin's purpose.
## Skills
A skill is a folder containing a `SKILL.md` file and, when needed, supporting
scripts, references, templates, or assets. Skills describe when to use a
workflow, which steps to follow, and what a successful result looks like.
Use skills when instructions and the tools already available to the model are
enough to complete the task. A plugin can package one skill or group related
skills into one installable experience.
For example, a meeting follow-up plugin might include separate skills for
drafting a recap, identifying action items, and preparing a customer email.
## MCP servers
Build an MCP server when your plugin must connect to a service, expose a
controlled set of tools, authenticate users, or run behavior on infrastructure
you operate. The server defines:
- The tools the model can call.
- Input and output schemas for those tools.
- Authentication and authorization requirements.
- Structured results and model-readable content.
- Optional UI resources.
An MCP server gives you control over which capabilities you expose. It also
lets you update server behavior independently and observe requests made to
your infrastructure.
## Optional UI
Custom UI is not required for an MCP server. Use model responses or structured
results when they communicate the outcome.
Add UI when people need to inspect, compare, edit, confirm, or navigate
structured information. For example, a product comparison, editable schedule,
or map can benefit from a component, while a background status lookup often
does not.
ChatGPT supports the open [MCP Apps UI
standard](https://developers.openai.com/plugins/build/chatgpt-ui#start-with-mcp-apps). Start with the shared
standard, then add optional ChatGPT extensions only when the UI needs
capabilities the standard does not cover. Keep tools useful without the
component so the model can complete headless workflows and decide when UI adds
value.
## Choose a plugin shape
| Shape | Choose it when |
| --------------------- | ------------------------------------------------------------------------- |
| Skills only | Instructions and existing tools are enough to complete the workflow. |
| MCP server only | The plugin needs MCP tools but does not need extra workflow instructions. |
| Skills and MCP server | Skills should guide the model through workflows that use your MCP tools. |
| MCP server with UI | Visual interaction materially improves part of an MCP-backed workflow. |
After choosing a shape, [build the skills](https://developers.openai.com/plugins/build/skills) or
[build the MCP server](https://developers.openai.com/plugins/build/mcp-server). Add
[UI to the MCP server](https://developers.openai.com/plugins/build/chatgpt-ui) only when a use case
requires it, then [package the plugin](https://developers.openai.com/plugins/build/plugins).
---
# Skills
Skills are folders of instructions and resources that teach ChatGPT and Codex
how to complete repeatable workflows. In an MCP-backed plugin, skills
complement the server by teaching the model how to combine its tools for
recognizable user goals.
Each skill has a `SKILL.md` file with:
- A name.
- A description that tells the model when to consider the skill.
- Instructions for completing the workflow.
- Optional references, scripts, templates, and other assets.
## How skills complement an MCP server
An MCP server provides live information and controlled actions. A skill
provides the workflow around those tools: when to call them, in what order, how
to handle incomplete results, and what the final output should contain.
For example, a skill can define how to:
- Retrieve account activity and turn it into a customer briefing.
- Review project data, identify risks, and draft a status update.
- Combine search and fetch tools into a sourced research workflow.
- Apply an organization's writing or review standards to MCP results.
Keep the boundary clear: the [MCP server](https://developers.openai.com/plugins/concepts/mcp-server)
provides data, authentication, authorization, and actions; the skill provides
reusable instructions, examples, templates, and other resources. A skill can
also work without an MCP server when the workflow needs only packaged
instructions and resources.
## How skills activate
The model first sees skill metadata, including the name and description. It
loads the complete instructions when the user's request matches the skill or
the user invokes it directly.
Write descriptions around the user goal and the conditions that should trigger
the workflow. Keep detailed steps and output requirements in the instruction
body.
## Skills in a plugin
Skills are the workflow layer of a plugin. They can:
- Guide the model through tools exposed by the plugin's MCP server.
- Package organization-specific procedures with reusable templates and
references.
- Work on their own when no live data or controlled action is required.
Skills and MCP tools should have clear, complementary roles. A skill explains
how to complete the workflow; an MCP server provides live information and
enforces controlled actions.
Continue with [Build skills](https://developers.openai.com/plugins/build/skills) to create, test, and
package a skill.
---
# UI guidelines
## Overview
Optional plugin UI can extend what users can do without breaking the flow of
conversation. Use cards, carousels, fullscreen views, and other display modes
only when visual interaction improves the workflow.
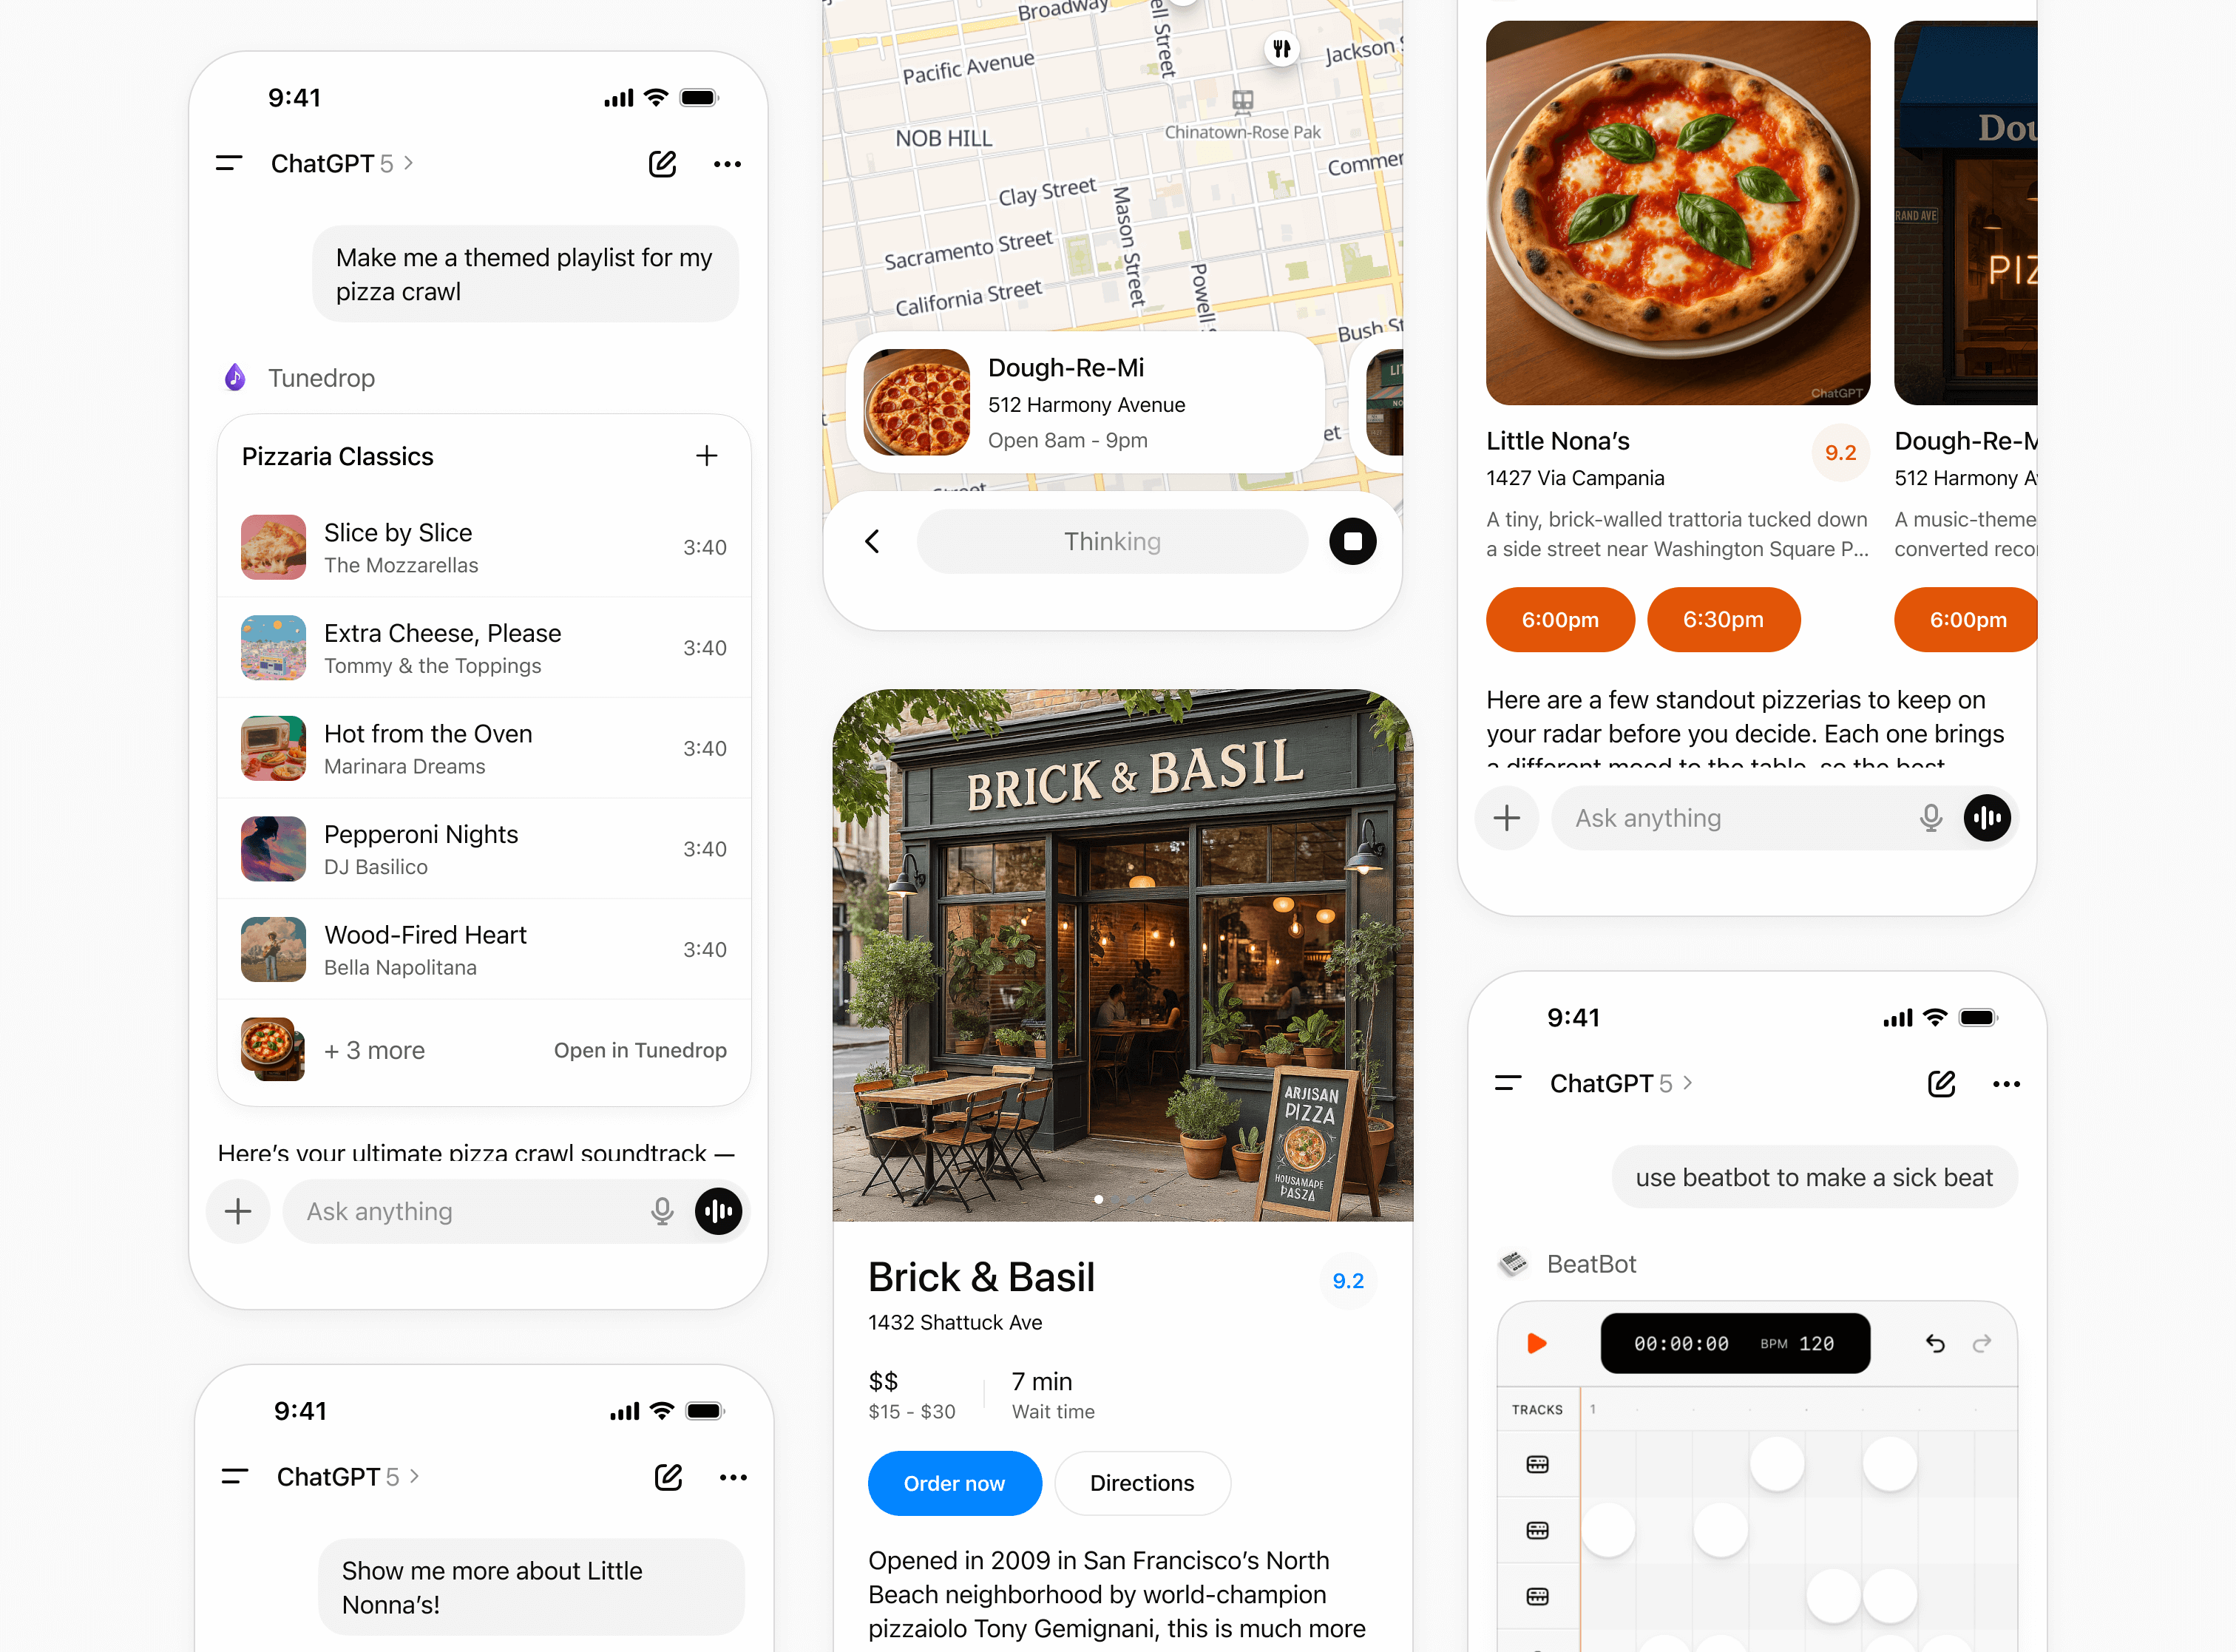
## Design system
To design high-quality UI that feels native to ChatGPT, you can use the
[`@openai/apps-sdk-ui`](https://openai.github.io/apps-sdk-ui/) component
library.
It provides styling foundations with Tailwind, CSS variable design tokens, and a library of well-crafted, accessible components.
The component library is optional. It provides a faster way to build
components that match the ChatGPT design system.
Before diving into code, start designing with our [Figma component
library](https://www.figma.com/community/file/1625636989296445101)
## Display modes
Display modes are the surfaces developers use to create experiences for apps in ChatGPT. They allow partners to show content and actions that feel native to conversation. Each mode is designed for a specific type of interaction, from quick confirmations to immersive workflows.
Using these consistently helps experiences stay basic and predictable.
### Inline
The inline display mode appears directly in the flow of the conversation. Inline surfaces currently always appear before the generated model response. Every app initially appears inline.
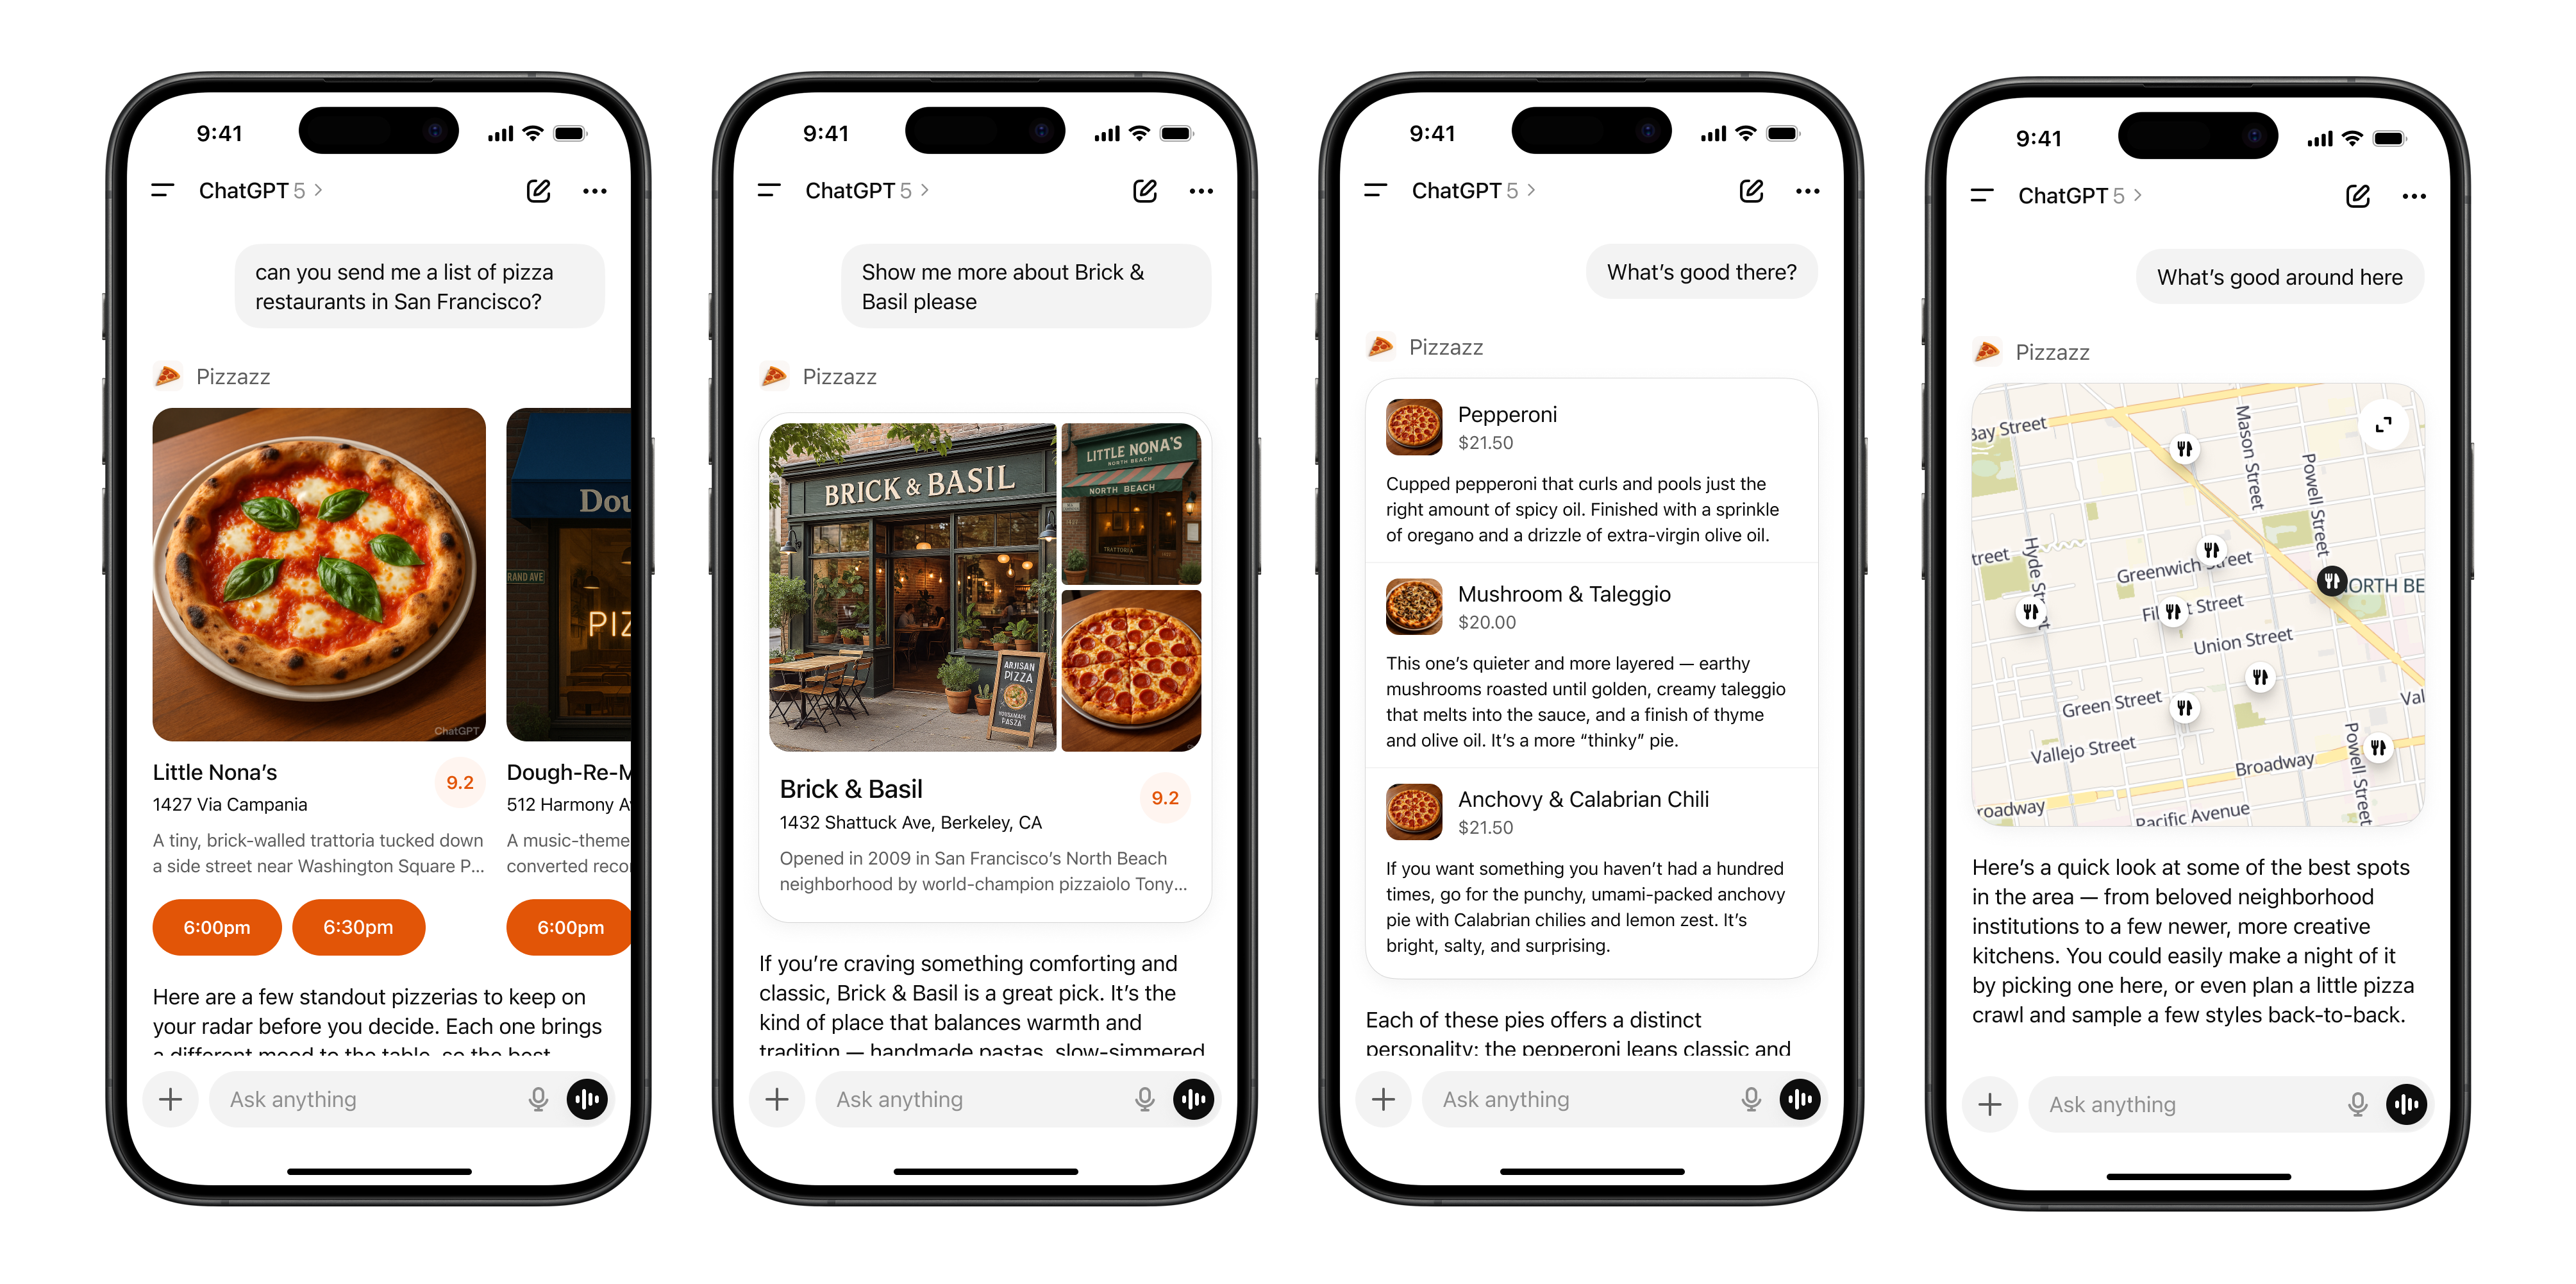
**Layout**
- **Icon & tool call**: A label with the app name and icon.
- **Inline display**: A lightweight display with app content embedded above the model response.
- **Follow-up**: A short, model-generated response shown after the widget to suggest edits, next steps, or related actions. Avoid content that is redundant with the card.
#### Inline card
Lightweight, single-purpose widgets embedded directly in conversation. They provide quick confirmations, basic actions, or visual aids.
**When to use**
- A single action or decision (for example, confirm a booking).
- Small amounts of structured data (for example, a map, order summary, or quick status).
- A fully self-contained widget or tool (for example, an audio player or a score card).
**Layout**
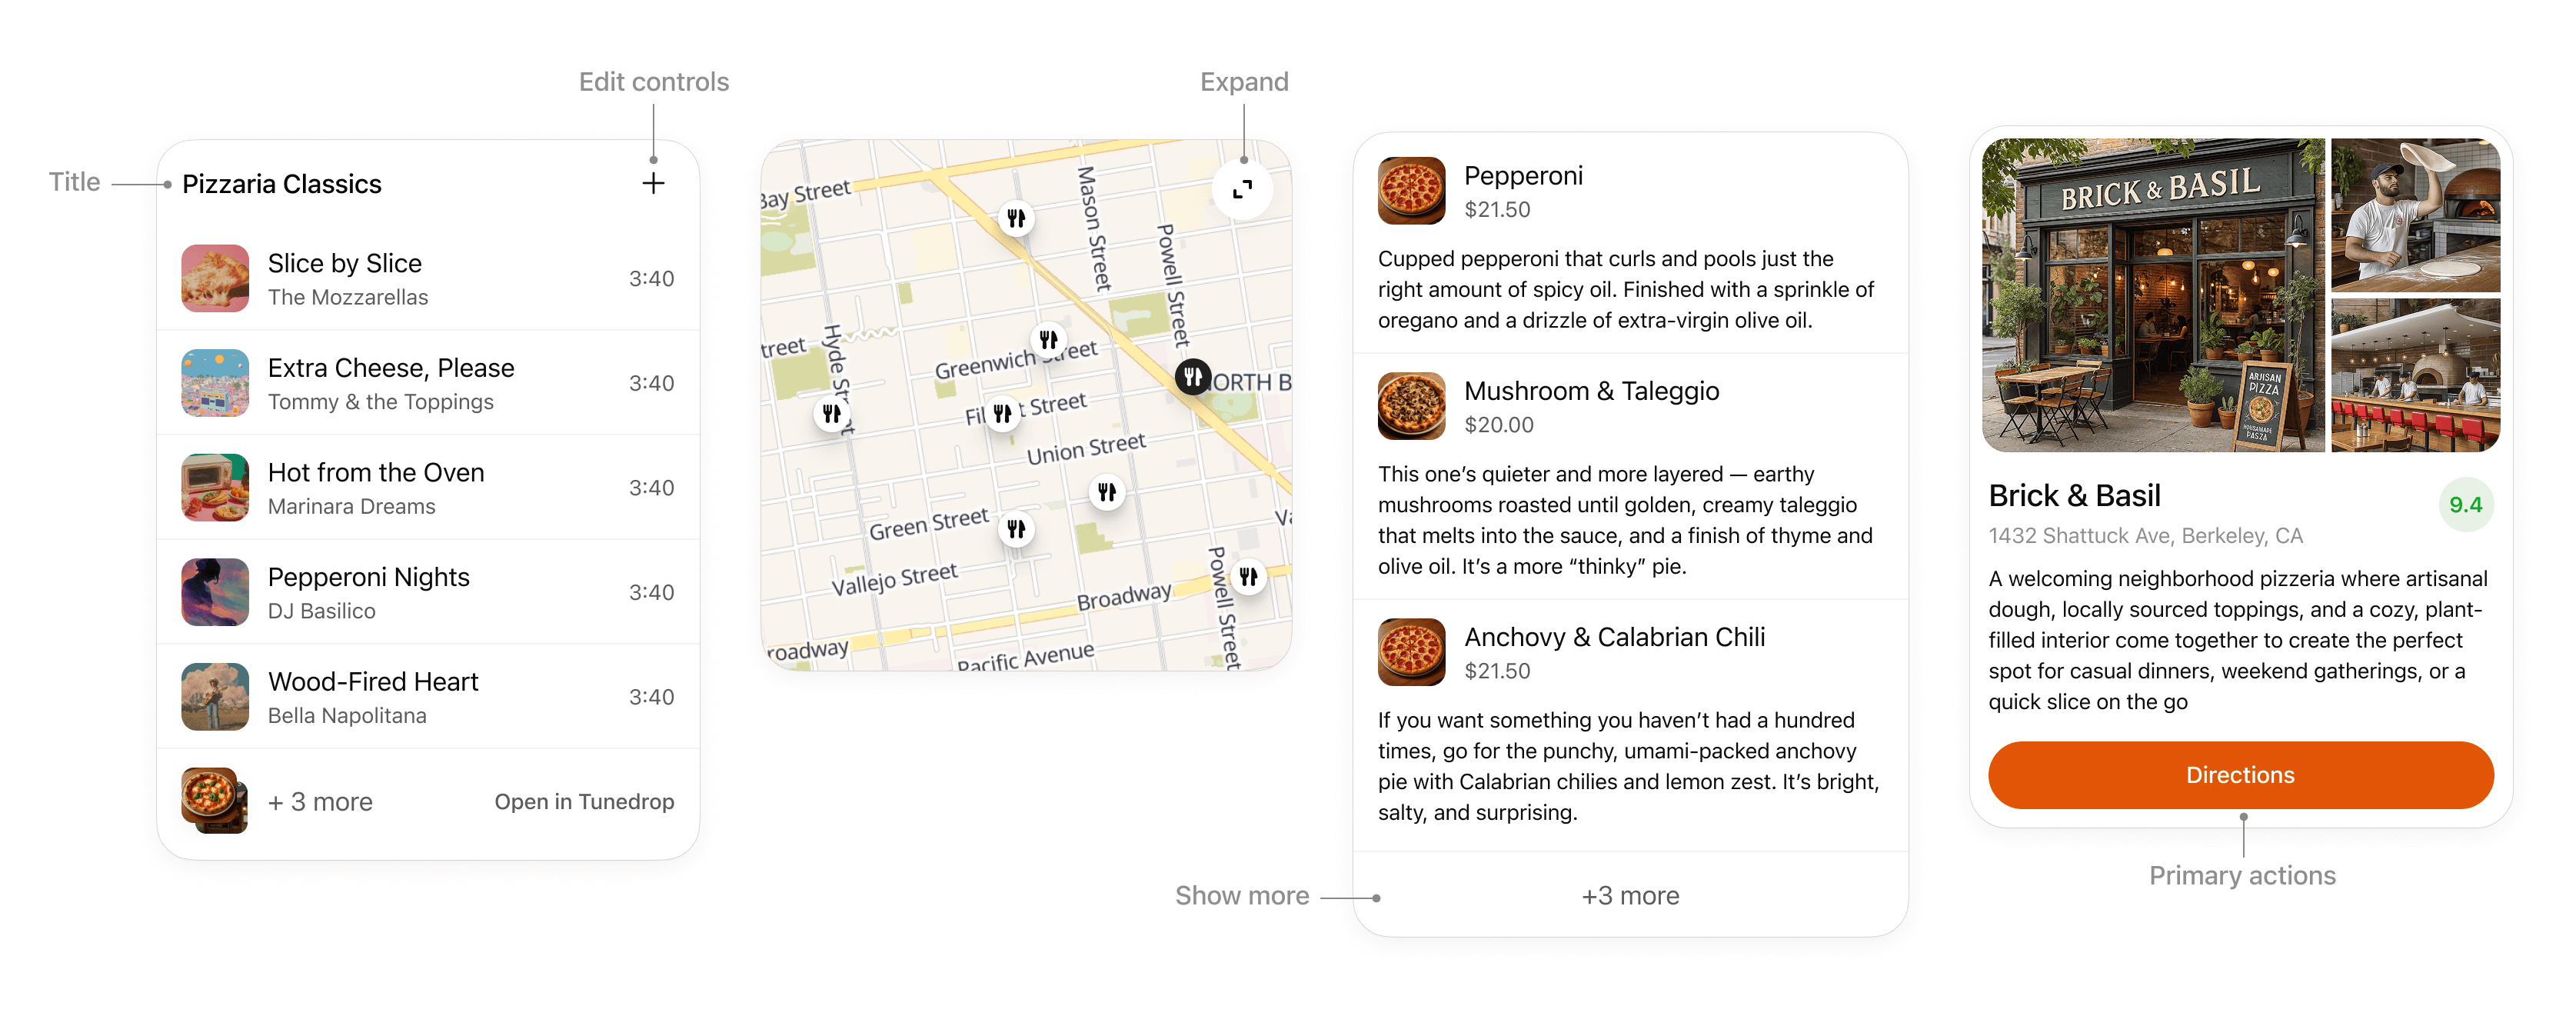
- **Title**: Include a title if your card is document-based or contains items with a parent element, like songs in a playlist.
- **Expand**: Use to open a fullscreen display mode if the card contains rich media or interactivity like a map or an interactive diagram.
- **Show more**: Use to disclose additional items if multiple results are presented in a list.
- **Edit controls**: Provide inline support for app responses without overwhelming the conversation.
- **Primary actions**: Limit to two actions, placed at bottom of card. Actions should perform either a conversation turn or a tool call.
**Interaction**
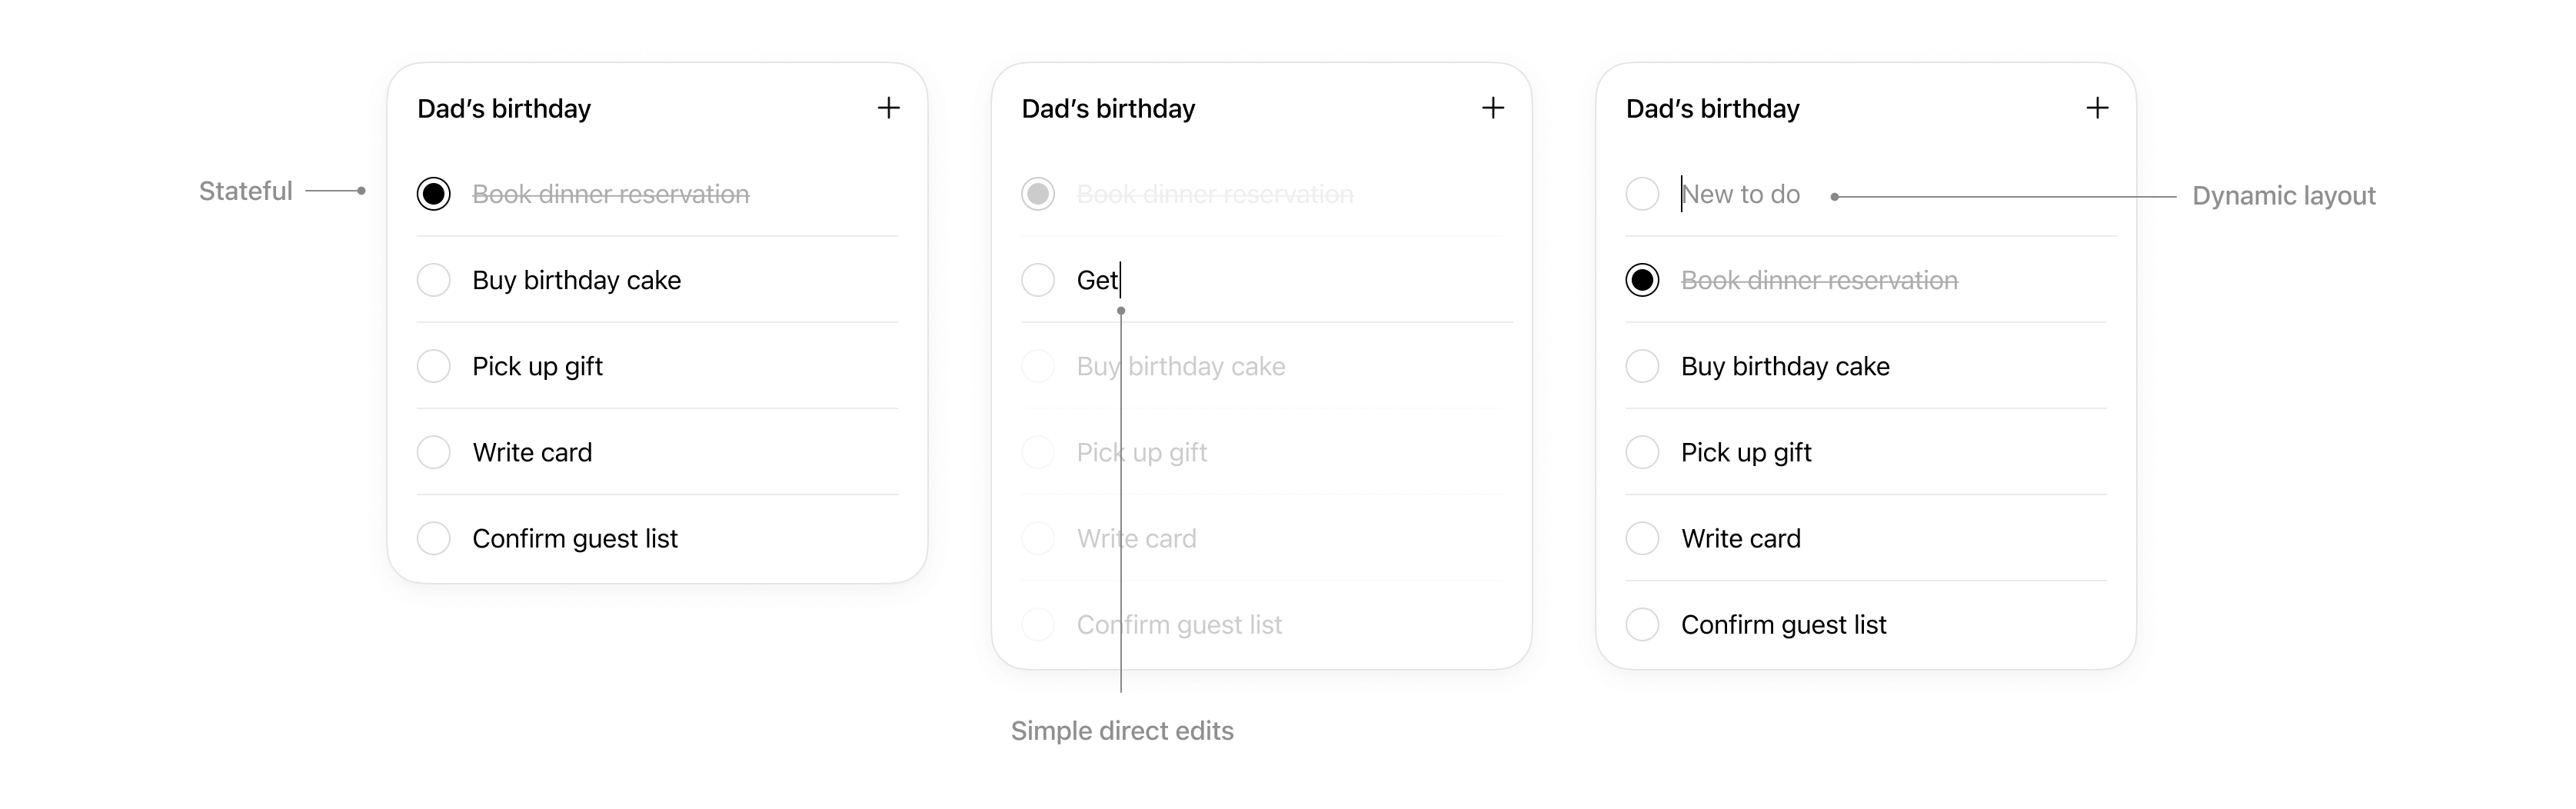
Cards support basic direct interaction.
- **States**: Edits made are persisted.
- **Basic direct edits**: If appropriate, inline editable text allows users to make quick edits without needing to prompt the model.
- **Dynamic layout**: Card layout can expand its height to match its contents up to the height of the mobile display area.
**Rules of thumb**
- **Limit primary actions per card**: Support up to two actions maximum, with one primary CTA and one optional secondary CTA.
- **No deep navigation or multiple views within a card.** Cards should not contain multiple drill-ins, tabs, or deeper navigation. Consider splitting these into separate cards or tool actions.
- **No nested scrolling**. Cards should auto fit their content and prevent internal scrolling.
- **No duplicate inputs**. Don’t replicate ChatGPT features in a card.
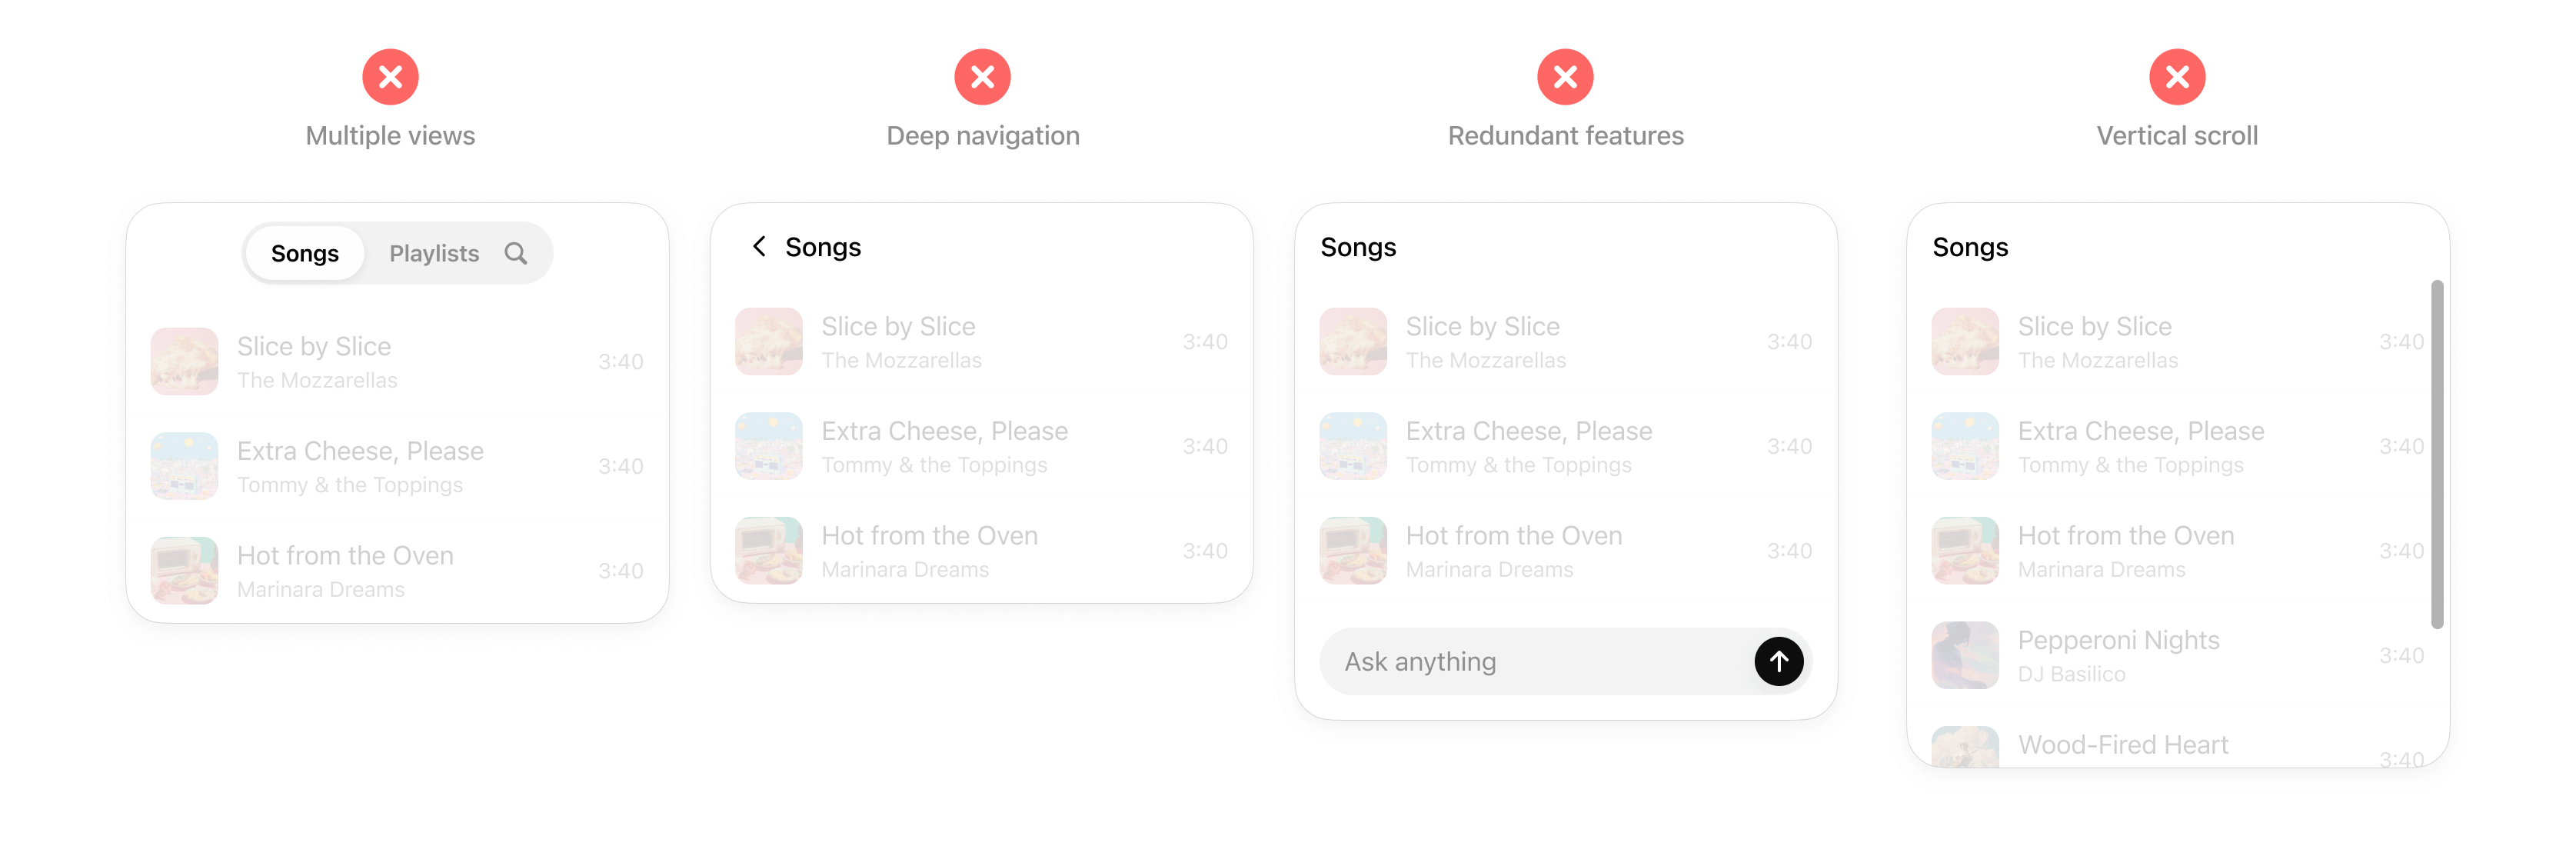
#### Inline carousel
A set of cards presented side-by-side, letting users quickly scan and choose from multiple options.
**When to use**
- Presenting a small list of similar items (for example, restaurants, playlists, events).
- Items have more visual content and metadata than will fit in basic rows.
**Layout**
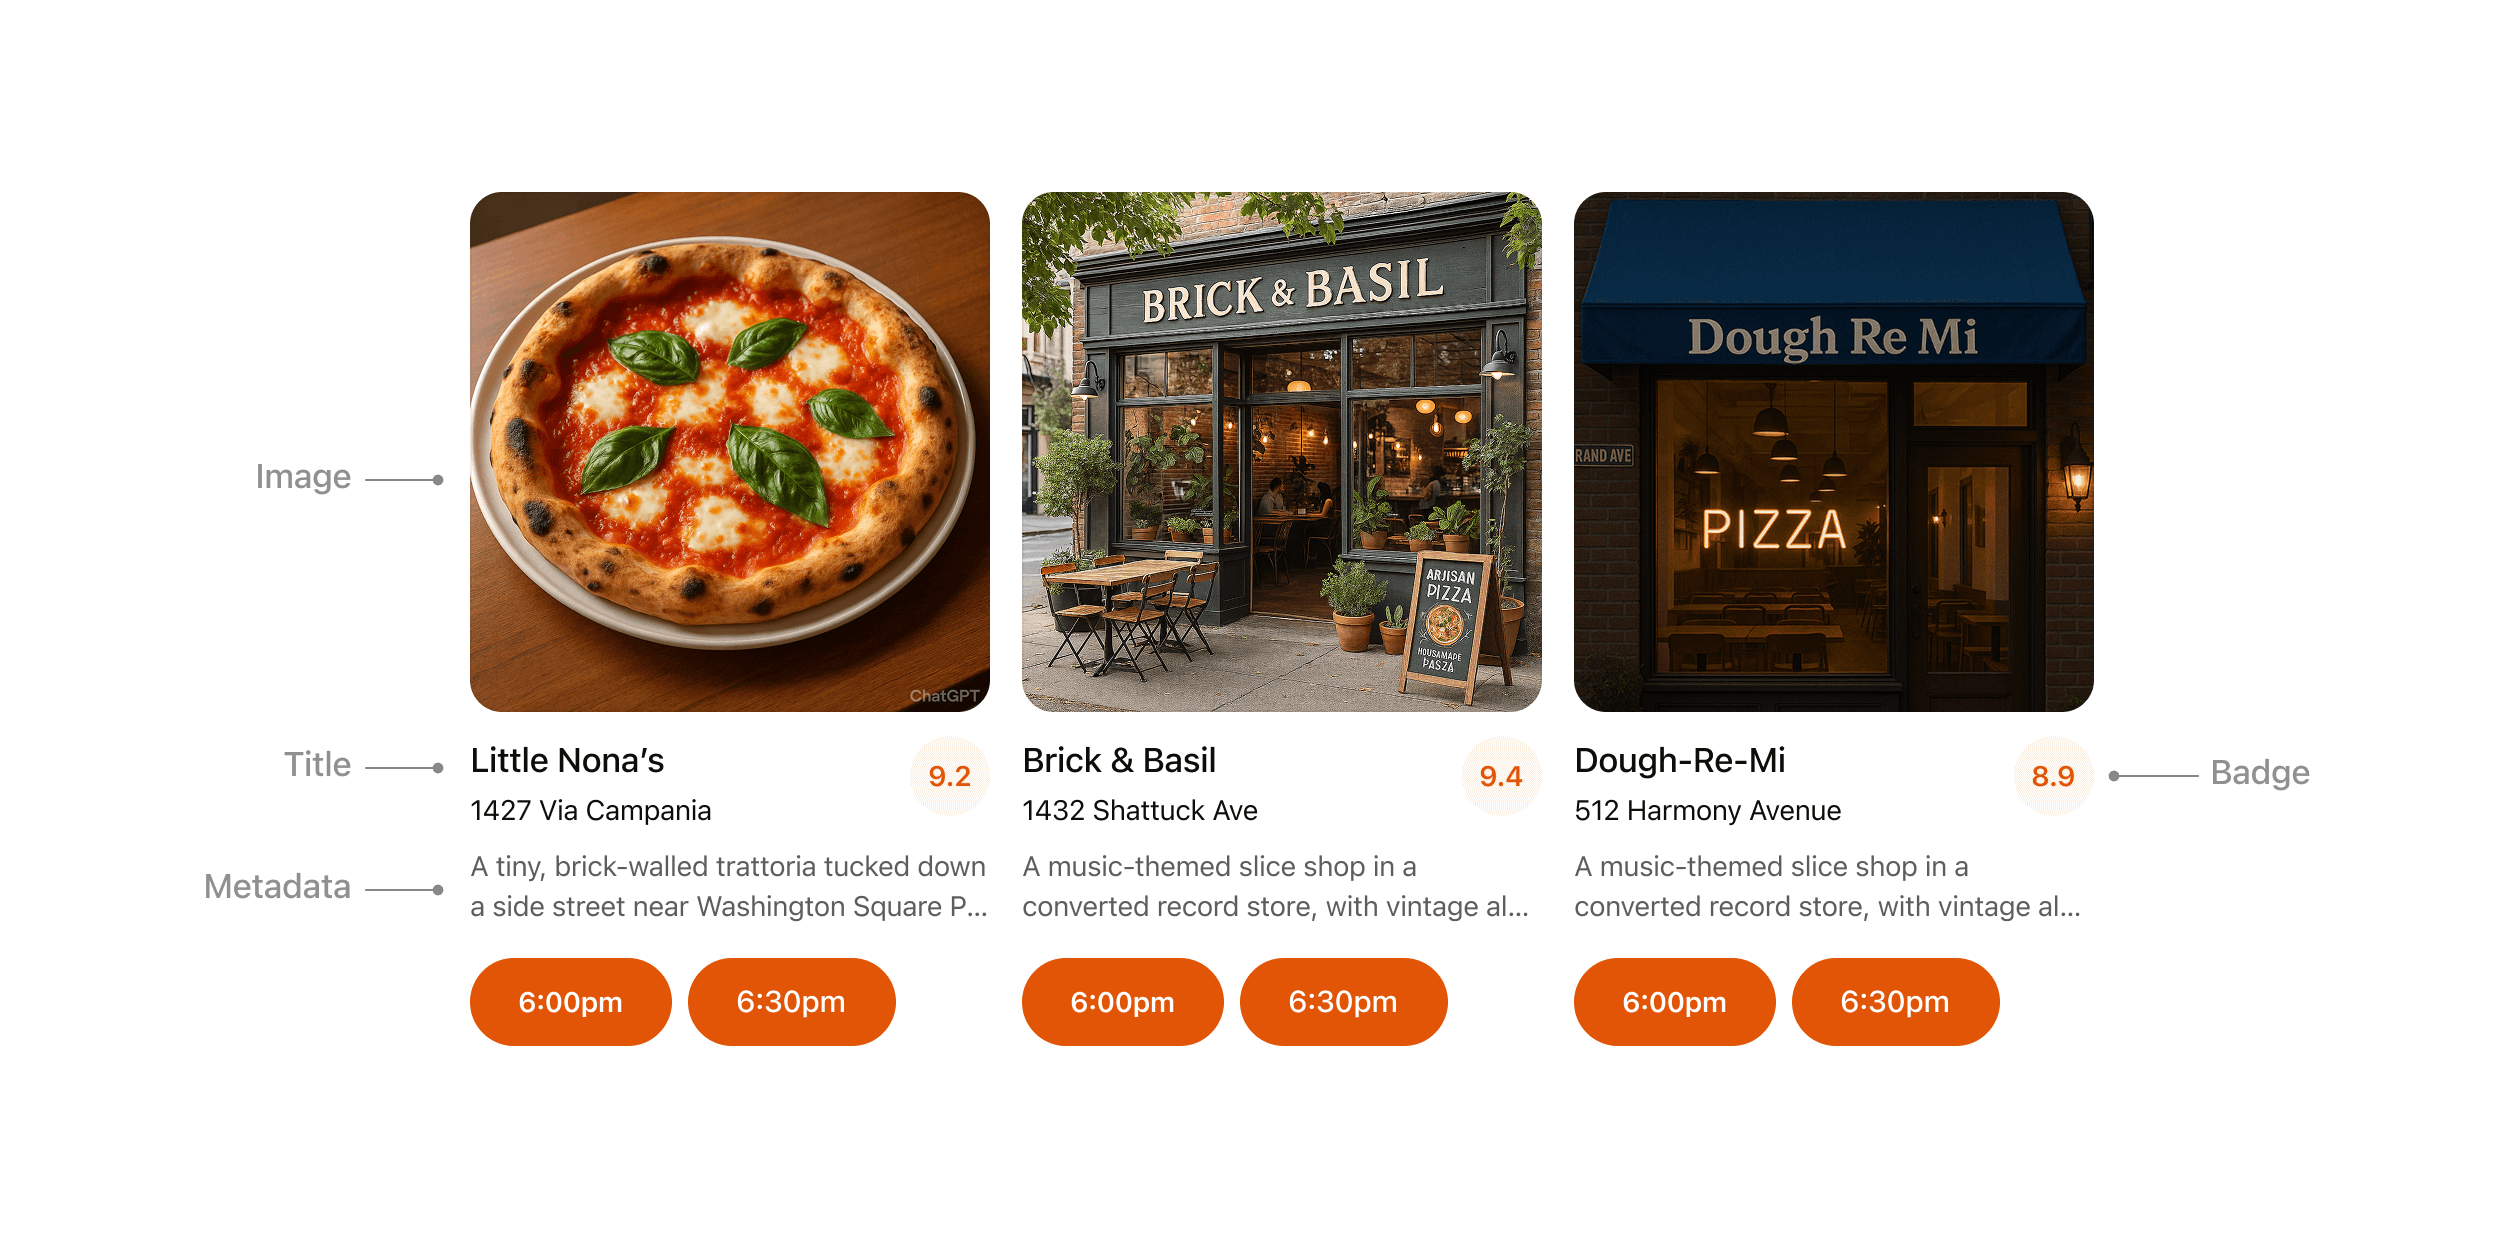
- **Image**: Items should always include an image or visual.
- **Title**: Carousel items should typically include a title to explain the content.
- **Metadata**: Use metadata to show the most important and relevant information about the item in the context of the response. Avoid showing more than two lines of text.
- **Badge**: Use the badge to show supporting context where appropriate.
- **Actions**: Provide a single clear CTA per item whenever possible.
**Rules of thumb**
- Keep to **3–8 items per carousel** for readability.
- Reduce metadata to the most relevant details, with three lines max.
- Each card may have a single, optional CTA (for example, “Book” or “Play”).
- Use consistent visual hierarchy across cards.
### fullscreen
Immersive experiences that expand beyond the inline card, giving users space for multi-step workflows or deeper exploration. The ChatGPT composer remains overlaid, allowing users to continue “talking to the app” through natural conversation in the context of the fullscreen view.
**When to use**
- Rich tasks that cannot be reduced to a single card (for example, an interactive map with pins, a rich editing canvas, or an interactive diagram).
- Browsing detailed content (for example, real estate listings, menus).
**Layout**
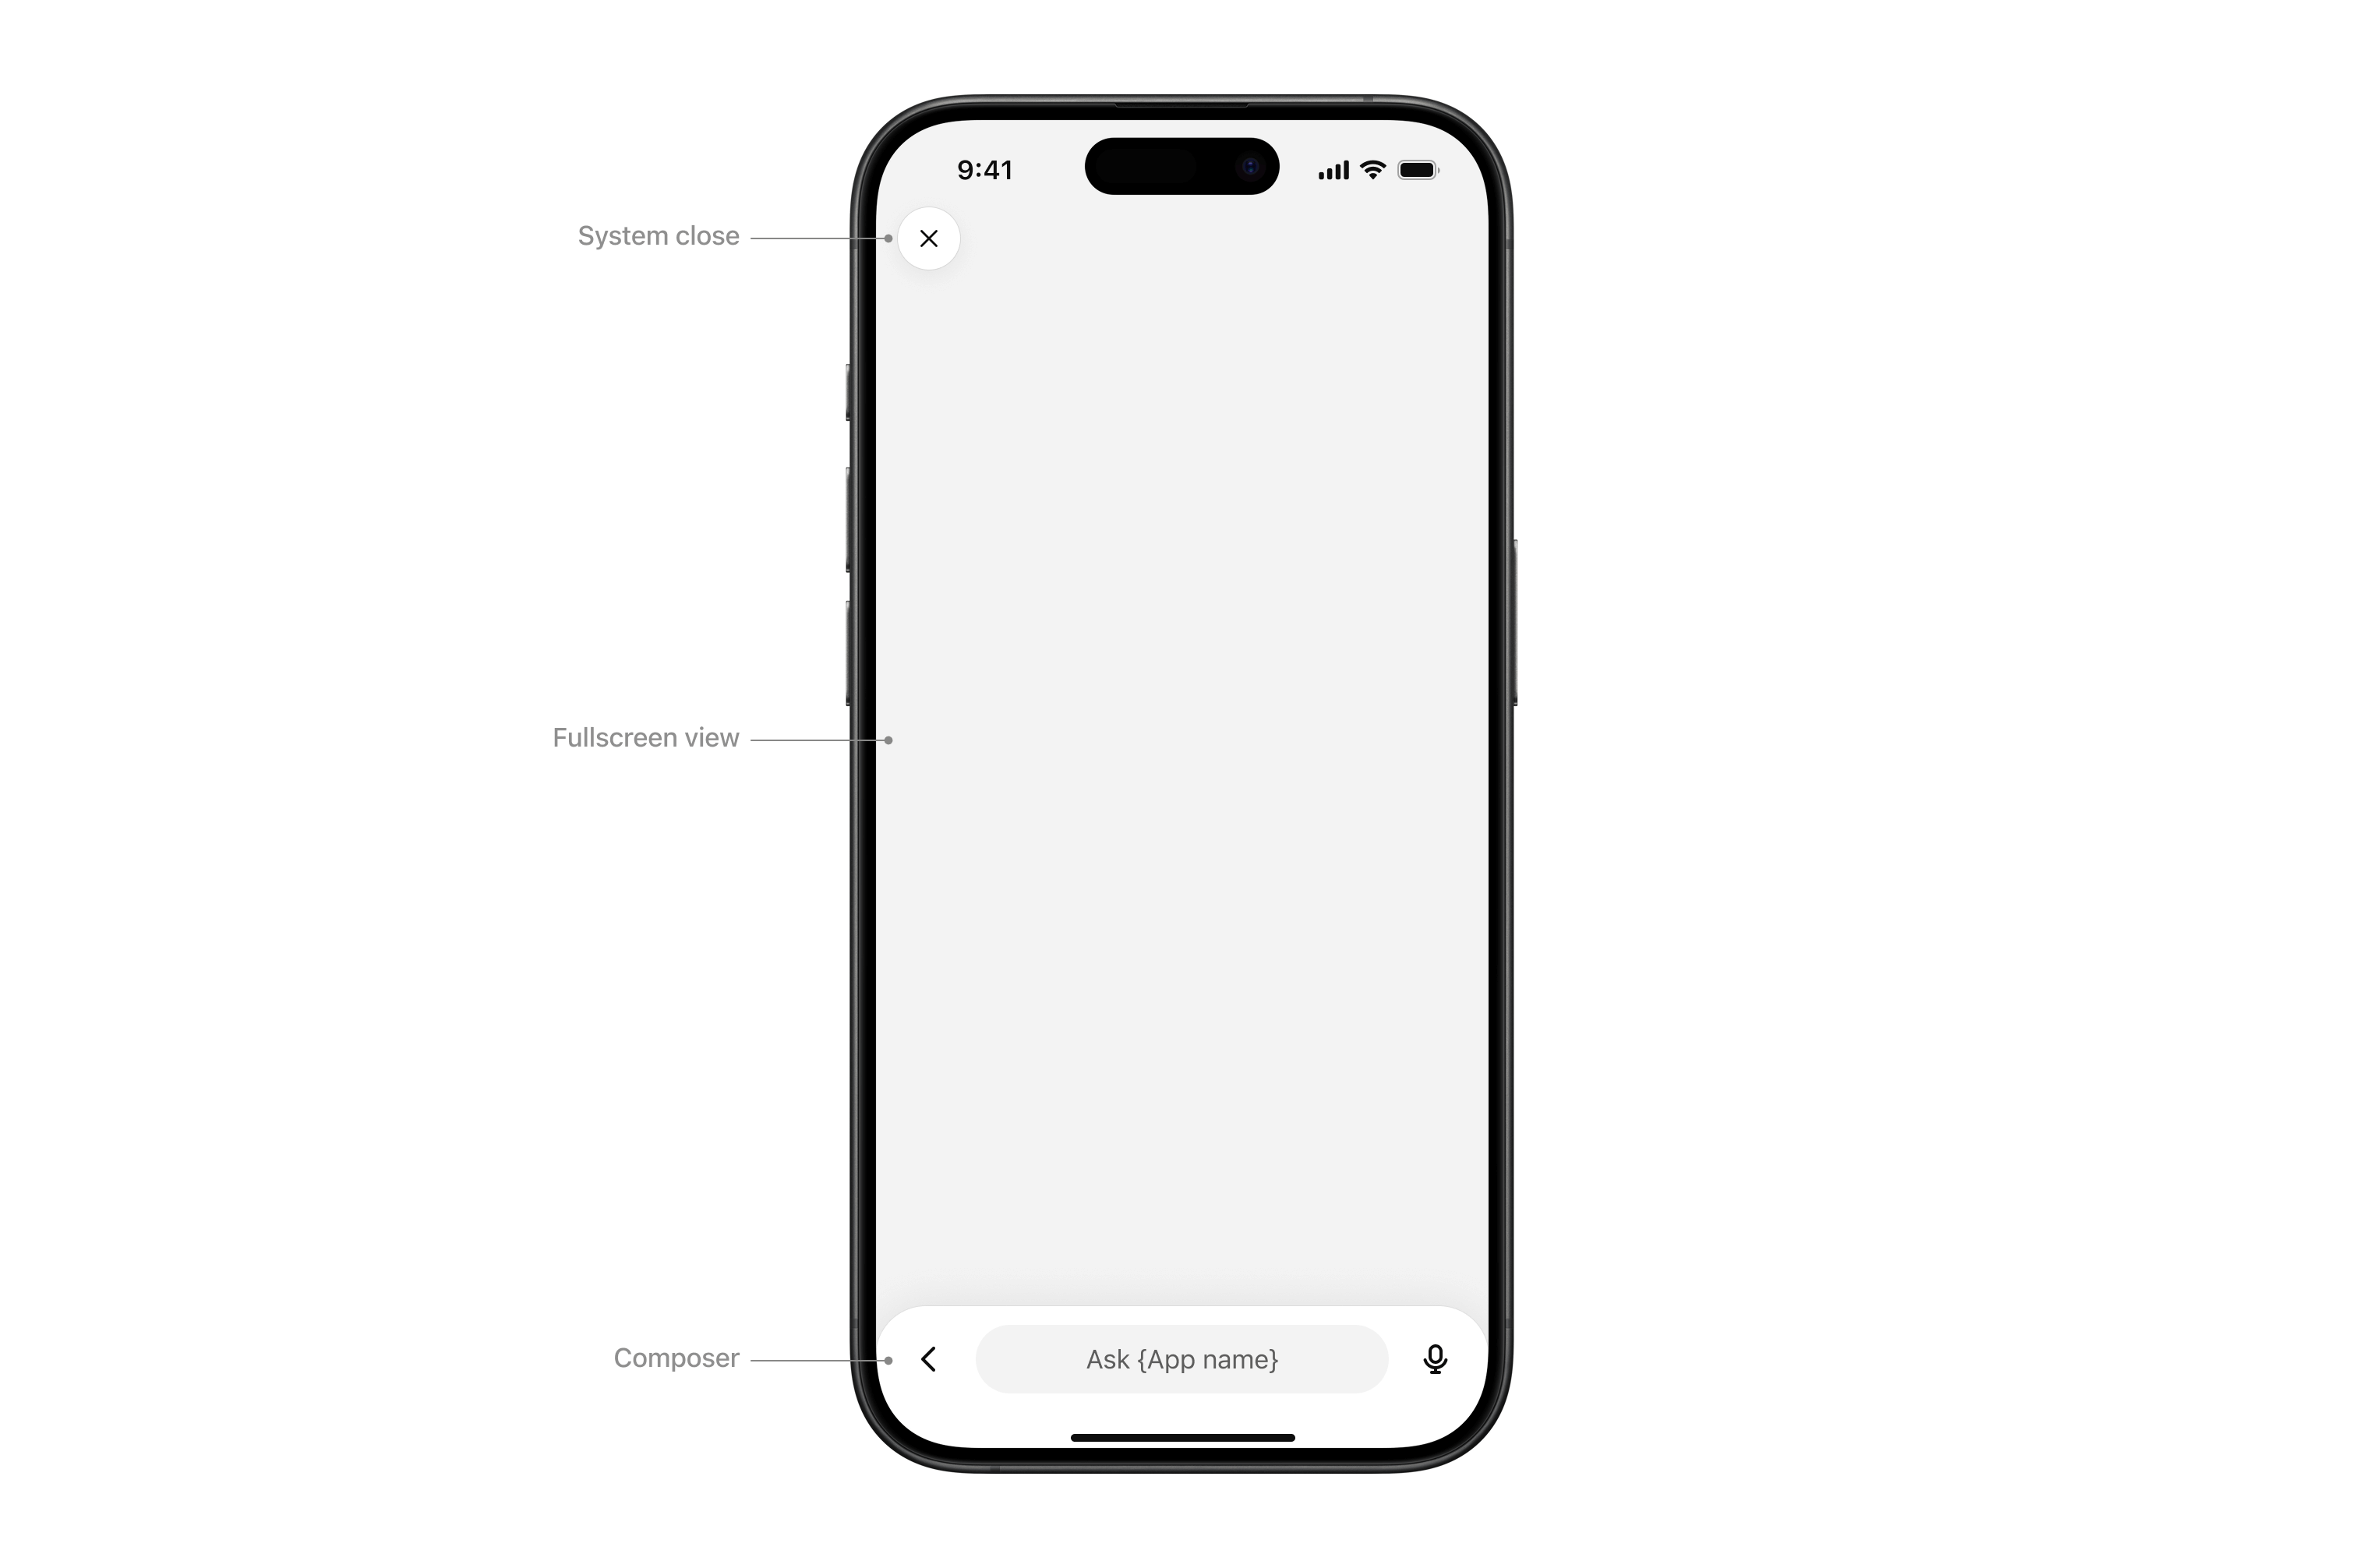
- **System close**: Closes the sheet or view.
- **fullscreen view**: Content area.
- **Composer**: ChatGPT’s native composer, allowing the user to follow up in the context of the fullscreen view.
**Interaction**
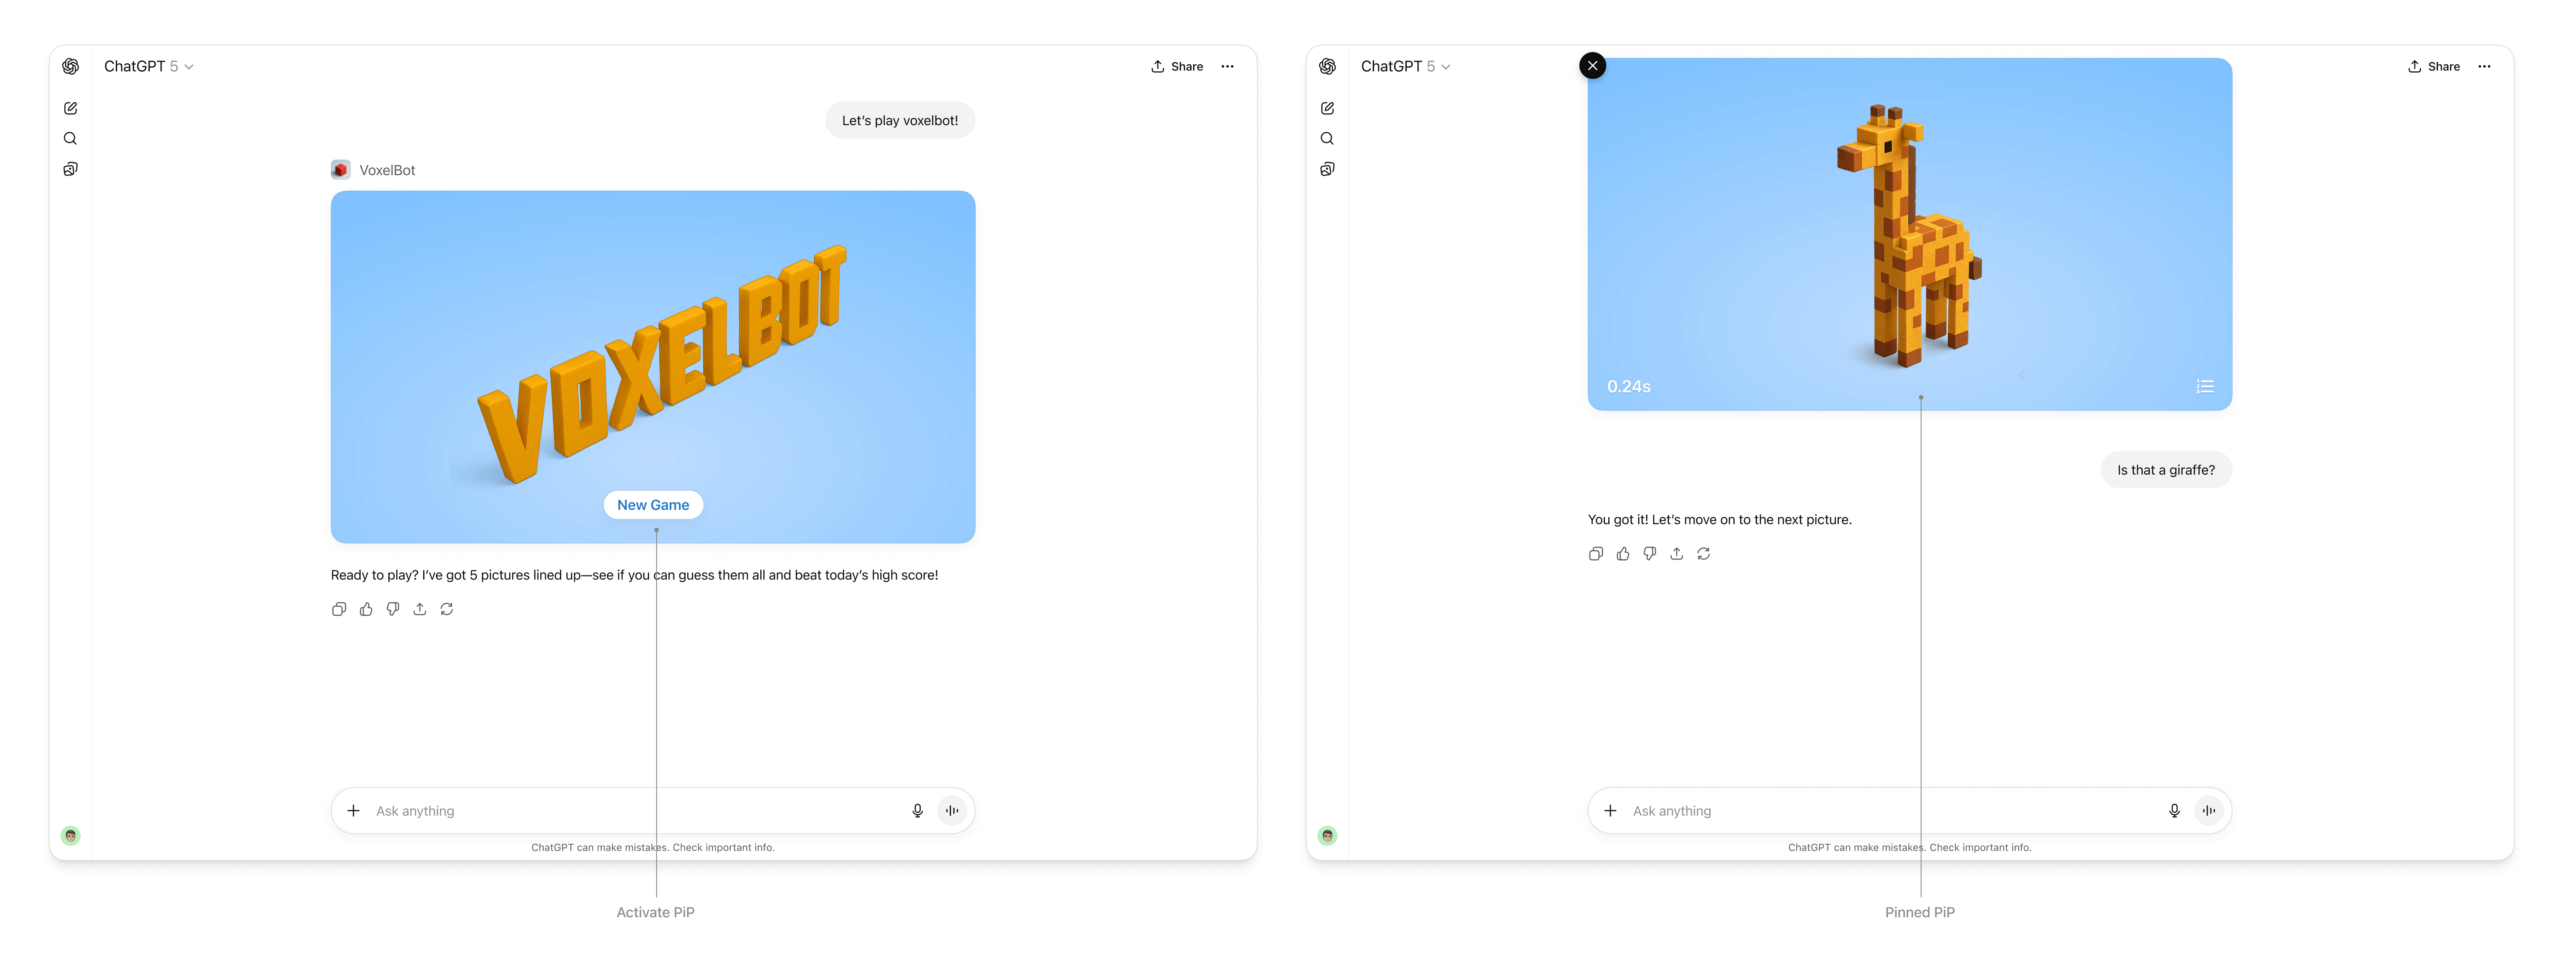
- **Chat sheet**: Maintain conversational context alongside the fullscreen surface.
- **Thinking**: The composer input “shimmers” to show that a response is streaming.
- **Response**: When the model completes its response, an ephemeral, truncated snippet displays above the composer. Tapping it opens the chat sheet.
**Rules of thumb**
- **Design your UX to work with the system composer**. The composer is always present in fullscreen, so make sure your experience supports conversational prompts that can trigger tool calls and feel natural for users.
- **Use fullscreen to deepen engagement**, not to replicate your native app wholesale.
### Picture-in-picture (PiP)
A persistent floating window inside ChatGPT optimized for ongoing or live sessions like games or videos. PiP remains visible while the conversation continues, and it can update dynamically in response to user prompts.
**When to use**
- **Activities that run in parallel with conversation**, such as a game, live collaboration, quiz, or learning session.
- **Situations where the PiP widget can react to chat input**, for example continuing a game round or refreshing live data based on a user request.
**Interaction**
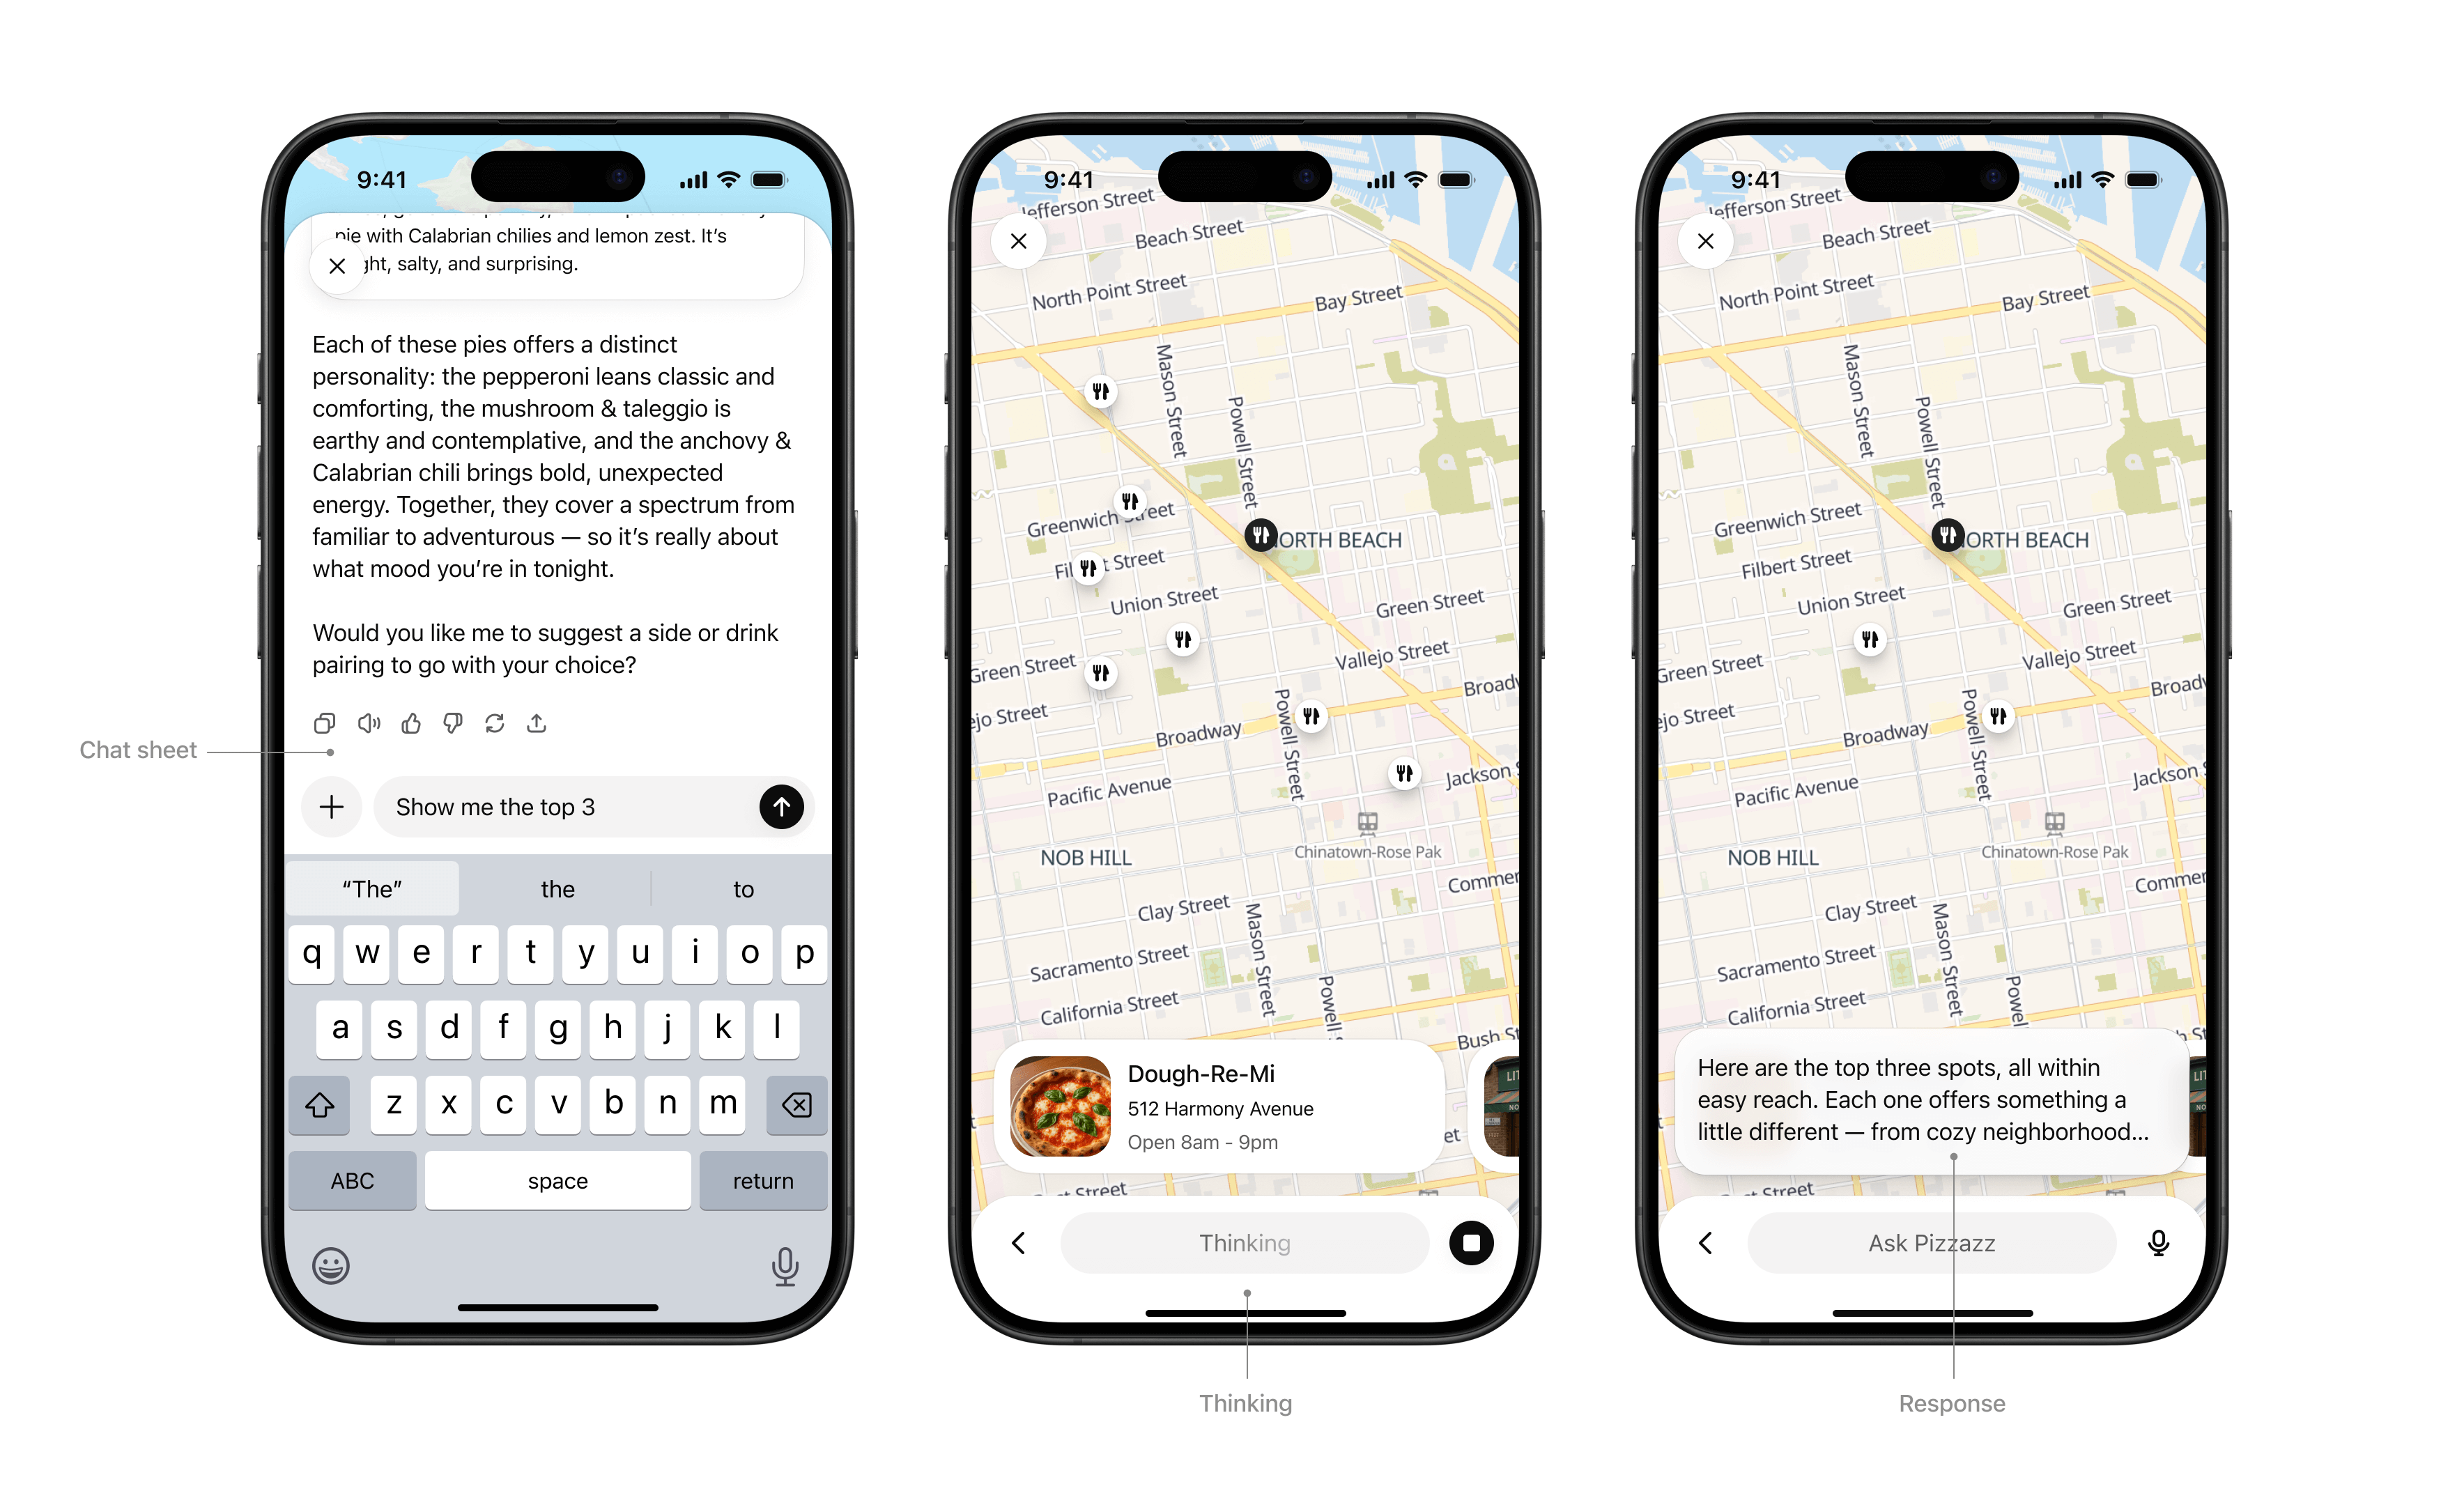
- **Activated:** On scroll, the PiP window stays fixed to the top of the display area
- **Pinned:** The PiP remains fixed until the user dismisses it or the session ends.
- **Session ends:** The PiP returns to an inline position and scrolls away.
**Rules of thumb**
- **Ensure the PiP state can update or respond** when users interact through the system composer.
- **Close PiP automatically** when the session ends.
- **Do not overload PiP with controls or static content** better suited for inline or fullscreen.
## Visual design guidelines
A consistent look and feel helps partner-built tools feel like a natural part of the ChatGPT platform. Visual guidelines support clarity, usability, and accessibility, while still leaving room for brand expression in the right places.
These principles outline how to use color, type, spacing, and imagery in ways that preserve system clarity while giving partners space to differentiate their service.
### Why this matters
Visual and UX consistency helps improve the overall user experience of using apps in ChatGPT. By following these guidelines, partners can present their tools in a way that feels consistent to users and delivers value without distraction.
### Color
System-defined palettes help ensure actions and responses always feel consistent with the ChatGPT platform. Partners can add branding through accents, icons, or inline imagery, but should not redefine system colors.
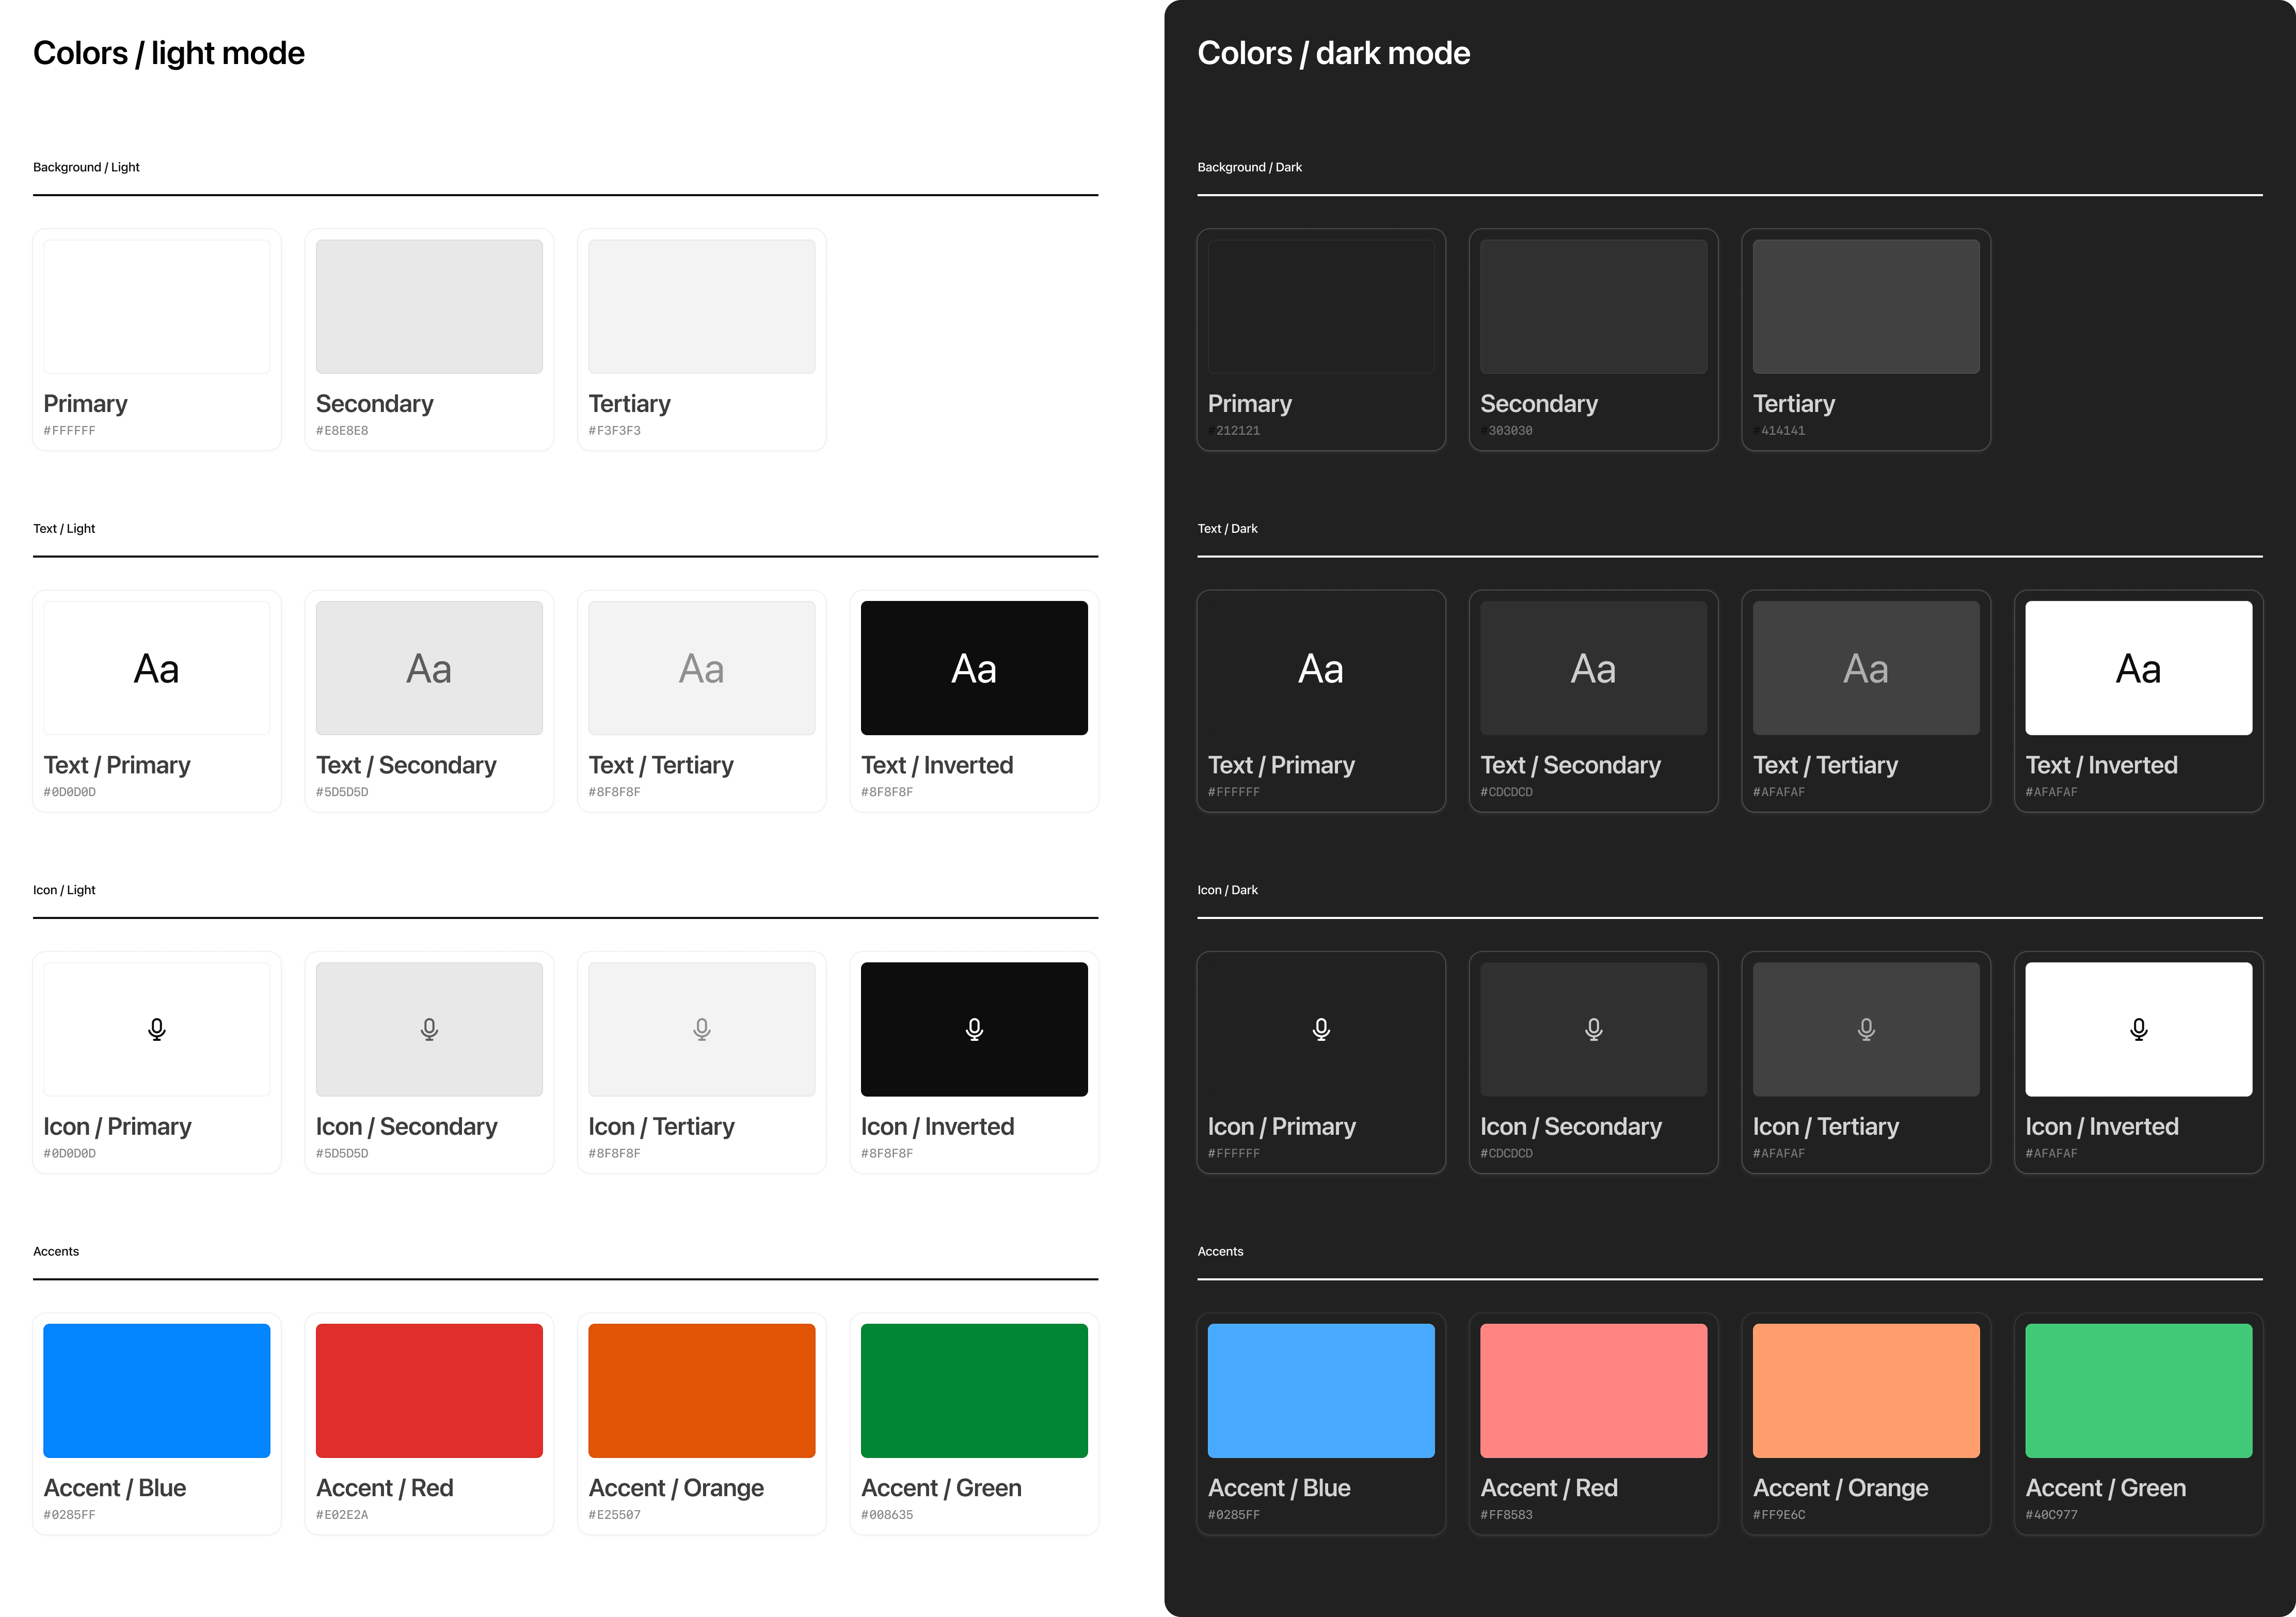
**Rules of thumb**
- Use system colors for text, icons, and spatial elements like dividers.
- Partner brand accents such as logos or icons should not override backgrounds or text colors.
- Avoid custom gradients or patterns that break ChatGPT’s minimal look.
- Use brand accent colors on primary buttons inside app display modes.
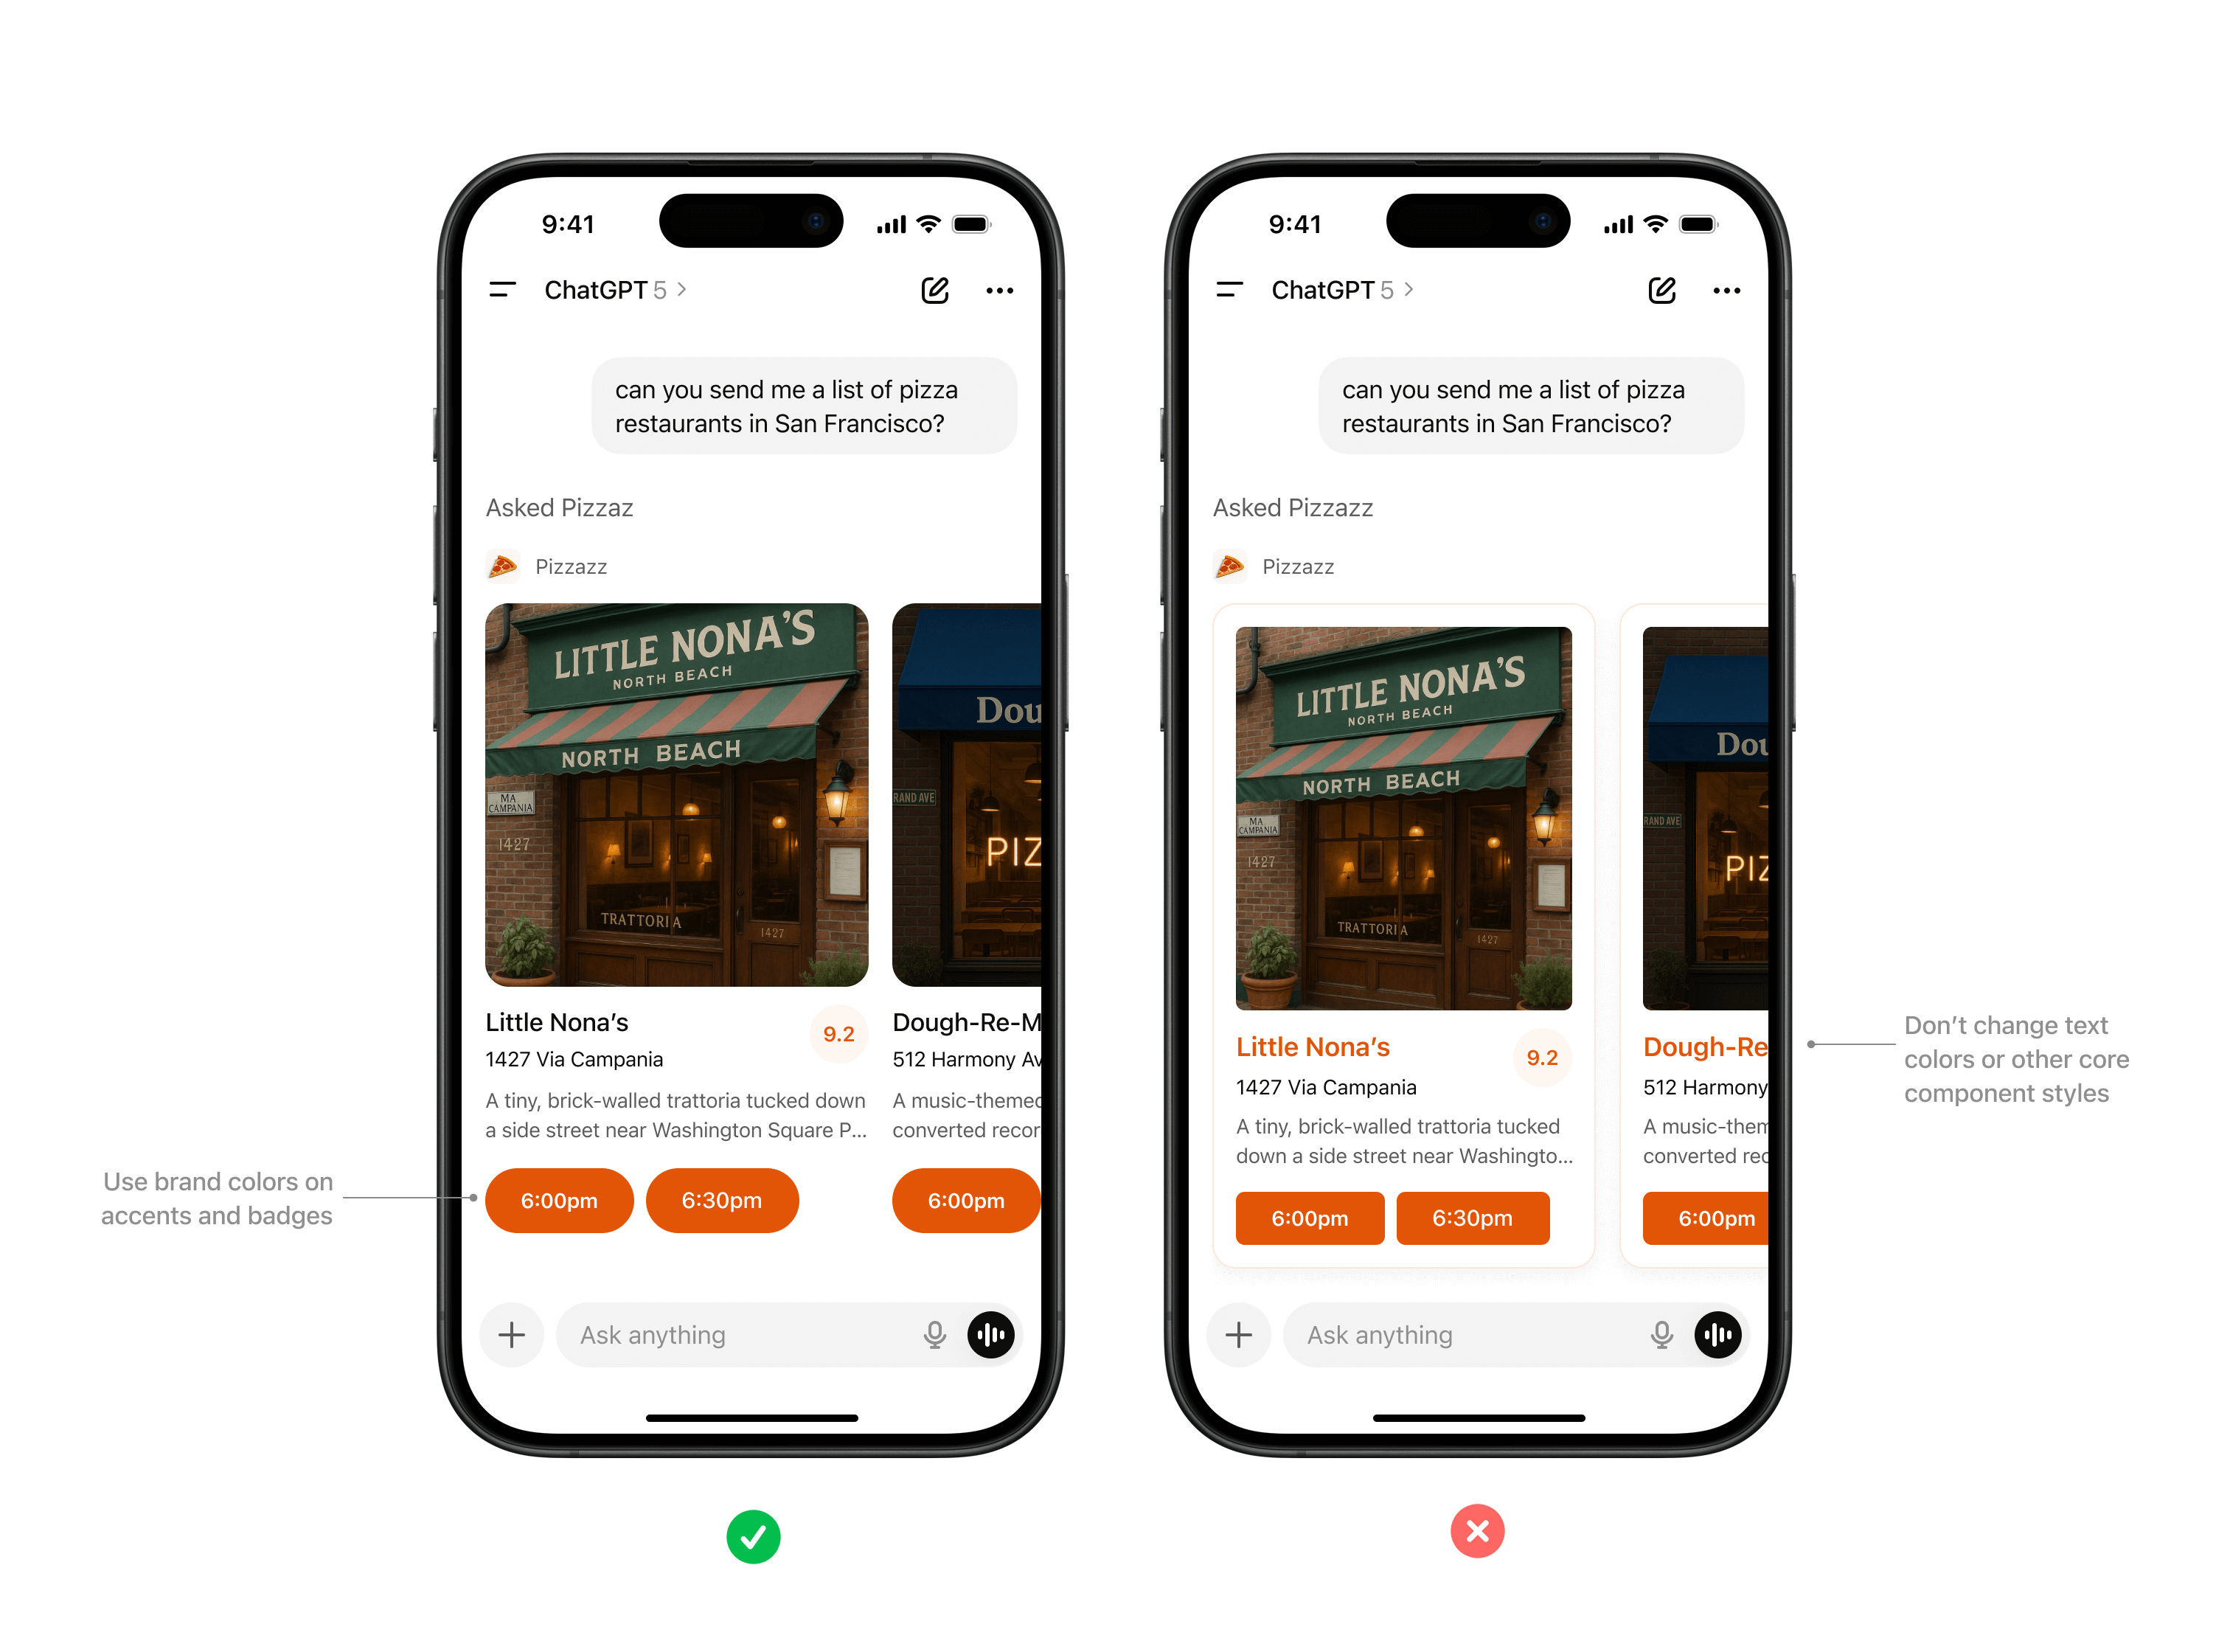
_Use brand colors on accents and badges. Don't change text colors or other core component styles._
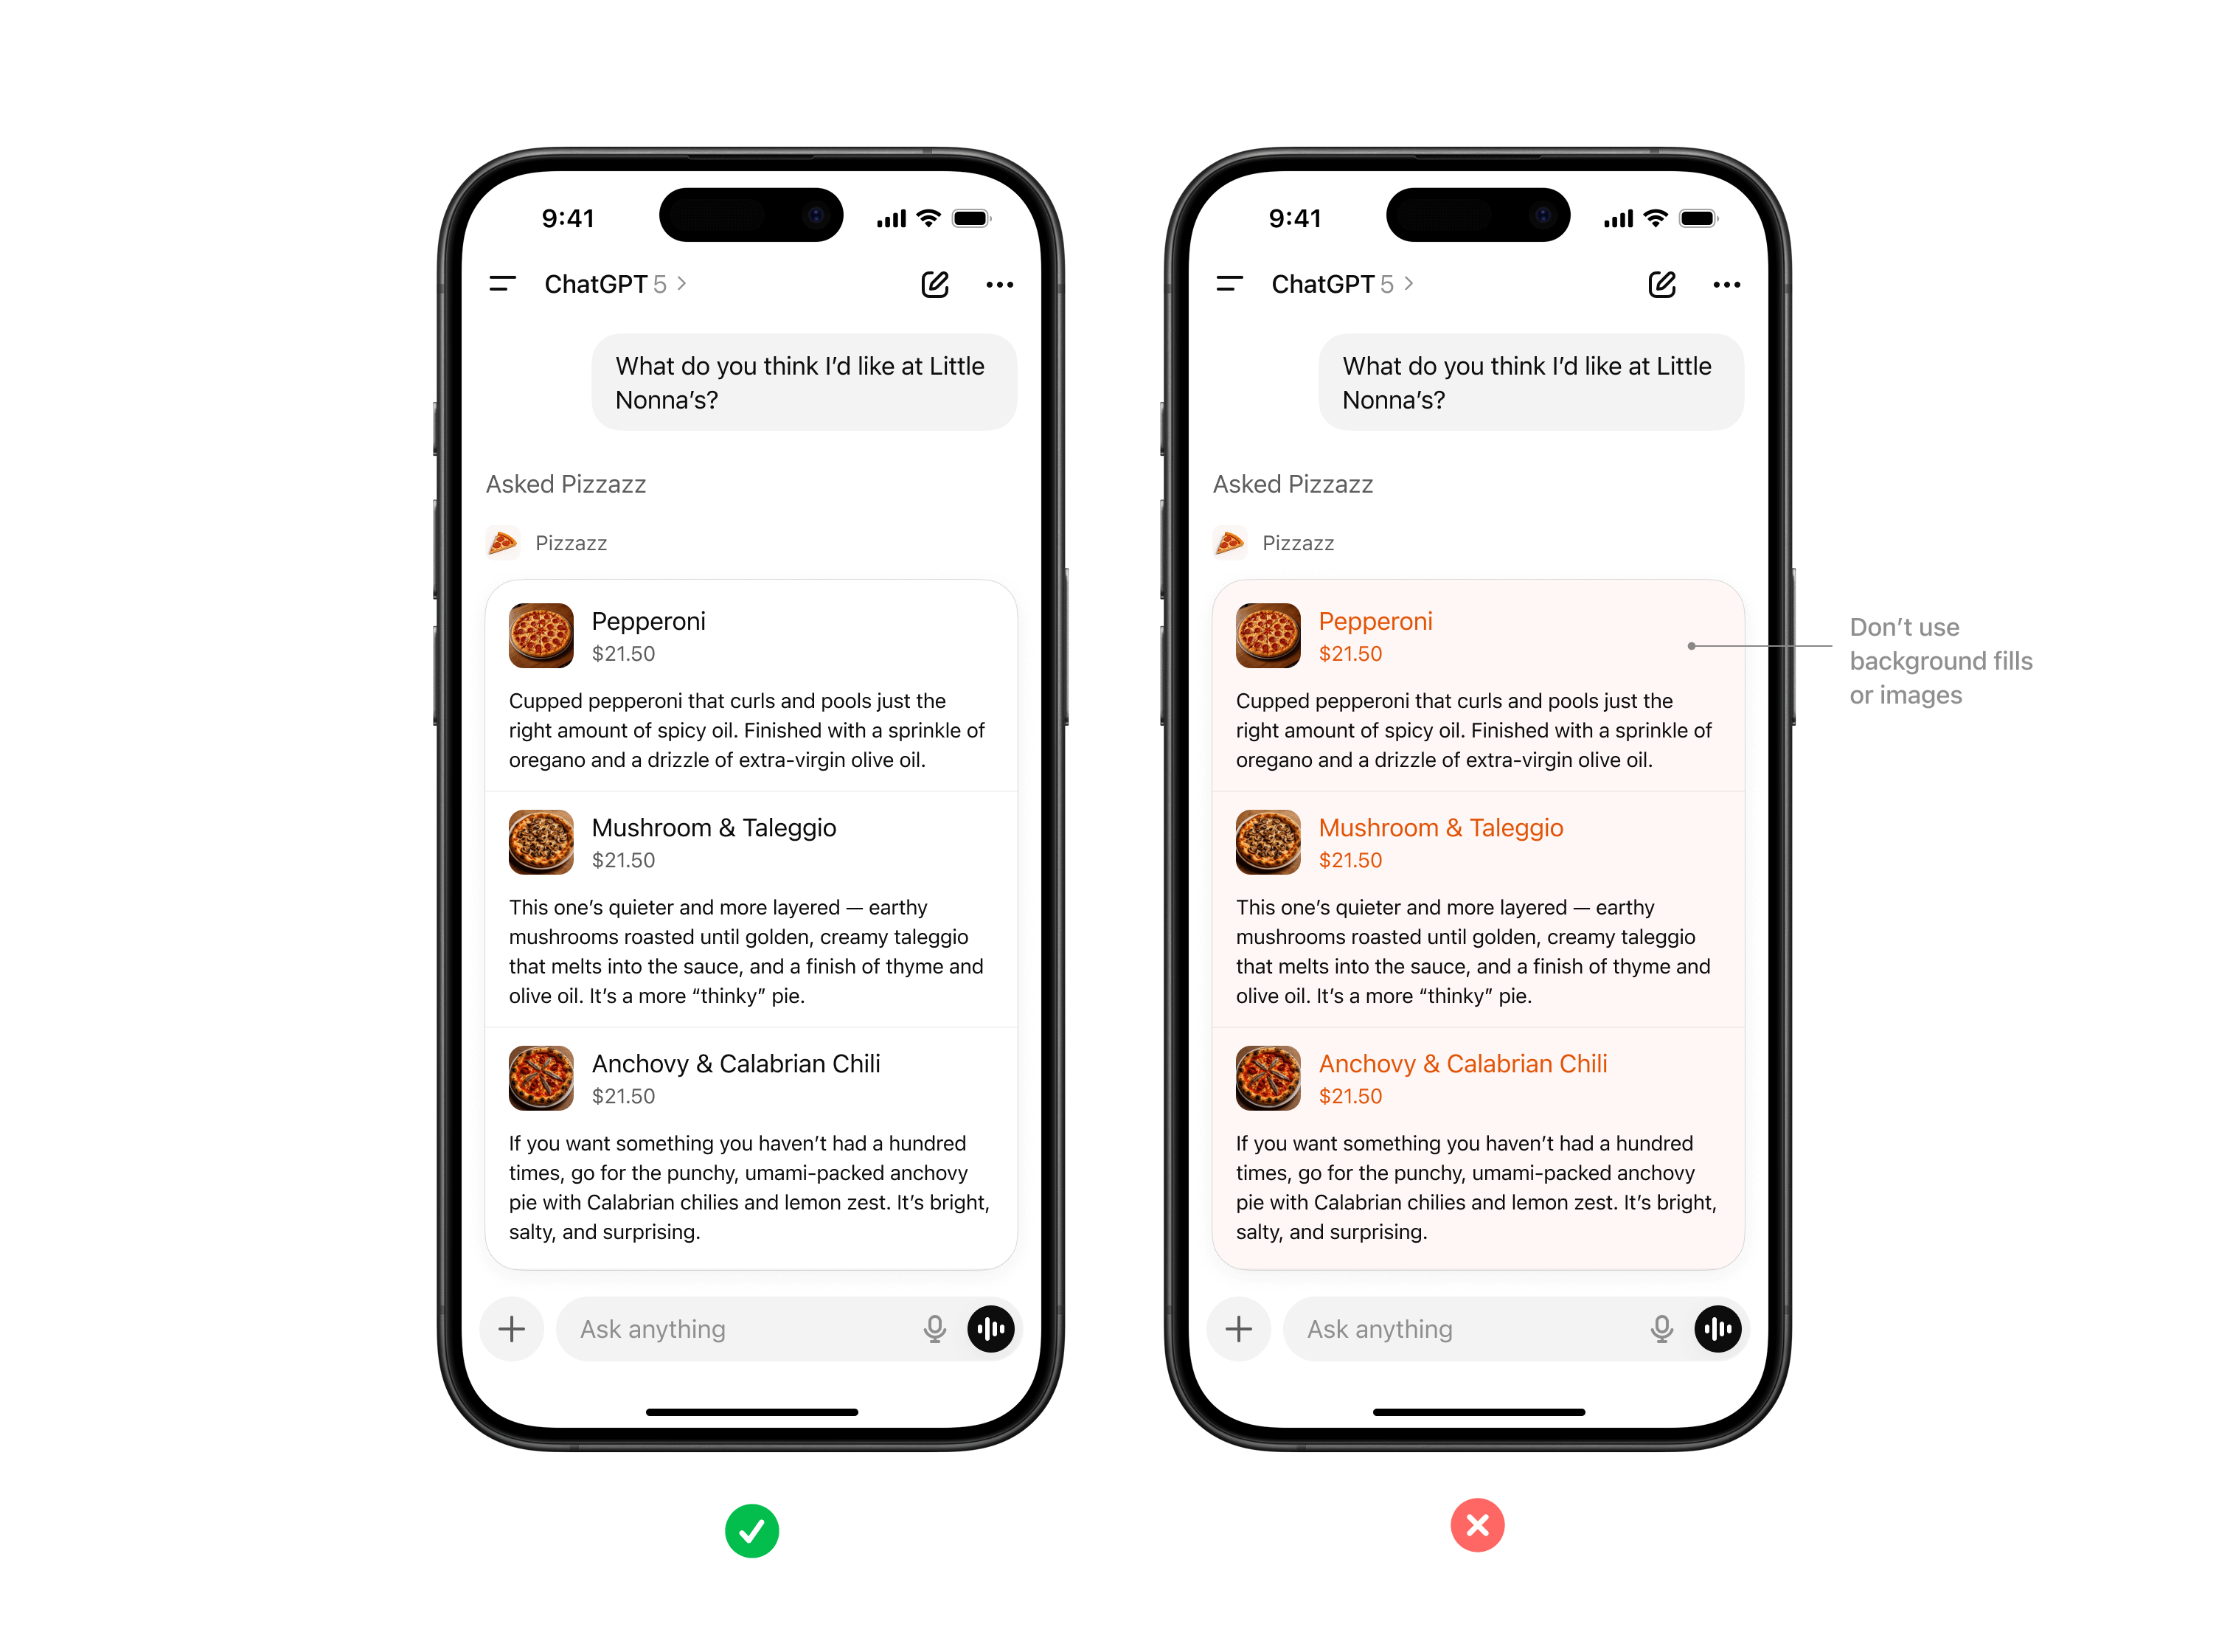
_Don't apply colors to backgrounds in text areas._
### Typography
ChatGPT uses platform-native system fonts (SF Pro on iOS, a sans-serif font on Android) to ensure readability and accessibility across devices.
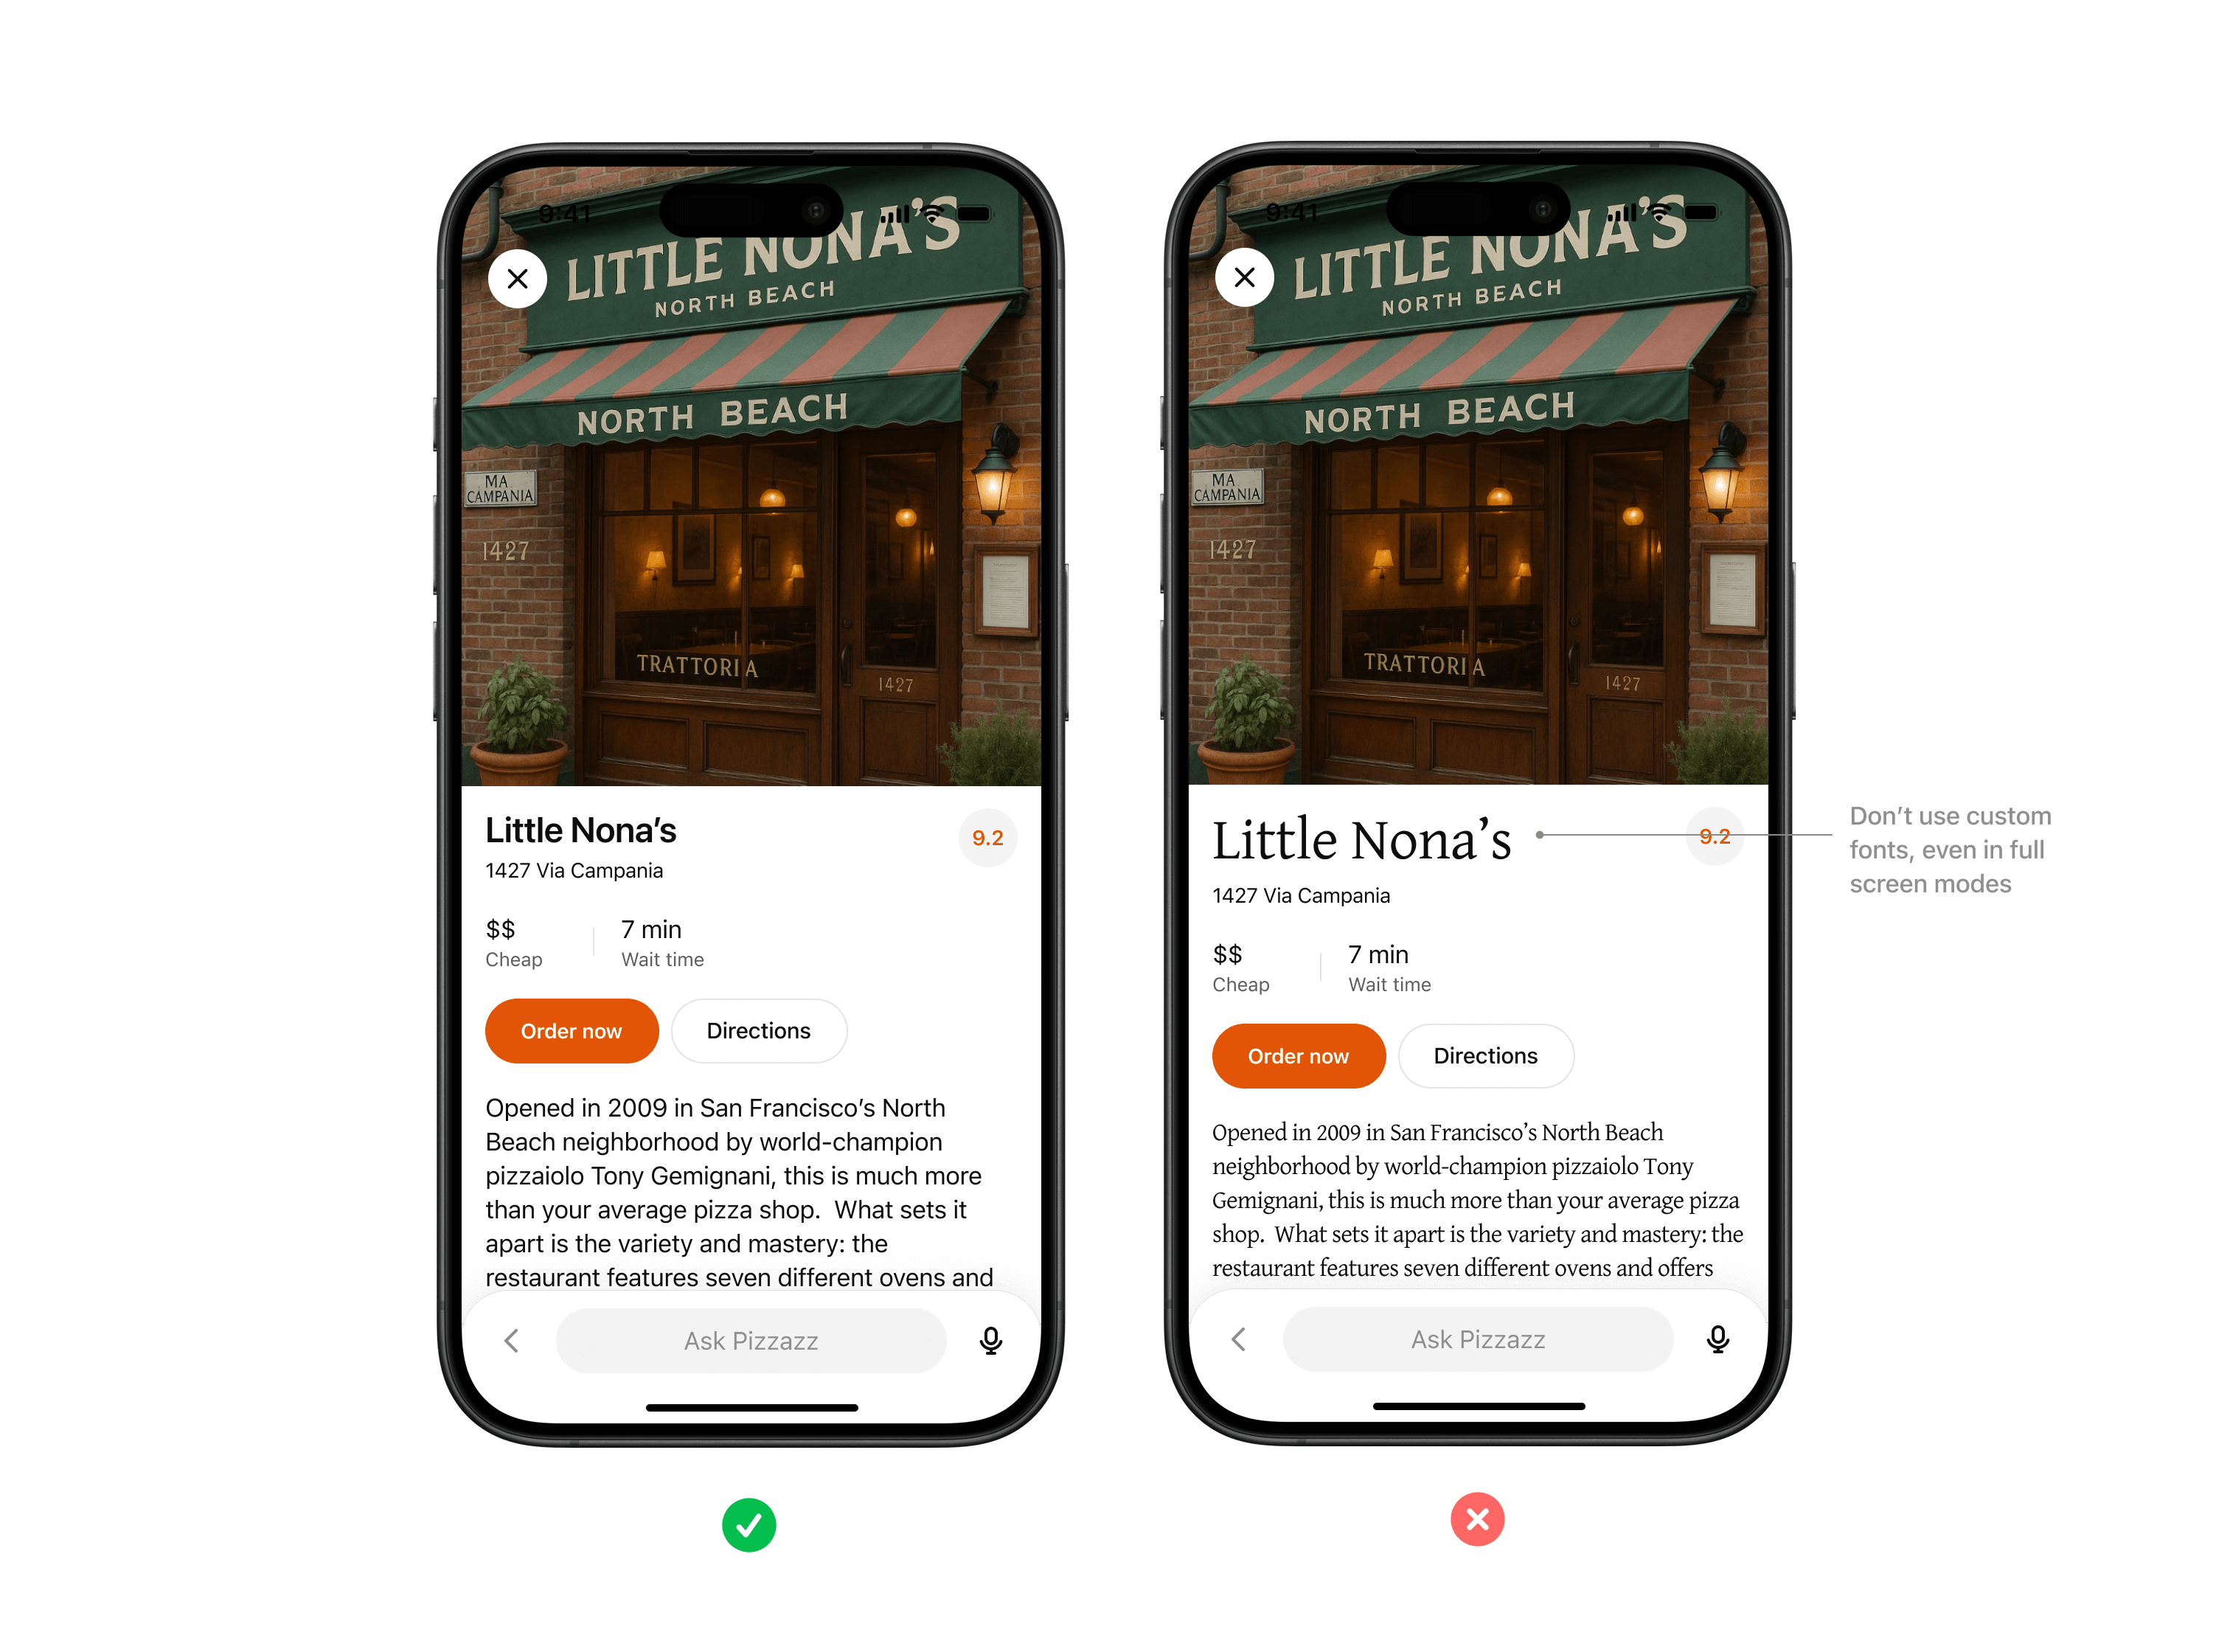
**Rules of thumb**
- Always inherit the system font stack, respecting system sizing rules for headings, body text, and captions.
- Use partner styling such as bold, italic, or highlights only within content areas, not for structural UI.
- Limit variation in font size as much as possible, preferring body and body-small sizes.
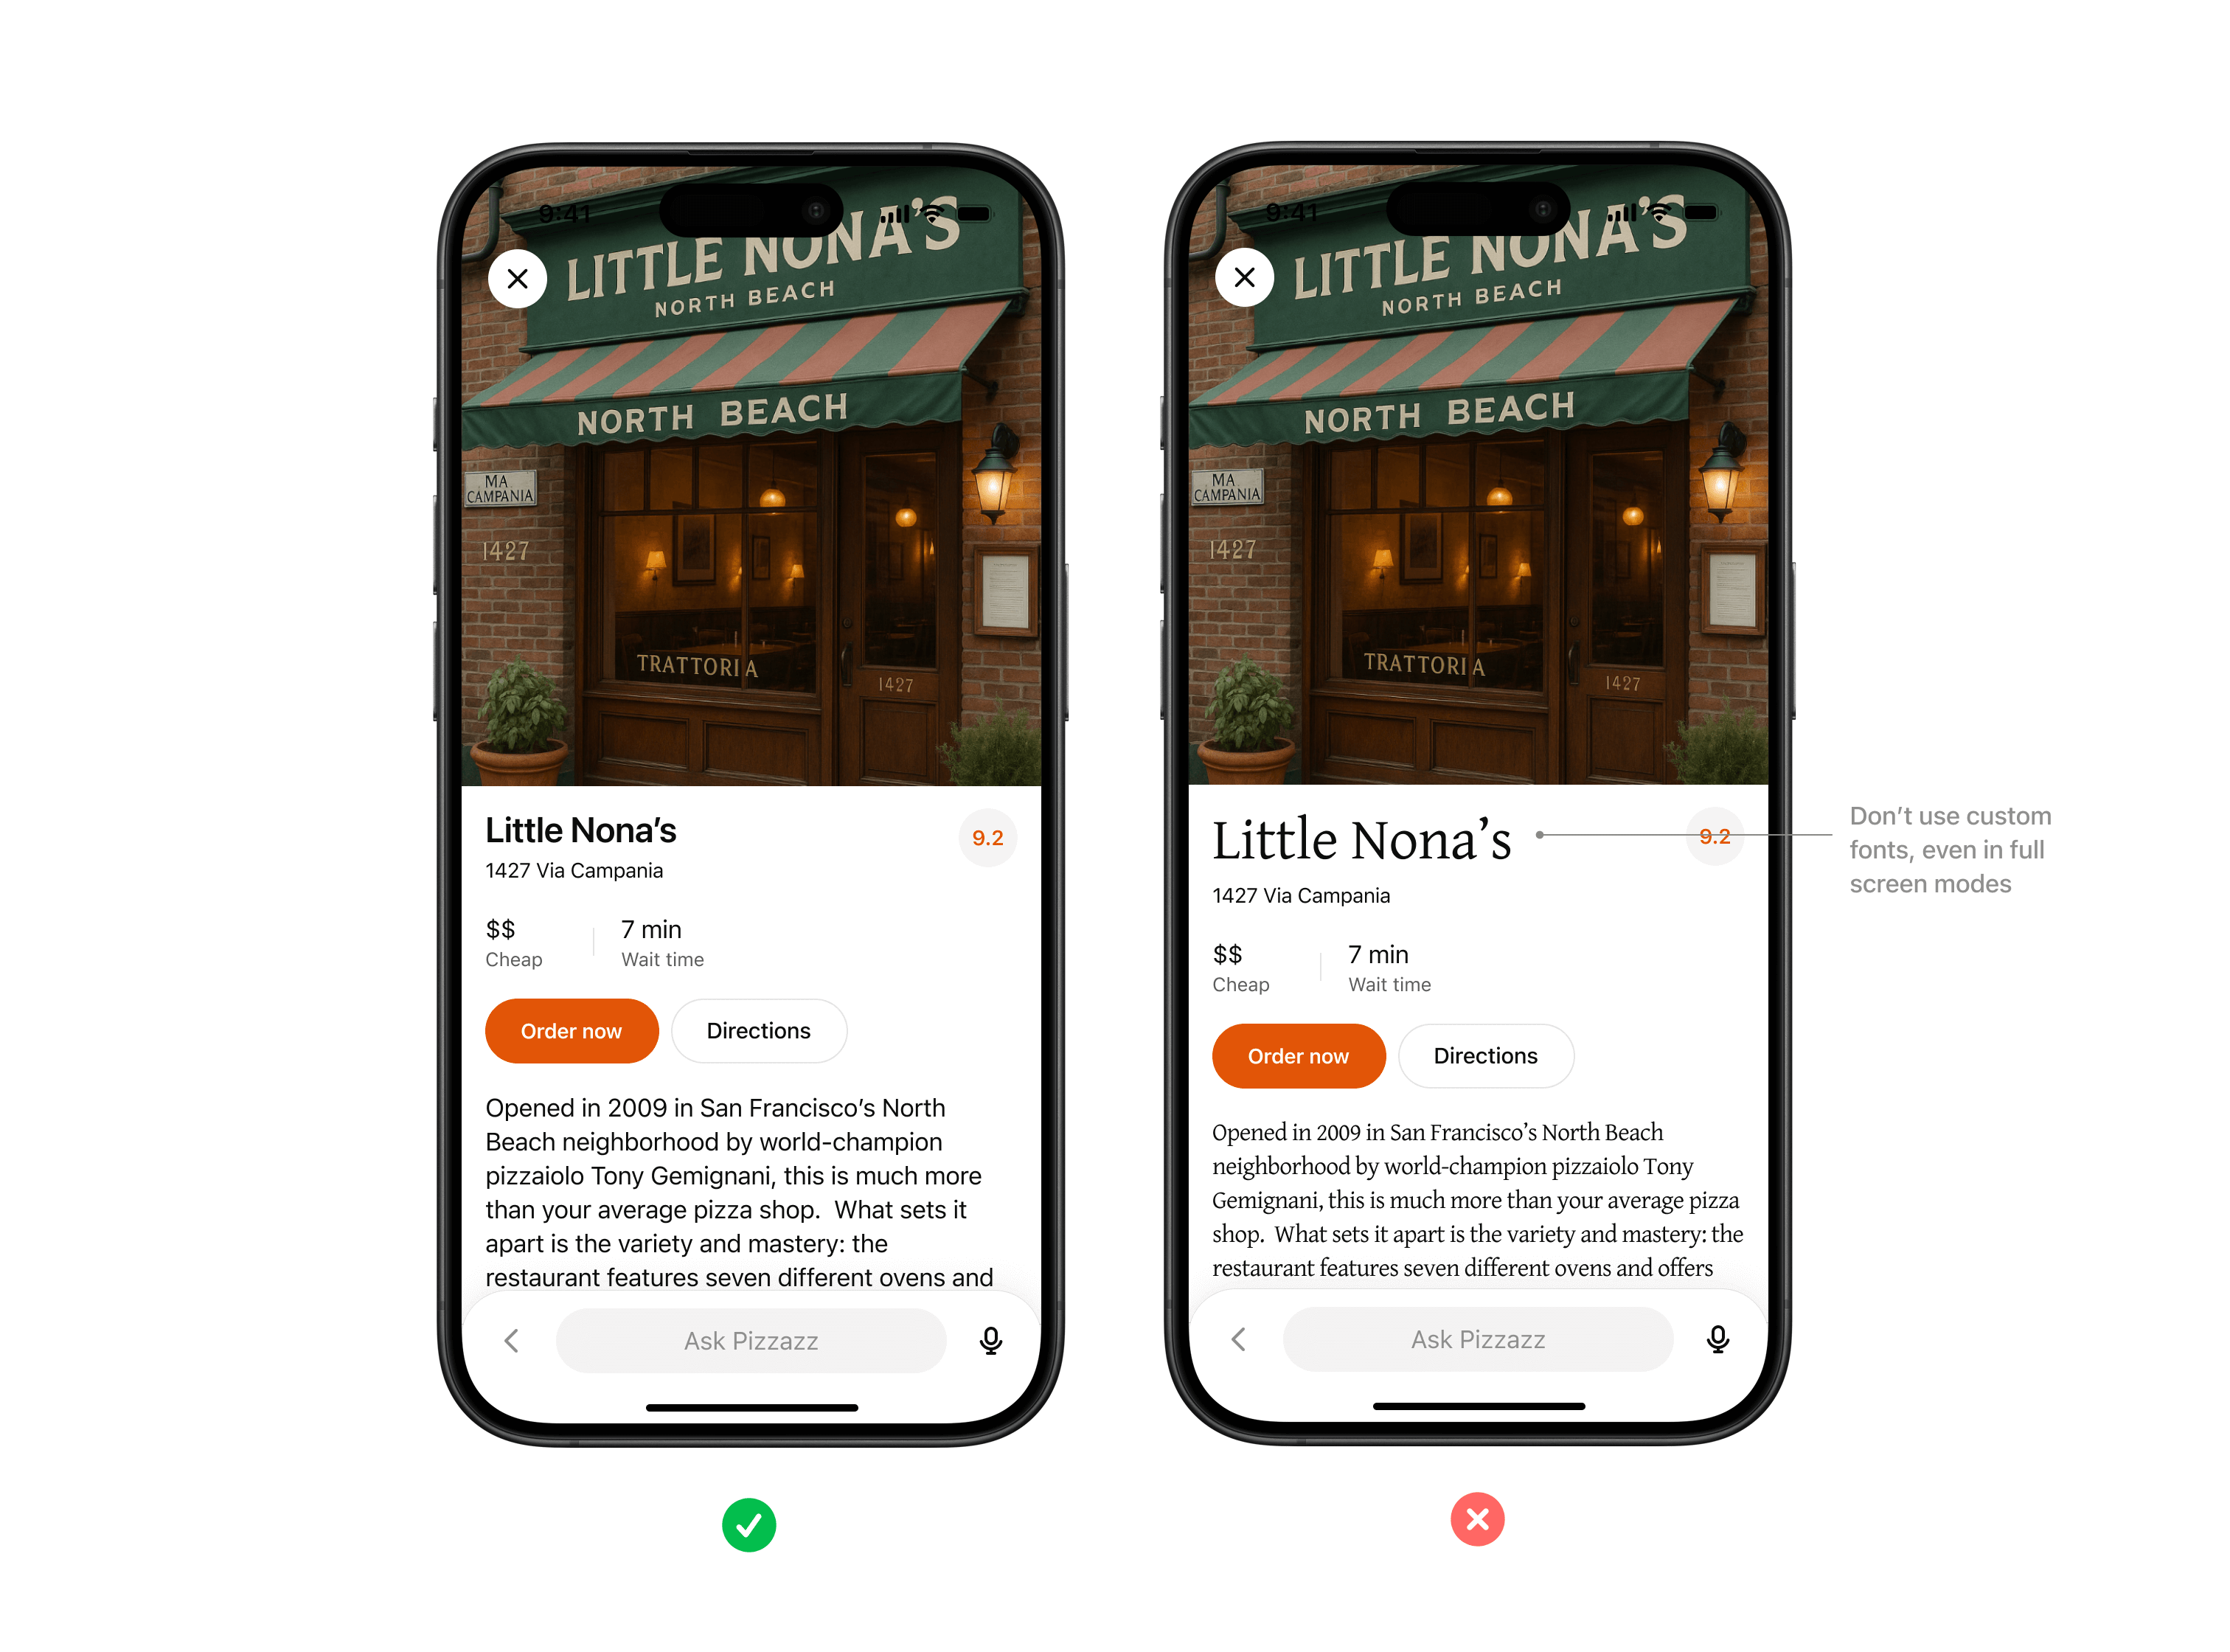
_Don't use custom fonts, even in full screen modes. Use system font variables wherever possible._
### Spacing & layout
Consistent margins, padding, and alignment keep partner content scannable and predictable inside conversation.
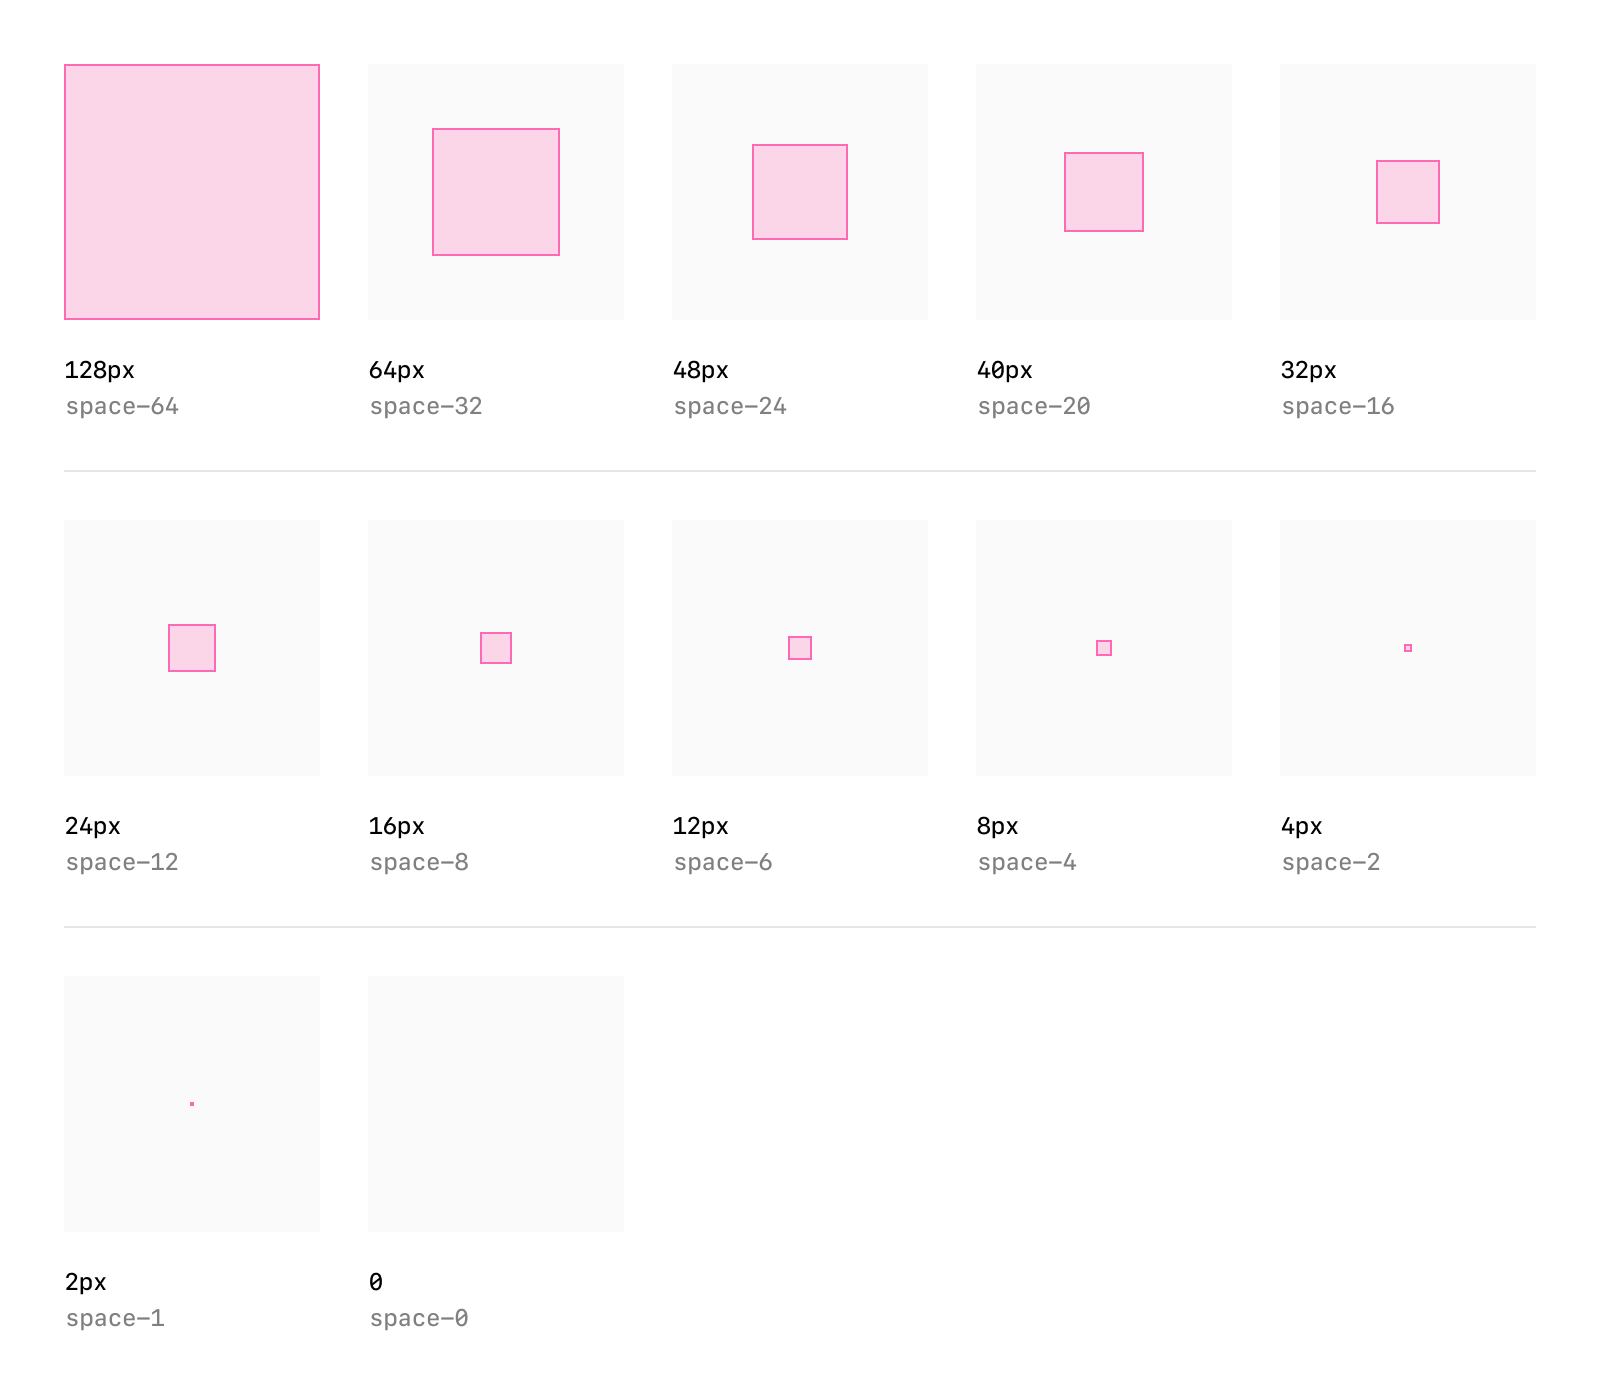
**Rules of thumb**
- Use system grid spacing for cards, collections, and inspector panels.
- Keep padding consistent and avoid cramming or edge-to-edge text.
- Respect system specified corner rounds when possible to keep shapes consistent.
- Maintain visual hierarchy with headline, supporting text, and CTA in a clear order.
### Icons & imagery
System iconography provides visual clarity, while partner logos and images help users recognize brand context.

**Rules of thumb**
- Use either system icons or custom iconography that fits within ChatGPT's visual world—monochromatic and outlined.
- Do not include your logo as part of the response. ChatGPT will always append your logo and app name before the widget is rendered.
- All imagery must follow enforced aspect ratios to avoid distortion.
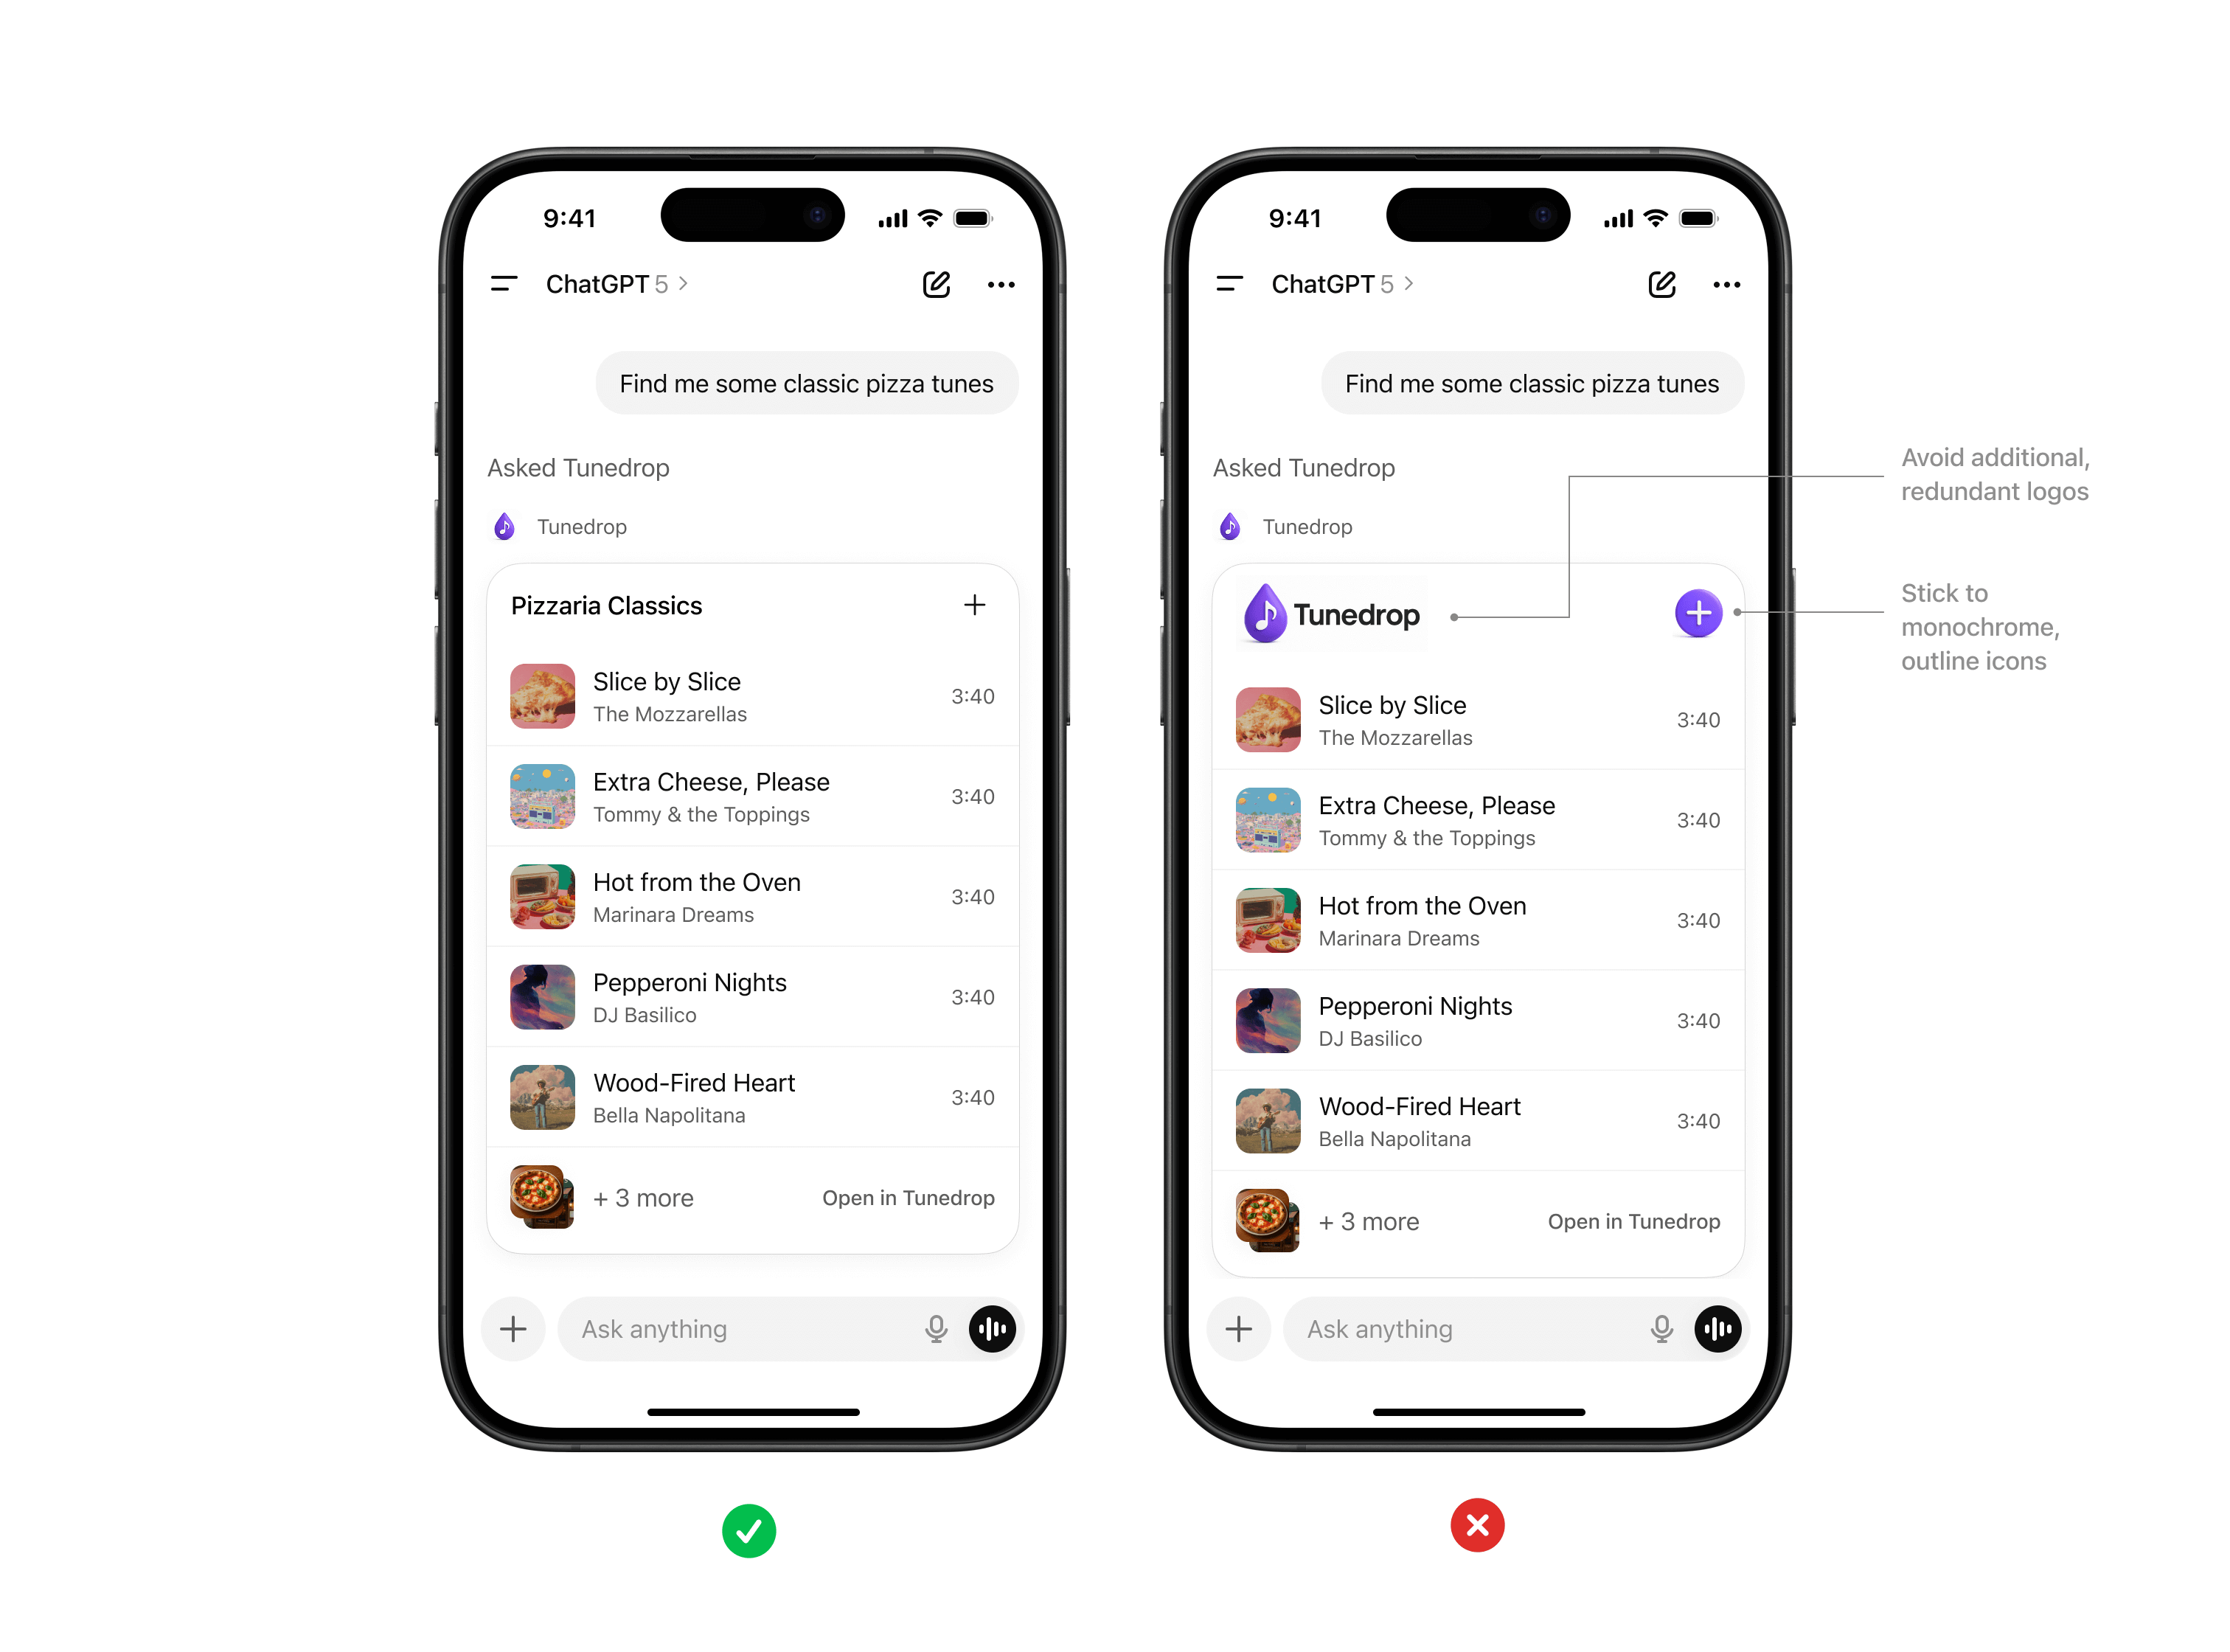
### Accessibility
Every partner experience should be usable by the widest possible audience.
Accessibility should be a core consideration when you are building apps for ChatGPT.
**Rules of thumb**
- Text and background must maintain a minimum contrast ratio (WCAG AA).
- Provide alt text for all images.
- Support text resizing without breaking layouts.
---
# Connect and test your plugin
Test each capability before testing the complete installed plugin. If the
plugin includes an MCP server, start by connecting and evaluating the server in
developer mode. Then package the plugin with its skills and test the complete
experience. Skills-only plugins can skip the first section.
Keep your evaluation prompts and results throughout development so you can
compare behavior across releases.
## Test an MCP server (optional)
### Prepare the endpoint
Confirm that:
- The MCP server is reachable through a public HTTPS endpoint or
[Secure MCP Tunnel](https://developers.openai.com/api/docs/guides/secure-mcp-tunnels).
- A public endpoint supports streamable HTTP, typically at `/mcp`, or the
tunnel can reach its configured stdio or HTTP MCP server.
- Tool names, descriptions, schemas, and annotations are present.
- Authentication discovery works for tools that require an account.
Use Secure MCP Tunnel to connect a private MCP server in developer mode without
exposing the server to the public internet. A development tunnel or another
HTTPS forwarding service can also provide an endpoint for local testing. These
testing options do not replace the public HTTPS endpoint required for
[plugin submission](https://developers.openai.com/plugins/build/mcp-server#deploy-the-endpoint).
### Inspect the MCP server
Use [MCP Inspector](https://modelcontextprotocol.io/docs/tools/inspector) to
list and call tools directly:
```bash
npx @modelcontextprotocol/inspector@latest
```
Exercise each tool with representative inputs, edge cases, missing identifiers,
and empty results. Verify schema validation, authentication errors, annotations,
confirmation behavior, and the model-readable result.
### Enable developer mode
In ChatGPT:
1. Open **Settings**.
2. Select **Security and login**.
3. Turn on **Developer mode**.
Developer mode availability can depend on account and workspace policy.
### Add the MCP server
1. Go to [ChatGPT Plugins](https://chatgpt.com/plugins).
2. Select the plus button.
3. Enter a user-facing name and description.
4. Under **Connection**, choose the connection method:
- For a public endpoint, enter the MCP server URL, including the `/mcp` path.
- For Secure MCP Tunnel, select **Tunnel**, then choose an available tunnel
or enter its `tunnel_id`.
5. Create the connection.
6. Review the tools and metadata discovered from the server.
If ChatGPT cannot connect, verify the public HTTPS endpoint with MCP Inspector,
or check the tunnel's workspace association and `tunnel-client` status. Resolve
transport, initialization, schema, or authentication errors before continuing.
### Check tool selection
Start a new conversation and add the MCP connection from the tools menu. Create
an evaluation set that includes:
- Direct requests that should call a specific tool.
- Indirect requests that express the same goal.
- Follow-up requests that reuse identifiers from earlier results.
- Write actions that require authorization or confirmation.
- Unsupported requests that shouldn't call a tool.
For each request, record the selected tool, arguments, result, errors, and
confirmation behavior. Rerun the set whenever you change tool names,
descriptions, schemas, or annotations.
If the server returns optional UI, test both the component and the
model-readable result.
### Test through the API Playground
For raw request and response logs, open the
[API Playground](https://platform.openai.com/playground):
1. Choose **Tools → Add → MCP Server**.
2. Enter the HTTPS endpoint and connect.
3. Run test prompts and inspect the request and response data.
### Refresh metadata
After changing tool names, descriptions, schemas, annotations, authentication,
or UI resources:
1. Deploy or restart the MCP server.
2. Open the connection at [ChatGPT Plugins](https://chatgpt.com/plugins).
3. Select **Refresh**.
4. Confirm that the advertised metadata changed.
5. Start a new conversation and rerun the affected tests.
This refresh flow applies to MCP servers connected in developer mode.
Published plugins with MCP use reviewed
[metadata snapshots](https://developers.openai.com/plugins/deploy/submission#how-published-mcp-metadata-versions-work).
To update published metadata, scan the server, submit a new version, and
publish the approved version.
Before packaging the plugin, confirm that:
- The tool list matches the documented capabilities.
- Structured results match each tool's declared output schema.
- Authentication failures return useful errors.
- Positive prompts select the expected tools and negative prompts don't.
- Optional UI renders without console errors and restores state correctly.
## Test the complete plugin
After the MCP server works—or immediately for a skills-only plugin—package and
install the complete plugin from a local source:
1. [Package the plugin](https://developers.openai.com/plugins/build/plugins) with its skills, manifest, and
MCP server connection when applicable.
2. Add the plugin to a local marketplace and install it from the Plugins
Directory.
3. Start a new conversation with the plugin enabled.
4. Run representative requests from the plugin's use-case inventory.
Create an evaluation set that includes:
- Direct requests that should use a skill.
- Indirect requests that express the same goal.
- Follow-up requests that depend on an earlier result.
- Negative requests that shouldn't use the plugin.
- Boundary cases that the plugin intentionally doesn't support.
For each request, check that the plugin follows the skill instructions, uses
the expected resources, completes every required step, and produces a useful
result. Record any missing steps, unnecessary activations, or inconsistent
results.
For plugins with an MCP server, also confirm that skills invoke the right tools,
tool results return to the workflow, authentication works after installation,
and users can complete each combined workflow from start to finish.
Before submission, confirm that:
- Each skill activates for the intended requests.
- Similar phrasing produces consistent behavior.
- Unsupported requests don't activate the plugin.
- Bundled files and references resolve after installation.
- The plugin's starter prompts represent workflows it can complete.
- For plugins with an MCP server, bundled skills and tools work together as
intended.
---
# MCP server review requirements
Prepare an MCP server and its optional UI for public review as part of a
plugin.
Submit and publish the complete plugin, including its skills, MCP server, and
optional UI, through the plugin submission portal. See
[Submit plugins](https://developers.openai.com/plugins/deploy/submission) for the
source-of-truth submission flow and
[Build an MCP server](https://developers.openai.com/plugins/build/mcp-server) for how
server-backed capabilities fit into plugins.
## Prepare MCP capabilities for plugin submission
Use this page for requirements that apply when a plugin includes an MCP server:
organization verification, management permissions, server requirements,
review snapshots, and version maintenance.
When the plugin works in
[developer mode](https://developers.openai.com/plugins/deploy/connect-chatgpt#test-an-mcp-server-optional),
submit it
for review in the
[plugin submission portal](https://platform.openai.com/plugins). This page
covers the MCP server and optional UI requirements for that submission.
Only submit the plugin if you intend for it to be publicly available in the
countries you define during submission. For private or workspace-only use, use
[developer mode](https://platform.openai.com/docs/guides/developer-mode)
instead.
Before submitting the plugin, review the
[plugin guidelines](https://developers.openai.com/plugins/app-guidelines) for MCP server and optional UI
expectations, and see
[Submit plugins](https://developers.openai.com/plugins/deploy/submission) for the full plugin submission,
approval, and publishing flow.
For the complete flow, including skills-only and MCP-backed plugins, review,
approval, and publishing, see
[Submit plugins](https://developers.openai.com/plugins/deploy/submission).
## Before you submit the plugin
### Organization verification
Before submitting a plugin with MCP, complete identity verification
in the [OpenAI Platform Dashboard](https://platform.openai.com/settings/organization/general)
for the name you plan to publish under in the directory.
- **If you want to publish under your own name**, complete **individual verification**.
- **If you want to publish under a business name**, complete **business verification**.
This is enforced during review. Publishing under an unverified individual or
business name will result in rejection.
### Plugin submission permissions
To create plugin drafts with MCP and submit them for review, you need
the `api.apps.write` permission. To view drafts and review status in the
Dashboard, you need the `api.apps.read` permission. Organization owners
automatically have both permissions, and can grant them to non-owners through
roles in the [OpenAI Platform Dashboard](https://platform.openai.com/settings/organization/roles).
### MCP server requirements
- Your MCP server is hosted on a publicly accessible domain
- You are not using a local or testing endpoint
- If the server returns UI, you defined a [content security policy (CSP)](https://developers.openai.com/plugins/build/chatgpt-ui#content-security-policy-csp) that allows the exact domains the component fetches from.
### Template MCP server URLs
Most plugins should submit a universal MCP server URL: a single hosted MCP endpoint that works for all users and organizations. Choose **Template** only if the plugin uses workspace-specific MCP server URLs, such as when each customer has a separate tenant, workspace, or managed MCP endpoint. We only support template-based URLs for trusted developers with whom we have an established relationship.
Template submissions require two URL values:
- **Example MCP Server URL:** A concrete, working MCP endpoint for review and automated checks.
- **Template MCP Server URL:** The URL pattern that describes which part of the MCP endpoint changes across customer workspaces.
The example MCP server URL must be a real endpoint that OpenAI can connect to during submission review. Don't enter a placeholder URL in the **Example MCP Server URL** field.
Use placeholders in the **Template MCP Server URL** for the parts that a workspace admin will configure later. Placeholders must use `{name}` syntax, start with a letter, and contain only letters, numbers, or underscores. Each placeholder name must be unique.
Make sure the concrete **Example MCP Server URL** matches the template pattern after replacing each placeholder with a real value.
For example:
```text
Example MCP Server URL: https://acme.example.com/mcp
Template MCP Server URL: https://{workspace}.example.com/mcp
```
## Submit for review
If the prerequisites are met, you can submit the plugin
for review from the [plugin submission portal](https://platform.openai.com/plugins).
### Start the review process
In the plugin submission portal:
1. Add your MCP server details (as well as OAuth credentials if OAuth is selected), and then select **Scan Tools**.
2. Complete the required fields in the submission form and check all confirmation boxes. You will need to provide the plugin name, logo, description, company and privacy policy URLs, MCP and tool information, test prompts and responses, and localization information. If the plugin has UI, you may also provide optional screenshots. Don't provide screenshots when the plugin has no UI.
3. Select **Submit for review**.
### Metadata stored during tool scanning
When you select **Scan Tools**, the dashboard imports metadata advertised by your MCP endpoint into the draft. This includes tool names, titles, and descriptions; input and output schemas; security schemes; `_meta` fields; [tool annotations](https://developers.openai.com/plugins/reference#annotations); linked UI resource metadata, including CSP settings; and MCP server `instructions`. The dashboard displays the annotation values provided by your server.
Your submission justifications should explain why those server-provided annotation values match each tool's behavior. They don't override the annotations. For example, if your server advertises `readOnlyHint: false`, describing the tool as “functionally read-only” in the justification doesn't make the tool read-only. If the tool is truly read-only, update its server annotation to `readOnlyHint: true`, deploy the change, select **Scan Tools** again, verify the updated value, and then submit.
Each organization can publish multiple unique plugins with MCP. For each MCP
server integration, only one version may be published at a time and only one
version may be in review at a time. If you need to make changes after
submitting, withdraw that submission by selecting **Cancel Review** and
resubmit the same version draft.
_For now, projects with EU data residency cannot submit plugins with MCP
servers for review. Use a project with global data residency. If you don't have
one, create a new project in your current organization from the OpenAI
Dashboard._
## Review and approval
Once submitted, the plugin will enter the review queue. You can review the
status within the Dashboard and will receive an email notification informing
you of any status changes.
### Reviews and checks
We may perform automated scans or manual reviews to understand how your plugin
works and whether it may conflict with our policies.
### Approval, rejection, and appeals
If your plugin is approved, we will notify you by email. Once approved, you can publish it from the plugin submission portal.
If your plugin is rejected or removed because of its MCP server, tools, or UI,
you will receive feedback on which checks were unsuccessful. After making the
necessary changes, you may resubmit the plugin for review. To appeal the
decision, respond to the email you received with a clear rationale and any new
information that can assist the review.
### Getting help
If you have questions before, during, or after submission and the documentation
does not answer them, contact OpenAI support. Include the ID shown in the plugin
submission portal so the support team can identify your plugin.
### Review and approval FAQs
**How long does review take?**
Review timelines may vary as we continue to build and scale our processes. Please do not contact support to request expedited review, as these requests cannot be accommodated.
**What are common rejection reasons and how can I resolve them?**
- **We're unable to connect to your MCP server using the MCP URL and/or test credentials we were given.**
- For servers requiring authentication, our review team must be able to log into a demo account with no further configuration required.
- Ensure that the provided URL and credentials are correct, do not feature MFA (including requiring SMS codes, login through systems that require SMS, email or other verification schemes).
- Ensure that the provided credentials can be used to log in successfully (test them outside any company networks, local area networks, or other internal networks).
- Confirm that the credentials have not expired.
- **One or more of your test cases did not produce correct results.**
- Review all test cases carefully and rerun each one. Ensure that outputs match the expected results. Verify that there are no errors in the UI (if applicable) - for example, issues with loading content, images, or other UI issues.
- Ensure that the returned textual output closely adheres to the user's request, and does not offer extraneous information that is irrelevant to the request, including personal identifiers.
- Ensure that all test cases pass on the supported ChatGPT and Codex surfaces
where the plugin will be available.
- Compare actual outputs to precise expected behavior for each tool and fix any mismatch so results are relevant to the user's input and the plugin reliably does what it promises.
- If required, in your resubmission, modify your test cases and expected responses to be clear and unambiguous.
- **Your plugin returns user-related data types that are not disclosed in your privacy policy.**
- Audit your MCP tool responses in developer mode by running a few realistic example requests and listing every user-related field the server returns (including nested fields and “debug” payloads). Ensure tools return only what's strictly necessary for the user's request and remove any unnecessary PII, telemetry/internal identifiers (for example, session, trace, or request IDs; timestamps; internal account IDs; or logs) and any auth secrets (tokens, keys, or passwords).
- You may also consider updating your published privacy policy so it explicitly discloses all categories of personal data you collect, process, or return and why—if a field isn't truly needed, remove it rather than disclose it.
- If a user identifier is truly necessary, make it explicitly requested and directly tied to the user's intent (not “looked up and echoed” by default).
- **Tool hint annotations do not appear to match the tool's behavior:**
- **readOnlyHint:** Set to `true` if it strictly fetches/looks up/lists/retrieves data and does not modify anything. Set to `false` if the tool can create/update/delete anything, trigger actions (send emails/messages, run jobs, enqueue tasks, write logs, start workflows), or otherwise change state.
- **Destructive hint:** Set the destructive annotation to `true` if the tool can cause irreversible outcomes (deleting, overwriting, sending messages or transactions you can't undo, revoking access, or destructive admin actions), even in only select modes, through default parameters, or through indirect side effects. Ensure the justification explains what is irreversible and under what conditions, including safeguards such as confirmation steps, dry-run options, or scoping constraints. Otherwise, set it to `false`.
- **openWorldHint:** Set to `true` if it can write to or change publicly visible internet state (for example, posting to social media, blogs, or forums; sending emails, SMS, or messages to external recipients; creating public tickets or issues; publishing pages; pushing code or content to public endpoints; submitting forms to third parties; or otherwise affecting systems outside a private or first-party context). Set to `false` only if it operates entirely within closed or private systems (including internal writes) and cannot change the state of the publicly visible internet.
## Publication and distribution
### Publish the plugin
Once the plugin is approved, you can publish it from the [plugin submission portal](https://platform.openai.com/plugins) by selecting **Publish**.
### Discovery
Once published, users can find your plugin in the universal directory shared
by ChatGPT and Codex by:
- Clicking a direct link to the plugin listing in the directory.
- Searching for the plugin by name.
Plugins that demonstrate strong real-world utility and high user satisfaction may be eligible for enhanced distribution opportunities—such as directory placement or proactive suggestions—but few plugins will receive enhanced distribution at publication. Developers cannot request enhanced distribution.
### Publication and Distribution FAQs
**What happens after the plugin is approved? Will it be listed in the plugin directory automatically?**
After the plugin is approved, you can choose to publish it from the [plugin submission portal](https://platform.openai.com/plugins). You must publish before it can appear in the universal plugin directory.
**Why can't I see my plugin in the directory?**
Plugins appear on the directory's main pages only if OpenAI selects them for enhanced distribution. To confirm that your plugin is published, search for it using the exact publication name or open its directory URL from the plugin submission portal.
**What should I do if I want to issue a press release or public announcement about my plugin?**
Before issuing any press releases or public announcements regarding the launch
of your plugin, please first reach out to
[press@openai.com](mailto:press@openai.com) to coordinate with our
communications team.
## Ongoing Maintenance
### How published MCP metadata versions work
Treat the metadata exposed by your MCP server as a versioned API contract for
the plugin. When you scan the MCP endpoint in the plugin submission portal,
OpenAI stores the discovered metadata with that draft version. Submitting the
version sends that stored snapshot for review. The published plugin uses this
metadata snapshot while tool calls and UI resources continue to use your live
MCP server.
Use this table to determine how to ship each change:
| Change | Required action | When users see the change |
| -------------------------------------------------------------------------------------------------------------------------------------------------------------------------------------------------------- | ------------------------------------------------------------------------------------------------------------------------------------------------------------------------------- | ----------------------------------------------------------------------------------------------------------- |
| Tool list, names, titles, descriptions, input or output schemas, annotations, tool security schemes, tool `_meta` fields (including UI resource references and visibility), or MCP server `instructions` | Deploy the change, create or update a draft version, scan the endpoint, submit the version for review, and publish it after approval. | After you publish the approved version. Until then, users continue to use the currently published snapshot. |
| UI resource URI or linked resource metadata, including content security policy (CSP) settings | Deploy the change, create or update a draft version, scan the endpoint, submit the version for review, and publish it after approval. | After you publish the approved version. |
| Backward-compatible content update served from the same published UI resource URI | Deploy the content update. You don't need to scan, submit, or publish a new version if the URI and published contract remain compatible. | After deployment. ChatGPT may continue serving cached resource contents for up to one hour. |
| Server-only fix or change to live tool results, including result `_meta`, or business data | Deploy the server change. You don't need to scan, submit, or publish a new version if the change preserves the published contract. | Through your live endpoint after deployment. |
| MCP server origin (`scheme`, `hostname`, or `port`) | To change the origin, create a new plugin, then complete its scan, submission, review, and publication flow. To change only the endpoint path, use the normal new-version flow. | After you publish the new plugin or approved version. |
Breaking changes to the MCP server contract inside a published plugin aren't
currently supported. Removing or renaming a tool, making a schema incompatible,
or serving incompatible content at or removing content from a published UI
resource URI can break the current version as soon as the server change
deploys. Make backward-compatible updates instead:
1. Add new tools, fields, or UI resources while continuing to honor the published contracts.
2. Submit the updated metadata as a new version.
3. Publish the approved version and keep the old contracts available.
You can deploy server-only fixes without submitting a new version if they preserve the published contract. If a deployment breaks the published version, roll back the server change rather than waiting for a new version to complete review.
### Submitting new versions for review
Once your plugin is published, its submitted information and reviewed metadata
snapshot are locked for safety. To update either, create a new draft version of
the existing plugin and resubmit that version for review. Each resubmission
starts a new review. In the release notes, describe what changed.
The MCP server origin (`scheme`, `hostname`, or `port`) can't change between
versions. To use a different origin, submit a new plugin with the new MCP
server origin. You can change the endpoint path in a new version of the
existing plugin.
We will review the updated plugin metadata again and inform you by email and in
the [plugin submission portal](https://platform.openai.com/plugins) whether the
update was approved or rejected. If rejected, you may update and resubmit or
appeal the decision.
Once your resubmission is approved, you can publish the update, which will
replace the previous plugin version.
If you've made additional changes to the plugin between submission and approval
and want to submit a new version for review, cancel the review from the plugin
submission portal and resubmit.
### Changing published metadata versions and removing the plugin
Once a plugin is published, you can change its published version from the
[plugin submission portal](https://platform.openai.com/plugins) by removing the
current version from publication and publishing an approved replacement. You
can remove the plugin from public visibility by removing the current version
from publication and not publishing an alternative version.
To remove the plugin from your organization and from ChatGPT and Codex, delete
it from the plugin submission portal.
### Maintenance requirements
Plugins may be removed if they are inactive, unstable, or non-compliant. We may
reject or remove any plugin from our services at any time and for any reason
without notice, such as for legal or security concerns or policy violations.
### Ongoing Maintenance FAQs
**What happens if users report my plugin as harmful or misleading?**
OpenAI reviews user reports and may review or investigate your plugin,
including its MCP server, tools, and UI. Plugins that violate our policies may
be restricted or removed. You may appeal a removal or other enforcement action
by following the appeals process described here. Regularly review and respond
to feedback, and update your plugin if issues are found.
**How long will updates take?**
Similar to new reviews, we are unable to offer estimated times for update
reviews.
---
# Plugin submission errors
Plugins submitted to the public directory are held to a higher standard than
plugins installed in a workspace. Directory submissions must pass the shared
package checks and the additional checks for listing fields, review materials,
MCP tools, skills, assets, and images. This reference also covers shared
package checks, such as app references, that can appear outside the submission
portal.
Use the error code returned during submission to find the matching requirement.
Errors block submission. Warnings don't block submission, but you should review
them before continuing.
Non-empty values can't contain only whitespace. Supported text excludes control
characters, Unicode line or paragraph separators, and unsupported invisible
formatting characters. HTTPS URLs must include a host and contain no embedded
credentials or unsupported characters.
## Final directory submission
A package can pass upload validation and still fail final directory submission.
Final submission uses stricter listing limits and checks MCP configuration,
skill scans, test cases, and policy attestations.
| Field | Final submission rule |
| ----------------- | --------------------------------------------------------------------------------------------------------------------------------------------------------------------------- |
| Package name | Required; at most 64 characters. Start with an ASCII letter or digit and use only ASCII letters, digits, `_`, and `-`. |
| Version | Required; use a semantic version of at most 64 characters. |
| Display name | Required; one line; at most 30 characters. |
| Short description | Required; one line; at most 30 characters. |
| Long description | Required; at most 4,000 characters. Line breaks are allowed. |
| Developer name | Required; one line; at most 80 characters. |
| Category | Required; choose a supported category listed in the [Listing and interface errors](#listing-and-interface-errors) section. |
| Capabilities | At most 20. Each capability must be non-empty, one line, and at most 120 characters. |
| Starter prompts | At most 3. Each prompt must be non-empty, unique after Unicode and whitespace normalization, one line, at most 128 characters, and contain no app `@mention`. |
| URLs | Required for MCP-backed submissions; optional for skills-only submissions. Website, support, privacy policy, and terms URLs must use HTTPS and be at most 1,024 characters. |
| Brand colors | Optional six-digit hex colors. The light color must have at least 2:1 contrast against white, and the dark color must have at least 2:1 contrast against `#212121`. |
Every plugin submission also requires:
- Passing safety and security scans for every bundled skill. Scans can take up
to 2 hours.
- A verified developer or business identity and all required policy
attestations.
For an MCP-backed plugin, final submission also requires:
- Website, support, privacy policy, and terms URLs that meet the rules above.
- A demo-recording URL that shows the main use cases and tools across supported
platforms.
- Exactly five positive test cases, three negative test cases, and release
notes.
- A production HTTPS MCP server URL, a completed domain-verification challenge,
and a successful, current tool scan.
- Explicit `readOnlyHint`, `openWorldHint`, and `destructiveHint` values and a
justification for each value on every MCP tool.
- Reviewer-ready demo credentials when the server uses OAuth.
- Screenshots only when the MCP server provides custom UI. If you add
screenshots, provide one PNG or JPEG image for every starter prompt. Each
screenshot must be exactly 706 pixels wide and 400–860 pixels tall.
### Final metadata errors
In these error names, `subtitle` means short description and `description`
means long description.
| Name | Requirement |
| ------------------------------------------------- | ------------------------------------------------------------------------------------------------------- |
| `submission_display_name_required` | Display name is required, non-empty, and single-line. |
| `submission_display_name_too_long` | Display name must be 30 characters or fewer. |
| `submission_display_name_character_unsupported` | Display name must use supported text and fit on one line. |
| `submission_subtitle_required` | Short description is required, non-empty, and single-line. |
| `submission_subtitle_too_long` | Short description must be 30 characters or fewer. |
| `submission_subtitle_character_unsupported` | Short description must use supported text and fit on one line. |
| `submission_description_required` | Long description is required and must be non-empty. Line breaks are allowed. |
| `submission_description_too_long` | Long description must be 4,000 characters or fewer. |
| `submission_description_character_unsupported` | Long description must use supported text. Line breaks are allowed. |
| `submission_developer_name_required` | Developer name is required, non-empty, and single-line. |
| `submission_developer_name_too_long` | Developer name must be 80 characters or fewer. |
| `submission_developer_name_character_unsupported` | Developer name must use supported text and fit on one line. |
| `plugin_capability_invalid` | Each capability must be non-empty, use supported text, fit on one line, and be 120 characters or fewer. |
| `plugin_default_prompt_mention` | Starter prompts must not contain app `@mentions`. |
| `plugin_default_prompt_duplicate` | Starter prompts must be unique after Unicode and whitespace normalization. |
### MCP and review errors
These errors apply to MCP-backed submissions.
| Name | Requirement |
| ----------------------------------- | --------------------------------------------------------------------------------------------------------------------------------------------------------------------------------- |
| `annotations_required` | Every MCP tool must set `readOnlyHint`, `openWorldHint`, and `destructiveHint` accurately. |
| `justification_required` | Every MCP tool annotation must include a justification for its read-only, open-world, or destructive behavior. |
| `scan_required` | MCP tools must have a successful, current scan of the production MCP server. |
| `domain_verification_required` | The exact verification token must be hosted at the generated `/.well-known/openai-apps-challenge` URL on the MCP host or an allowed parent host, and **Verify Domain** must pass. |
| `frame_domain_explanation_required` | Every external frame domain reported by the MCP tool scan must have an explanation of why the UI needs it and what content it provides. |
| `screenshots_not_allowed` | Screenshots are allowed only when the current MCP tool scan reports a UI output template. |
## Archive errors
### Skills-only ZIP upload errors and warnings
**Skills only** uploads accept a plugin manifest and bundled skills. A changed
package name blocks an update; the other findings require confirmation.
| Name | Requirement |
| ----------------------------------- | --------------------------------------------------------------------------------------------------------------------------------------------------------- |
| `plugin_name_mismatch` | The package name in an update must match the existing plugin name. |
| `plugin_version_unchanged` | A new release must use a different manifest `version`; reusing the published version requires confirmation. |
| `mcp_configuration_excluded` | Skills-only ZIP uploads must not include `mcpServers` or `.mcp.json`; MCP-backed plugins must use **With MCP**. |
| `app_configuration_excluded` | Skills-only ZIP uploads must not include `apps` or `.app.json`; plugins with app content must use **With MCP**. |
| `screenshot_configuration_excluded` | Skills-only ZIP uploads must not include `interface.screenshots`; screenshots require **With MCP** and custom UI. |
| `claude_format_normalized` | `.claude-plugin/plugin.json` is converted to `.codex-plugin/plugin.json`, with missing interface defaults and normalized text fields added by the portal. |
| `manifest_normalized` | The portal saves the normalized manifest as `.codex-plugin/plugin.json`; changed fields require confirmation. |
| `developer_name_defaulted` | `author.name` and `interface.developerName` must match, or the selected verified identity is used for both after confirmation. |
### ZIP structure and limit errors
| Name | Requirement |
| --------------------------------------------- | ------------------------------------------------------------------------------------------------ |
| `archive_empty` | Archive must not be empty. |
| `archive_too_large` | Compressed ZIP must be 100 MB or less. |
| `archive_format_not_zip` | Archive must be a valid, uncorrupted ZIP file. |
| `archive_member_path_empty` | Archive entry path must not be empty. |
| `archive_member_path_has_outer_whitespace` | Archive entry path must not begin or end with whitespace. |
| `archive_member_path_has_backslash` | Archive entry path must use `/`, not backslashes. |
| `archive_member_path_absolute` | Archive entry path must be relative to the archive root. |
| `archive_member_path_has_empty_segment` | Archive entry path must not contain empty segments. |
| `archive_member_path_has_parent_segment` | Archive entry path must not contain `..` segments. |
| `archive_member_path_too_deep` | Archive entry path must contain at most 20 segments, including the filename. |
| `archive_member_path_too_long` | Archive entry path must be within the supported path-length limit. |
| `archive_member_path_normalization_collision` | Archive entry paths must remain unique after case and Unicode normalization. |
| `archive_member_type_unsupported` | Archive entries must be regular files or directories. |
| `archive_member_too_large` | Archive entry must not exceed 100 MiB. |
| `archive_member_path_duplicate` | Archive entry path must be unique. |
| `archive_member_path_type_conflict` | A file path cannot also be a directory or contain another archive entry. |
| `archive_too_many_entries` | Archive must not contain more than 5,000 entries. |
| `archive_uncompressed_too_large` | Extracted archive must not exceed 512 MiB. |
| `archive_member_unreadable` | Every archive entry must be readable, must not be encrypted, and must use supported compression. |
## Plugin root errors
| Name | Requirement |
| ------------------------------ | --------------------------------------------------------------------------------------------------------------------- |
| `plugin_root_missing` | The selected path must exist and be a directory containing a plugin. |
| `archive_plugin_files_missing` | A skills-only ZIP must contain a supported plugin manifest and at least one valid skill at `skills//SKILL.md`. |
| `plugin_root_ambiguous` | ZIP must contain exactly one plugin root, either at the archive root or in one top-level directory. |
| `plugin_root_has_siblings` | A ZIP with a top-level plugin directory must not contain sibling files. |
## Plugin manifest errors
| Name | Requirement |
| ------------------------------------------- | ------------------------------------------------------------------------------------------------------------------------------------------------------------ |
| `plugin_manifest_missing` | ZIP must contain `.codex-plugin/plugin.json`, `.agent-plugin/plugin.json`, or `.claude-plugin/plugin.json` at the root or in its single top-level directory. |
| `plugin_manifest_not_file` | Plugin manifest must be a regular JSON file. |
| `plugin_manifest_unreadable` | Plugin manifest must be readable UTF-8 text. |
| `plugin_manifest_json_malformed` | Plugin manifest must contain valid JSON; malformed syntax is reported with a line number. |
| `plugin_manifest_root_not_object` | Plugin manifest must contain a JSON object at the top level. |
| `codex_manifest_parent_not_directory` | `.codex-plugin` must be a directory. |
| `codex_manifest_path_not_file` | `.codex-plugin/plugin.json` must be a regular JSON file. |
| `plugin_id_wrong_type` | `id` must be a string when provided. |
| `plugin_id_empty` | `id` must be non-empty when provided. |
| `plugin_name_missing` | `name` is required. |
| `plugin_name_wrong_type` | `name` must be a string. |
| `plugin_name_empty` | `name` must be non-empty. |
| `plugin_name_too_long` | `name` must be 64 characters or fewer. |
| `plugin_name_format` | `name` must start with an ASCII letter or digit and contain only ASCII letters, digits, `_`, or `-`. |
| `plugin_version_missing` | `version` is required. |
| `plugin_version_wrong_type` | `version` must be a string. |
| `plugin_version_empty` | `version` must be a non-empty semantic-version string, such as `1.0.0`. |
| `plugin_version_not_semver` | `version` must use semantic versioning, such as `1.0.0`. |
| `plugin_version_too_long` | `version` must be 64 characters or fewer. |
| `plugin_description_missing` | `description` is required. |
| `plugin_description_wrong_type` | `description` must be a string. |
| `plugin_description_empty` | `description` must be non-empty. |
| `plugin_description_too_long` | `description` must be 1,024 characters or fewer. |
| `plugin_description_character_unsupported` | `description` must use supported text. Line breaks are allowed. |
| `plugin_developer_missing` | `author.name` is required. `interface.developerName` is also required and is reported separately. |
| `plugin_author_wrong_type` | `author` must be an object. |
| `plugin_author_name_wrong_type` | `author.name` must be a string. |
| `plugin_author_name_empty` | `author.name` must be non-empty. |
| `plugin_author_name_too_long` | `author.name` must be 120 characters or fewer. |
| `plugin_author_name_character_unsupported` | `author.name` must use supported text. |
| `plugin_author_email_wrong_type` | `author.email` must be a string when provided. |
| `plugin_author_email_empty` | `author.email` must be non-empty when provided. |
| `plugin_author_email_too_long` | `author.email` must be 320 characters or fewer. |
| `plugin_author_email_character_unsupported` | `author.email` must use supported text. |
| `plugin_author_url_wrong_type` | `author.url` must be a string when provided. |
| `plugin_author_url_empty` | `author.url` must be non-empty when provided. |
| `plugin_author_url_not_https` | `author.url` must be an HTTPS URL. |
| `plugin_author_url_has_credentials` | `author.url` must not contain credentials. |
| `plugin_author_url_too_long` | `author.url` must be 2,048 characters or fewer. |
| `plugin_author_url_character_unsupported` | `author.url` must use supported text. |
## Listing and interface errors
The plugin manifest's `interface` object defines the public listing shown to
users. It lives in `.codex-plugin/plugin.json` and uses fields such as
`displayName` and `shortDescription`:
```json
{
"interface": {
"displayName": "Example Plugin",
"shortDescription": "Summarize documents",
"longDescription": "Summarize and organize documents.",
"developerName": "Example",
"category": "Productivity",
"capabilities": ["Summarize documents"]
}
}
```
The four listing URLs (website, privacy policy, terms, and support) are
optional for skills-only plugins and required for MCP-backed plugins. Their
length limit is 2,048 characters for package validation and 1,024 characters
for final directory submission.
| Name | Requirement |
| ------------------------------------------------ | ----------------------------------------------------------------------------------------------------------------------------------------------------------------------------------------------------------------------------------------------- |
| `plugin_interface_wrong_type` | The plugin manifest's `interface` field must be a JSON object. |
| `plugin_display_name_wrong_type` | `interface.displayName` must be a string. |
| `plugin_display_name_empty` | `interface.displayName` is required and must be non-empty. |
| `plugin_display_name_too_long` | `interface.displayName` must be 80 characters or fewer for package validation and 30 characters or fewer for final directory submission. |
| `plugin_display_name_character_unsupported` | `interface.displayName` must use supported text. |
| `plugin_short_description_missing` | `interface.shortDescription` is required, must fit on one line, and must be 240 characters or fewer for package validation and 30 characters or fewer for final directory submission. |
| `plugin_short_description_wrong_type` | `interface.shortDescription` must be a string. |
| `plugin_short_description_empty` | `interface.shortDescription` must be non-empty. |
| `plugin_short_description_too_long` | `interface.shortDescription` must be 240 characters or fewer for package validation and 30 characters or fewer for final directory submission. |
| `plugin_short_description_character_unsupported` | `interface.shortDescription` must use supported text. |
| `plugin_long_description_wrong_type` | `interface.longDescription` must be a string. |
| `plugin_long_description_empty` | `interface.longDescription` is required and must be non-empty. |
| `plugin_long_description_too_long` | `interface.longDescription` must be 4,000 characters or fewer. |
| `plugin_long_description_character_unsupported` | `interface.longDescription` must use supported text. Line breaks are allowed. |
| `plugin_developer_name_wrong_type` | `interface.developerName` must be a string. |
| `plugin_developer_name_empty` | `interface.developerName` is required and must be non-empty. |
| `plugin_developer_name_too_long` | `interface.developerName` must be 120 characters or fewer for package validation and 80 characters or fewer for final directory submission. |
| `plugin_developer_name_character_unsupported` | `interface.developerName` must use supported text. |
| `plugin_category_wrong_type` | `interface.category` must be a string. |
| `plugin_category_empty` | `interface.category` must be non-empty when provided; omit it to use `Other`. |
| `plugin_category_unknown` | `interface.category` must be `Productivity`, `Creativity`, `Developer Tools`, `Business & Operations`, `Data & Analytics`, `Communication`, `Education & Research`, `Security`, `Finance`, `Healthcare`, `Travel`, `Entertainment`, or `Other`. |
| `plugin_category_character_unsupported` | `interface.category` must use supported text. |
| `plugin_capabilities_wrong_type` | `interface.capabilities` must be a list of strings. |
| `plugin_capabilities_too_many` | `interface.capabilities` must contain 20 entries or fewer. |
| `plugin_capability_wrong_type` | Each `interface.capabilities` entry must be a string. |
| `plugin_capability_empty` | Each `interface.capabilities` entry must be non-empty when provided. |
| `plugin_capability_too_long` | Each `interface.capabilities` entry must be 120 characters or fewer. |
| `plugin_capability_character_unsupported` | Each `interface.capabilities` entry must use supported text. |
| `plugin_website_url_wrong_type` | `interface.websiteURL` must be a string when provided. |
| `plugin_website_url_empty` | `interface.websiteURL` must be non-empty when provided. |
| `plugin_website_url_format` | `interface.websiteURL` must be an HTTPS URL. |
| `plugin_website_url_too_long` | `interface.websiteURL` must meet the listing URL length limits. |
| `plugin_privacy_policy_url_wrong_type` | `interface.privacyPolicyURL` must be a string when provided. |
| `plugin_privacy_policy_url_empty` | `interface.privacyPolicyURL` must be non-empty when provided. |
| `plugin_privacy_policy_url_format` | `interface.privacyPolicyURL` must be an HTTPS URL. |
| `plugin_privacy_policy_url_too_long` | `interface.privacyPolicyURL` must meet the listing URL length limits. |
| `plugin_terms_of_service_url_wrong_type` | `interface.termsOfServiceURL` must be a string when provided. |
| `plugin_terms_of_service_url_empty` | `interface.termsOfServiceURL` must be non-empty when provided. |
| `plugin_terms_of_service_url_format` | `interface.termsOfServiceURL` must be an HTTPS URL. |
| `plugin_terms_of_service_url_too_long` | `interface.termsOfServiceURL` must meet the listing URL length limits. |
| `plugin_support_url_wrong_type` | `interface.supportURL` must be a string when provided. |
| `plugin_support_url_empty` | `interface.supportURL` must be non-empty when provided. |
| `plugin_support_url_format` | `interface.supportURL` must be an HTTPS URL. |
| `plugin_support_url_too_long` | `interface.supportURL` must meet the listing URL length limits. |
| `plugin_homepage_wrong_type` | `homepage` must be a string when provided. |
| `plugin_homepage_empty` | `homepage` must be non-empty when provided. |
| `plugin_homepage_format` | `homepage` must be an HTTPS URL. |
| `plugin_homepage_too_long` | `homepage` must be 2,048 characters or fewer. |
| `plugin_brand_color_wrong_type` | `interface.brandColor` must be a string when provided. |
| `plugin_brand_color_empty` | `interface.brandColor` must be non-empty when provided. |
| `plugin_brand_color_format` | `interface.brandColor` must be a six-digit hex color, such as `#1ABCFE`. |
| `plugin_brand_color_dark_wrong_type` | `interface.brandColorDark` must be a string when provided. |
| `plugin_brand_color_dark_empty` | `interface.brandColorDark` must be non-empty when provided. |
| `plugin_brand_color_dark_format` | `interface.brandColorDark` must be a six-digit hex color, such as `#1ABCFE`. |
| `plugin_brand_color_contrast` | `interface.brandColor` must have at least 2:1 contrast against white. |
| `plugin_brand_color_dark_contrast` | `interface.brandColorDark` must have at least 2:1 contrast against `#212121`. |
| `plugin_default_prompt_wrong_type` | `interface.defaultPrompt` must be a string or list of strings. |
| `plugin_default_prompt_too_many` | `interface.defaultPrompt` must contain at most three prompts. |
| `plugin_default_prompt_entry_wrong_type` | Each `interface.defaultPrompt` entry must be a string. |
| `plugin_default_prompt_empty` | Each `interface.defaultPrompt` entry must be non-empty when provided. |
| `plugin_default_prompt_too_long` | Each `interface.defaultPrompt` entry must be 512 characters or fewer for package validation and 128 characters or fewer for final directory submission. |
| `plugin_default_prompt_character_unsupported` | Each `interface.defaultPrompt` entry must use supported text and fit on one line. |
## Plugin content errors
| Name | Requirement |
| ---------------------------------- | -------------------------------------------------------------------------------------------------------------------------------------------- |
| `plugin_skills_path_wrong_type` | `skills` must be a string path for the root `skills/` directory. |
| `plugin_skills_path_empty` | `skills` must be a non-empty path to the root `skills/` directory when provided. |
| `plugin_skills_path_unsupported` | `skills` must resolve to the root `skills/` directory. |
| `plugin_skills_directory_missing` | A declared root `skills/` directory must exist. |
| `plugin_skills_path_not_directory` | Root `skills/` must be a directory when declared. |
| `plugin_apps_path_wrong_type` | `apps` must be a string path for the root `.app.json`. |
| `plugin_apps_path_empty` | `apps` must be a non-empty path to the root `.app.json` when provided. |
| `plugin_apps_path_unsupported` | `apps` must resolve to the root `.app.json`. |
| `plugin_apps_file_missing` | A declared root `.app.json` file must exist. |
| `plugin_apps_path_not_file` | Root `.app.json` must be a regular file when declared. |
| `plugin_runtime_surface_missing` | A skills-only ZIP must contain at least one valid skill at `skills//SKILL.md`; app and MCP references don't satisfy this requirement. |
## Skill errors
| Name | Requirement |
| ----------------------------------------- | --------------------------------------------------------------------------------------------- |
| `skill_manifest_missing` | Skill must contain a `SKILL.md` file. |
| `skill_bundle_too_large` | Each compressed skill bundle must be within the MiB limit reported in the error. |
| `skill_directory_hidden` | Skill directory names must not begin with `.`. |
| `skill_manifest_nested` | Each skill directory must be an immediate child of `skills/`. |
| `skill_manifest_not_regular_file` | `SKILL.md` must be a regular file. |
| `skill_manifest_unreadable` | `SKILL.md` must be readable. |
| `skill_manifest_invalid_utf8` | `SKILL.md` must contain valid UTF-8. |
| `skill_frontmatter_missing` | `SKILL.md` must start with YAML front matter between `---` lines. |
| `skill_frontmatter_unclosed` | `SKILL.md` YAML front matter must end with `---`. |
| `skill_frontmatter_yaml_malformed` | `SKILL.md` front matter must contain valid YAML. |
| `skill_frontmatter_wrong_type` | `SKILL.md` front matter must contain a YAML mapping. |
| `skill_name_missing` | `name` is required and must not be empty. |
| `skill_name_wrong_type` | `name` must be a string. |
| `skill_name_empty` | `name` must be non-empty. |
| `skill_name_character_unsupported` | Skill front matter `name` must use supported text. |
| `skill_description_missing` | `description` is required and must not be empty. |
| `skill_description_wrong_type` | `description` must be a string. |
| `skill_description_empty` | `description` must be non-empty. |
| `skill_description_too_long` | `description` must be 1,024 characters or fewer. |
| `skill_description_character_unsupported` | Skill front matter `description` must use supported text. |
| `skill_body_empty` | Skill instructions must not be empty. |
| `skill_identity_too_long` | The combined plugin and skill name (`plugin-name:skill-name`) must be 64 characters or fewer. |
| `skill_identity_duplicate` | Each skill `name` must be unique within the plugin. |
## Skill agent metadata errors
A bundled skill can define its own `interface` in
`skills//agents/openai.yaml`. This controls how the skill appears to
users and is separate from the plugin manifest's `interface`. Skill interface
fields use snake_case:
```yaml
interface:
display_name: "Summarize documents"
short_description: "Summarize a document"
icon_small: "./assets/icon.png"
default_prompt: "Summarize the selected document."
```
| Name | Requirement |
| -------------------------------------------------- | ---------------------------------------------------------------------------------------------------------------------------------------------------------------------------------- |
| `skill_agent_not_regular_file` | `agents/openai.yaml` must be a regular file. |
| `skill_agent_unreadable` | `agents/openai.yaml` must be readable. |
| `skill_agent_invalid_utf8` | `agents/openai.yaml` must contain valid UTF-8. |
| `skill_agent_yaml_malformed` | `agents/openai.yaml` must contain valid YAML. |
| `skill_agent_top_level_wrong_type` | `agents/openai.yaml` must contain a YAML mapping at the top level. |
| `skill_agent_interface_missing` | `interface` is required in `agents/openai.yaml` when that file is included. |
| `skill_agent_interface_wrong_type` | `interface` in `agents/openai.yaml` must be a YAML mapping. |
| `skill_agent_display_name_missing` | `interface.display_name` is required and must not be empty. |
| `skill_agent_display_name_wrong_type` | `interface.display_name` must be a string. |
| `skill_agent_display_name_empty` | `interface.display_name` must not be empty. |
| `skill_agent_short_description_missing` | `interface.short_description` is required and must not be empty. |
| `skill_agent_short_description_wrong_type` | `interface.short_description` must be a string. |
| `skill_agent_short_description_empty` | `interface.short_description` must not be empty. |
| `skill_agent_icon_small_wrong_type` | `interface.icon_small` must be a non-empty relative file path when provided. |
| `skill_agent_icon_small_empty` | `interface.icon_small` must be a non-empty relative file path when provided, such as `assets/icon.png`. |
| `skill_agent_icon_large_wrong_type` | `interface.icon_large` must be a non-empty relative file path when provided. |
| `skill_agent_icon_large_empty` | `interface.icon_large` must be a non-empty relative file path when provided, such as `assets/icon.png`. |
| `skill_agent_brand_color_wrong_type` | `interface.brand_color` must be a string when provided. |
| `skill_agent_brand_color_empty` | `interface.brand_color` must be a non-empty six-digit hex color when provided, such as `#1ABCFE`. |
| `skill_agent_brand_color_format` | `interface.brand_color` must be a six-digit hex color, such as `#1ABCFE`. |
| `skill_agent_default_prompt_wrong_type` | `interface.default_prompt` must be a string when provided. |
| `skill_agent_default_prompt_empty` | `interface.default_prompt` must be non-empty when provided. |
| `skill_agent_policy_wrong_type` | `policy` must be a YAML mapping when provided. |
| `skill_agent_allow_implicit_invocation_wrong_type` | `policy` may contain only `products` and `allow_implicit_invocation`. `products` must contain `CHAT`, `CODEX`, or both, and `allow_implicit_invocation` must be `true` or `false`. |
| `skill_agent_dependencies_wrong_type` | `dependencies` must be a YAML mapping; only `tools` is supported. |
| `skill_agent_dependency_unsupported` | Only `dependencies.tools` is supported in `agents/openai.yaml`. |
## Asset path errors
| Name | Requirement |
| ------------------------------------------- | ----------------------------------------------------------------------------------------------------------------------------------------------- |
| `declared_asset_path_wrong_type` | The named asset field must be a file path string. |
| `declared_asset_path_empty` | The named asset field must not be empty. |
| `declared_asset_path_has_outer_whitespace` | The named asset field must not begin or end with whitespace. |
| `declared_asset_path_has_control_character` | The named asset field must not contain characters U+0000–U+001F or U+007F. |
| `branding_asset_path_missing_root_prefix` | The named asset field must start with `./`. |
| `declared_asset_path_unsafe` | The named asset field must be a relative path inside the plugin and must not contain an absolute path, drive prefix, or `..` traversal segment. |
| `declared_asset_path_outside_package` | The named asset field must reference a file inside the plugin. |
| `declared_asset_file_missing` | The named asset field references a file that does not exist. |
| `declared_asset_not_regular_file` | The named asset field must reference a file, not a directory or special file. |
## Image errors
Directory branding images must use a supported file type and meet the size and
dimension limits below. These rules apply to packaged branding assets;
starter-prompt screenshots use the separate portal limits listed above.
| Name | Requirement |
| ----------------------------------------- | -------------------------------------------------------------------------- |
| `plugin_logo_path_missing` | `interface.logo` is required and must reference a square image. |
| `plugin_composer_icon_path_missing` | `interface.composerIcon` is required and must reference a square image. |
| `image_file_unreadable` | Image file must be readable. |
| `image_file_too_large` | Image must not exceed 5 MiB. |
| `image_file_format_unsupported` | Image filename must end in `.png`, `.jpg`, `.jpeg`, `.webp`, or `.svg`. |
| `raster_image_decode_failed` | Raster image must be a PNG, JPEG, or WebP file that can be decoded safely. |
| `raster_image_extension_content_mismatch` | Image filename extension must match the detected image format. |
| `raster_image_not_square` | Image must be square. |
| `raster_image_dimensions_too_small` | Image dimensions must be at least 48×48 pixels. |
| `raster_image_dimensions_too_large` | Image dimensions must not exceed 4,096×4,096 pixels. |
| `svg_xml_malformed` | SVG must contain valid UTF-8 XML. |
| `svg_root_element_invalid` | SVG root element must be `
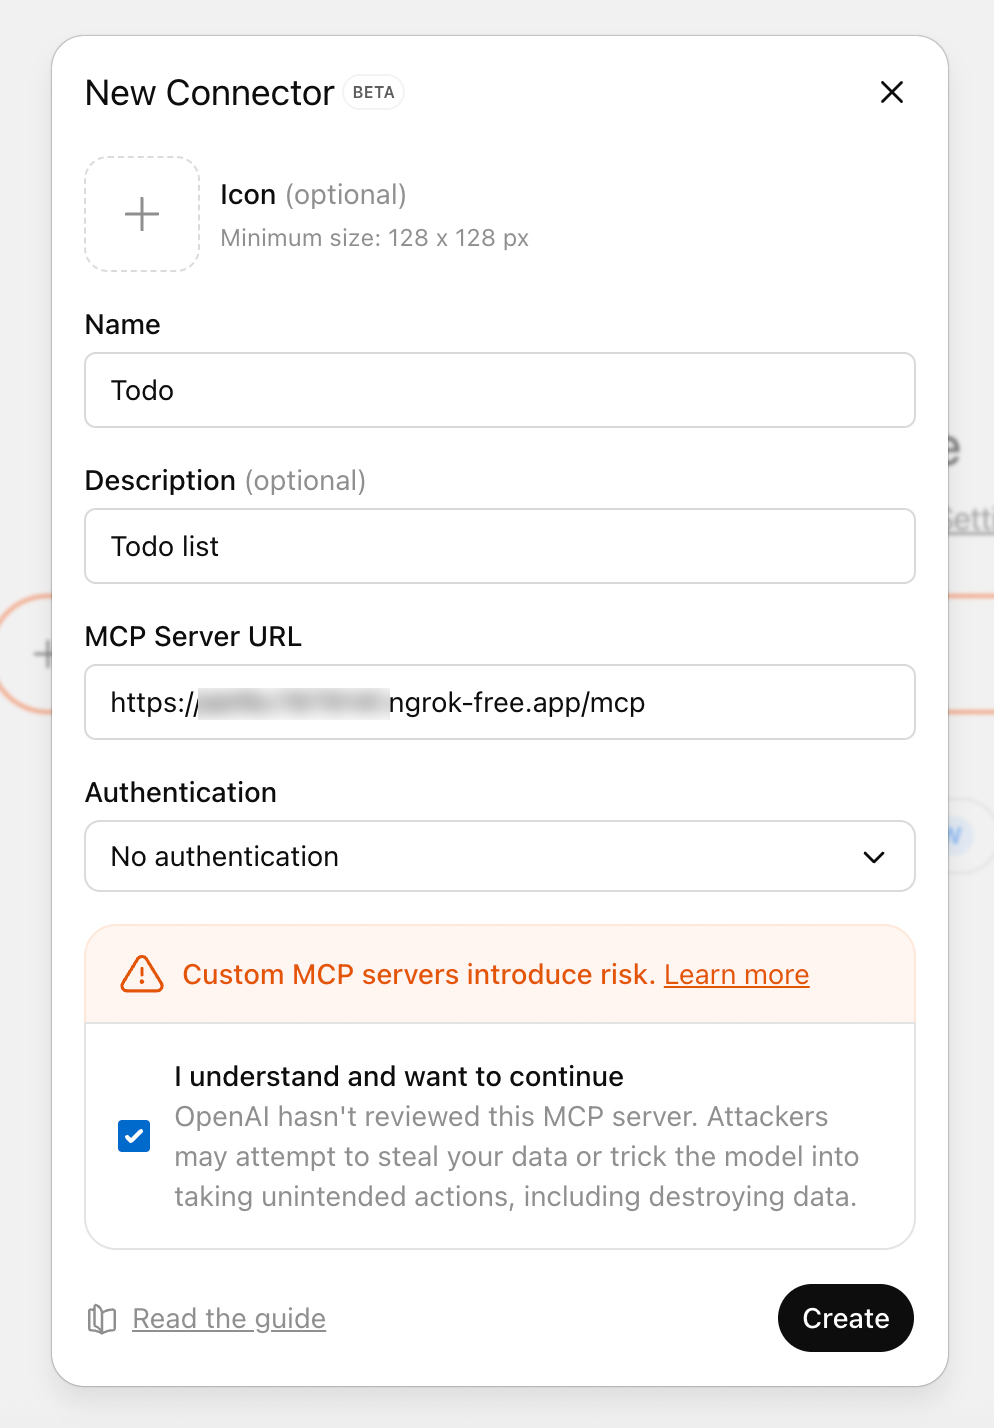 4. Open a new chat, select the plugin from the **More** menu (accessible after clicking the **+** button), and prompt the model (for example, “Add a new task to read my book”). ChatGPT will stream tool payloads so you can confirm inputs and outputs.

## Next steps
From there, you can iterate on the UI/UX, prompts, tool metadata, and the overall experience.
Refresh the plugin connection after each change to the MCP server (tools,
metadata, and related configuration). You can do this from the detail page at
[chatgpt.com/plugins](https://chatgpt.com/plugins).
When you're preparing for public distribution, review
[Submit plugins](https://developers.openai.com/plugins/deploy/submission), the
[Plugin guidelines](https://developers.openai.com/plugins/app-guidelines), and
[Brainstorm plugin use cases](https://developers.openai.com/plugins/plan/use-case). If you're building a UI, you
can also review the [UI guidelines](https://developers.openai.com/plugins/concepts/ui-guidelines).
Once you understand the basics, you can
[build richer UI](https://developers.openai.com/plugins/build/chatgpt-ui), [authenticate
users](https://developers.openai.com/plugins/build/auth) when needed, and
[manage state](https://developers.openai.com/plugins/build/chatgpt-ui#manage-state).
---
# Package your plugin
After building your [skills](https://developers.openai.com/plugins/build/skills) and, when needed, an
[MCP server](https://developers.openai.com/plugins/build/mcp-server), assemble those parts into the plugin
people will install. Packaging gives the plugin a stable identity and tells
ChatGPT and Codex which skills, MCP server connections, and other resources
belong together.
Every plugin has a `.codex-plugin/plugin.json` manifest. Depending on the
plugin's architecture, its folder can also include:
- A `skills/` directory containing the workflows you built.
- An `.app.json` file that references a registered MCP server connection. The
filename is a compatibility identifier; the underlying primitive is the MCP
server.
- An `.mcp.json` file for an MCP server distributed with the plugin.
- Optional assets and lifecycle hooks.
UI and authentication remain part of the MCP server integration you built in
the preceding steps; the plugin manifest connects that integration to the rest
of the package.
Public plugins are published once to the universal plugin directory shared by
ChatGPT and Codex. Local and repo marketplaces are separate authoring, testing,
and team-distribution sources, and their availability can vary by surface.
Use `@plugin-creator` for the fastest path, or create the manifest and folder
structure manually. Both approaches produce the same plugin structure.
For complete public examples, inspect
[Figma](https://github.com/openai/plugins/tree/main/plugins/figma),
[Notion](https://github.com/openai/plugins/tree/main/plugins/notion), and
[Build web apps](https://github.com/openai/plugins/tree/main/plugins/build-web-apps).
## Package with `@plugin-creator`
For the fastest setup, use the built-in `@plugin-creator` skill.
It scaffolds the required `.codex-plugin/plugin.json` manifest and can also
generate a local marketplace entry for testing. If you already have a plugin
folder, you can still use `@plugin-creator` to wire it into a local
marketplace.
### Create and test a plugin locally with an MCP server
You can also use the plugin-creator skill to test a plugin that includes an MCP
server. The plugin still needs a local folder and manifest, and you first
register the MCP server connection in ChatGPT developer mode.
First, enable developer mode in ChatGPT:
1. Open [ChatGPT](https://chatgpt.com).
2. Open **Settings**.
3. Select **Security and login**.
4. Turn on **Developer mode**.
Then register the MCP server in developer mode:
1. Go to [ChatGPT Plugins](https://chatgpt.com/plugins).
2. Select the plus button.
3. Complete the modal with your MCP server URL and connection details.
4. After ChatGPT creates the connection, copy its technical ID from the browser
URL. It starts with `plugin_asdk_app`.
Give that `plugin_asdk_app...` ID to `@plugin-creator` in Work mode in ChatGPT
or `$plugin-creator` in Codex. For example, in Work mode:
Plugin Creator prompt
`{`@plugin-creator create a plugin for ChatGPT and Codex using my MCP server.
Use plugin_asdk_app_6a4c0062f3b88191855c0a80eac5d53d and name it Acme Support.
Include a personal marketplace entry so I can test it locally.`}`
The plugin-creator skill will create the plugin folder, create the required
`.codex-plugin/plugin.json`, and add MCP server wiring for the plugin. If you ask
it to create a personal marketplace entry, the plugin appears under your local
source in the Plugins Directory for testing.
After the plugin-creator skill creates the plugin:
1. Review `.app.json` and confirm the registered MCP server mapping points at
the correct `plugin_asdk_app...` ID.
2. Review `.codex-plugin/plugin.json` and make sure its compatibility `apps`
field points to `./.app.json`.
3. Add any bundled skills under `skills/` if the plugin should include
repeatable workflows alongside the MCP server.
4. If the skill created a personal marketplace entry, refresh ChatGPT
and install the plugin from your local source in the Plugins Directory. Then
test it in a new chat.
For the manifest shape and file layout, see [Plugin structure](#plugin-structure)
and [Path rules](#path-rules).
### Build your own curated plugin list
A marketplace is a JSON catalog of plugins. `@plugin-creator` can generate one
for a single plugin, and you can keep adding entries to that same marketplace
to build your own curated list for a repo, team, or personal workflow.
In Work mode or Codex in the ChatGPT desktop app, each marketplace appears as a
selectable source in the Plugins Directory. Use
`$REPO_ROOT/.agents/plugins/marketplace.json` for a repo-scoped list or
`~/.agents/plugins/marketplace.json` for a personal list. Add one entry per
plugin under `plugins[]`, point each `source.path` at the plugin folder with a
`./`-prefixed path relative to the marketplace root, and set
`interface.displayName` to the label you want the plugin to show in the marketplace
picker. Then restart the ChatGPT desktop app. After that, open the Plugins
Directory, choose your marketplace, and browse or install the plugins in that
curated list.
You don't need a separate marketplace per plugin. One marketplace can expose a
single plugin while you are testing, then grow into a larger curated catalog as
you add more plugins.
### Add a marketplace from the CLI
Use `codex plugin marketplace add` to add and track a marketplace source instead
of editing `config.toml` by hand. These commands support plugin authoring and
catalog setup. Use the ChatGPT desktop app to install and test a local plugin.
```bash
codex plugin marketplace add owner/repo
codex plugin marketplace add owner/repo --ref main
codex plugin marketplace add https://github.com/example/plugins.git --sparse .agents/plugins
codex plugin marketplace add ./local-marketplace-root
```
Marketplace sources can be GitHub shorthand (`owner/repo` or
`owner/repo@ref`), HTTP or HTTPS Git URLs, SSH Git URLs, or local marketplace root
directories. Use `--ref` to pin a Git ref, and repeat `--sparse PATH` to use a
sparse checkout for Git-backed marketplace repos. `--sparse` is valid only for
Git marketplace sources.
To inspect, refresh, or remove configured marketplaces:
```bash
codex plugin marketplace list
codex plugin marketplace upgrade
codex plugin marketplace upgrade marketplace-name
codex plugin marketplace remove marketplace-name
```
`codex plugin marketplace list` prints each marketplace Codex is considering
and the root path it resolves from, including local default marketplaces and
configured marketplace snapshots.
### Create a plugin manually
Start with a minimal plugin that packages one skill.
1. Create a plugin folder with a manifest at `.codex-plugin/plugin.json`.
```bash
mkdir -p my-first-plugin/.codex-plugin
```
`my-first-plugin/.codex-plugin/plugin.json`
```json
{
"name": "my-first-plugin",
"version": "1.0.0",
"description": "Reusable greeting workflow",
"skills": "./skills/"
}
```
Use a stable plugin `name` in kebab-case. Plugin hosts use it as the plugin
identifier and component namespace.
2. Add a skill under `skills/
4. Open a new chat, select the plugin from the **More** menu (accessible after clicking the **+** button), and prompt the model (for example, “Add a new task to read my book”). ChatGPT will stream tool payloads so you can confirm inputs and outputs.

## Next steps
From there, you can iterate on the UI/UX, prompts, tool metadata, and the overall experience.
Refresh the plugin connection after each change to the MCP server (tools,
metadata, and related configuration). You can do this from the detail page at
[chatgpt.com/plugins](https://chatgpt.com/plugins).
When you're preparing for public distribution, review
[Submit plugins](https://developers.openai.com/plugins/deploy/submission), the
[Plugin guidelines](https://developers.openai.com/plugins/app-guidelines), and
[Brainstorm plugin use cases](https://developers.openai.com/plugins/plan/use-case). If you're building a UI, you
can also review the [UI guidelines](https://developers.openai.com/plugins/concepts/ui-guidelines).
Once you understand the basics, you can
[build richer UI](https://developers.openai.com/plugins/build/chatgpt-ui), [authenticate
users](https://developers.openai.com/plugins/build/auth) when needed, and
[manage state](https://developers.openai.com/plugins/build/chatgpt-ui#manage-state).
---
# Package your plugin
After building your [skills](https://developers.openai.com/plugins/build/skills) and, when needed, an
[MCP server](https://developers.openai.com/plugins/build/mcp-server), assemble those parts into the plugin
people will install. Packaging gives the plugin a stable identity and tells
ChatGPT and Codex which skills, MCP server connections, and other resources
belong together.
Every plugin has a `.codex-plugin/plugin.json` manifest. Depending on the
plugin's architecture, its folder can also include:
- A `skills/` directory containing the workflows you built.
- An `.app.json` file that references a registered MCP server connection. The
filename is a compatibility identifier; the underlying primitive is the MCP
server.
- An `.mcp.json` file for an MCP server distributed with the plugin.
- Optional assets and lifecycle hooks.
UI and authentication remain part of the MCP server integration you built in
the preceding steps; the plugin manifest connects that integration to the rest
of the package.
Public plugins are published once to the universal plugin directory shared by
ChatGPT and Codex. Local and repo marketplaces are separate authoring, testing,
and team-distribution sources, and their availability can vary by surface.
Use `@plugin-creator` for the fastest path, or create the manifest and folder
structure manually. Both approaches produce the same plugin structure.
For complete public examples, inspect
[Figma](https://github.com/openai/plugins/tree/main/plugins/figma),
[Notion](https://github.com/openai/plugins/tree/main/plugins/notion), and
[Build web apps](https://github.com/openai/plugins/tree/main/plugins/build-web-apps).
## Package with `@plugin-creator`
For the fastest setup, use the built-in `@plugin-creator` skill.
It scaffolds the required `.codex-plugin/plugin.json` manifest and can also
generate a local marketplace entry for testing. If you already have a plugin
folder, you can still use `@plugin-creator` to wire it into a local
marketplace.
### Create and test a plugin locally with an MCP server
You can also use the plugin-creator skill to test a plugin that includes an MCP
server. The plugin still needs a local folder and manifest, and you first
register the MCP server connection in ChatGPT developer mode.
First, enable developer mode in ChatGPT:
1. Open [ChatGPT](https://chatgpt.com).
2. Open **Settings**.
3. Select **Security and login**.
4. Turn on **Developer mode**.
Then register the MCP server in developer mode:
1. Go to [ChatGPT Plugins](https://chatgpt.com/plugins).
2. Select the plus button.
3. Complete the modal with your MCP server URL and connection details.
4. After ChatGPT creates the connection, copy its technical ID from the browser
URL. It starts with `plugin_asdk_app`.
Give that `plugin_asdk_app...` ID to `@plugin-creator` in Work mode in ChatGPT
or `$plugin-creator` in Codex. For example, in Work mode:
Plugin Creator prompt
`{`@plugin-creator create a plugin for ChatGPT and Codex using my MCP server.
Use plugin_asdk_app_6a4c0062f3b88191855c0a80eac5d53d and name it Acme Support.
Include a personal marketplace entry so I can test it locally.`}`
The plugin-creator skill will create the plugin folder, create the required
`.codex-plugin/plugin.json`, and add MCP server wiring for the plugin. If you ask
it to create a personal marketplace entry, the plugin appears under your local
source in the Plugins Directory for testing.
After the plugin-creator skill creates the plugin:
1. Review `.app.json` and confirm the registered MCP server mapping points at
the correct `plugin_asdk_app...` ID.
2. Review `.codex-plugin/plugin.json` and make sure its compatibility `apps`
field points to `./.app.json`.
3. Add any bundled skills under `skills/` if the plugin should include
repeatable workflows alongside the MCP server.
4. If the skill created a personal marketplace entry, refresh ChatGPT
and install the plugin from your local source in the Plugins Directory. Then
test it in a new chat.
For the manifest shape and file layout, see [Plugin structure](#plugin-structure)
and [Path rules](#path-rules).
### Build your own curated plugin list
A marketplace is a JSON catalog of plugins. `@plugin-creator` can generate one
for a single plugin, and you can keep adding entries to that same marketplace
to build your own curated list for a repo, team, or personal workflow.
In Work mode or Codex in the ChatGPT desktop app, each marketplace appears as a
selectable source in the Plugins Directory. Use
`$REPO_ROOT/.agents/plugins/marketplace.json` for a repo-scoped list or
`~/.agents/plugins/marketplace.json` for a personal list. Add one entry per
plugin under `plugins[]`, point each `source.path` at the plugin folder with a
`./`-prefixed path relative to the marketplace root, and set
`interface.displayName` to the label you want the plugin to show in the marketplace
picker. Then restart the ChatGPT desktop app. After that, open the Plugins
Directory, choose your marketplace, and browse or install the plugins in that
curated list.
You don't need a separate marketplace per plugin. One marketplace can expose a
single plugin while you are testing, then grow into a larger curated catalog as
you add more plugins.
### Add a marketplace from the CLI
Use `codex plugin marketplace add` to add and track a marketplace source instead
of editing `config.toml` by hand. These commands support plugin authoring and
catalog setup. Use the ChatGPT desktop app to install and test a local plugin.
```bash
codex plugin marketplace add owner/repo
codex plugin marketplace add owner/repo --ref main
codex plugin marketplace add https://github.com/example/plugins.git --sparse .agents/plugins
codex plugin marketplace add ./local-marketplace-root
```
Marketplace sources can be GitHub shorthand (`owner/repo` or
`owner/repo@ref`), HTTP or HTTPS Git URLs, SSH Git URLs, or local marketplace root
directories. Use `--ref` to pin a Git ref, and repeat `--sparse PATH` to use a
sparse checkout for Git-backed marketplace repos. `--sparse` is valid only for
Git marketplace sources.
To inspect, refresh, or remove configured marketplaces:
```bash
codex plugin marketplace list
codex plugin marketplace upgrade
codex plugin marketplace upgrade marketplace-name
codex plugin marketplace remove marketplace-name
```
`codex plugin marketplace list` prints each marketplace Codex is considering
and the root path it resolves from, including local default marketplaces and
configured marketplace snapshots.
### Create a plugin manually
Start with a minimal plugin that packages one skill.
1. Create a plugin folder with a manifest at `.codex-plugin/plugin.json`.
```bash
mkdir -p my-first-plugin/.codex-plugin
```
`my-first-plugin/.codex-plugin/plugin.json`
```json
{
"name": "my-first-plugin",
"version": "1.0.0",
"description": "Reusable greeting workflow",
"skills": "./skills/"
}
```
Use a stable plugin `name` in kebab-case. Plugin hosts use it as the plugin
identifier and component namespace.
2. Add a skill under `skills/