
Authenticate your users
Many Apps SDK apps can operate in a read-only, anonymous mode, but anything that exposes customer-specific data or write actions should authenticate users.
You can integrate with your own authorization server when you need to connect to an existing backend or share data between users.
Custom auth with OAuth 2.1
For an authenticated MCP server, you are expected to implement an OAuth 2.1 flow that conforms to the MCP authorization spec.
Components
- Resource server – your MCP server, which exposes tools and verifies access tokens on each request.
- Authorization server – your identity provider (Auth0, Okta, Cognito, or a custom implementation) that issues tokens and publishes discovery metadata.
- Client – ChatGPT acting on behalf of the user. It supports Client ID Metadata Documents (CIMD), dynamic client registration (DCR), predefined OAuth clients, and PKCE.
MCP authorization spec requirements
- Host protected resource metadata on your MCP server
- Publish OAuth metadata from your authorization server
- Echo the
resourceparameter throughout the OAuth flow - Choose how ChatGPT identifies or registers its OAuth client: CIMD, DCR, or a predefined OAuth client
- Publish the token endpoint authentication methods your authorization server accepts
Here is what the spec expects, in plain language.
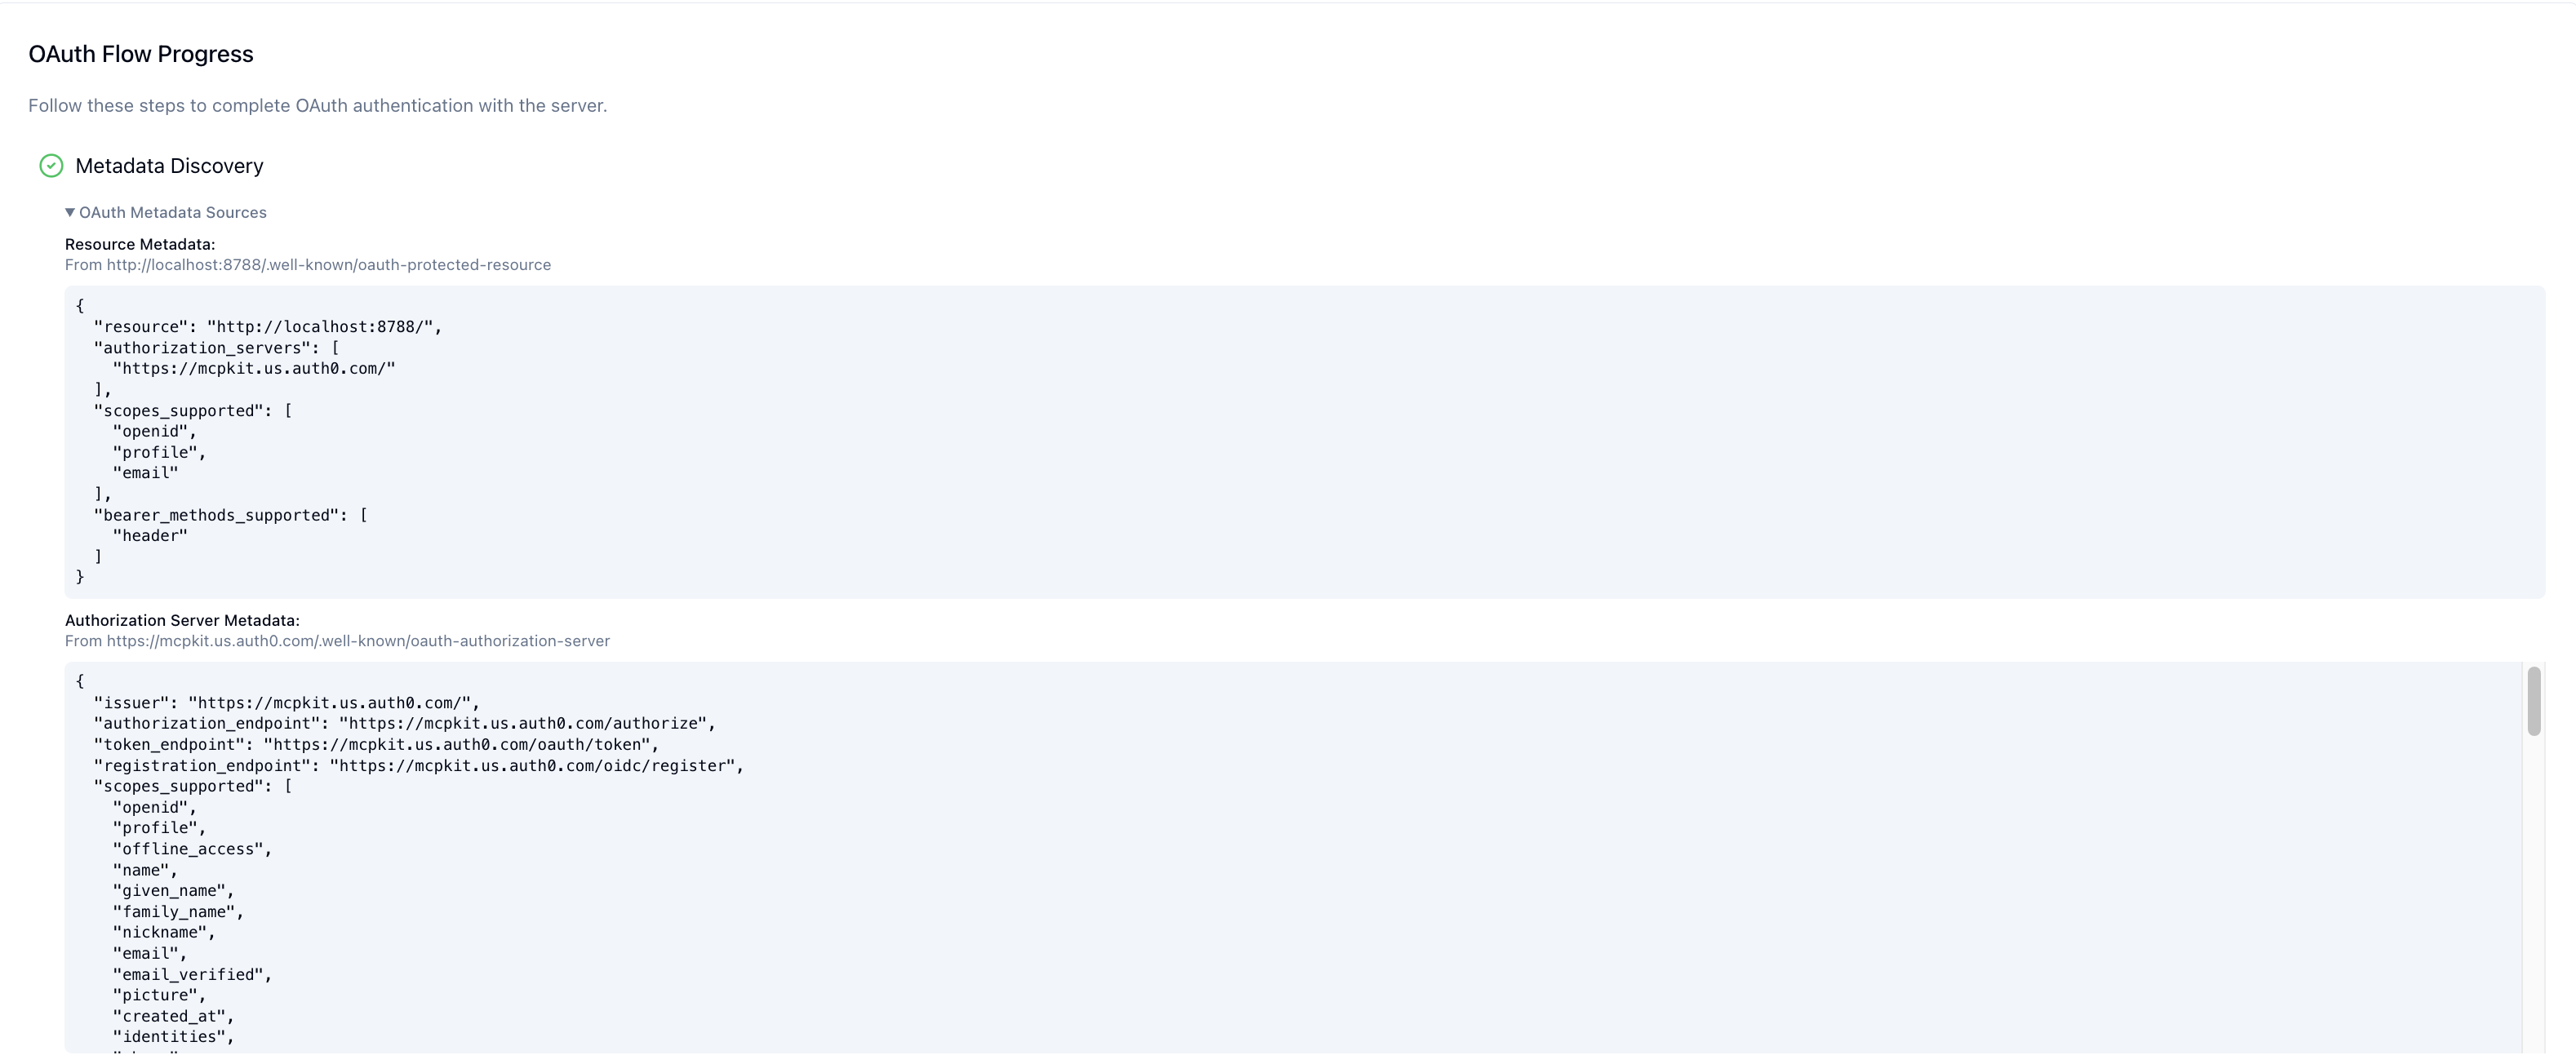
Host protected resource metadata on your MCP server
- You need an HTTPS endpoint such as
GET https://your-mcp.example.com/.well-known/oauth-protected-resource(or advertise the same URL in aWWW-Authenticateheader on401 Unauthorizedresponses) so ChatGPT knows where to fetch your metadata. - That endpoint returns a JSON document describing the resource server and its available authorization servers:
{
  "resource": "https://your-mcp.example.com",
  "authorization_servers": ["https://auth.yourcompany.com"],
  "scopes_supported": ["files:read", "files:write"],
  "resource_documentation": "https://yourcompany.com/docs/mcp"
}- Key fields you must populate:
resource: the canonical HTTPS identifier for your MCP server. ChatGPT sends this exact value as theresourcequery parameter during OAuth.authorization_servers: one or more issuer base URLs that point to your identity provider. ChatGPT will try each to find OAuth metadata.scopes_supported: optional list that helps ChatGPT explain the permissions it is going to ask the user for.- Optional extras from RFC 9728 such as
resource_documentation,token_endpoint_auth_methods_supported, orintrospection_endpointmake it easier for clients and admins to understand your setup.
When you block a request because it is unauthenticated, return a challenge like:
HTTP/1.1 401 Unauthorized
WWW-Authenticate: Bearer resource_metadata="https://your-mcp.example.com/.well-known/oauth-protected-resource",
                         scope="files:read"
That single header lets ChatGPT discover the metadata URL even if it has not seen it before.
Publish OAuth metadata from your authorization server
- Your identity provider must expose one of the well-known discovery documents so ChatGPT can read its configuration:
- OAuth 2.0 metadata at
https://auth.yourcompany.com/.well-known/oauth-authorization-server - OpenID Connect metadata at
https://auth.yourcompany.com/.well-known/openid-configuration
- OAuth 2.0 metadata at
- Each document answers three big questions for ChatGPT: where to send the user, how to exchange codes, and how to identify itself. A typical response looks like:
{
  "issuer": "https://auth.yourcompany.com",
  "authorization_endpoint": "https://auth.yourcompany.com/oauth2/v1/authorize",
  "token_endpoint": "https://auth.yourcompany.com/oauth2/v1/token",
  "client_id_metadata_document_supported": true,
  "token_endpoint_auth_methods_supported": ["none", "private_key_jwt"],
  "registration_endpoint": "https://auth.yourcompany.com/oauth2/v1/register",
  "code_challenge_methods_supported": ["S256"],
  "scopes_supported": ["files:read", "files:write"]
}- Fields that must be correct:
authorization_endpoint,token_endpoint: the URLs ChatGPT needs to run the OAuth authorization-code + PKCE flow end to end.client_id_metadata_document_supported: set totruewhen you want ChatGPT to use CIMD for client registration. ChatGPT prioritizes CIMD when it is available, but the connector creator can choose DCR when both CIMD and DCR are available.token_endpoint_auth_methods_supported: include the token endpoint authentication methods your authorization server accepts. This applies to CIMD, DCR, and predefined OAuth clients. For CIMD, ChatGPT supportsnonefor public-client token exchange andprivate_key_jwtfor signed client assertion token exchange. Other OAuth clients commonly usenone,client_secret_post, orclient_secret_basic.registration_endpoint: include this when you support dynamic client registration (DCR), which lets ChatGPT create and reuse a dedicatedclient_idfor the connector instance.code_challenge_methods_supported: includeS256if your authorization server advertises PKCE support.- Optional fields follow RFC 8414 / OpenID Discovery; include whatever helps your administrators configure policies.
OIDC scopes
- If your provider advertises OIDC scopes (e.g.
openid,email,profile) inscopes_supportedof its.well-known/oauth-authorization-serveror.well-known/openid-configurationdocument, ChatGPT requests those scopes by default during the OAuth flow. - Some identity providers may not enable advertised OIDC scopes by default. Check your provider’s configuration settings and make sure every advertised scope is enabled for the OAuth client, whether it uses CIMD, was created manually, or was created through DCR.
Preserve login context during reauthorization
When ChatGPT reauthorizes an existing link, including to request additional OAuth scopes, it may include the prior OIDC ID token in the authorization request as the standard id_token_hint parameter. To let users grant additional scopes without starting login from scratch, configure your authorization server to issue an ID token during the original OAuth flow and honor id_token_hint during authorization.
This optimization is optional. Reauthorization still works when an ID token is unavailable or your authorization server does not use the hint.
Redirect URL
ChatGPT completes the OAuth flow by redirecting to https://chatgpt.com/connector/oauth/{callback_id} and the URL will be shown in the app management page. Add that production redirect URI to your authorization server’s allowlist so the authorization code can be returned successfully.
- For apps that are already published, the previous legacy redirect URI
https://chatgpt.com/connector_platform_oauth_redirectcontinues to work.
Echo the resource parameter throughout the OAuth flow
- Expect ChatGPT to append
resource=https%3A%2F%2Fyour-mcp.example.comto both the authorization and token requests. This ties the token back to the protected resource metadata shown above. - Configure your authorization server to copy that value into the access token (commonly the
audclaim) so your MCP server can verify the token was minted for it and nobody else. - If a token arrives without the expected audience or scopes, reject it and rely on the
WWW-Authenticatechallenge to prompt ChatGPT to re-authorize with the correct parameters.
Support the authorization-code flow
- ChatGPT, acting as the MCP client, performs the authorization-code flow with PKCE using the
S256code challenge so intercepted authorization codes cannot be replayed by an attacker. - If your authorization server publishes
code_challenge_methods_supported, includeS256so clients can confirm PKCE support from metadata.
OAuth flow
Provided that you have implemented the MCP authorization spec delineated above, the OAuth flow will be as follows:
- ChatGPT queries your MCP server for protected resource metadata.
- ChatGPT identifies itself as the OAuth client. When the connector uses CIMD, ChatGPT skips dynamic client registration and sends a CIMD document URL as the
client_id, such ashttps://chatgpt.com/oauth/.../client.json(the exact URL is specific to the MCP server because the redirect URI is MCP-specific). When the connector uses DCR, ChatGPT calls your authorization server’sregistration_endpointonce for the connector instance, receives a generatedclient_id, and reuses that client for the instance.
When using CIMD, there is no client registration step. The following screen shows the DCR path:
- When the user first invokes a tool, the ChatGPT client launches the OAuth authorization code + PKCE flow. The user authenticates and consents to the requested scopes.
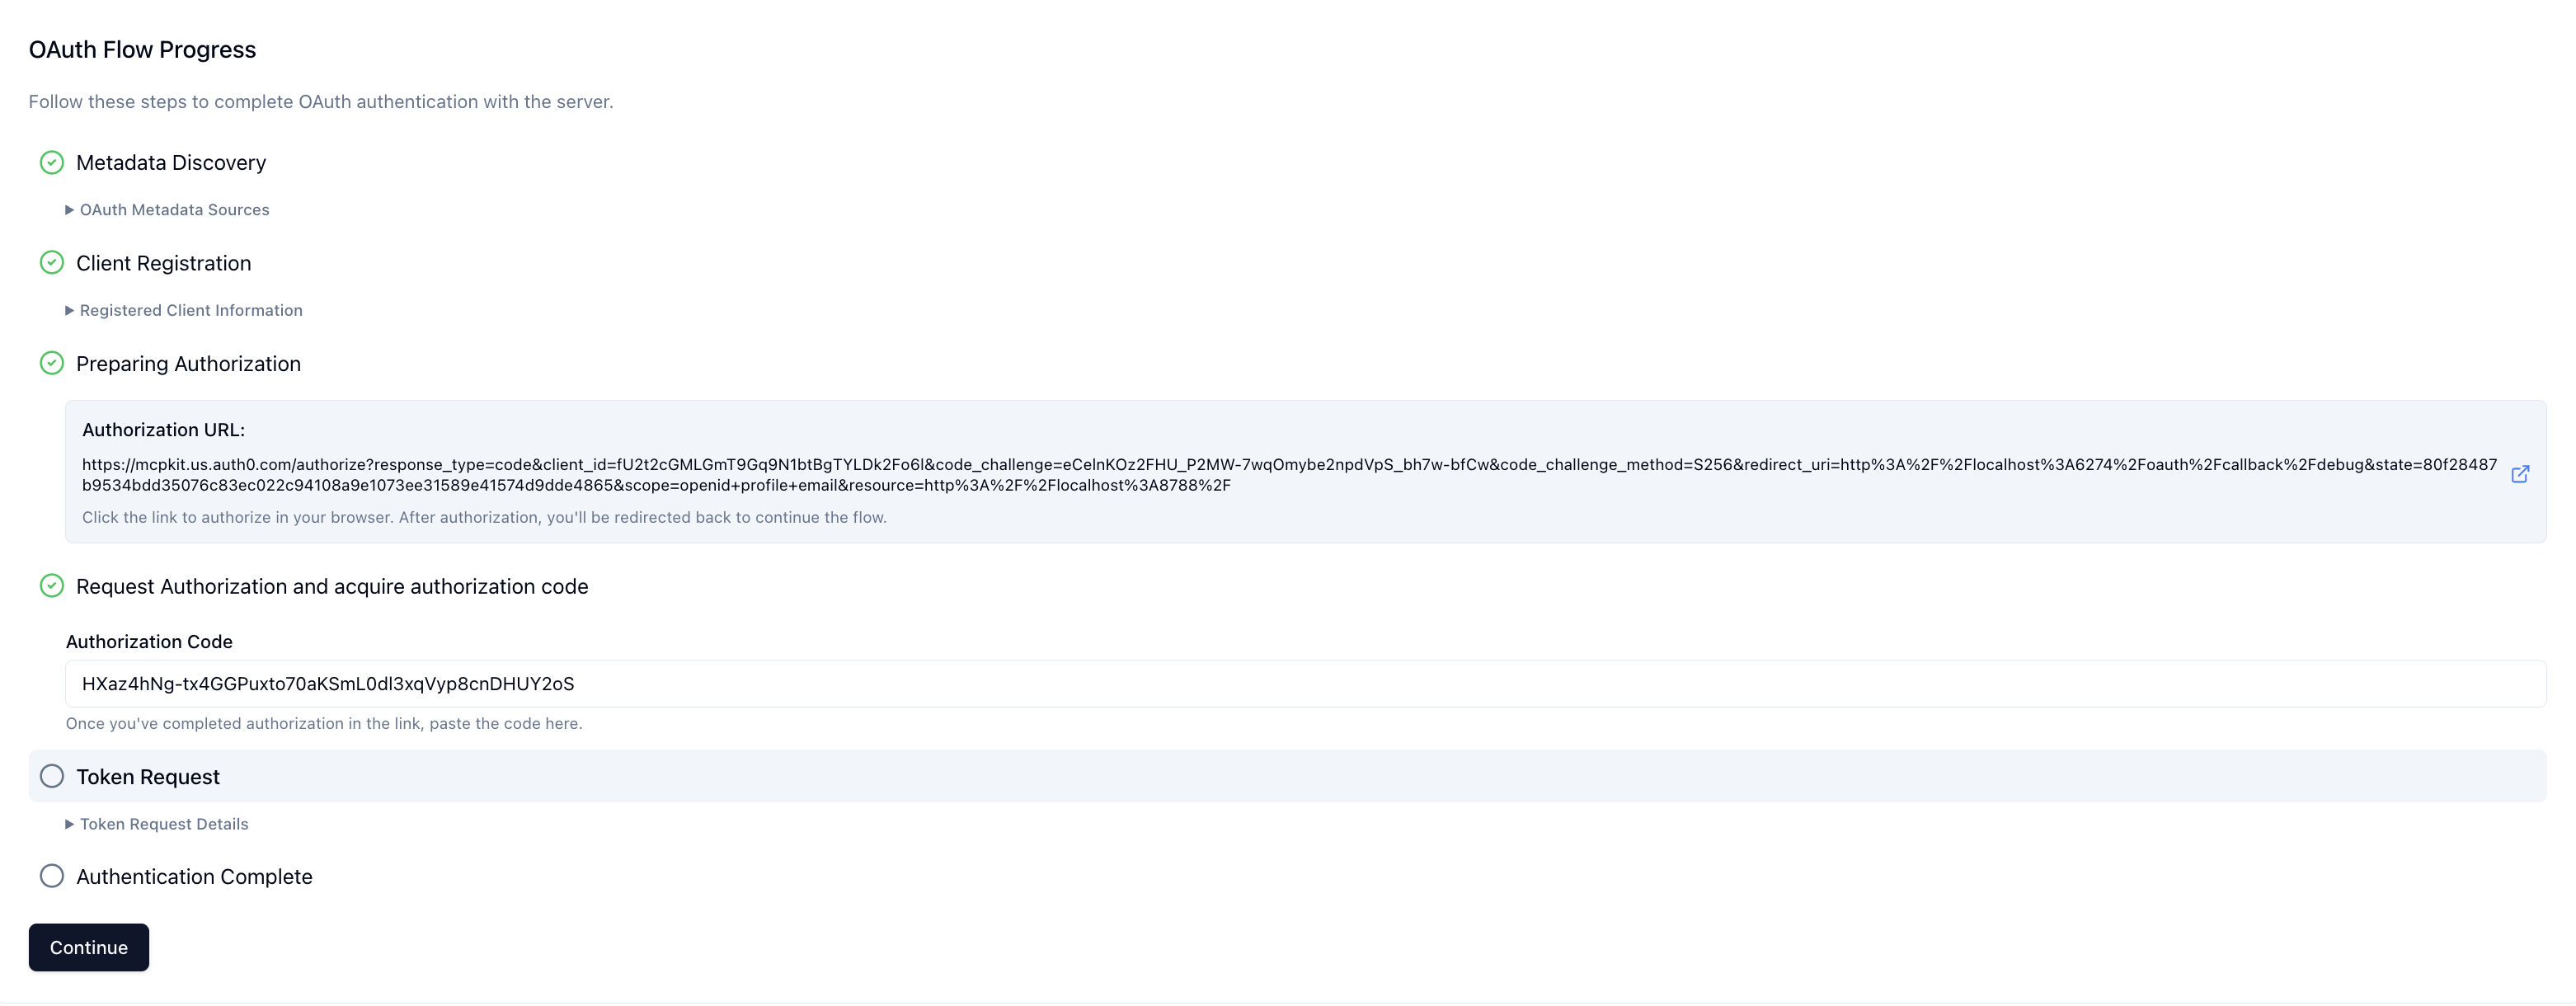
- ChatGPT exchanges the authorization code for an access token and attaches it to subsequent MCP requests (
Authorization: Bearer <token>).
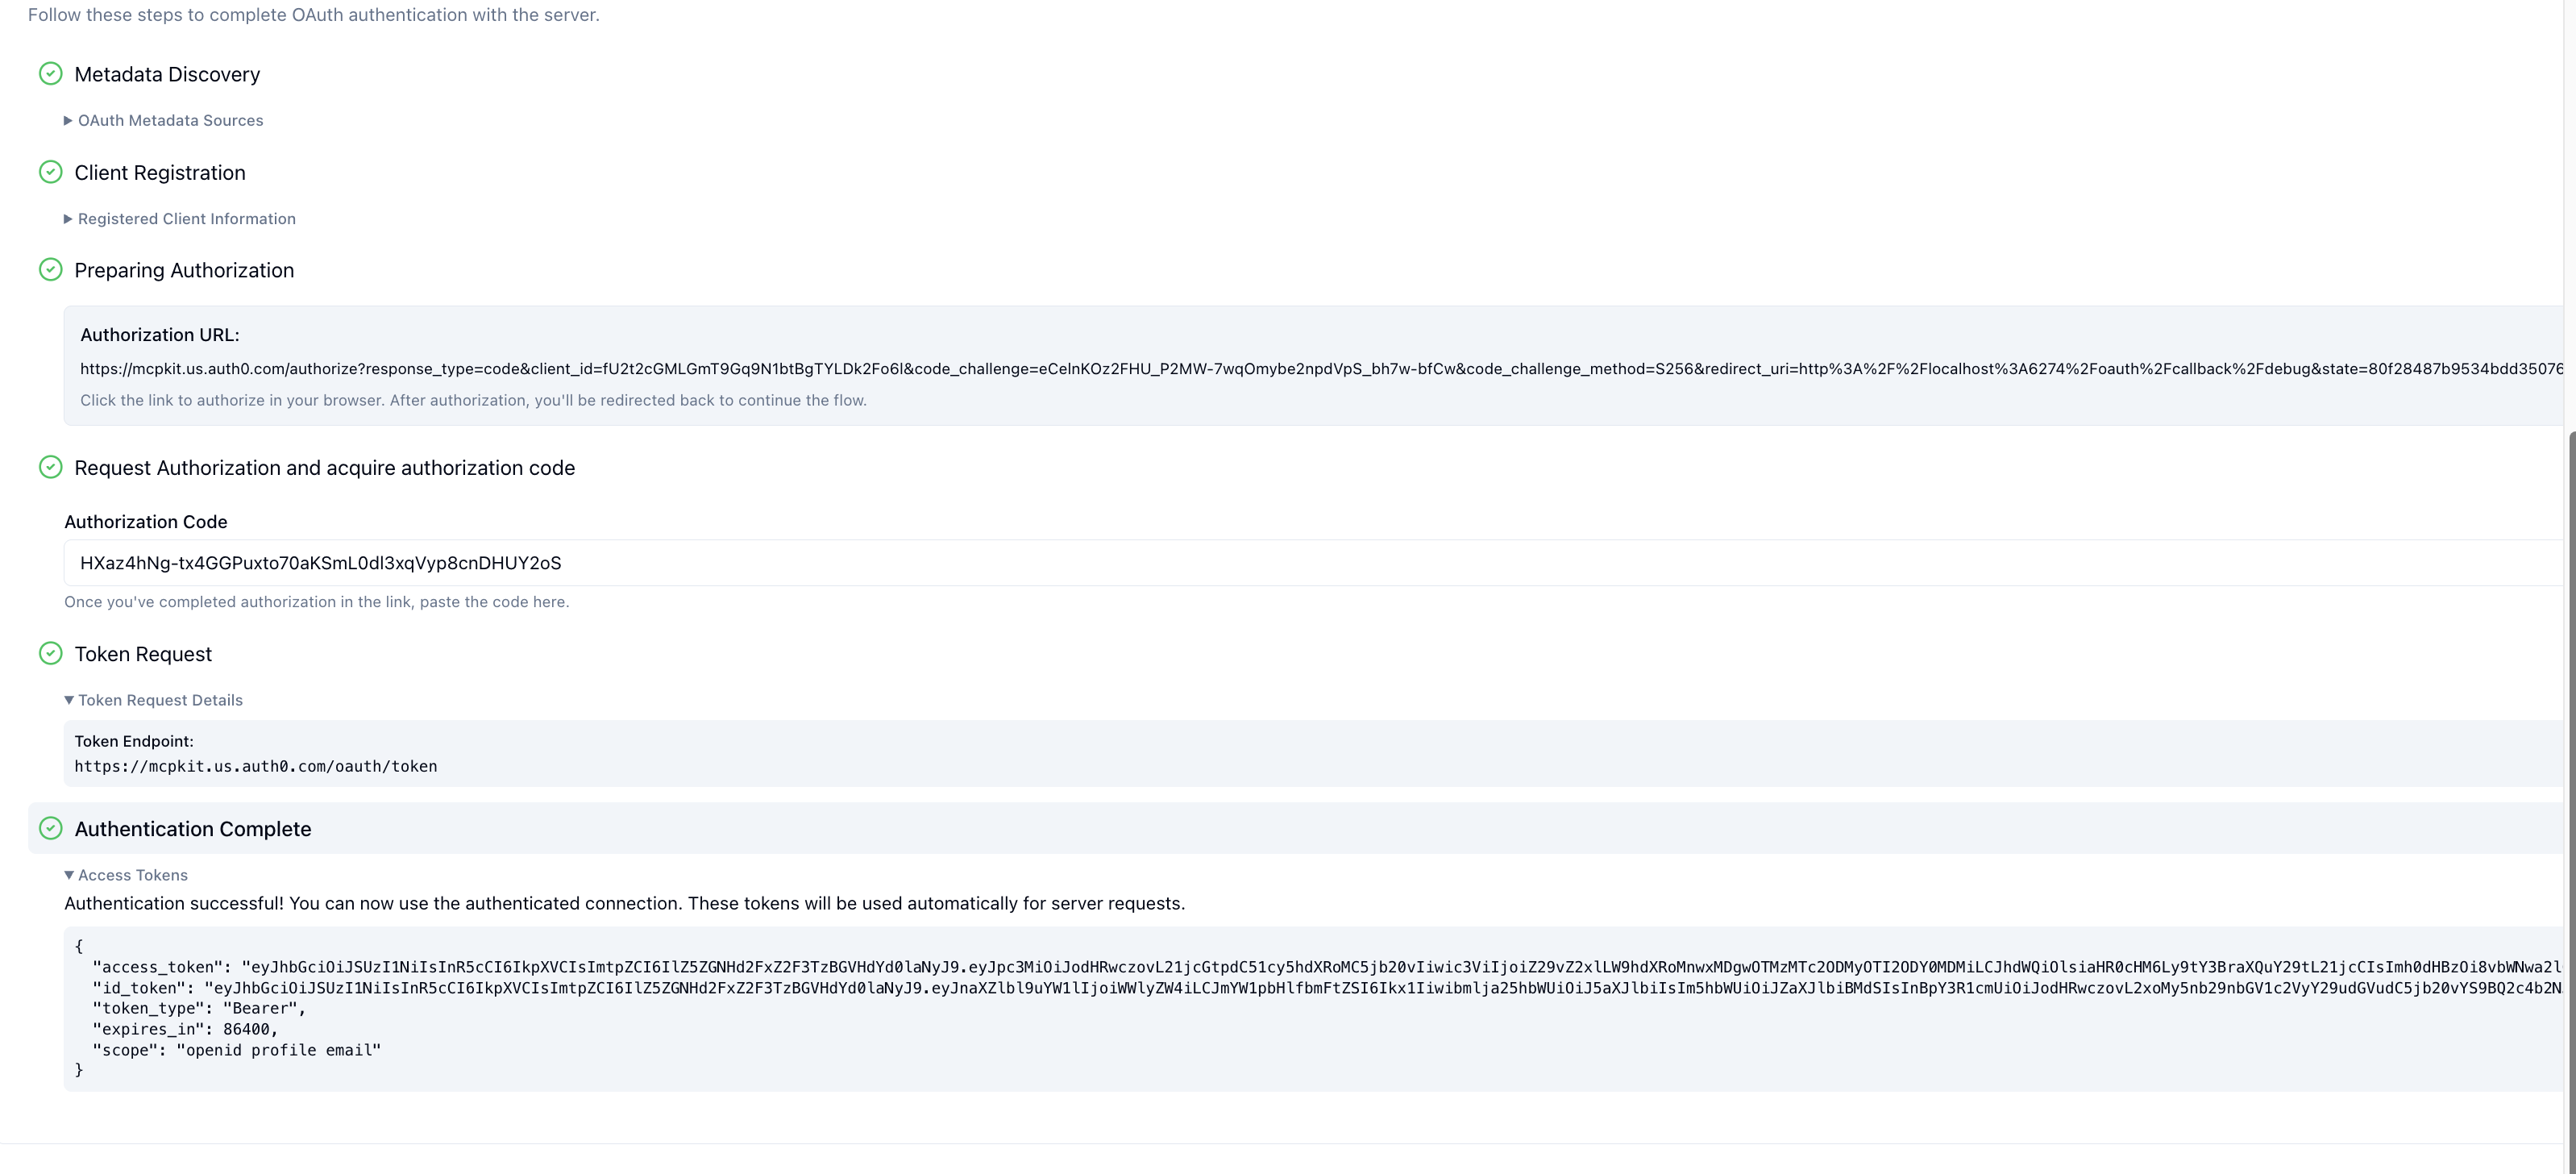
- Your server verifies the token on each request (issuer, audience, expiration, scopes) before executing the tool.
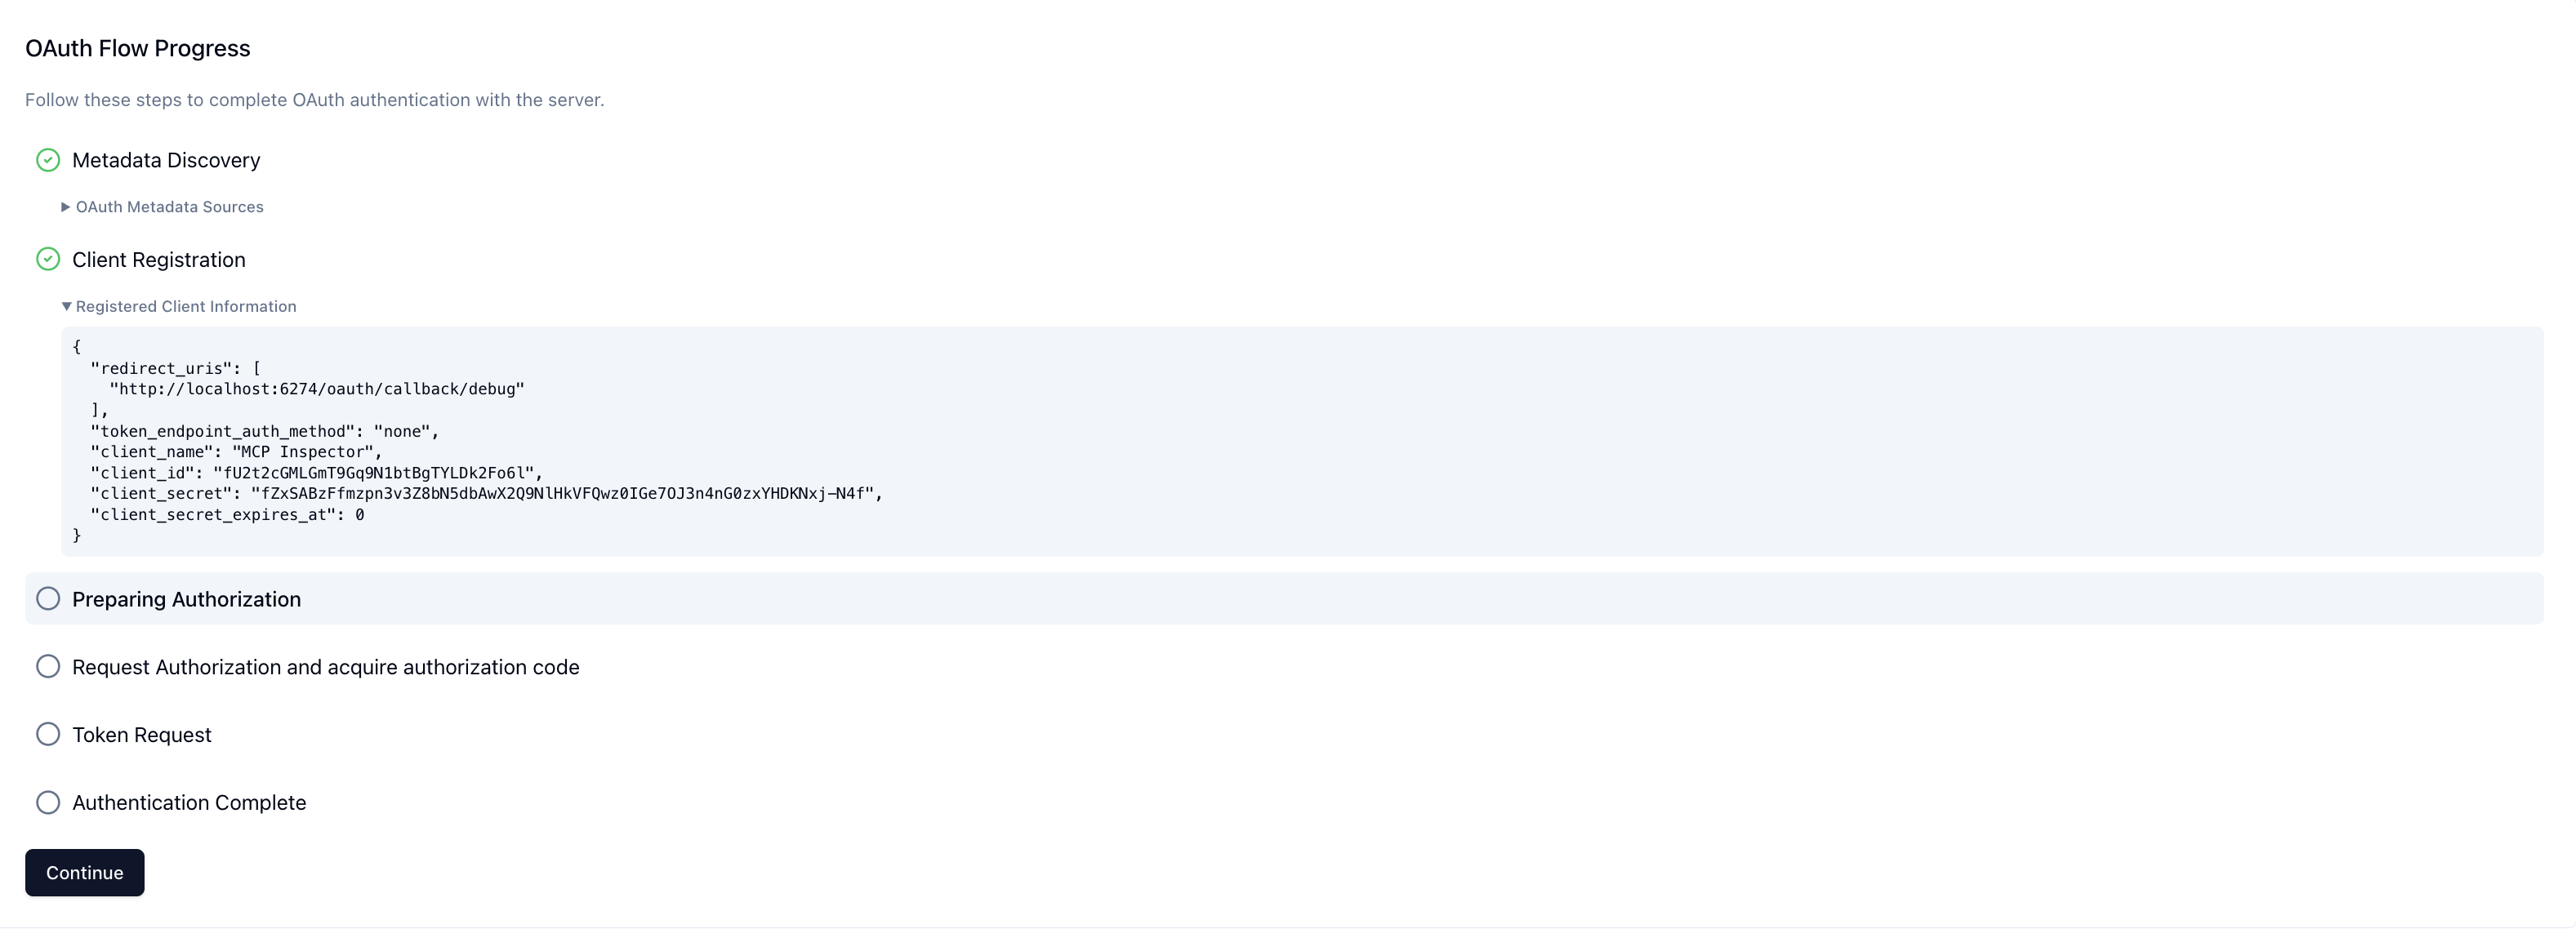
Client registration
Use Client ID Metadata Documents (CIMD) as the preferred client registration method when your authorization server supports it and the connector creator chooses it. With CIMD, ChatGPT uses an HTTPS metadata document URL as its client_id. Your authorization server fetches that document, validates the published client metadata and redirect URIs, and treats the URL as ChatGPT’s stable client identity.
If you support CIMD, set client_id_metadata_document_supported: true in your authorization server metadata. This lets ChatGPT use one stable client identity for connectors that choose CIMD, which your authorization server can use for redirect URI allowlists, rate limits, and other policies.
ChatGPT supports two token endpoint authentication methods for CIMD-backed clients:
none: use this public-client flow when your token endpoint supports PKCE-based authorization-code exchange without client authentication. ChatGPT does not store a per-client secret.private_key_jwt: use this signed client assertion flow when your token endpoint requires client authentication. ChatGPT publishes CIMD metadata withtoken_endpoint_auth_method: "private_key_jwt"and a public JWKS URL. The JWKS is served from/oauth/jwks.jsonon the metadata origin. ChatGPT signs token requests server-side with a managed private key andkid; your authorization server verifies the assertion against the public JWKS.
DCR is still supported. If you include registration_endpoint, ChatGPT can register dynamically when the connector creator chooses DCR or CIMD is not available. ChatGPT runs DCR once per connector instance, then keeps and reuses the registered OAuth client for that instance. DCR can still create many registered clients across many separate connector instances, so CIMD is usually easier to administer at scale.
Client identification
A frequent question is how your MCP server can confirm that a request actually comes from ChatGPT. ChatGPT presents an OpenAI-managed client certificate when connecting to MCP servers, so you can verify the client at the transport layer with mTLS. You can also allowlist ChatGPT’s published egress IP ranges. ChatGPT does not support machine-to-machine OAuth grants such as client credentials, service accounts, or JWT bearer assertions, nor can it present custom API keys or customer-provided mTLS certificates.
CIMD further strengthens client identification by giving your authorization server a stable, HTTPS-hosted declaration of ChatGPT’s identity. When you use private_key_jwt, verify ChatGPT’s token endpoint client assertion against the public JWKS published in the CIMD metadata.
Mutual TLS (mTLS)
ChatGPT now presents an OpenAI-managed client certificate when establishing TLS connections to MCP servers. If your application validates client certificates, configure it to trust the OpenAI certificate chain below.
To validate the client certificate when establishing the TLS connection to your MCP server:
- Verify a leaf certificate is present and chains to the OpenAI Connectors mTLS intermediate CA.
- Verify the leaf certificate is valid for client authentication.
- Verify the leaf certificate’s SAN
dnsNameismtls.prod.connectors.openai.com. - Avoid pinning a leaf certificate fingerprint; OpenAI may rotate the leaf certificate while keeping it under the published CA chain.
Use mTLS to authenticate ChatGPT as the MCP client. Continue to use OAuth 2.1 to authenticate the end user and authorize tool access.
Choosing an identity provider
Most OAuth 2.1 identity providers can satisfy the MCP authorization requirements once they expose a discovery document, support CIMD with none or private_key_jwt, support DCR when needed, and echo the resource parameter into issued tokens. Prefer providers that support CIMD for client registration.
We strongly recommend that you use an existing established identity provider rather than implementing authentication from scratch yourself.
Here are instructions for some popular identity providers.
Auth0
Auth0 enables MCP clients to securely connect to MCP servers by providing metadata discovery, CIMD registration, API security, and token exchange for first- and third-party tool calls.
- Guide to configuring Auth0 for MCP authorization
- Auth0 securing MCP servers overview
- Auth0 securing MCP servers quickstarts
Stytch
- Guide to configuring Stytch for MCP authorization
- Overview guide to MCP authorization
- Overview guide to MCP authorization specifically for Apps SDK
Implementing token verification
When the OAuth flow finishes, ChatGPT simply attaches the access token it received to subsequent MCP requests (Authorization: Bearer …). Once a request reaches your MCP server you must assume the token is untrusted and perform the full set of resource-server checks yourself—signature validation, issuer and audience matching, expiry, replay considerations, and scope enforcement. That responsibility sits with you, not with ChatGPT.
In practice you should:
- Fetch the signing keys published by your authorization server (usually via JWKS) and verify the token’s signature and
iss. - Reject tokens that have expired or have not yet become valid (
exp/nbf). - Confirm the token was minted for your server (
audor theresourceclaim) and contains the scopes you marked as required. - Run any app-specific policy checks, then either attach the resolved identity to the request context or return a
401with aWWW-Authenticatechallenge.
If verification fails, respond with 401 Unauthorized and a WWW-Authenticate header that points back to your protected-resource metadata. This tells the client to run the OAuth flow again.
SDK token verification primitives
Both Python and TypeScript MCP SDKs include helpers so you do not have to wire this from scratch.
Testing and rollout
- Local testing – start with a development tenant that issues short-lived tokens so you can iterate quickly.
- Dogfood – once authentication works, gate access to trusted testers before rolling out broadly. You can require linking for specific tools or the entire connector.
- Rotation – plan for token revocation, refresh, and scope changes. Your server should treat missing or stale tokens as unauthenticated and return a helpful error message.
- OAuth debugging – use the MCP Inspector Auth settings to walk through each OAuth step and pinpoint where the flow breaks before you ship.
With authentication in place you can confidently expose user-specific data and write actions to ChatGPT users.
Triggering authentication UI
ChatGPT only surfaces its OAuth linking UI when your MCP server signals that OAuth is available or necessary.
Triggering the tool-level OAuth flow requires both metadata (securitySchemes and the resource metadata document) and runtime errors that carry _meta["mcp/www_authenticate"]. Without both halves ChatGPT will not show the linking UI for that tool.
-
Publish resource metadata. The MCP server must expose its OAuth configuration at a well-known URL such as
https://your-mcp.example.com/.well-known/oauth-protected-resource. -
Describe each tool’s auth policy with
securitySchemes. DeclaringsecuritySchemesper tool tells ChatGPT which tools require OAuth versus which can run anonymously. Stick to per-tool declarations even if the entire server uses the same policy; server-level defaults make it difficult to evolve individual tools later.Two scheme types are available today, and you can list more than one to express optional auth:
noauth— the tool is callable anonymously; ChatGPT can run it immediately.oauth2— the tool needs an OAuth 2.0 access token; include the scopes you will request so the consent screen is accurate.
If you omit the array entirely, the tool inherits whatever default the server advertises. Declaring both
noauthandoauth2tells ChatGPT it can start with anonymous calls but that linking unlocks privileged behavior. Regardless of what you signal to the client, your server must still verify the token, scopes, and audience on every invocation.Example (public + optional auth) – TypeScript SDK
import { McpServer } from "@modelcontextprotocol/sdk/server/mcp.js";
import { z } from "zod";

declare const server: McpServer;

server.registerTool(
  "search",
  {
    title: "Public Search",
    description: "Search public documents.",
    inputSchema: {
      q: z.string(),
    },
    outputSchema: {},
    securitySchemes: [
      { type: "noauth" },
      { type: "oauth2", scopes: ["search.read"] },
    ],
  },
  async ({ q }) => {
    return {
      content: [{ type: "text", text: `Results for ${q}` }],
      structuredContent: {},
    };
  }
);
Example (auth required) – TypeScript SDK
import { McpServer } from "@modelcontextprotocol/sdk/server/mcp.js"; import { z } from "zod"; declare const server: McpServer; server.registerTool( "create_doc", { title: "Create Document", description: "Make a new doc in your account.", inputSchema: { title: z.string(), }, outputSchema: {}, securitySchemes: [{ type: "oauth2", scopes: ["docs.write"] }], }, async ({ title }) => { return { content: [{ type: "text", text: `Created doc: ${title}` }], structuredContent: {}, }; } ); -
Check tokens inside the tool handler and emit
_meta["mcp/www_authenticate"]when you want ChatGPT to trigger the authentication UI. Inspect the token and verify issuer, audience, expiry, and scopes. If no valid token is present, return an error result that includes_meta["mcp/www_authenticate"]and make sure the value contains both anerroranderror_descriptionparameter. ThisWWW-Authenticatepayload is what actually triggers the tool-level OAuth UI once steps 1 and 2 are in place. When a challenge prompts reauthorization, your provider can preserve the user’s existing login context during that flow.Example
{
  "jsonrpc": "2.0",
  "id": 4,
  "result": {
    "content": [
      {
        "type": "text",
        "text": "Authentication required: no access token provided."
      }
    ],
    "_meta": {
      "mcp/www_authenticate": [
        "'Bearer resource_metadata=\"https://your-mcp.example.com/.well-known/oauth-protected-resource\", error=\"insufficient_scope\", error_description=\"You need to login to continue\"'"
      ]
    },
    "isError": true
  }
}