
Introduction
Apps built with the Apps SDK use the Model Context Protocol (MCP) to connect to ChatGPT. To build an app for ChatGPT with the Apps SDK, you need:
- A Model Context Protocol (MCP) server (required) that defines your app’s capabilities (tools) and exposes them to ChatGPT.
- (Optional) A web component built with the framework of your choice, rendered in an iframe inside ChatGPT if you want a UI.
ChatGPT implements the open MCP Apps UI standard so you can build your UI once and run it across MCP Apps-compatible hosts.
In this quickstart, we’ll build a simple to-do list app, contained in a single HTML file that keeps the markup, CSS, and JavaScript together.
To see more advanced examples using React, see the examples repository on GitHub.
Build a web component
This step is optional. If you only need tools and no ChatGPT UI, skip to Build an MCP server and do not register a UI resource.
Let’s start by creating a file called public/todo-widget.html in a new directory that will be the UI rendered by the Apps SDK in ChatGPT.
This file will contain the web component that will be rendered in the ChatGPT interface.
Add the following content:
<!DOCTYPE html>
<html lang="en">
  <head>
    <meta charset="utf-8" />
    <title>Todo list</title>
    <style>
      :root {
        color: #0b0b0f;
        font-family:
          "Inter",
          system-ui,
          -apple-system,
          sans-serif;
      }

      html,
      body {
        width: 100%;
        min-height: 100%;
        box-sizing: border-box;
      }

      body {
        margin: 0;
        padding: 16px;
        background: #f6f8fb;
      }

      main {
        width: 100%;
        max-width: 360px;
        min-height: 260px;
        margin: 0 auto;
        background: #fff;
        border-radius: 16px;
        padding: 20px;
        box-shadow: 0 12px 24px rgba(15, 23, 42, 0.08);
      }

      h2 {
        margin: 0 0 16px;
        font-size: 1.25rem;
      }

      form {
        display: flex;
        gap: 8px;
        margin-bottom: 16px;
      }

      form input {
        flex: 1;
        padding: 10px 12px;
        border-radius: 10px;
        border: 1px solid #cad3e0;
        font-size: 0.95rem;
      }

      form button {
        border: none;
        border-radius: 10px;
        background: #111bf5;
        color: white;
        font-weight: 600;
        padding: 0 16px;
        cursor: pointer;
      }

      form button:disabled {
        opacity: 0.7;
        cursor: not-allowed;
      }

      input[type="checkbox"] {
        accent-color: #111bf5;
      }

      ul {
        list-style: none;
        padding: 0;
        margin: 0;
        display: flex;
        flex-direction: column;
        gap: 8px;
      }

      li {
        background: #f2f4fb;
        border-radius: 12px;
        padding: 10px 14px;
        display: flex;
        align-items: center;
        gap: 10px;
      }

      li span {
        flex: 1;
      }

      li[data-completed="true"] span {
        text-decoration: line-through;
        color: #6c768a;
      }

      li[data-busy="true"] {
        opacity: 0.7;
      }
    </style>
  </head>
  <body>
    <main>
      <h2>Todo list</h2>
      <form id="add-form" autocomplete="off">
        <input id="todo-input" name="title" placeholder="Add a task" />
        <button type="submit">Add</button>
      </form>
      <ul id="todo-list"></ul>
    </main>

    <script type="module">
      const listEl = document.querySelector("#todo-list");
      const formEl = document.querySelector("#add-form");
      const inputEl = document.querySelector("#todo-input");
      const addButtonEl = formEl.querySelector('button[type="submit"]');
      const addButtonText = addButtonEl.textContent;

      let tasks = [];
      let isAdding = false;
      const busyTodoIds = new Set();

      const render = () => {
        listEl.innerHTML = "";
        tasks.forEach((task) => {
          const li = document.createElement("li");
          li.dataset.id = task.id;
          li.dataset.completed = String(Boolean(task.completed));
          li.dataset.busy = String(busyTodoIds.has(task.id));

          const label = document.createElement("label");
          label.style.display = "flex";
          label.style.alignItems = "center";
          label.style.gap = "10px";

          const checkbox = document.createElement("input");
          checkbox.type = "checkbox";
          checkbox.checked = Boolean(task.completed);
          checkbox.disabled = busyTodoIds.has(task.id);

          const span = document.createElement("span");
          span.textContent = task.title;

          label.appendChild(checkbox);
          label.appendChild(span);
          li.appendChild(label);
          listEl.appendChild(li);
        });
      };

      const updateFromResponse = (response) => {
        if (response?.structuredContent?.tasks) {
          tasks = response.structuredContent.tasks;
          render();
        }
      };

      // MCP Apps standard bridge: JSON-RPC messages over postMessage.
      //
      // - Initialize the bridge with `ui/initialize`.
      // - Confirm readiness with `ui/notifications/initialized`.
      // - Call tools with `tools/call`.
      // - Listen for `ui/notifications/tool-result` to react to model-initiated tool calls.
      let rpcId = 0;
      const pendingRequests = new Map();

      const rpcNotify = (method, params) => {
        window.parent.postMessage({ jsonrpc: "2.0", method, params }, "*");
      };

      const rpcRequest = (method, params) =>
        new Promise((resolve, reject) => {
          const id = ++rpcId;
          pendingRequests.set(id, { resolve, reject });
          window.parent.postMessage(
            { jsonrpc: "2.0", id, method, params },
            "*"
          );
        });

      window.addEventListener(
        "message",
        (event) => {
          if (event.source !== window.parent) return;
          const message = event.data;
          if (!message || message.jsonrpc !== "2.0") return;

          // Responses
          if (typeof message.id === "number") {
            const pending = pendingRequests.get(message.id);
            if (!pending) return;
            pendingRequests.delete(message.id);

            if (message.error) {
              pending.reject(message.error);
              return;
            }

            pending.resolve(message.result);
            return;
          }

          // Notifications
          if (typeof message.method !== "string") return;
          if (message.method === "ui/notifications/tool-result") {
            updateFromResponse(message.params);
          }
        },
        { passive: true }
      );

      const initializeBridge = async () => {
        const appInfo = { name: "todo-widget", version: "0.1.0" };
        const appCapabilities = {};
        const protocolVersion = "2026-01-26";

        try {
          await rpcRequest("ui/initialize", {
            appInfo,
            appCapabilities,
            protocolVersion,
          });
          rpcNotify("ui/notifications/initialized", {});
        } catch (error) {
          console.error("Failed to initialize the MCP Apps bridge:", error);
          throw error;
        }
      };

      const bridgeReady = initializeBridge();

      const callTodoTool = async (name, payload) => {
        await bridgeReady;
        const response = await rpcRequest("tools/call", {
          name,
          arguments: payload,
        });
        updateFromResponse(response);
      };

      formEl.addEventListener("submit", async (event) => {
        event.preventDefault();
        const title = inputEl.value.trim();
        if (!title || isAdding) return;

        isAdding = true;
        addButtonEl.disabled = true;
        addButtonEl.textContent = "Adding…";

        try {
          await callTodoTool("add_todo", { title });
          inputEl.value = "";
        } catch (error) {
          console.error("Failed to add todo:", error);
        } finally {
          isAdding = false;
          addButtonEl.disabled = false;
          addButtonEl.textContent = addButtonText;
        }
      });

      listEl.addEventListener("change", async (event) => {
        const checkbox = event.target;
        if (!checkbox.matches('input[type="checkbox"]')) return;
        const id = checkbox.closest("li")?.dataset.id;
        if (!id) return;

        if (!checkbox.checked) {
          checkbox.checked = true;
          return;
        }

        if (busyTodoIds.has(id)) return;
        busyTodoIds.add(id);
        checkbox.disabled = true;
        const rowEl = checkbox.closest("li");
        if (rowEl) rowEl.dataset.busy = "true";

        try {
          await callTodoTool("complete_todo", { id });
        } catch (error) {
          console.error("Failed to complete todo:", error);
        } finally {
          busyTodoIds.delete(id);
          render();
        }
      });

      render();
    </script>
  </body>
</html>
Using the Apps SDK in your web component
For new apps, use the MCP Apps host bridge: JSON-RPC over postMessage
with ui/* notifications and methods such as tools/call.
ChatGPT continues to support Apps SDK compatibility and optional ChatGPT extensions. For details, see MCP Apps compatibility in ChatGPT.
Build an MCP server
Install the official Python or Node MCP SDK to create a server and expose a /mcp endpoint.
In this quickstart, we’ll use the Node SDK.
If you’re using Python, refer to our examples repository on GitHub to see an example MCP server with the Python SDK.
Install the Node SDK, MCP Apps helpers, and Zod with:
npm install @modelcontextprotocol/sdk @modelcontextprotocol/ext-apps zodMCP server with Apps SDK resources
Register a resource for your component bundle and the tools the model can call (e.g. add_todo and complete_todo) so ChatGPT can drive the UI.
Create a file named server.js and paste the following example that uses the Node SDK:
import { createServer } from "node:http";
import { readFileSync } from "node:fs";
import {
  registerAppResource,
  registerAppTool,
  RESOURCE_MIME_TYPE,
} from "@modelcontextprotocol/ext-apps/server";
import { McpServer } from "@modelcontextprotocol/sdk/server/mcp.js";
import { StreamableHTTPServerTransport } from "@modelcontextprotocol/sdk/server/streamableHttp.js";
import { z } from "zod";

const todoHtml = readFileSync("public/todo-widget.html", "utf8");

const addTodoInputSchema = {
  title: z.string().min(1),
};

const completeTodoInputSchema = {
  id: z.string().min(1),
};

const todoOutputSchema = {
  tasks: z.array(
    z.object({
      id: z.string(),
      title: z.string(),
      completed: z.boolean(),
    })
  ),
};

let todos = [];
let nextId = 1;

const replyWithTodos = (message) => ({
  content: message ? [{ type: "text", text: message }] : [],
  structuredContent: { tasks: todos },
});

function createTodoServer() {
  const server = new McpServer({ name: "todo-app", version: "0.1.0" });

  registerAppResource(
    server,
    "todo-widget",
    "ui://widget/todo.html",
    {},
    async () => ({
      contents: [
        {
          uri: "ui://widget/todo.html",
          mimeType: RESOURCE_MIME_TYPE,
          text: todoHtml,
        },
      ],
    })
  );

  registerAppTool(
    server,
    "add_todo",
    {
      title: "Add todo",
      description: "Creates a todo item with the given title.",
      inputSchema: addTodoInputSchema,
      outputSchema: todoOutputSchema,
      _meta: {
        ui: { resourceUri: "ui://widget/todo.html" },
      },
    },
    async (args) => {
      const title = args?.title?.trim?.() ?? "";
      if (!title) return replyWithTodos("Missing title.");
      const todo = { id: `todo-${nextId++}`, title, completed: false };
      todos = [...todos, todo];
      return replyWithTodos(`Added "${todo.title}".`);
    }
  );

  registerAppTool(
    server,
    "complete_todo",
    {
      title: "Complete todo",
      description: "Marks a todo as done by id.",
      inputSchema: completeTodoInputSchema,
      outputSchema: todoOutputSchema,
      _meta: {
        ui: { resourceUri: "ui://widget/todo.html" },
      },
    },
    async (args) => {
      const id = args?.id;
      if (!id) return replyWithTodos("Missing todo id.");
      const todo = todos.find((task) => task.id === id);
      if (!todo) {
        return replyWithTodos(`Todo ${id} was not found.`);
      }

      todos = todos.map((task) =>
        task.id === id ? { ...task, completed: true } : task
      );

      return replyWithTodos(`Completed "${todo.title}".`);
    }
  );

  return server;
}

const port = Number(process.env.PORT ?? 8787);
const MCP_PATH = "/mcp";

const httpServer = createServer(async (req, res) => {
  if (!req.url) {
    res.writeHead(400).end("Missing URL");
    return;
  }

  const url = new URL(req.url, `http://${req.headers.host ?? "localhost"}`);

  if (req.method === "OPTIONS" && url.pathname === MCP_PATH) {
    res.writeHead(204, {
      "Access-Control-Allow-Origin": "*",
      "Access-Control-Allow-Methods": "POST, GET, OPTIONS",
      "Access-Control-Allow-Headers": "content-type, mcp-session-id",
      "Access-Control-Expose-Headers": "Mcp-Session-Id",
    });
    res.end();
    return;
  }

  if (req.method === "GET" && url.pathname === "/") {
    res.writeHead(200, { "content-type": "text/plain" }).end("Todo MCP server");
    return;
  }

  const MCP_METHODS = new Set(["POST", "GET", "DELETE"]);
  if (url.pathname === MCP_PATH && req.method && MCP_METHODS.has(req.method)) {
    res.setHeader("Access-Control-Allow-Origin", "*");
    res.setHeader("Access-Control-Expose-Headers", "Mcp-Session-Id");

    const server = createTodoServer();
    const transport = new StreamableHTTPServerTransport({
      sessionIdGenerator: undefined, // stateless mode
      enableJsonResponse: true,
    });

    res.on("close", () => {
      transport.close();
      server.close();
    });

    try {
      await server.connect(transport);
      await transport.handleRequest(req, res);
    } catch (error) {
      console.error("Error handling MCP request:", error);
      if (!res.headersSent) {
        res.writeHead(500).end("Internal server error");
      }
    }
    return;
  }

  res.writeHead(404).end("Not Found");
});

httpServer.listen(port, () => {
  console.log(
    `Todo MCP server listening on http://localhost:${port}${MCP_PATH}`
  );
});
This snippet also responds to GET / for health checks, handles CORS preflight for /mcp and nested routes like /mcp/actions, and returns 404 Not Found for OAuth discovery routes you are not using yet. That keeps ChatGPT’s connector wizard from surfacing 502 errors while you iterate without authentication.
Run locally
If you’re using a web framework like React, build your component into static assets so the HTML template can inline them.
Usually, you can run a build command such as npm run build to produce a dist directory with your compiled assets.
In this quickstart, since we’re using vanilla HTML, no build step is required.
Start the MCP server on http://localhost:<port>/mcp from the directory that contains server.js (or server.ts).
Make sure you have "type": "module" in your package.json file:
{
  "type": "module",
  "dependencies": {
    "@modelcontextprotocol/sdk": "^1.20.2",
    "@modelcontextprotocol/ext-apps": "^1.0.1",
    "zod": "^3.25.76"
  }
}
Then run the server with the following command:
node server.jsThe server should print Todo MCP server listening on http://localhost:8787/mcp once it is ready.
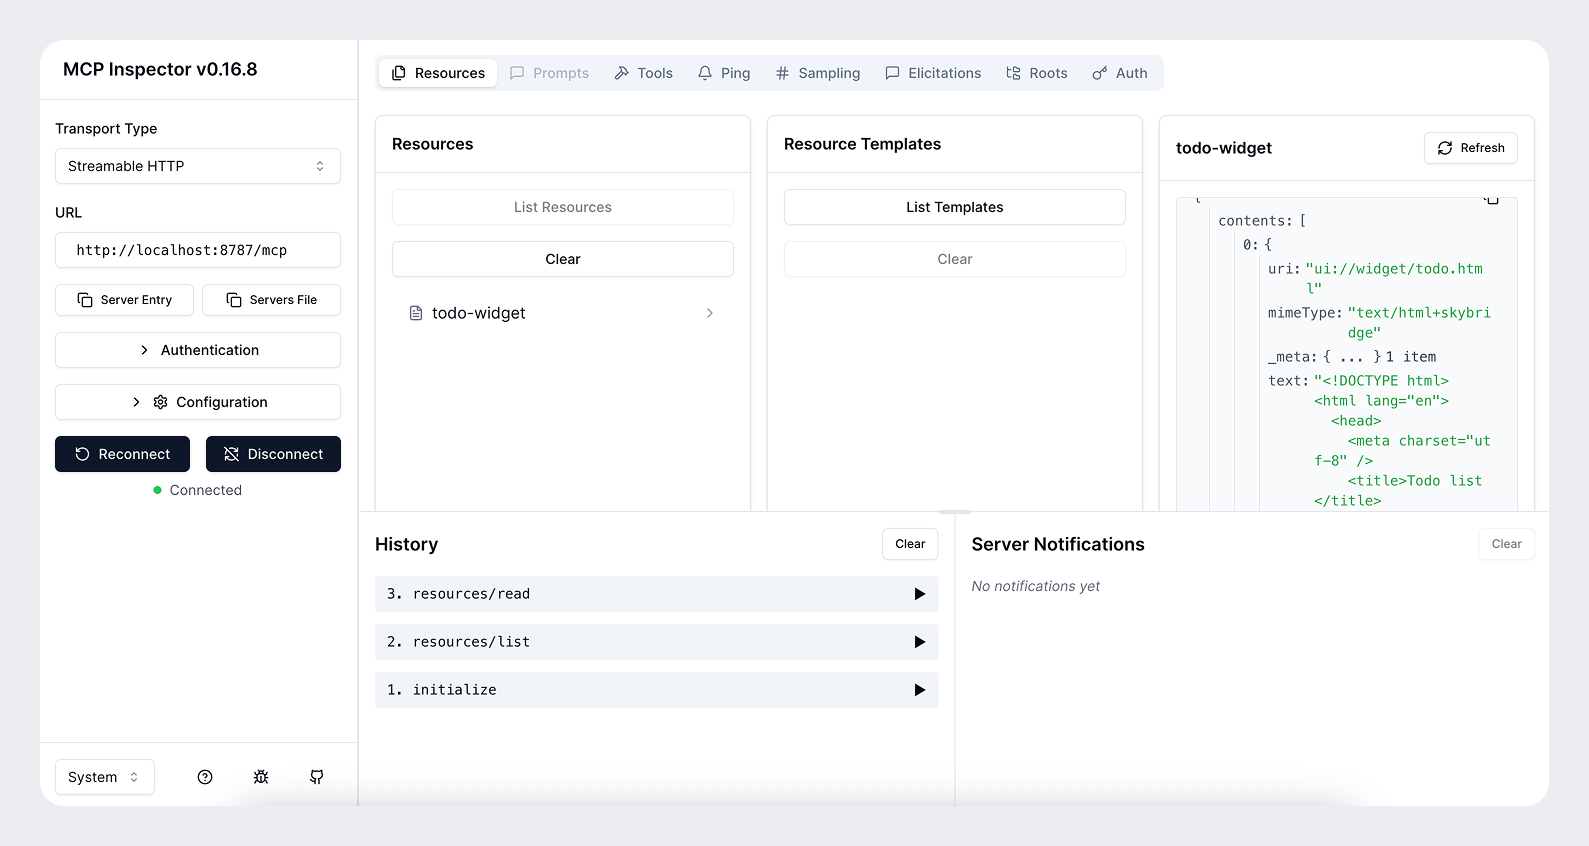
Test with MCP Inspector
You can use the MCP Inspector to test your server locally.
npx @modelcontextprotocol/inspector@latest --server-url http://localhost:8787/mcp --transport httpThis will open a browser window with the MCP Inspector interface. You can use this to test your server and see the tool responses.
Expose your server to the public internet
For ChatGPT to access your server during development, you need to expose it to the public internet. You can use a tool such as ngrok to open a tunnel to your local server.
ngrok http <port>This will give you a public URL like https://<subdomain>.ngrok.app that you can use to access your server from ChatGPT.
When you add your connector, provide the public URL with the /mcp path (e.g. https://<subdomain>.ngrok.app/mcp).
Add your app to ChatGPT
Once you have your MCP server and web component working locally, you can add your app to ChatGPT with the following steps:
- Enable developer mode under Settings → Apps & Connectors → Advanced settings in ChatGPT.
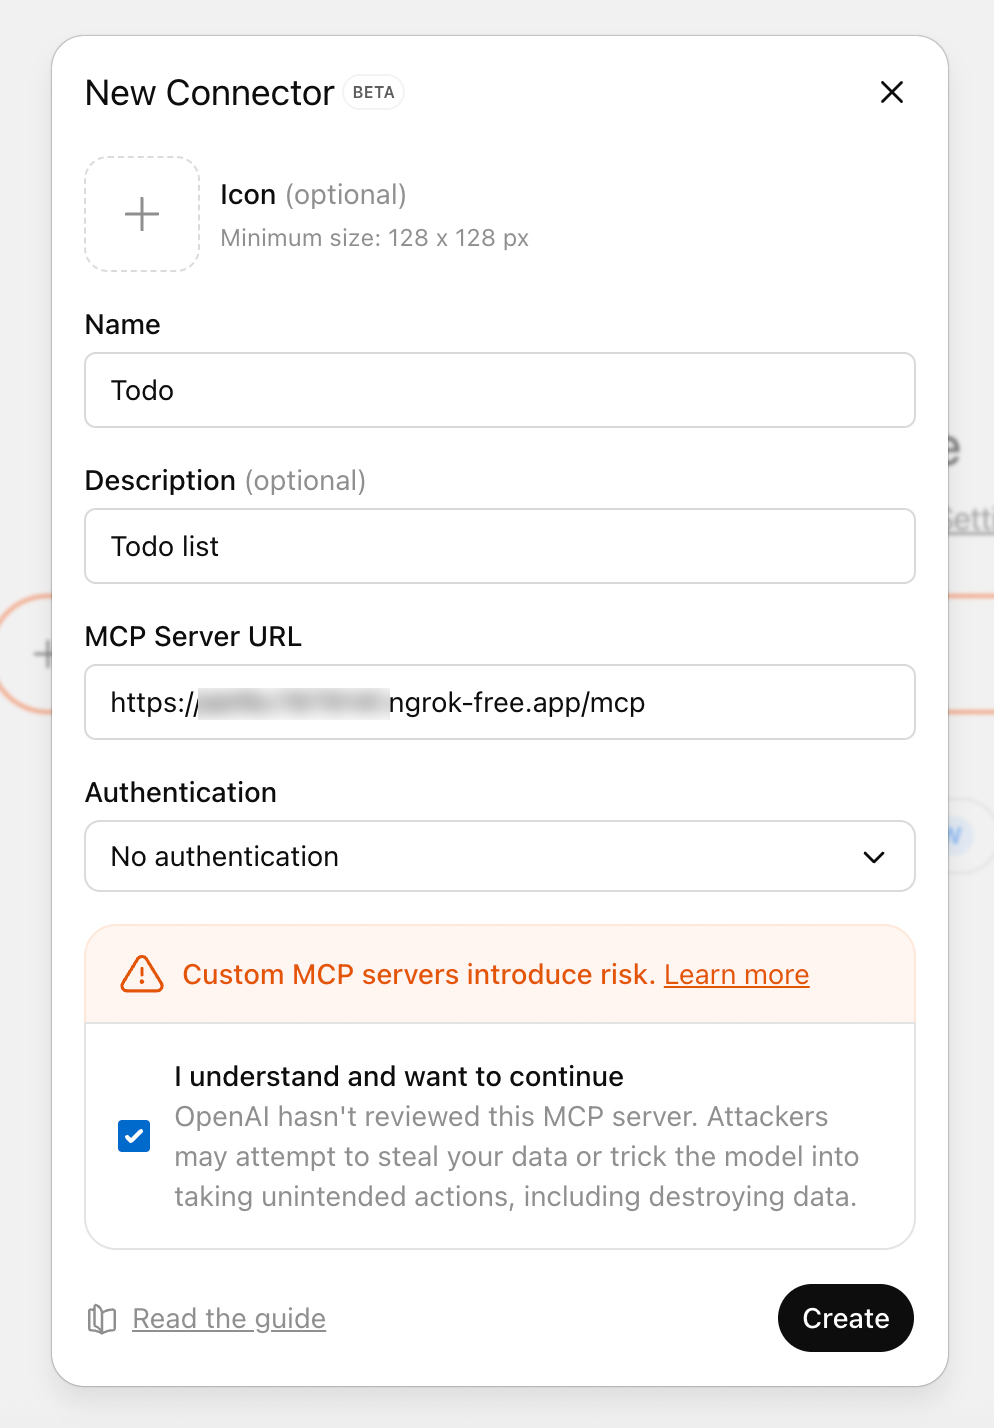
- Click the Create button to add a connector under Settings → Connectors and paste the HTTPS +
/mcpURL from your tunnel or deployment (e.g.https://<subdomain>.ngrok.app/mcp). - Name the connector, provide a short description and click Create.
- Open a new chat, add your connector from the More menu (accessible after clicking the + button), and prompt the model (e.g., “Add a new task to read my book”). ChatGPT will stream tool payloads so you can confirm inputs and outputs.

Next steps
From there, you can iterate on the UI/UX, prompts, tool metadata, and the overall experience.
Refresh the connector after each change to the MCP server (tools, metadata, etc.) You can do this by clicking the Refresh button in Settings → Connectors after selecting your connector.
When you’re preparing for submission, review the ChatGPT app submission guidelines and research your use case. If you’re building a UI, you can also review the design guidelines.
Once you understand the basics, you can leverage the Apps SDK to build a ChatGPT UI using the Apps SDK primitives, authenticate users if needed, and persist state.