
This guide is for ChatGPT Enterprise admins who want to set up Codex for their workspace.
Use this page as the step-by-step rollout guide. For detailed policy, configuration, automation, and monitoring details, use the linked pages: Authentication, Agent approvals & security, Access tokens, Managed configuration, and Governance.
Enterprise-grade security and privacy
Codex supports ChatGPT Enterprise security features, including:
- No training on enterprise data
- Residency and retention that follow ChatGPT Enterprise policies
- Granular user access controls
- Data encryption at rest (AES-256) and in transit (TLS 1.2+)
- Audit logging via the ChatGPT Compliance API
For security controls and runtime protections, see Agent approvals & security. Refer to Zero Data Retention (ZDR) for more details. For a broader enterprise security overview, see the Codex security white paper.
Pre-requisites: Determine owners and rollout strategy
During your rollout, team members may support different aspects of integrating Codex into your organization. Ensure you have the following owners:
- ChatGPT Enterprise workspace owner: required to configure Codex settings in your workspace.
- Security owner: determines agent permissions settings for Codex.
- Analytics owner: integrates analytics and compliance APIs into your data pipelines.
Decide which Codex surfaces you will use:
- Codex local: includes the Codex app, CLI, and IDE extension. The agent runs on the developer’s computer in a sandbox.
- Codex cloud: includes hosted Codex features (including Codex cloud, iOS, Code Review, and tasks created by the Slack integration or Linear integration). The agent runs remotely in a hosted container with your codebase.
- Both: use local + cloud together.
You can enable local, cloud, or both, and control access with workspace settings and role-based access control (RBAC).
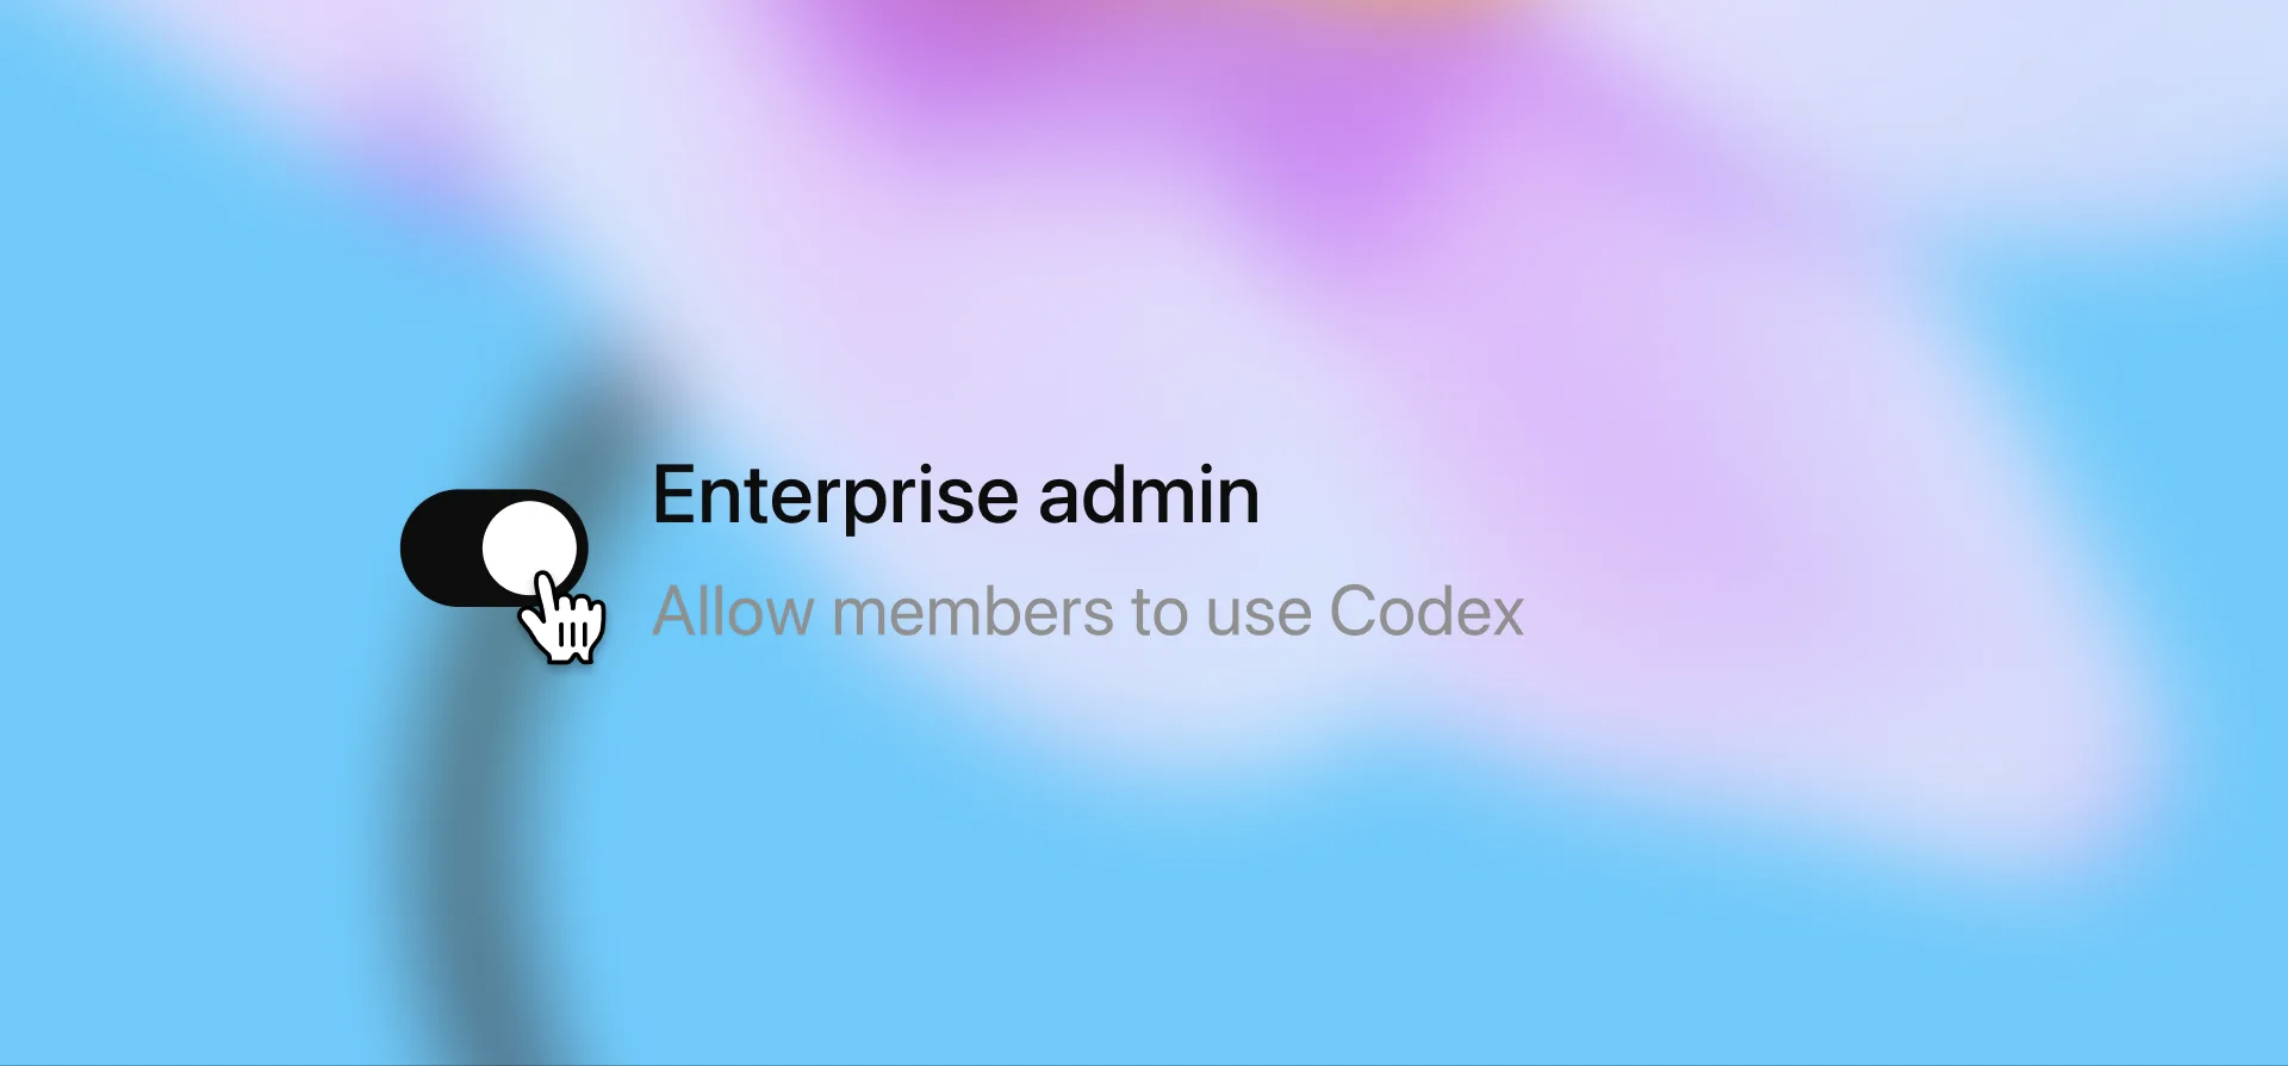
Step 1: Enable Codex in your workspace
You configure access to Codex in ChatGPT Enterprise workspace settings.
Go to Workspace Settings > Settings and Permissions.
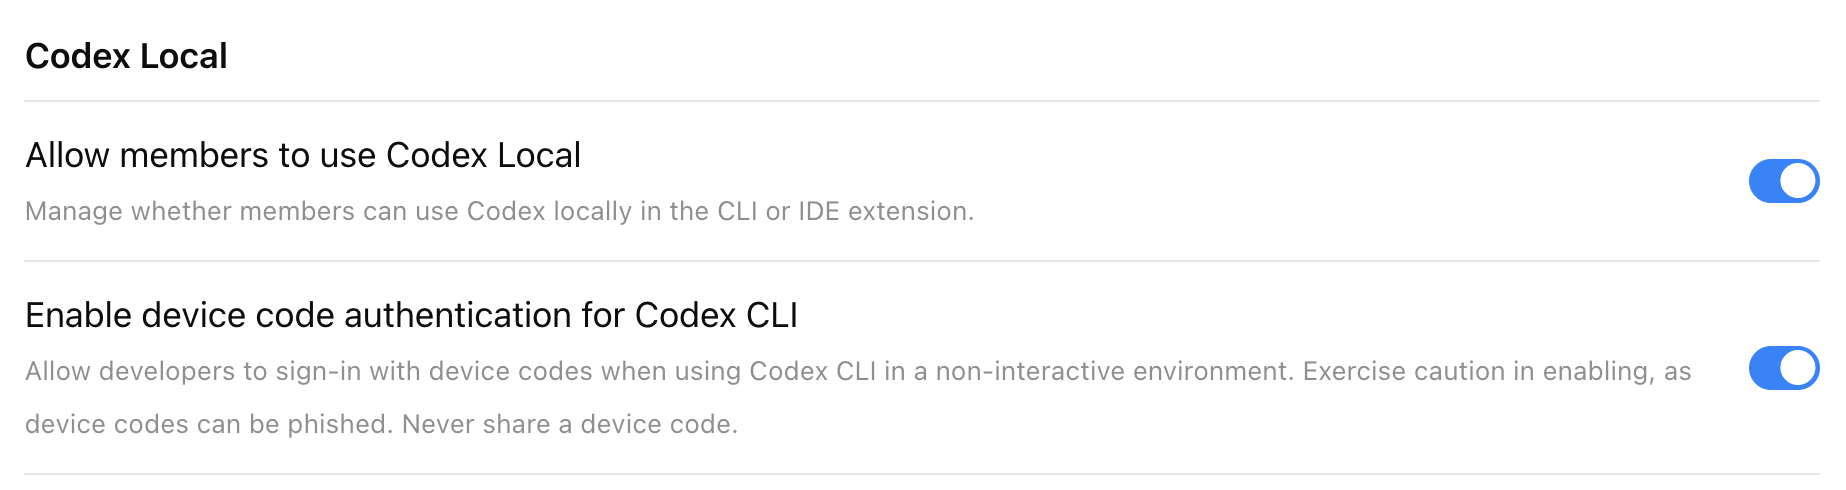
Codex local
Codex local is enabled by default for new ChatGPT Enterprise workspaces. If you are not a ChatGPT workspace owner, you can test whether you have access by installing Codex and logging in with your work email.
Turn on Allow members to use Codex Local.
This enables use of the Codex app, CLI, and IDE extension for allowed users.
If members need programmatic Codex local workflows, grant Allow users to create access tokens in the Access tokens section or through a custom role. Workspace owners and admins can use Access token expiration limit in the Codex Local section to set the longest expiration members can choose for new tokens. For setup and permission details, see Access tokens.
If the Codex Local toggle is off, users who attempt to use the Codex app, CLI, or IDE will see the following error: “403 - Unauthorized. Contact your ChatGPT administrator for access.”
Enable device code authentication for Codex CLI
Allow developers to sign in with a device code when using Codex CLI in a non-interactive environment (for example, a remote development box). More details are in authentication.
Codex cloud
Prerequisites
Codex cloud requires GitHub (cloud-hosted) repositories. If your codebase is on-premises or not on GitHub, you can use the Codex SDK to build similar workflows on your own infrastructure.
To set up Codex as an admin, you must have GitHub access to the repositories commonly used across your organization. If you don’t have the necessary access, work with someone on your engineering team who does.
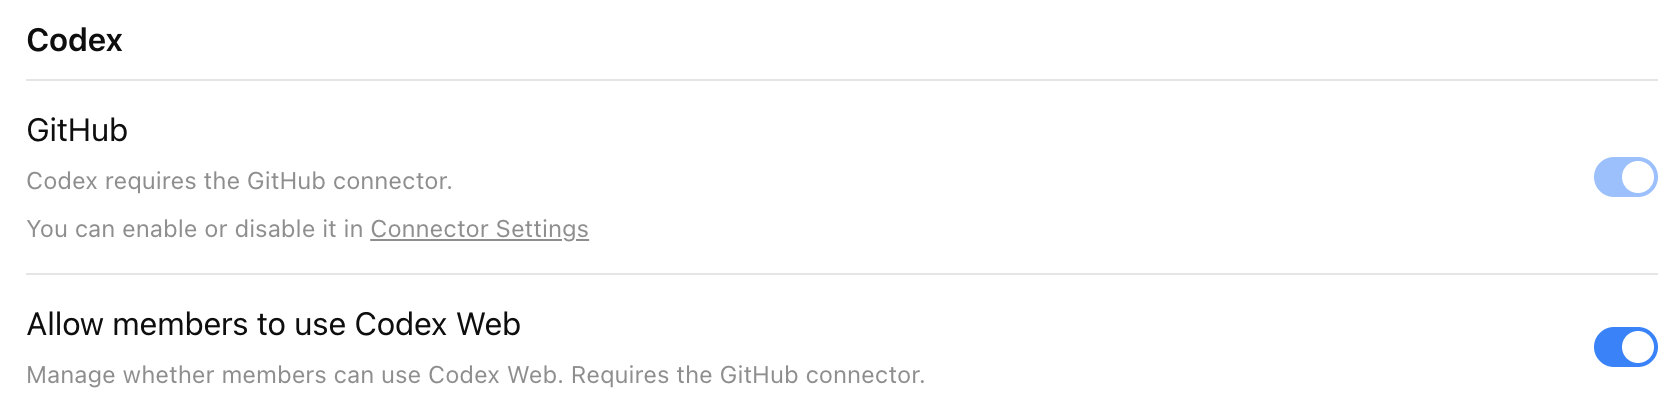
Enable Codex cloud in workspace settings
Start by turning on the ChatGPT GitHub Connector in the Codex section of Workspace Settings > Settings and Permissions.
To enable Codex cloud for your workspace, turn on Allow members to use Codex cloud. Once enabled, users can access Codex directly from the left-hand navigation panel in ChatGPT.
Note that it may take up to 10 minutes for Codex to appear in ChatGPT.
Enable Codex Slack app to post answers on task completion
Codex posts its full answer back to Slack when the task completes. Otherwise, Codex posts only a link to the task.
To learn more, see Codex in Slack.
Enable Codex agent to access the internet
By default, Codex cloud agents have no internet access during runtime to help protect against security and safety risks like prompt injection.
This setting lets users use an allowlist for common software dependency domains, add domains and trusted sites, and specify allowed HTTP methods.
For security implications of internet access and runtime controls, see Agent approvals & security.
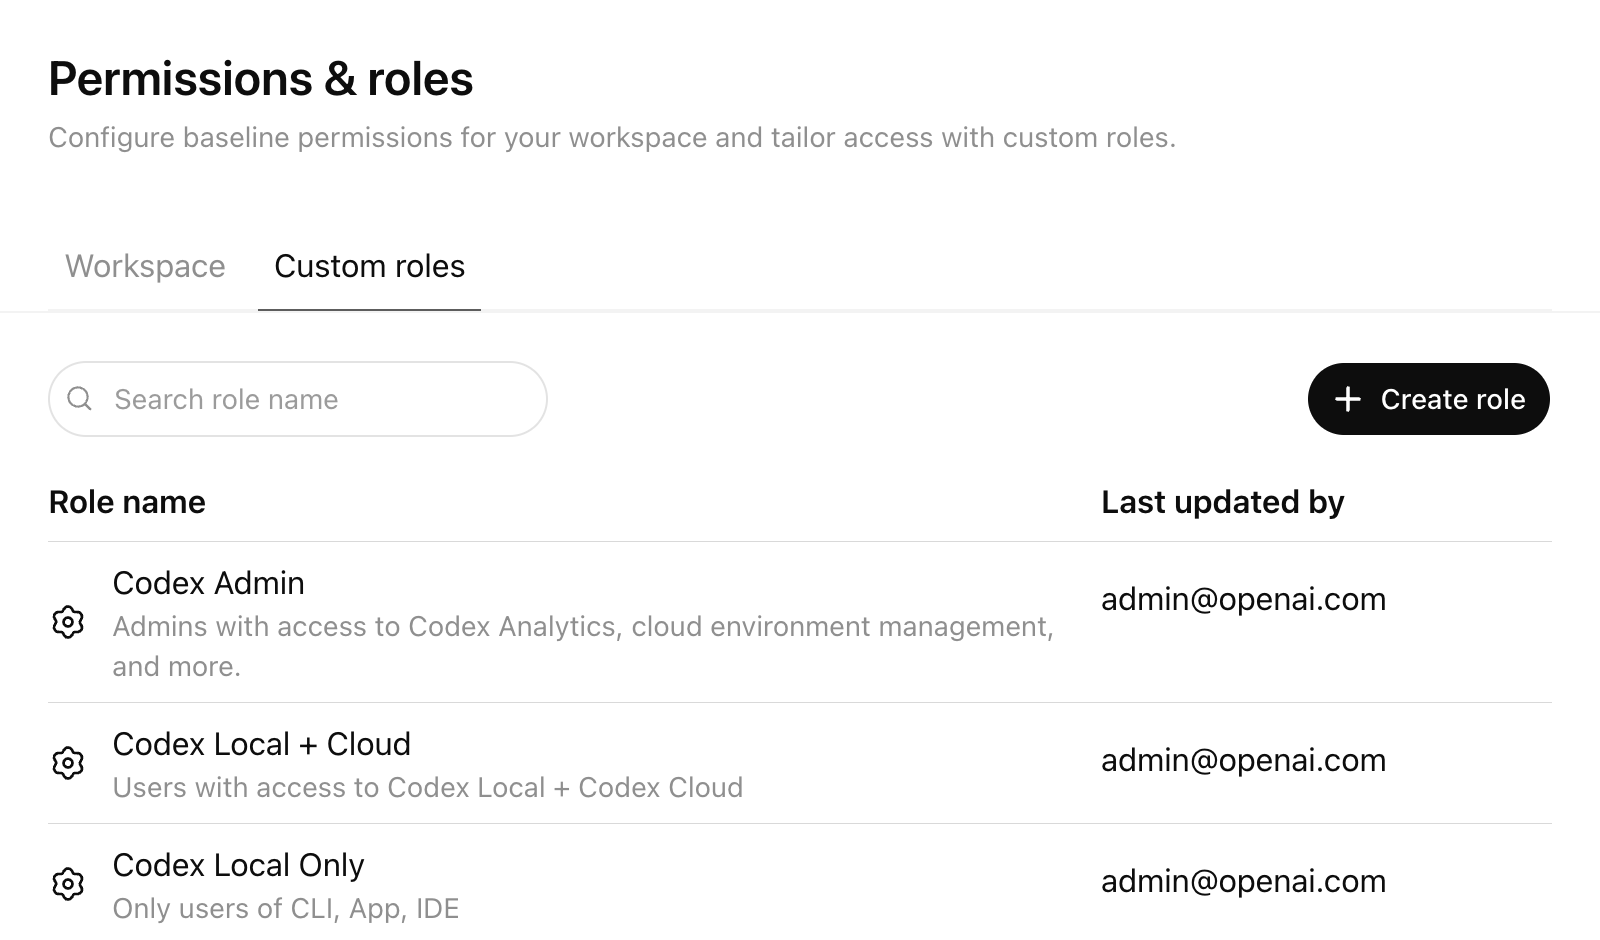
Step 2: Set up custom roles (RBAC)
Use RBAC to control granular permissions for access Codex local and Codex cloud.
What RBAC lets you do
Workspace Owners can use RBAC in ChatGPT admin settings to:
- Set a default role for users who aren’t assigned any custom role
- Create custom roles with granular permissions
- Assign one or more custom roles to Groups
- Automatically sync users into Groups via SCIM
- Manage roles centrally from the Custom Roles tab
Users can inherit more than one role, and permissions resolve to the most permissive (least restrictive) access across those roles.
Create a Codex Admin group
Set up a dedicated “Codex Admin” group rather than granting Codex administration to a broad audience.
The Allow members to administer Codex toggle grants the Codex Admin role. Codex Admins can:
- View Codex workspace analytics
- Open the Codex Policies page to manage cloud-managed
requirements.tomlpolicies - Assign those managed policies to user groups or configure a default fallback policy
- Manage Codex cloud environments, including editing and deleting environments
Use this role for the small set of admins who own Codex rollout, policy management, and governance. It’s not required for general Codex users. You don’t need Codex cloud to enable this toggle.
Recommended rollout pattern:
- Create a “Codex Users” group for people who should use Codex
- Create a separate “Codex Admin” group for the smaller set of people who should manage Codex settings and policies
- Assign the custom role with Allow members to administer Codex enabled only to the “Codex Admin” group
- Keep membership in the “Codex Admin” group limited to workspace owners or designated platform, IT, and governance operators
- If you use SCIM, back the “Codex Admin” group with your identity provider so membership changes are auditable and centrally managed
This separation makes it easier to roll out Codex while keeping analytics, environment management, and policy deployment limited to trusted admins. For RBAC setup details and the full permission model, see the OpenAI RBAC Help Center article.
Step 3: Configure Codex local requirements
Codex Admins can deploy admin-enforced requirements.toml policies from the Codex Policies page.
Use this page when you want to apply different local Codex constraints to different groups without distributing device-level files first. The managed policy uses the same requirements.toml format described in Managed configuration, so you can define allowed approval policies, sandbox modes, web search behavior, MCP server allowlists, feature pins, and restrictive command rules. To disable Browser Use, the in-app browser, or Computer Use, see Pin feature flags.
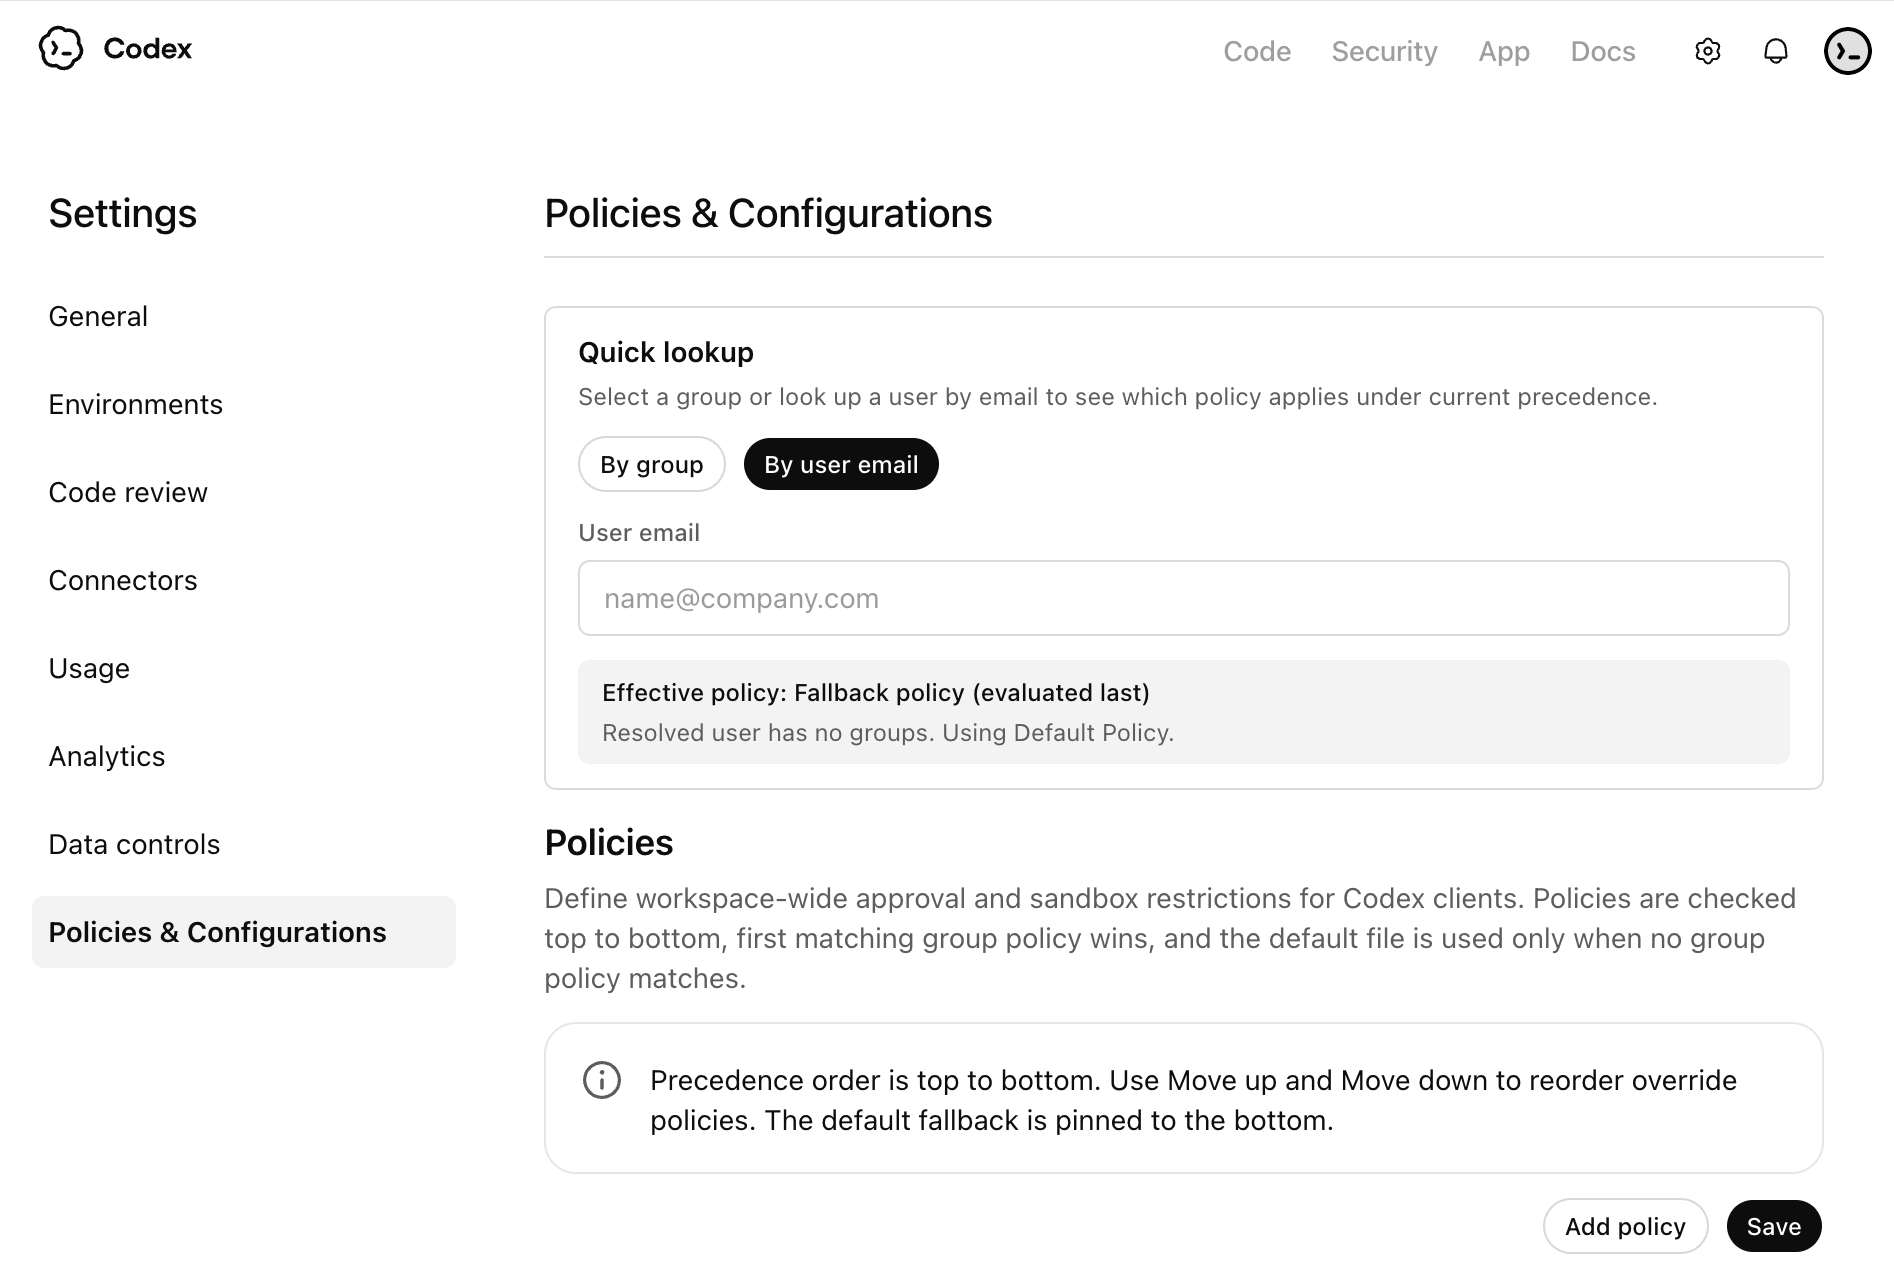
Recommended setup:
- Create a baseline policy for most users, then create stricter or more permissive variants only where needed.
- Assign each managed policy to a specific user group, and configure a default fallback policy for everyone else.
- Order group rules with care. If a user matches more than one group-specific rule, the first matching rule applies.
- Treat each policy as a complete profile for that group. Codex doesn’t fill missing fields from later matching group rules.
These cloud-managed policies apply across Codex local surfaces when users sign in with ChatGPT, including the Codex app, CLI, and IDE extension.
Example requirements.toml policies
Use cloud-managed requirements.toml policies to enforce the guardrails you want for each group. The snippets below are examples you can adapt, not required settings.
For Codex 0.138.0 or later, prefer allowed_permission_profiles with managed
default_permissions. Use allowed_sandbox_modes only for legacy deployments
that still configure sandbox_mode.
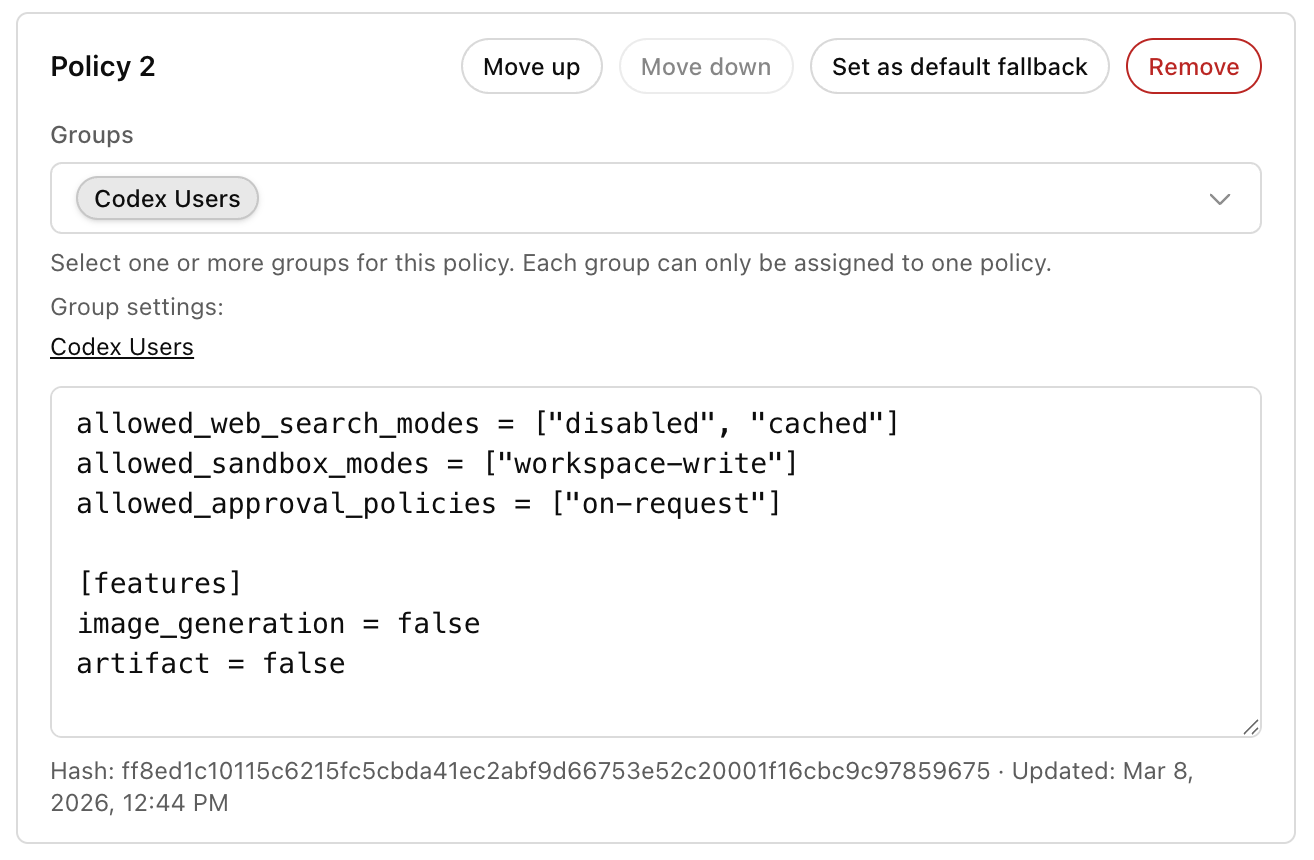
Example: limit web search, sandbox mode, and approvals for a standard local rollout:
allowed_web_search_modes = ["disabled", "cached"]
allowed_sandbox_modes = ["workspace-write"]
allowed_approval_policies = ["on-request"]
Example: allow the standard permission profiles for an upgraded fleet:
Permission-profile allowlists require Codex 0.138.0 or later. Use this example only after every managed client runs a supporting release.
default_permissions = ":workspace"

[allowed_permission_profiles]
":read-only" = true
":workspace" = true
Example: constrain Browser Use, the in-app browser, and Computer Use:
[features]
browser_use = false
browser_use_full_cdp_access = false
in_app_browser = false
computer_use = false
Example: add a restrictive command rule when you want admins to block or gate specific commands:
[rules]
prefix_rules = [
  { pattern = [{ token = "git" }, { any_of = ["push", "commit"] }], decision = "prompt", justification = "Require review before mutating remote history." },
]
You can use any example on its own or combine them in a single managed policy for a group. For exact keys, precedence, and more examples, see Managed configuration and Agent approvals & security.
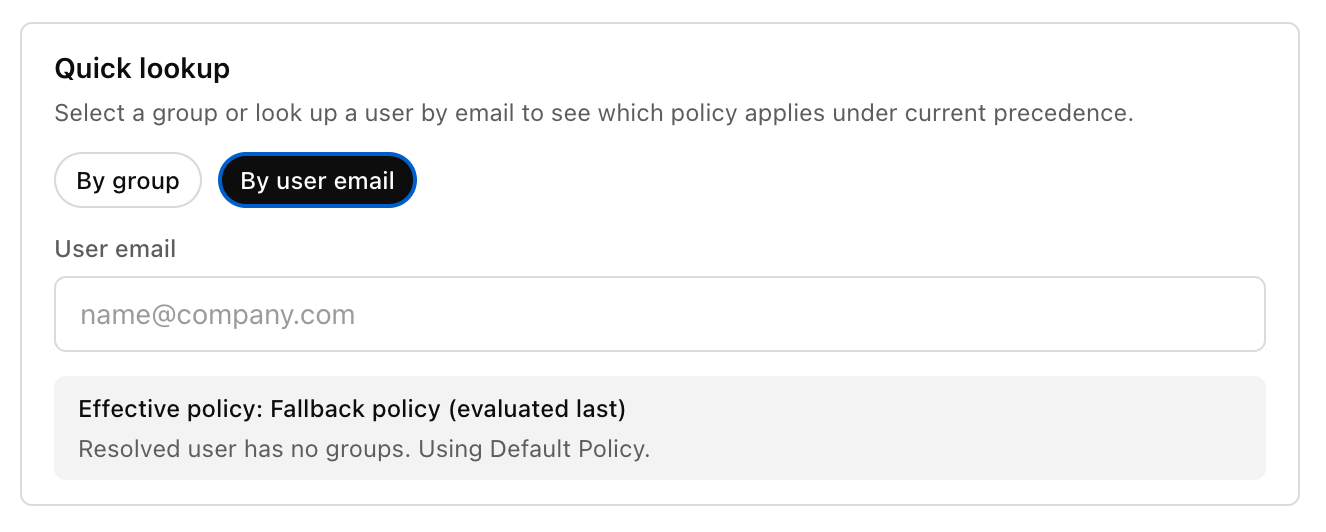
Checking user policies
Use the policy lookup tools at the end of the workflow to confirm which managed policy applies to a user. You can check policy assignment by group or by entering a user email.
If you plan to restrict login method or workspace for local clients, see the admin-managed authentication restrictions in Authentication.
Step 4: Standardize local configuration with Team Config
Teams who want to standardize Codex across an organization can use Team Config to share defaults, rules, and skills without duplicating setup on every local configuration.
You can check Team Config settings into the repository under the .codex directory. Codex automatically picks up Team Config settings when a user opens that repository.
Start with Team Config for your highest-traffic repositories so teams get consistent behavior in the places they use Codex most.
| Type | Path | Use it to |
|---|---|---|
| Config basics | config.toml | Set defaults for sandbox mode, approvals, model, reasoning effort, and more. |
| Rules | rules/ | Control which commands Codex can run outside the sandbox. |
| Skills | skills/ | Make shared skills available to your team. |
For locations and precedence, see Config basics.
Step 5: Configure Codex cloud usage (if enabled)
This step covers repository and environment setup after you enable the Codex cloud workspace toggle.
Connect Codex cloud to repositories
- Navigate to Codex and select Get started
- Select Connect to GitHub to install the ChatGPT GitHub Connector if you haven’t already connected GitHub to ChatGPT
- Install or connect the ChatGPT GitHub Connector
- Choose an installation target for the ChatGPT Connector (typically your main organization)
- Allow the repositories you want to connect to Codex
For GitHub Enterprise Managed Users (EMU), an organization owner must install the Codex GitHub App for the organization before users can connect repositories in Codex cloud.
For more, see Cloud environments.
Codex uses short-lived, least-privilege GitHub App installation tokens for each operation and respects the user’s existing GitHub repository permissions and branch protection rules.
Configure IP addresses
If your GitHub organization controls the IP addresses that apps use to connect, make sure to include the Codex cloud egress IP ranges.
These IP ranges can change. Consider checking them automatically and updating your allow list based on the latest values.
Enable code review with Codex cloud
To allow Codex to perform code reviews on GitHub, go to Settings → Code review.
You can configure code review at the repository level. Users can also enable auto review for their PRs and choose when Codex automatically triggers a review. More details are on the GitHub integration page.
Use the overview page to confirm your workspace has code review turned on and to see the available review controls.
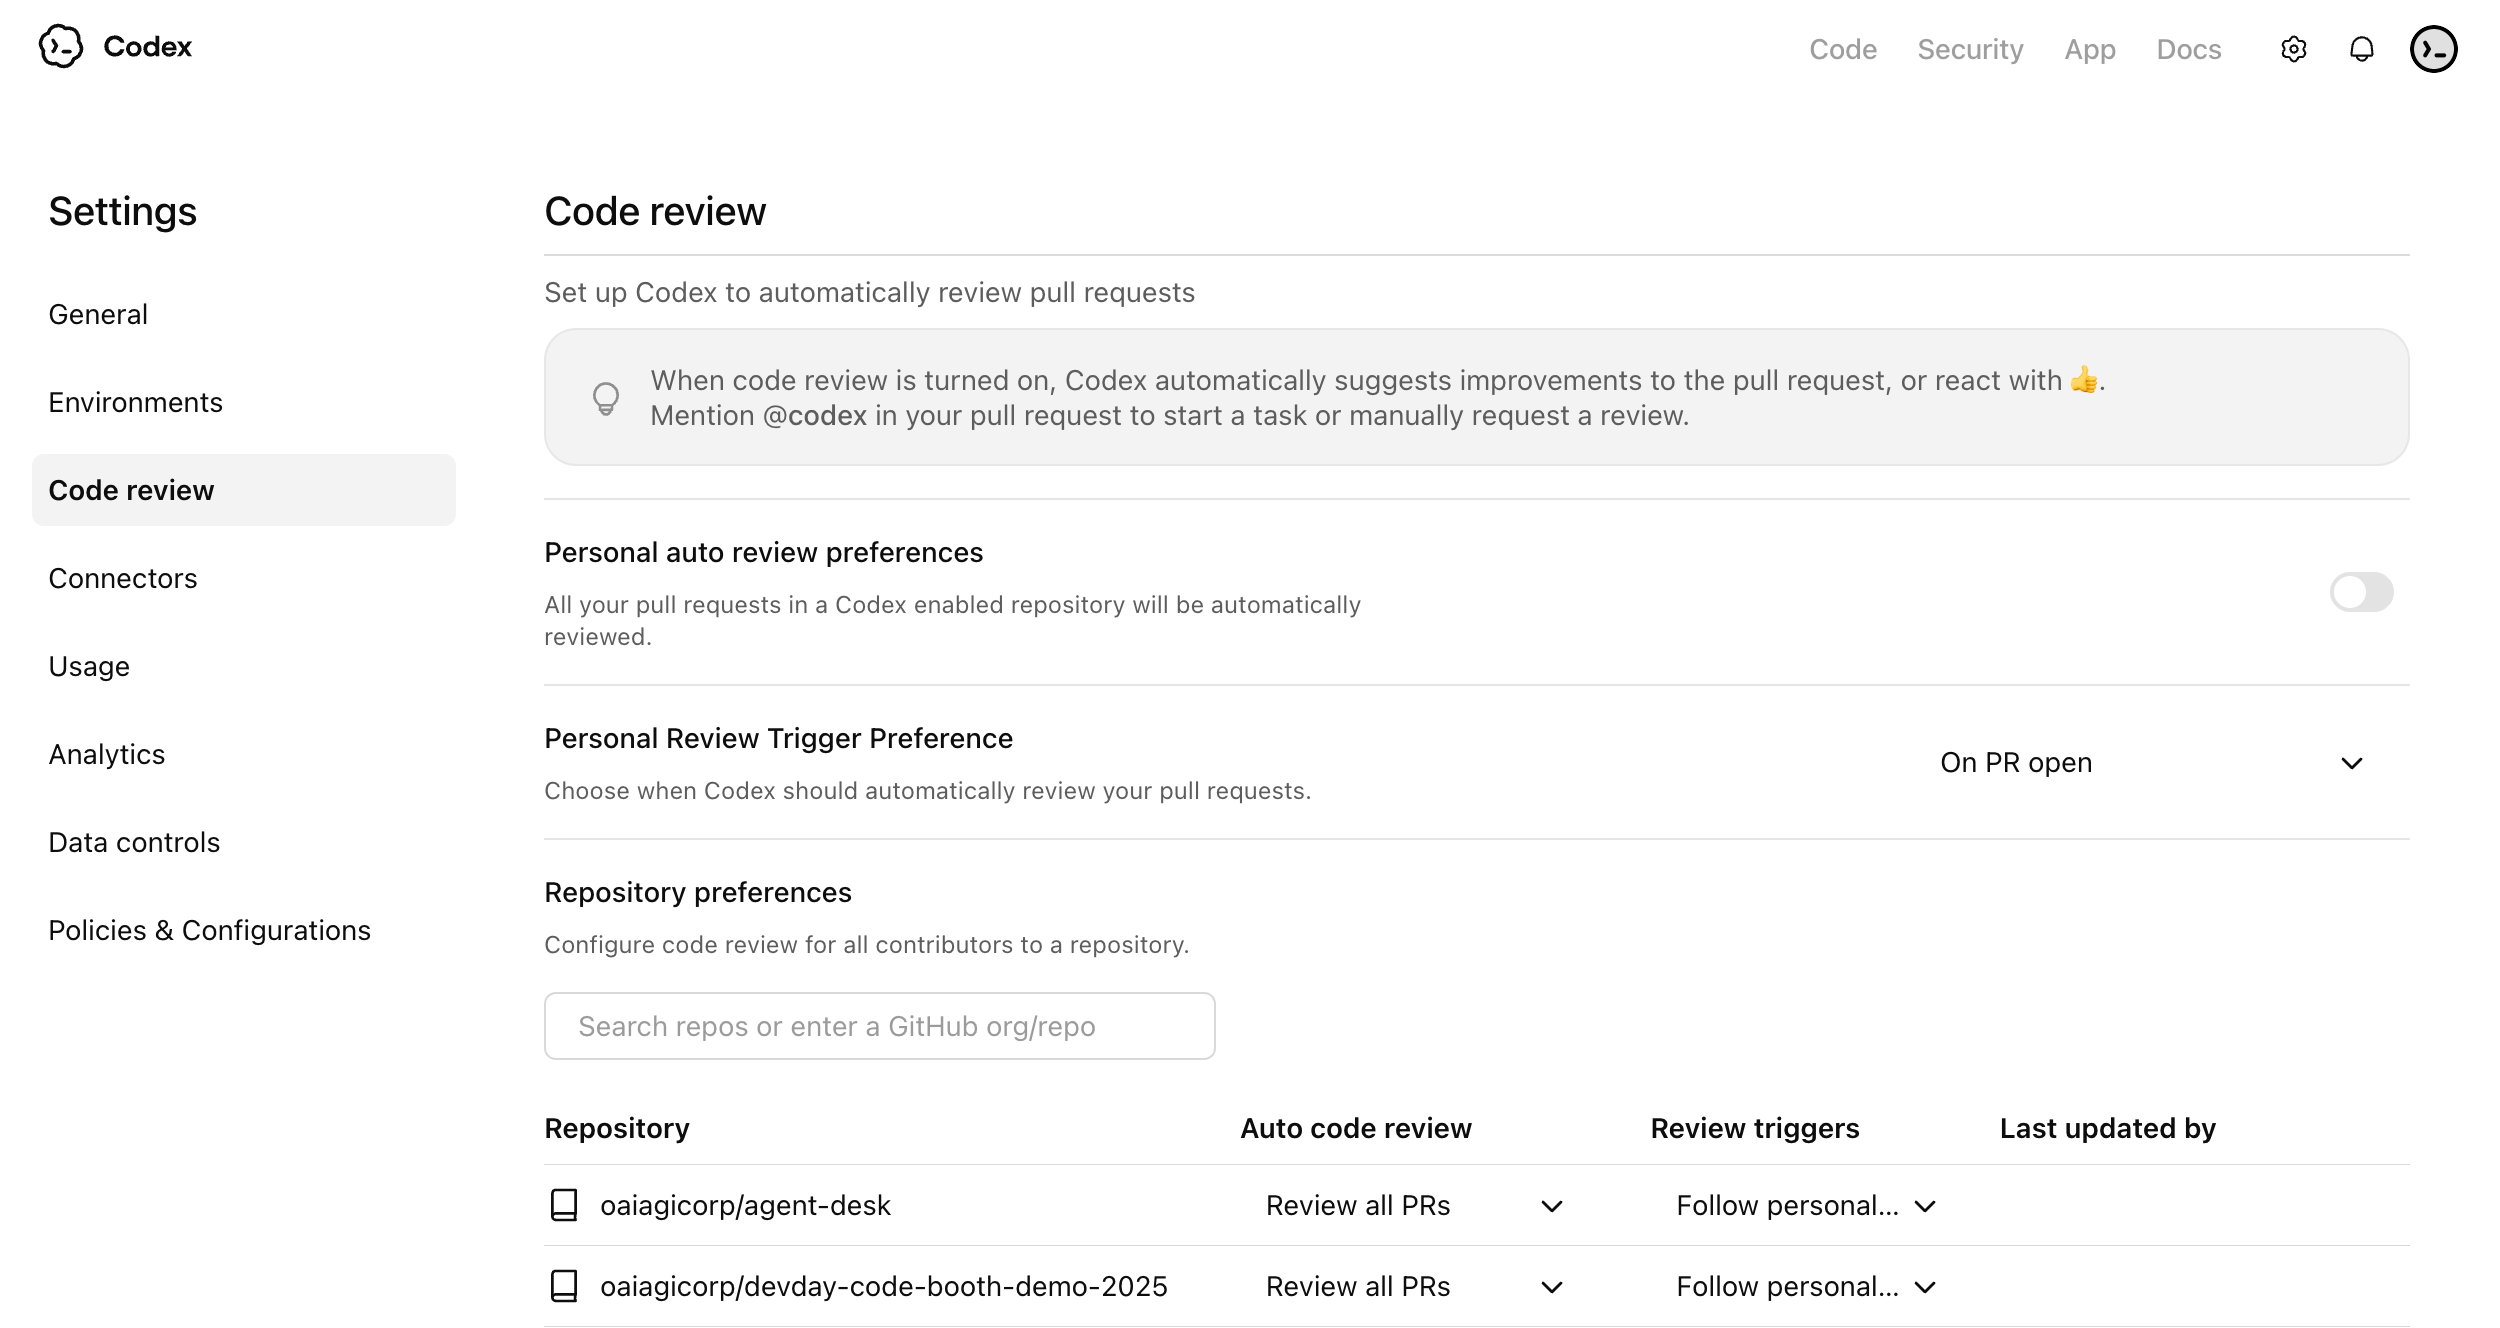
Use the auto review settings to decide whether Codex should review pull requests automatically for connected repositories.
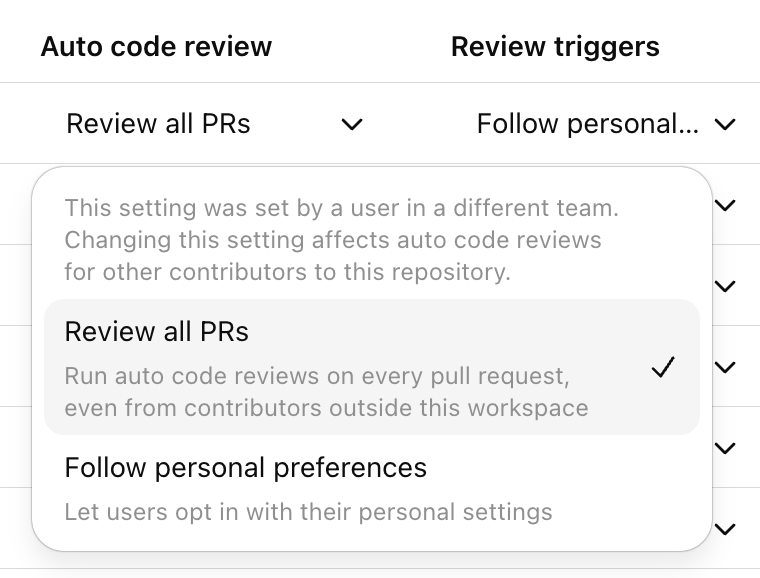
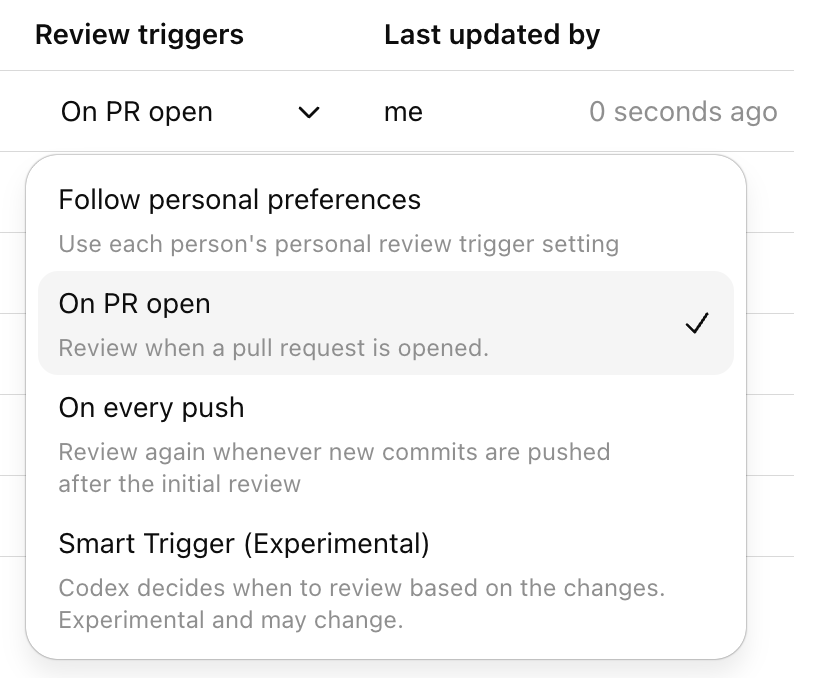
Use review triggers to control which pull request events should start a Codex review.
Configure Codex security
Codex Security helps engineering and security teams find, confirm, and remediate likely vulnerabilities in connected GitHub repositories.
At a high level, Codex Security:
- scans connected repositories commit by commit
- ranks likely findings and confirms them when possible
- shows structured findings with evidence, criticality, and suggested remediation
- lets teams refine a repository threat model to improve prioritization and review quality
For setup, scan creation, findings review, and threat model guidance, see Codex Security setup. For a product overview, see Codex Security.
Integration docs are also available for Slack, GitHub, and Linear.
Step 6: Set up governance and observability
Codex gives enterprise teams options for visibility into adoption and impact. Set up governance early so your team can track adoption, investigate issues, and support compliance workflows.
Codex governance typically uses
- Analytics Dashboard for quick, self-serve visibility
- Analytics API for programmatic reporting and business intelligence integration
- Compliance API for audit and investigation workflows
Recommended baseline setup
- Assign an owner for adoption reporting
- Assign an owner for audit and compliance review
- Define a review cadence
- Decide what success looks like
Analytics API setup steps
To set up the Analytics API key:
- Sign in to the OpenAI API Platform Portal as an owner or admin, and select the correct organization.
- Go to the API keys page.
- Create a new secret key dedicated to Codex Analytics, and give it a descriptive name such as Codex Analytics API.
- Select the appropriate project for your organization. If you only have one project, the default project is fine.
- Set the key permissions to Read only, since this API only retrieves analytics data.
- Copy the key value and store it securely, because you can only view it once.
- Email support@openai.com to have that key scoped to
codex.enterprise.analytics.readonly. Wait for OpenAI to confirm your API key has Codex Analytics API access.

To use the Analytics API key:
- Find your
workspace_idin the ChatGPT Admin console under Workspace details. - Call the Analytics API at
https://api.chatgpt.com/v1/analytics/codexusing your Platform API key, and include yourworkspace_idin the path. - Choose the endpoint you want to query:
- /workspaces/
{workspace_id}/usage - /workspaces/
{workspace_id}/code_reviews - /workspaces/
{workspace_id}/code_review_responses
- Set a reporting date range with
start_timeandend_timeif needed. - Retrieve the next page of results with
next_pageif the response spans more than one page.
Example curl command to retrieve workspace usage:
curl -H "Authorization: Bearer YOUR_PLATFORM_API_KEY" \
  "https://api.chatgpt.com/v1/analytics/codex/workspaces/WORKSPACE_ID/usage"
For more details on the Analytics API, see Analytics API.
Compliance API setup steps
To set up the Compliance API key:
- Sign in to the OpenAI API Platform Portal as an owner or admin, and select the correct organization.
- Go to the API keys page.
- Create a new secret key dedicated to Compliance API and select the appropriate project for your organization. If you only have one project, the default project is fine.
- Choose All permissions.
- Copy the key value and store it securely, because you can only view it once.
- Send an email to support@openai.com with:
- the last 4 digits of the API key
- the key name
- the created-by name
- the scope needed:
read,delete, or both
- Wait for OpenAI to confirm your API key has Compliance API access.
To use the Compliance API key:
- Find your
workspace_idin the ChatGPT Admin console under Workspace details. - Use the Compliance API at
https://api.chatgpt.com/v1/ - Pass your Compliance API key in the Authorization header as a Bearer token.
- For Codex-related compliance data, use these endpoints:
- /compliance/workspaces/
{workspace_id}/logs - /compliance/workspaces/
{workspace_id}/logs/{log_file_id} - /compliance/workspaces/
{workspace_id}/codex_tasks - /compliance/workspaces/
{workspace_id}/codex_environments
- For most Codex compliance integrations, start with the logs endpoint and request Codex event types such as CODEX_LOG or CODEX_SECURITY_LOG.
- Use /logs to list available Codex compliance log files, then /logs/
{log_file_id}to download a specific file.
Example curl command to list compliance log files:
curl -L -H "Authorization: Bearer YOUR_COMPLIANCE_API_KEY" \
  "https://api.chatgpt.com/v1/compliance/workspaces/WORKSPACE_ID/logs?event_type=CODEX_LOG&after=2026-03-01T00:00:00Z"
Example curl command to list Codex tasks:
curl -H "Authorization: Bearer YOUR_COMPLIANCE_API_KEY" \
  "https://api.chatgpt.com/v1/compliance/workspaces/WORKSPACE_ID/codex_tasks"
For more details on the Compliance API, see Compliance API.
Step 7: Confirm and verify setup
What to verify
- Users can sign in to Codex local (ChatGPT or API key)
- (If enabled) Users can sign in to Codex cloud (ChatGPT sign-in required)
- MFA and SSO requirements match your enterprise security policy
- RBAC and workspace toggles produce the expected access behavior
- Managed configuration applies for users
- Governance data is visible for admins
For authentication options and enterprise login restrictions, see Authentication.
Once your team is confident with setup, you can roll Codex out to more teams and organizations.