
简介
插件使用模型上下文协议(MCP)向 ChatGPT 和 Codex 提供由服务器实现的功能。本教程用到以下两部分。
- MCP 服务器,用于定义工具,供 ChatGPT 和 Codex 调用。
- 可选的 Web 组件,在 ChatGPT 内的 iframe 中渲染。
ChatGPT 实现了 MCP Apps 开放 UI 标准,因此您只需构建一次 UI,就能在兼容 MCP Apps 的不同主机上运行它。
本快速入门将带您构建一个简单的待办事项工作流。整个 UI 都放在一个 HTML 文件中,包括标记、CSS 和 JavaScript。
如需查看使用 React 的进阶示例,请参阅 GitHub 上的示例代码仓库。
构建 Web 组件
此步骤可选。如果您只需要工具,无需在 ChatGPT 中显示 UI,请跳至构建 MCP 服务器,并跳过 UI 资源注册。
首先,在新目录中创建 public/todo-widget.html 文件。此文件包含要在 ChatGPT 界面中渲染的 Web 组件。当关联的 MCP 工具返回该 UI 时,ChatGPT 就会渲染它。
将以下内容添加到文件中。
<!doctype html>
<html lang="en">
<head>
<meta charset="utf-8" />
<title>Todo list</title>
<style>
:root {
color: #0b0b0f;
font-family:
"Inter",
system-ui,
-apple-system,
sans-serif;
}
html,
body {
width: 100%;
min-height: 100%;
box-sizing: border-box;
}
body {
margin: 0;
padding: 16px;
background: #f6f8fb;
}
main {
width: 100%;
max-width: 360px;
min-height: 260px;
margin: 0 auto;
background: #fff;
border-radius: 16px;
padding: 20px;
box-shadow: 0 12px 24px rgba(15, 23, 42, 0.08);
}
h2 {
margin: 0 0 16px;
font-size: 1.25rem;
}
form {
display: flex;
gap: 8px;
margin-bottom: 16px;
}
form input {
flex: 1;
padding: 10px 12px;
border-radius: 10px;
border: 1px solid #cad3e0;
font-size: 0.95rem;
}
form button {
border: none;
border-radius: 10px;
background: #111bf5;
color: white;
font-weight: 600;
padding: 0 16px;
cursor: pointer;
}
form button:disabled {
opacity: 0.7;
cursor: not-allowed;
}
input[type="checkbox"] {
accent-color: #111bf5;
}
ul {
list-style: none;
padding: 0;
margin: 0;
display: flex;
flex-direction: column;
gap: 8px;
}
li {
background: #f2f4fb;
border-radius: 12px;
padding: 10px 14px;
display: flex;
align-items: center;
gap: 10px;
}
li span {
flex: 1;
}
li[data-completed="true"] span {
text-decoration: line-through;
color: #6c768a;
}
li[data-busy="true"] {
opacity: 0.7;
}
</style>
</head>
<body>
<main>
<h2>Todo list</h2>
<form id="add-form" autocomplete="off">
<input id="todo-input" name="title" placeholder="Add a task" />
<button type="submit">Add</button>
</form>
<ul id="todo-list"></ul>
</main>
<script type="module">
const listEl = document.querySelector("#todo-list");
const formEl = document.querySelector("#add-form");
const inputEl = document.querySelector("#todo-input");
const addButtonEl = formEl.querySelector('button[type="submit"]');
const addButtonText = addButtonEl.textContent;
let tasks = [];
let isAdding = false;
const busyTodoIds = new Set();
const render = () => {
listEl.innerHTML = "";
tasks.forEach((task) => {
const li = document.createElement("li");
li.dataset.id = task.id;
li.dataset.completed = String(Boolean(task.completed));
li.dataset.busy = String(busyTodoIds.has(task.id));
const label = document.createElement("label");
label.style.display = "flex";
label.style.alignItems = "center";
label.style.gap = "10px";
const checkbox = document.createElement("input");
checkbox.type = "checkbox";
checkbox.checked = Boolean(task.completed);
checkbox.disabled = busyTodoIds.has(task.id);
const span = document.createElement("span");
span.textContent = task.title;
label.appendChild(checkbox);
label.appendChild(span);
li.appendChild(label);
listEl.appendChild(li);
});
};
const updateFromResponse = (response) => {
if (response?.structuredContent?.tasks) {
tasks = response.structuredContent.tasks;
render();
}
};
// MCP Apps standard bridge: JSON-RPC messages over postMessage.
//
// - Initialize the bridge with `ui/initialize`.
// - Confirm readiness with `ui/notifications/initialized`.
// - Call tools with `tools/call`.
// - Listen for `ui/notifications/tool-result` to react to model-initiated tool calls.
let rpcId = 0;
const pendingRequests = new Map();
const rpcNotify = (method, params) => {
window.parent.postMessage({ jsonrpc: "2.0", method, params }, "*");
};
const rpcRequest = (method, params) =>
new Promise((resolve, reject) => {
const id = ++rpcId;
pendingRequests.set(id, { resolve, reject });
window.parent.postMessage(
{ jsonrpc: "2.0", id, method, params },
"*"
);
});
window.addEventListener(
"message",
(event) => {
if (event.source !== window.parent) return;
const message = event.data;
if (!message || message.jsonrpc !== "2.0") return;
// Responses
if (typeof message.id === "number") {
const pending = pendingRequests.get(message.id);
if (!pending) return;
pendingRequests.delete(message.id);
if (message.error) {
pending.reject(message.error);
return;
}
pending.resolve(message.result);
return;
}
// Notifications
if (typeof message.method !== "string") return;
if (message.method === "ui/notifications/tool-result") {
updateFromResponse(message.params);
}
},
{ passive: true }
);
const initializeBridge = async () => {
const appInfo = { name: "todo-widget", version: "0.1.0" };
const appCapabilities = {};
const protocolVersion = "2026-01-26";
try {
await rpcRequest("ui/initialize", {
appInfo,
appCapabilities,
protocolVersion,
});
rpcNotify("ui/notifications/initialized", {});
} catch (error) {
console.error("Failed to initialize the MCP Apps bridge:", error);
throw error;
}
};
const bridgeReady = initializeBridge();
const callTodoTool = async (name, payload) => {
await bridgeReady;
const response = await rpcRequest("tools/call", {
name,
arguments: payload,
});
updateFromResponse(response);
};
formEl.addEventListener("submit", async (event) => {
event.preventDefault();
const title = inputEl.value.trim();
if (!title || isAdding) return;
isAdding = true;
addButtonEl.disabled = true;
addButtonEl.textContent = "Adding…";
try {
await callTodoTool("add_todo", { title });
inputEl.value = "";
} catch (error) {
console.error("Failed to add todo:", error);
} finally {
isAdding = false;
addButtonEl.disabled = false;
addButtonEl.textContent = addButtonText;
}
});
listEl.addEventListener("change", async (event) => {
const checkbox = event.target;
if (!checkbox.matches('input[type="checkbox"]')) return;
const id = checkbox.closest("li")?.dataset.id;
if (!id) return;
if (!checkbox.checked) {
checkbox.checked = true;
return;
}
if (busyTodoIds.has(id)) return;
busyTodoIds.add(id);
checkbox.disabled = true;
const rowEl = checkbox.closest("li");
if (rowEl) rowEl.dataset.busy = "true";
try {
await callTodoTool("complete_todo", { id });
} catch (error) {
console.error("Failed to complete todo:", error);
} finally {
busyTodoIds.delete(id);
render();
}
});
render();
</script>
</body>
</html>在 Web 组件中使用 MCP Apps
开发新 UI 时,请使用 MCP Apps 主机桥接接口。它通过 postMessage 传递 JSON-RPC 消息,支持 ui/* 通知以及 tools/call 等方法。
先确保通用的 MCP Apps 流程可以正常运行。只有在需要标准未涵盖的功能时,才通过 window.openai 添加可选的 ChatGPT 扩展功能。详情请参阅为 MCP 服务器添加 UI。
构建 MCP 服务器
使用 MCP SDK 创建服务器并提供 /mcp 端点。
各个服务器实现都使用同一个 HTML 页面。
使用 Go 1.26 或更高版本初始化一个模块,然后添加 github.com/modelcontextprotocol/go-sdk/mcp 依赖,指定版本为 v1.8.0。将示例保存为 main.go,将 public/todo-widget.html 保留在同一个项目目录中,然后运行 go run .。如需使用其他端口,请修改代码中 port 的字面值。
如果您使用 Ruby 3.3,请安装 mcp(1.10.0)、rackup(2.3.1)和 webrick(1.9.2)这三个 gem 包。
如果您使用 Python,请参阅我们在 GitHub 上的示例代码仓库,查看使用 Python SDK 构建 MCP 服务器的示例。
TypeScript 版本使用 TypeScript SDK。
请使用 Node.js 22.6 或更高版本。运行以下命令安装 TypeScript SDK、MCP Apps 辅助工具和 zod 包。
npm install @modelcontextprotocol/sdk @modelcontextprotocol/ext-apps zod带有 UI 资源的 MCP 服务器
将打包好的组件注册为资源,并注册可供模型调用的工具(例如 add_todo 和 complete_todo),以便 ChatGPT 通过这些工具控制 UI。
将 TypeScript 示例保存为 server.ts。
将 Ruby 示例保存为 server.rb。
将 public/todo-widget.html 保留在同一个项目目录中。
import { createServer } from "node:http";
import { readFileSync } from "node:fs";
import {
registerAppResource,
registerAppTool,
RESOURCE_MIME_TYPE,
} from "@modelcontextprotocol/ext-apps/server";
import { McpServer } from "@modelcontextprotocol/sdk/server/mcp.js";
import { StreamableHTTPServerTransport } from "@modelcontextprotocol/sdk/server/streamableHttp.js";
import { z } from "zod";
const todoHtml = readFileSync("public/todo-widget.html", "utf8");
const addTodoInputSchema = {
title: z.string().min(1),
};
const completeTodoInputSchema = {
id: z.string().min(1),
};
const todoOutputSchema = {
tasks: z.array(
z.object({
id: z.string(),
title: z.string(),
completed: z.boolean(),
})
),
};
let todos: { id: string; title: string; completed: boolean }[] = [];
let nextId = 1;
const replyWithTodos = (message: string) => ({
content: message ? [{ type: "text" as const, text: message }] : [],
structuredContent: { tasks: todos },
});
function createTodoServer() {
const server = new McpServer({
name: "todo-plugin-server",
version: "0.1.0",
});
registerAppResource(
server,
"todo-widget",
"ui://widget/todo.html",
{},
async () => ({
contents: [
{
uri: "ui://widget/todo.html",
mimeType: RESOURCE_MIME_TYPE,
text: todoHtml,
},
],
})
);
registerAppTool(
server,
"add_todo",
{
title: "Add todo",
description: "Creates a todo item with the given title.",
inputSchema: addTodoInputSchema,
outputSchema: todoOutputSchema,
_meta: {
ui: { resourceUri: "ui://widget/todo.html" },
},
},
async (args) => {
const title = args?.title?.trim?.() ?? "";
if (!title) return replyWithTodos("Missing title.");
const todo = { id: `todo-${nextId++}`, title, completed: false };
todos = [...todos, todo];
return replyWithTodos(`Added "${todo.title}".`);
}
);
registerAppTool(
server,
"complete_todo",
{
title: "Complete todo",
description: "Marks a todo as done by id.",
inputSchema: completeTodoInputSchema,
outputSchema: todoOutputSchema,
_meta: {
ui: { resourceUri: "ui://widget/todo.html" },
},
},
async (args) => {
const id = args?.id;
if (!id) return replyWithTodos("Missing todo id.");
const todo = todos.find((task) => task.id === id);
if (!todo) {
return replyWithTodos(`Todo ${id} was not found.`);
}
todos = todos.map((task) =>
task.id === id ? { ...task, completed: true } : task
);
return replyWithTodos(`Completed "${todo.title}".`);
}
);
return server;
}
const port = Number(process.env.PORT ?? 8787);
const MCP_PATH = "/mcp";
const httpServer = createServer(async (req, res) => {
if (!req.url) {
res.writeHead(400).end("Missing URL");
return;
}
const url = new URL(req.url, `http://${req.headers.host ?? "localhost"}`);
if (req.method === "OPTIONS" && url.pathname === MCP_PATH) {
res.writeHead(204, {
"Access-Control-Allow-Origin": "*",
"Access-Control-Allow-Methods": "POST, GET, OPTIONS",
"Access-Control-Allow-Headers": "content-type, mcp-session-id",
"Access-Control-Expose-Headers": "Mcp-Session-Id",
});
res.end();
return;
}
if (req.method === "GET" && url.pathname === "/") {
res.writeHead(200, { "content-type": "text/plain" }).end("Todo MCP server");
return;
}
const MCP_METHODS = new Set(["POST", "GET", "DELETE"]);
if (url.pathname === MCP_PATH && req.method && MCP_METHODS.has(req.method)) {
res.setHeader("Access-Control-Allow-Origin", "*");
res.setHeader("Access-Control-Expose-Headers", "Mcp-Session-Id");
const server = createTodoServer();
const transport = new StreamableHTTPServerTransport({
sessionIdGenerator: undefined, // stateless mode
enableJsonResponse: true,
});
res.on("close", () => {
transport.close();
server.close();
});
try {
await server.connect(transport);
await transport.handleRequest(req, res);
} catch (error) {
console.error("Error handling MCP request:", error);
if (!res.headersSent) {
res.writeHead(500).end("Internal server error");
}
}
return;
}
res.writeHead(404).end("Not Found");
});
httpServer.listen(port, () => {
console.log(
`Todo MCP server listening on http://localhost:${port}${MCP_PATH}`
);
});这段代码还会响应健康检查请求 GET /,处理 /mcp 的 CORS 预检请求,并针对尚未使用的 OAuth 发现路由返回 404 Not Found。这样,您在未配置身份验证的情况下迭代开发时,ChatGPT 就不会显示 502 错误。
在本地运行
如果您使用 React 等 Web 框架,请将组件构建为静态资源,以便将它们内嵌到 HTML 模板中。通常,您可以运行 npm run build 等构建命令,生成包含编译后资源的 dist 目录。
本快速入门使用原生 HTML,因此无需构建。
要让 MCP 服务器在 http://localhost:<port>/mcp 上提供服务,请从服务器文件所在的目录启动服务器。
如果您使用 TypeScript,请确保 "type": "module" 已添加到 package.json 文件中。
{
  "type": "module",
  "dependencies": {
    "@modelcontextprotocol/sdk": "^1.20.2",
    "@modelcontextprotocol/ext-apps": "^1.0.1",
    "zod": "^3.25.76"
  }
}
运行以下命令启动 TypeScript 服务器。
node --experimental-strip-types server.ts运行 ruby server.rb 启动 Ruby 版本。Ruby 服务器支持通过 PORT 环境变量指定端口,并通过 WEBrick 输出启动信息。
默认情况下,各版本的服务器都在 http://localhost:8787/mcp 上提供服务。
TypeScript 服务器就绪后会输出 Todo MCP server listening on http://localhost:8787/mcp。
使用 MCP Inspector 测试
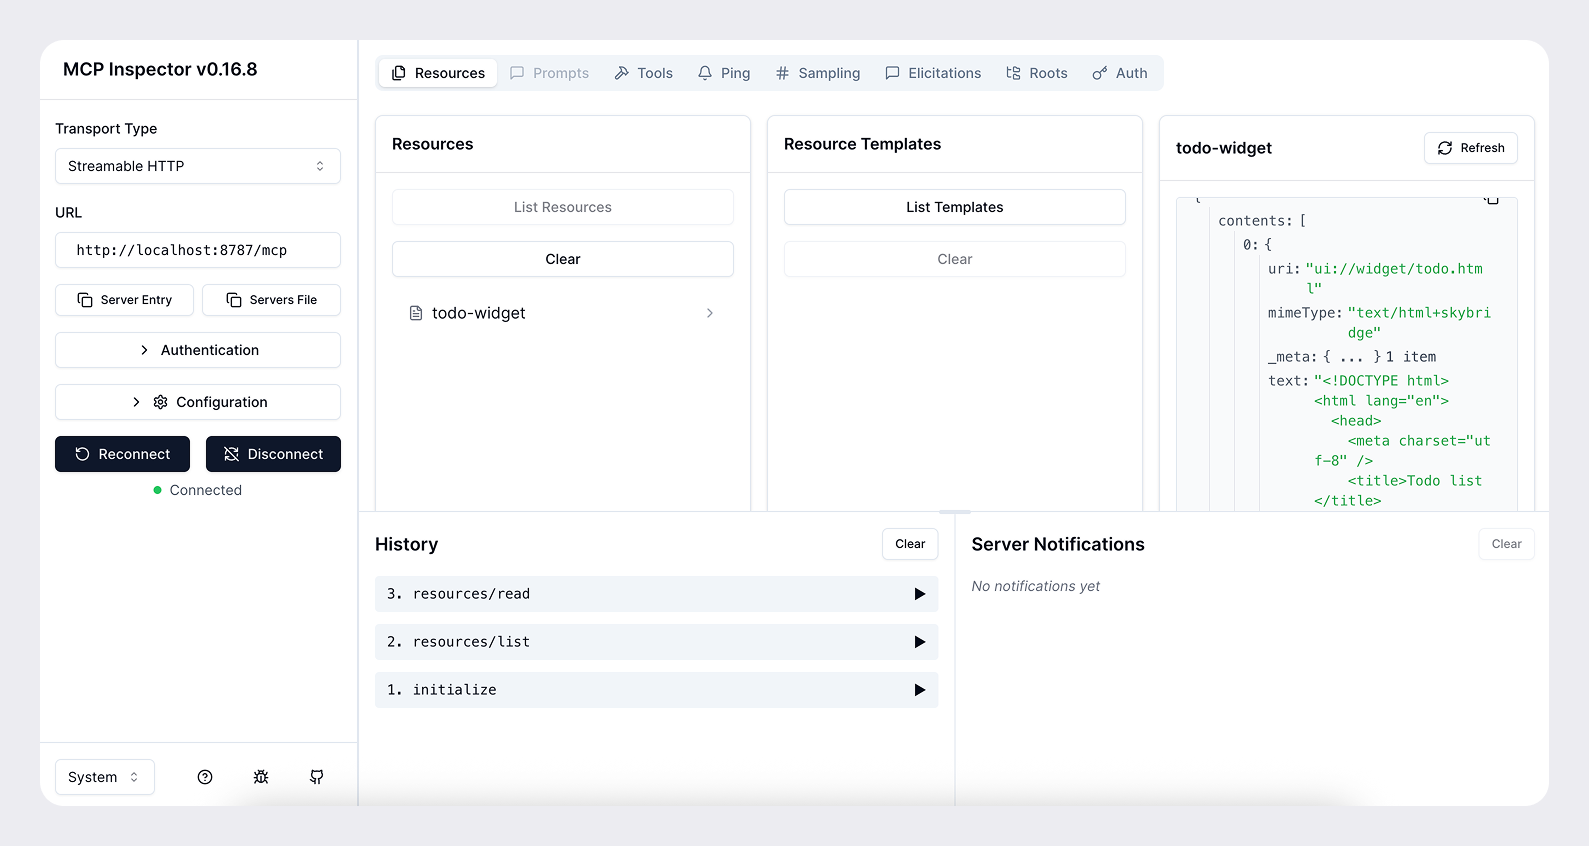
您可以使用 MCP Inspector 在本地测试服务器。
npx @modelcontextprotocol/inspector@latest此命令会打开 MCP Inspector 界面。选择 Streamable HTTP,输入 http://localhost:8787/mcp,然后建立连接,即可测试服务器并查看工具返回的响应。
让公网可以访问服务器
要让 ChatGPT 在开发期间访问您的服务器,您需要让服务器可从公网访问。可以使用 ngrok 等工具建立通往本地服务器的隧道。
ngrok http <port>运行后,您会得到一个类似 https://<subdomain>.ngrok.app 的公网 URL,ChatGPT 可以通过它访问您的服务器。
在 ChatGPT 中连接 MCP 服务器时,请提供带有 /mcp 路径的公网 URL(例如 https://<subdomain>.ngrok.app/mcp)。
在 ChatGPT 中连接 MCP 服务器
确认 MCP 服务器和 Web 组件在本地正常运行后,请按以下步骤在 ChatGPT 中连接服务器。
- 前往 ChatGPT 插件页面,点击加号按钮,然后选择添加自定义 MCP 服务器。
- 粘贴隧道或部署环境提供的 HTTPS URL,并确保其中包含
/mcp路径(例如https://<subdomain>.ngrok.app/mcp)。为连接命名并配置身份验证。 - 阅读风险提示,选择我已了解并希望继续,然后选择创建为插件。
- 安装刚创建的插件,打开新聊天,在输入框中输入
@并选择该插件。向模型发送提示词,例如“帮我加一项读我那本书的待办任务”。ChatGPT 会以流式方式传输工具调用数据,方便您核对输入和输出。
后续步骤
接下来,您可以继续完善用户界面与交互体验、提示词、工具元数据以及整体使用体验。
每次更改 MCP 服务器的工具、元数据或相关配置后,请刷新插件连接。您可以在 ChatGPT 插件页面打开相应插件的详情页,刷新连接。
准备公开发布插件时,请参阅提交插件、插件指南和构思插件使用场景。如果您正在构建 UI,还可以参阅 UI 指南。
掌握基础知识后,您可以构建功能更丰富的 UI、按需验证用户身份,以及管理状态。