
소개
플러그인은 모델 컨텍스트 프로토콜(MCP)을 사용해 서버에서 제공하는 기능을 ChatGPT와 Codex에서 사용할 수 있게 합니다. 이 튜토리얼에서는 다음 두 가지를 사용합니다.
- 도구를 정의하고 ChatGPT와 Codex에 제공하는 MCP 서버
- ChatGPT 안의 iframe에 렌더링되는 웹 컴포넌트(선택 사항)
ChatGPT는 개방형 MCP Apps UI 표준을 구현하므로 UI를 한 번만 만들어도 MCP Apps와 호환되는 여러 호스트에서 실행할 수 있습니다.
이 빠른 시작에서는 할 일을 추가하고 완료하는 기본 워크플로우를 만듭니다. UI의 마크업, CSS, JavaScript는 하나의 HTML 파일에 작성합니다.
React를 활용한 고급 예제는 GitHub 예제 리포지터리에서 확인하세요.
웹 컴포넌트 만들기
이 단계는 선택 사항입니다. ChatGPT UI 없이 도구만 필요하다면 MCP 서버 만들기로 건너뛰고 UI 리소스는 등록하지 마세요.
먼저 새 디렉터리에 public/todo-widget.html 파일을 만드세요. 이 파일에는 ChatGPT 인터페이스에 표시할 웹 컴포넌트를 작성합니다. 연결된 MCP 도구가 이 UI를 반환하면 ChatGPT가 렌더링합니다.
파일에 다음 내용을 추가하세요.
<!doctype html>
<html lang="en">
<head>
<meta charset="utf-8" />
<title>Todo list</title>
<style>
:root {
color: #0b0b0f;
font-family:
"Inter",
system-ui,
-apple-system,
sans-serif;
}
html,
body {
width: 100%;
min-height: 100%;
box-sizing: border-box;
}
body {
margin: 0;
padding: 16px;
background: #f6f8fb;
}
main {
width: 100%;
max-width: 360px;
min-height: 260px;
margin: 0 auto;
background: #fff;
border-radius: 16px;
padding: 20px;
box-shadow: 0 12px 24px rgba(15, 23, 42, 0.08);
}
h2 {
margin: 0 0 16px;
font-size: 1.25rem;
}
form {
display: flex;
gap: 8px;
margin-bottom: 16px;
}
form input {
flex: 1;
padding: 10px 12px;
border-radius: 10px;
border: 1px solid #cad3e0;
font-size: 0.95rem;
}
form button {
border: none;
border-radius: 10px;
background: #111bf5;
color: white;
font-weight: 600;
padding: 0 16px;
cursor: pointer;
}
form button:disabled {
opacity: 0.7;
cursor: not-allowed;
}
input[type="checkbox"] {
accent-color: #111bf5;
}
ul {
list-style: none;
padding: 0;
margin: 0;
display: flex;
flex-direction: column;
gap: 8px;
}
li {
background: #f2f4fb;
border-radius: 12px;
padding: 10px 14px;
display: flex;
align-items: center;
gap: 10px;
}
li span {
flex: 1;
}
li[data-completed="true"] span {
text-decoration: line-through;
color: #6c768a;
}
li[data-busy="true"] {
opacity: 0.7;
}
</style>
</head>
<body>
<main>
<h2>Todo list</h2>
<form id="add-form" autocomplete="off">
<input id="todo-input" name="title" placeholder="Add a task" />
<button type="submit">Add</button>
</form>
<ul id="todo-list"></ul>
</main>
<script type="module">
const listEl = document.querySelector("#todo-list");
const formEl = document.querySelector("#add-form");
const inputEl = document.querySelector("#todo-input");
const addButtonEl = formEl.querySelector('button[type="submit"]');
const addButtonText = addButtonEl.textContent;
let tasks = [];
let isAdding = false;
const busyTodoIds = new Set();
const render = () => {
listEl.innerHTML = "";
tasks.forEach((task) => {
const li = document.createElement("li");
li.dataset.id = task.id;
li.dataset.completed = String(Boolean(task.completed));
li.dataset.busy = String(busyTodoIds.has(task.id));
const label = document.createElement("label");
label.style.display = "flex";
label.style.alignItems = "center";
label.style.gap = "10px";
const checkbox = document.createElement("input");
checkbox.type = "checkbox";
checkbox.checked = Boolean(task.completed);
checkbox.disabled = busyTodoIds.has(task.id);
const span = document.createElement("span");
span.textContent = task.title;
label.appendChild(checkbox);
label.appendChild(span);
li.appendChild(label);
listEl.appendChild(li);
});
};
const updateFromResponse = (response) => {
if (response?.structuredContent?.tasks) {
tasks = response.structuredContent.tasks;
render();
}
};
// MCP Apps standard bridge: JSON-RPC messages over postMessage.
//
// - Initialize the bridge with `ui/initialize`.
// - Confirm readiness with `ui/notifications/initialized`.
// - Call tools with `tools/call`.
// - Listen for `ui/notifications/tool-result` to react to model-initiated tool calls.
let rpcId = 0;
const pendingRequests = new Map();
const rpcNotify = (method, params) => {
window.parent.postMessage({ jsonrpc: "2.0", method, params }, "*");
};
const rpcRequest = (method, params) =>
new Promise((resolve, reject) => {
const id = ++rpcId;
pendingRequests.set(id, { resolve, reject });
window.parent.postMessage(
{ jsonrpc: "2.0", id, method, params },
"*"
);
});
window.addEventListener(
"message",
(event) => {
if (event.source !== window.parent) return;
const message = event.data;
if (!message || message.jsonrpc !== "2.0") return;
// Responses
if (typeof message.id === "number") {
const pending = pendingRequests.get(message.id);
if (!pending) return;
pendingRequests.delete(message.id);
if (message.error) {
pending.reject(message.error);
return;
}
pending.resolve(message.result);
return;
}
// Notifications
if (typeof message.method !== "string") return;
if (message.method === "ui/notifications/tool-result") {
updateFromResponse(message.params);
}
},
{ passive: true }
);
const initializeBridge = async () => {
const appInfo = { name: "todo-widget", version: "0.1.0" };
const appCapabilities = {};
const protocolVersion = "2026-01-26";
try {
await rpcRequest("ui/initialize", {
appInfo,
appCapabilities,
protocolVersion,
});
rpcNotify("ui/notifications/initialized", {});
} catch (error) {
console.error("Failed to initialize the MCP Apps bridge:", error);
throw error;
}
};
const bridgeReady = initializeBridge();
const callTodoTool = async (name, payload) => {
await bridgeReady;
const response = await rpcRequest("tools/call", {
name,
arguments: payload,
});
updateFromResponse(response);
};
formEl.addEventListener("submit", async (event) => {
event.preventDefault();
const title = inputEl.value.trim();
if (!title || isAdding) return;
isAdding = true;
addButtonEl.disabled = true;
addButtonEl.textContent = "Adding…";
try {
await callTodoTool("add_todo", { title });
inputEl.value = "";
} catch (error) {
console.error("Failed to add todo:", error);
} finally {
isAdding = false;
addButtonEl.disabled = false;
addButtonEl.textContent = addButtonText;
}
});
listEl.addEventListener("change", async (event) => {
const checkbox = event.target;
if (!checkbox.matches('input[type="checkbox"]')) return;
const id = checkbox.closest("li")?.dataset.id;
if (!id) return;
if (!checkbox.checked) {
checkbox.checked = true;
return;
}
if (busyTodoIds.has(id)) return;
busyTodoIds.add(id);
checkbox.disabled = true;
const rowEl = checkbox.closest("li");
if (rowEl) rowEl.dataset.busy = "true";
try {
await callTodoTool("complete_todo", { id });
} catch (error) {
console.error("Failed to complete todo:", error);
} finally {
busyTodoIds.delete(id);
render();
}
});
render();
</script>
</body>
</html>웹 컴포넌트에서 MCP Apps 사용하기
새 UI를 만들 때는 MCP Apps 호스트 브리지를 사용하세요. 이 브리지는 postMessage로 JSON-RPC 메시지를 주고받으며, ui/* 알림과 tools/call 같은 메서드를 사용합니다.
여러 호스트에서 공통으로 사용하는 MCP Apps 플로우가 정상적으로 작동하는지 먼저 확인하세요. 표준에서 제공하지 않는 기능이 필요할 때만 window.openai를 사용해 ChatGPT 확장 기능을 추가하세요. 자세한 내용은 MCP 서버에 UI 추가하기를 참고하세요.
MCP 서버 만들기
Python 또는 Node용 공식 MCP SDK를 설치해 서버를 만들고 /mcp 엔드포인트를 제공하세요.
이 빠른 시작에서는 Node SDK를 사용합니다.
Python을 사용한다면 GitHub 예제 리포지터리에서 Python SDK로 만든 MCP 서버 예제를 확인하세요.
다음 명령어로 Node SDK, MCP Apps 헬퍼, zod 패키지를 설치하세요.
npm install @modelcontextprotocol/sdk @modelcontextprotocol/ext-apps zodUI 리소스를 제공하는 MCP 서버
ChatGPT가 UI를 제어할 수 있도록 컴포넌트 번들을 제공하는 리소스를 등록하고, 모델이 호출할 수 있는 도구(예: add_todo, complete_todo)도 등록하세요.
server.js 파일을 만들고 Node SDK를 사용하는 다음 예제 코드를 붙여넣으세요.
import { createServer } from "node:http";
import { readFileSync } from "node:fs";
import {
registerAppResource,
registerAppTool,
RESOURCE_MIME_TYPE,
} from "@modelcontextprotocol/ext-apps/server";
import { McpServer } from "@modelcontextprotocol/sdk/server/mcp.js";
import { StreamableHTTPServerTransport } from "@modelcontextprotocol/sdk/server/streamableHttp.js";
import { z } from "zod";
const todoHtml = readFileSync("public/todo-widget.html", "utf8");
const addTodoInputSchema = {
title: z.string().min(1),
};
const completeTodoInputSchema = {
id: z.string().min(1),
};
const todoOutputSchema = {
tasks: z.array(
z.object({
id: z.string(),
title: z.string(),
completed: z.boolean(),
})
),
};
let todos = [];
let nextId = 1;
const replyWithTodos = (message) => ({
content: message ? [{ type: "text", text: message }] : [],
structuredContent: { tasks: todos },
});
function createTodoServer() {
const server = new McpServer({
name: "todo-plugin-server",
version: "0.1.0",
});
registerAppResource(
server,
"todo-widget",
"ui://widget/todo.html",
{},
async () => ({
contents: [
{
uri: "ui://widget/todo.html",
mimeType: RESOURCE_MIME_TYPE,
text: todoHtml,
},
],
})
);
registerAppTool(
server,
"add_todo",
{
title: "Add todo",
description: "Creates a todo item with the given title.",
inputSchema: addTodoInputSchema,
outputSchema: todoOutputSchema,
_meta: {
ui: { resourceUri: "ui://widget/todo.html" },
},
},
async (args) => {
const title = args?.title?.trim?.() ?? "";
if (!title) return replyWithTodos("Missing title.");
const todo = { id: `todo-${nextId++}`, title, completed: false };
todos = [...todos, todo];
return replyWithTodos(`Added "${todo.title}".`);
}
);
registerAppTool(
server,
"complete_todo",
{
title: "Complete todo",
description: "Marks a todo as done by id.",
inputSchema: completeTodoInputSchema,
outputSchema: todoOutputSchema,
_meta: {
ui: { resourceUri: "ui://widget/todo.html" },
},
},
async (args) => {
const id = args?.id;
if (!id) return replyWithTodos("Missing todo id.");
const todo = todos.find((task) => task.id === id);
if (!todo) {
return replyWithTodos(`Todo ${id} was not found.`);
}
todos = todos.map((task) =>
task.id === id ? { ...task, completed: true } : task
);
return replyWithTodos(`Completed "${todo.title}".`);
}
);
return server;
}
const port = Number(process.env.PORT ?? 8787);
const MCP_PATH = "/mcp";
const httpServer = createServer(async (req, res) => {
if (!req.url) {
res.writeHead(400).end("Missing URL");
return;
}
const url = new URL(req.url, `http://${req.headers.host ?? "localhost"}`);
if (req.method === "OPTIONS" && url.pathname === MCP_PATH) {
res.writeHead(204, {
"Access-Control-Allow-Origin": "*",
"Access-Control-Allow-Methods": "POST, GET, OPTIONS",
"Access-Control-Allow-Headers": "content-type, mcp-session-id",
"Access-Control-Expose-Headers": "Mcp-Session-Id",
});
res.end();
return;
}
if (req.method === "GET" && url.pathname === "/") {
res.writeHead(200, { "content-type": "text/plain" }).end("Todo MCP server");
return;
}
const MCP_METHODS = new Set(["POST", "GET", "DELETE"]);
if (url.pathname === MCP_PATH && req.method && MCP_METHODS.has(req.method)) {
res.setHeader("Access-Control-Allow-Origin", "*");
res.setHeader("Access-Control-Expose-Headers", "Mcp-Session-Id");
const server = createTodoServer();
const transport = new StreamableHTTPServerTransport({
sessionIdGenerator: undefined, // stateless mode
enableJsonResponse: true,
});
res.on("close", () => {
transport.close();
server.close();
});
try {
await server.connect(transport);
await transport.handleRequest(req, res);
} catch (error) {
console.error("Error handling MCP request:", error);
if (!res.headersSent) {
res.writeHead(500).end("Internal server error");
}
}
return;
}
res.writeHead(404).end("Not Found");
});
httpServer.listen(port, () => {
console.log(
`Todo MCP server listening on http://localhost:${port}${MCP_PATH}`
);
});이 코드는 서버 상태를 확인하는 GET / 요청에 응답하고 /mcp 경로의 CORS 사전 요청도 처리합니다. 아직 사용하지 않는 OAuth 검색 경로에 대한 요청에는 404 Not Found를 반환합니다. 이렇게 하면 인증 없이 개발하고 테스트하는 동안 ChatGPT에 502 오류가 표시되는 것을 방지할 수 있습니다.
로컬에서 실행하기
React 같은 웹 프레임워크를 사용한다면 HTML 템플릿에 직접 삽입할 수 있도록 컴포넌트를 정적 자산으로 빌드하세요. 일반적으로 npm run build 같은 빌드 명령어를 실행하면 dist 디렉터리가 생성되고 그 안에 컴파일된 자산이 저장됩니다.
이 빠른 시작에서는 HTML을 그대로 사용하므로 빌드 단계가 필요하지 않습니다.
http://localhost:<port>/mcp에서 요청을 받을 수 있도록 server.js(또는 server.ts)가 있는 디렉터리에서 MCP 서버를 실행하세요.
먼저 "type": "module" 설정이 package.json 파일에 있는지 확인하세요.
{
  "type": "module",
  "dependencies": {
    "@modelcontextprotocol/sdk": "^1.20.2",
    "@modelcontextprotocol/ext-apps": "^1.0.1",
    "zod": "^3.25.76"
  }
}
다음 명령어로 서버를 실행하세요.
node server.js서버가 준비되면 Todo MCP server listening on http://localhost:8787/mcp가 출력됩니다.
MCP Inspector로 테스트하기
MCP Inspector를 사용하면 로컬에서 서버를 테스트할 수 있습니다.
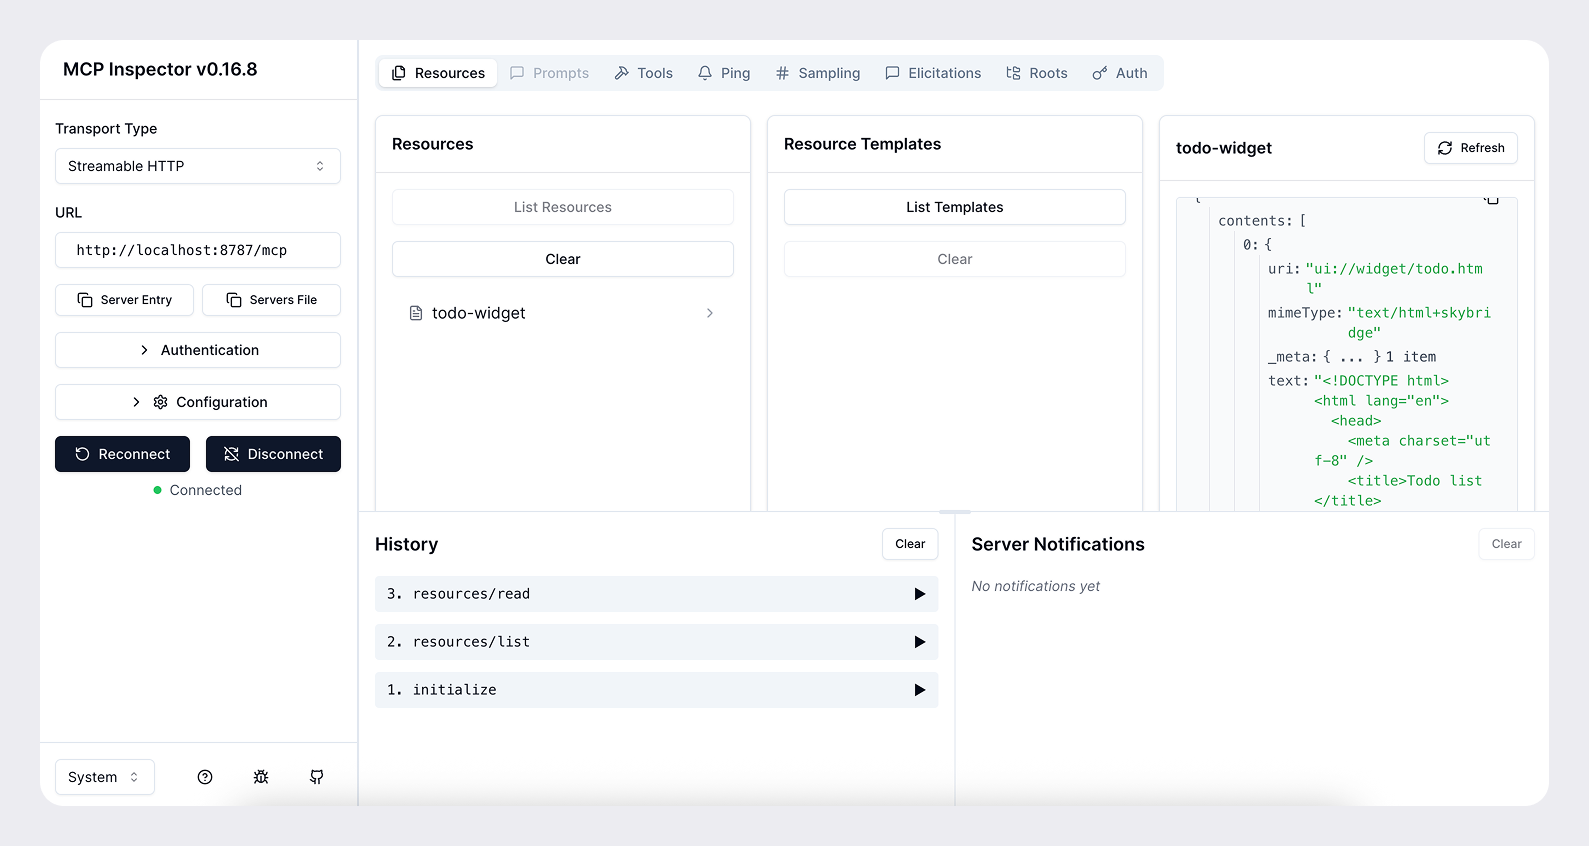
npx @modelcontextprotocol/inspector@latest이 명령어를 실행하면 MCP Inspector 인터페이스가 열립니다. Streamable HTTP를 선택하고 http://localhost:8787/mcp를 입력한 뒤 연결하세요. 이제 서버를 테스트하고 도구가 반환하는 응답을 확인할 수 있습니다.
인터넷에서 서버에 접속할 수 있도록 설정하기
개발 중에 ChatGPT가 서버에 접속하려면 인터넷에서 서버에 접근할 수 있어야 합니다. ngrok 같은 도구로 로컬 서버에 연결되는 터널을 열 수 있습니다.
ngrok http <port>이 명령어를 실행하면 https://<subdomain>.ngrok.app 형태의 공개 URL이 생성됩니다. 이 URL로 ChatGPT에서 서버에 접속할 수 있습니다.
ChatGPT에서 MCP 서버를 연결할 때는 공개 URL에 /mcp 경로를 붙여 입력하세요(예: https://<subdomain>.ngrok.app/mcp).
ChatGPT에서 MCP 서버 연결하기
MCP 서버와 웹 컴포넌트가 로컬에서 작동하면 다음 단계에 따라 ChatGPT에서 서버를 연결하세요.
- ChatGPT 플러그인으로 이동해 더하기 버튼을 누른 다음 사용자 지정 MCP 서버 추가를 선택하세요.
- 터널이나 배포 환경의 HTTPS URL에
/mcp를 붙인 주소(예:https://<subdomain>.ngrok.app/mcp)를 붙여넣으세요. 연결 이름을 입력하고 인증을 설정하세요. - 위험 경고를 읽고 이해했으며 계속 진행하겠습니다 옵션을 선택한 다음 플러그인으로 만들기를 선택하세요.
- 생성된 플러그인을 설치하고 새 채팅을 여세요. 프롬프트 입력란에
@를 입력하고 플러그인을 선택하세요. 모델에 “내 책 읽기를 새 할 일로 추가해 줘”와 같은 프롬프트를 입력하세요. ChatGPT가 도구 페이로드를 스트리밍하므로 입력과 출력을 확인할 수 있습니다.
다음 단계
이제 UI/UX, 프롬프트, 도구 메타데이터를 조정하면서 전반적인 사용 경험을 개선할 수 있습니다.
MCP 서버의 도구, 메타데이터 또는 관련 설정을 변경할 때마다 플러그인 연결을 새로 고치세요. chatgpt.com/plugins에서 해당 플러그인의 상세 페이지를 열면 연결을 새로 고칠 수 있습니다.
공개 배포를 준비할 때는 플러그인 제출하기, 플러그인 가이드라인, 플러그인 활용 사례 구상하기를 검토하세요. UI를 만들고 있다면 UI 가이드라인도 참고하세요.
기본 개념을 익힌 뒤에는 더 풍부한 UI를 만들고, 필요에 따라 사용자 인증을 추가하고, 상태를 관리할 수 있습니다.