
When you need full control—custom authentication, data residency, on‑prem deployment, or bespoke agent orchestration—you can run ChatKit on your own infrastructure. Use OpenAI’s advanced self‑hosted option to use your own server and customized ChatKit.
Agent Builder-hosted ChatKit workflows are in a transition window. For new ChatKit apps, build on your own server-side agent implementation with the ChatKit SDKs and the Agents SDK. See ChatKit transition guidance →
Run ChatKit on your own infrastructure
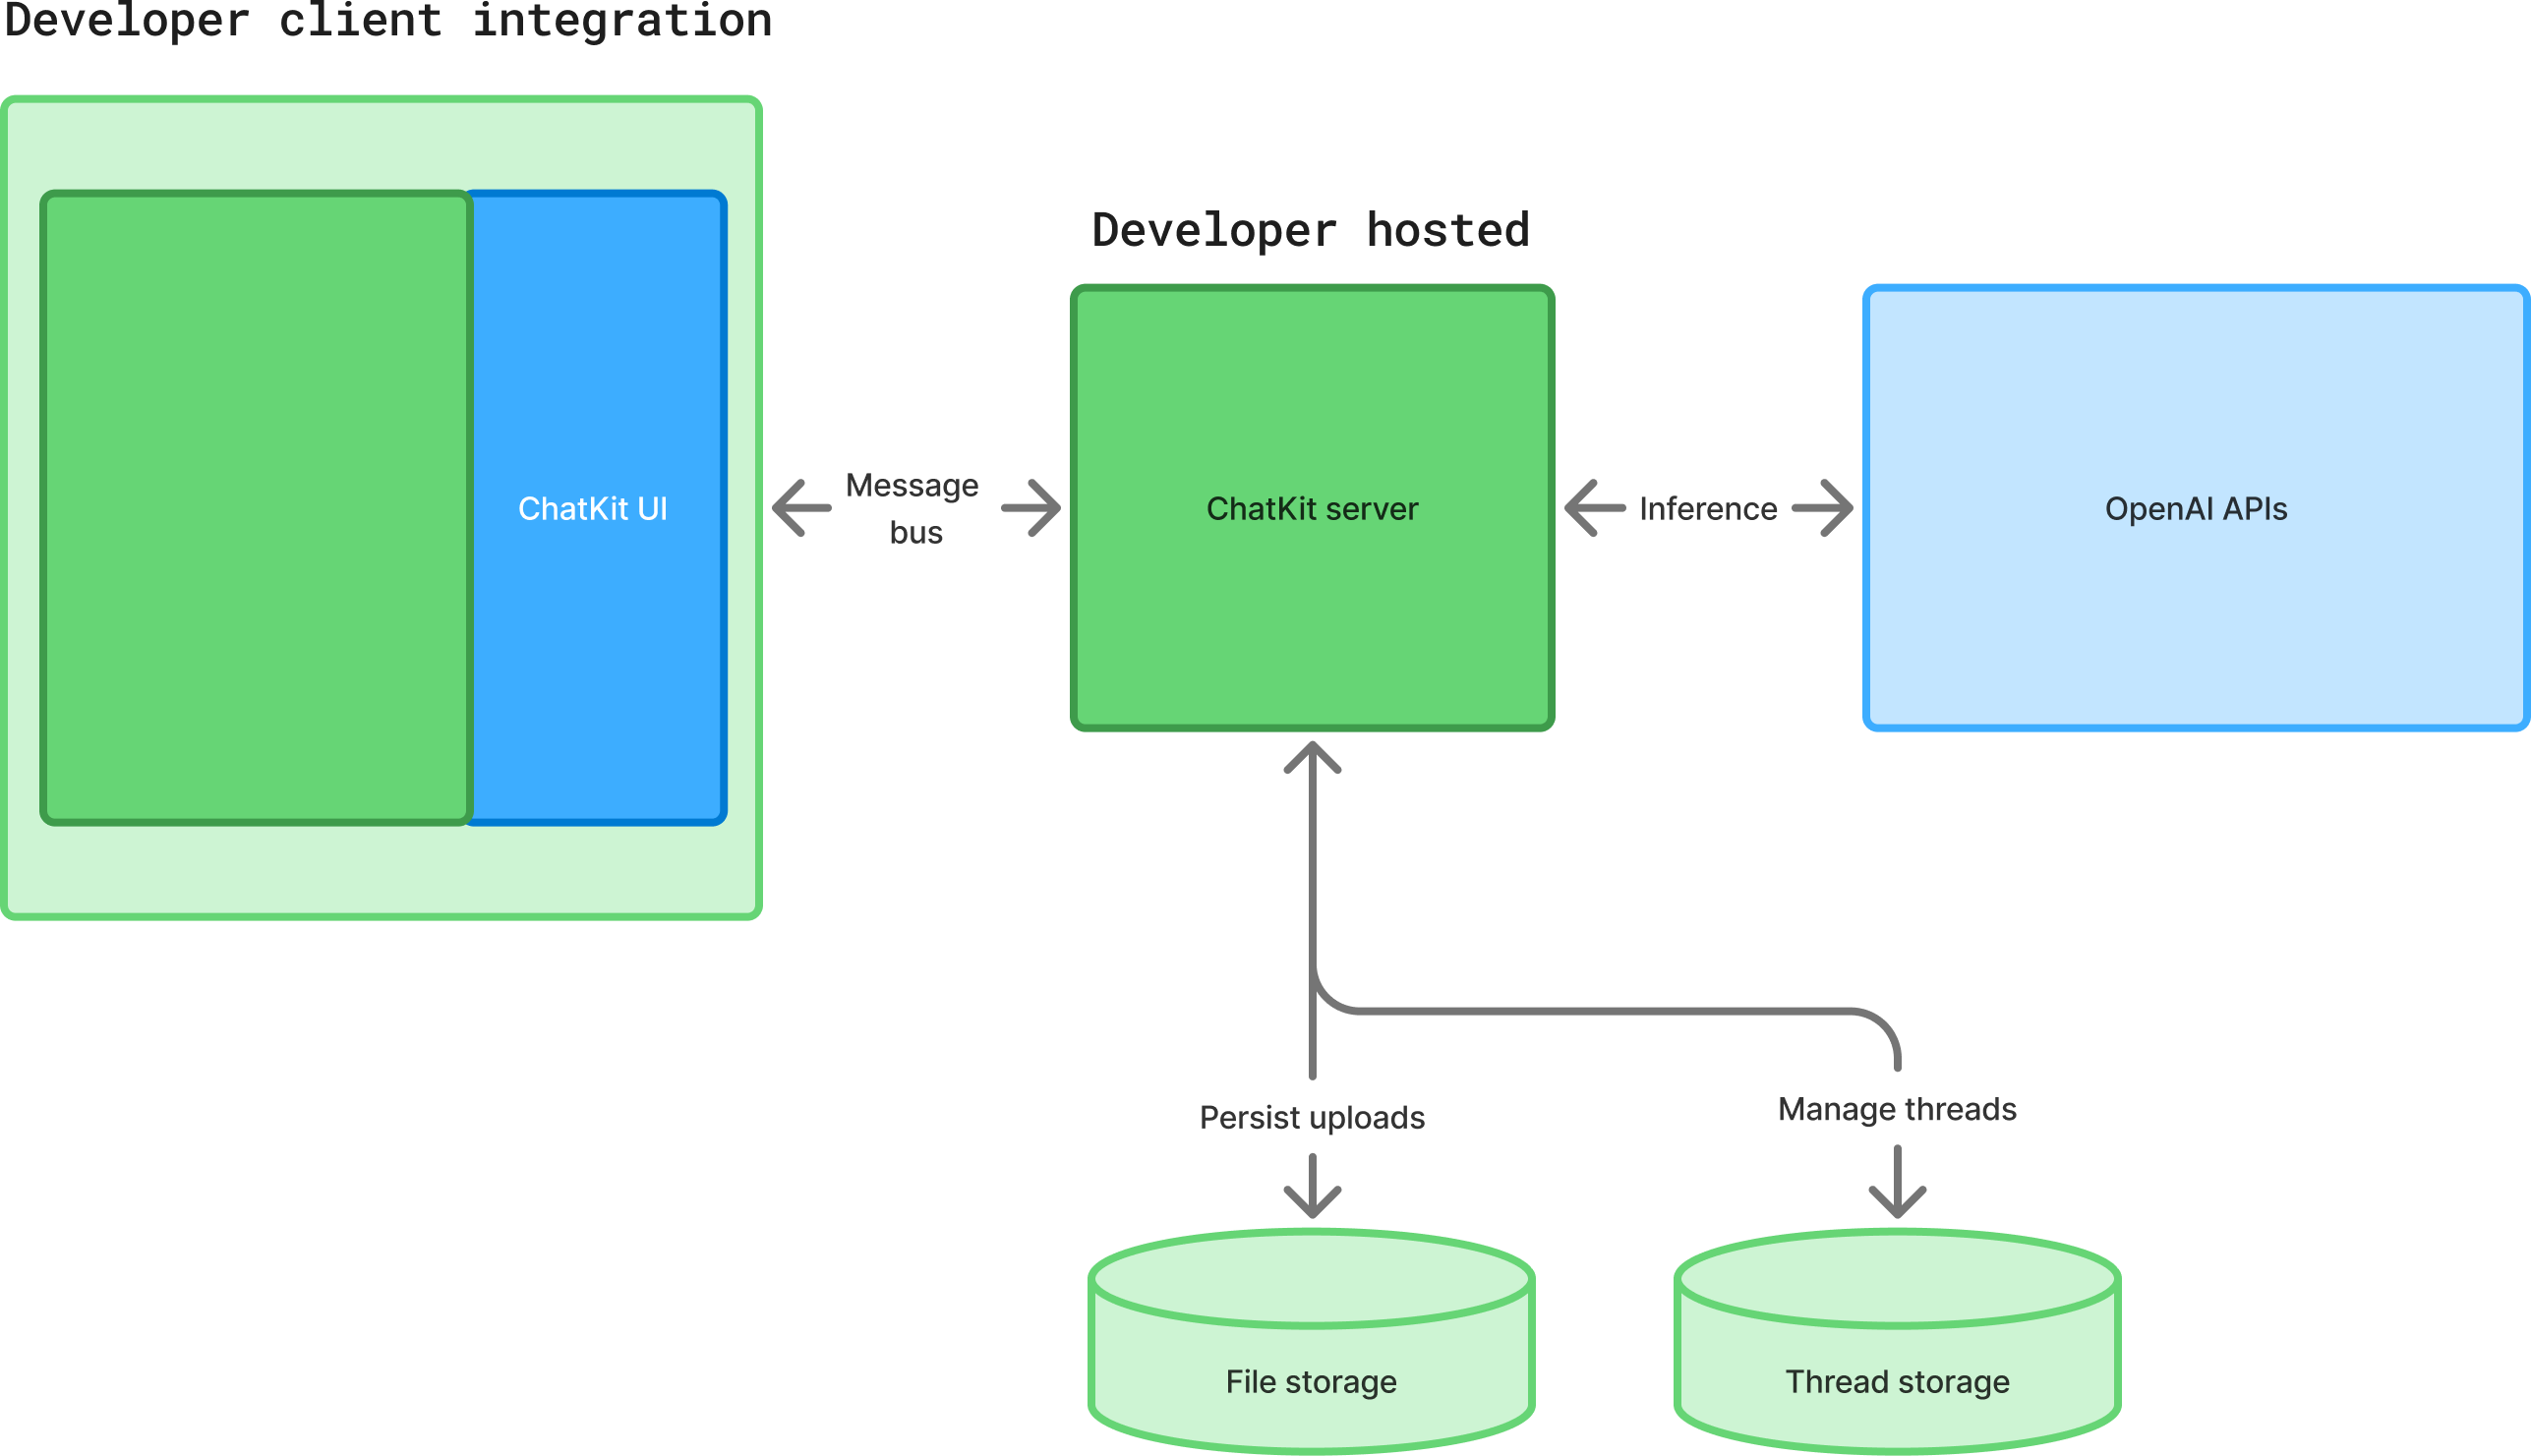
At a high level, an advanced ChatKit integration is a process of building your own ChatKit server and adding widgets to build out your chat surface. You’ll use OpenAI APIs and your ChatKit server to build a custom chat powered by OpenAI models.
Set up your ChatKit server
Follow the server guide on GitHub to learn how to handle incoming requests, run tools, and stream results back to the client. The snippets below highlight the main components.
1. Install the server package
pip install openai-chatkit2. Implement a server class
ChatKitServer drives the conversation. Override respond to stream events whenever a
user message or client tool output arrives. Helpers like stream_agent_response make it
simple to connect to the Agents SDK.
1
2
3
4
5
6
7
8
9
10
11
12
13
14
15
16
17
18
19
20
21
22
23
24
25
26
27
28
29
30
31
32
33
class MyChatKitServer(ChatKitServer):
    def __init__(self, data_store: Store, file_store: FileStore | None = None):
        super().__init__(data_store, file_store)

    assistant_agent = Agent[AgentContext](
        model="gpt-5.5",
        name="Assistant",
        instructions="You are a helpful assistant",
    )

    async def respond(
        self,
        thread: ThreadMetadata,
        input: UserMessageItem | ClientToolCallOutputItem,
        context: Any,
    ) -> AsyncIterator[Event]:
        agent_context = AgentContext(
            thread=thread,
            store=self.store,
            request_context=context,
        )
        result = Runner.run_streamed(
            self.assistant_agent,
            await to_input_item(input, self.to_message_content),
            context=agent_context,
        )
        async for event in stream_agent_response(agent_context, result):
            yield event

    async def to_message_content(
        self, input: FilePart | ImagePart
    ) -> ResponseInputContentParam:
        raise NotImplementedError()
3. Expose the endpoint
Use your framework of choice to forward HTTP requests to the server instance. For example, with FastAPI:
1
2
3
4
5
6
7
8
9
10
11
app = FastAPI()
data_store = SQLiteStore()
file_store = DiskFileStore(data_store)
server = MyChatKitServer(data_store, file_store)

@app.post("/chatkit")
async def chatkit_endpoint(request: Request):
    result = await server.process(await request.body(), {})
    if isinstance(result, StreamingResult):
        return StreamingResponse(result, media_type="text/event-stream")
    return Response(content=result.json, media_type="application/json")
4. Establish data store contract
Implement chatkit.store.Store to persist threads, messages, and files using your
preferred database. The default example uses SQLite for local development. Consider
storing the models as JSON blobs so library updates can evolve the schema without
migrations.
5. Provide file store contract
Provide a FileStore implementation if you support uploads. ChatKit works with direct
uploads (the client POSTs the file to your endpoint) or two-phase uploads (the client
requests a signed URL, then uploads to cloud storage). Expose previews to support inline
thumbnails and handle deletions when threads are removed.
6. Trigger client tools from the server
Client tools must be registered both in the client options and on your agent. Use
ctx.context.client_tool_call to enqueue a call from an Agents SDK tool.
1
2
3
4
5
6
7
8
9
10
11
12
13
14
@function_tool(description_override="Add an item to the user's todo list.")
async def add_to_todo_list(ctx: RunContextWrapper[AgentContext], item: str) -> None:
    ctx.context.client_tool_call = ClientToolCall(
        name="add_to_todo_list",
        arguments={"item": item},
    )

assistant_agent = Agent[AgentContext](
    model="gpt-5.5",
    name="Assistant",
    instructions="You are a helpful assistant",
    tools=[add_to_todo_list],
    tool_use_behavior=StopAtTools(stop_at_tool_names=[add_to_todo_list.name]),
)
7. Use thread metadata and state
Use thread.metadata to store server-side state such as the previous Responses API run
ID or custom labels. Metadata is not exposed to the client but is available in every
respond call.
8. Get tool status updates
Long-running tools can stream progress to the UI with ProgressUpdateEvent. ChatKit
replaces the progress event with the next assistant message or widget output.
9. Using server context
Pass a custom context object to server.process(body, context) to enforce permissions or
propagate user identity through your store and file store implementations.
Add inline interactive widgets
Widgets let agents surface rich UI inside the chat surface. Use them for cards, forms,
text blocks, lists, and other layouts. The helper stream_widget can render a widget
immediately or stream updates as they arrive.
1
2
3
4
5
6
7
8
9
10
11
12
13
14
15
16
17
18
async def respond(
    self,
    thread: ThreadMetadata,
    input: UserMessageItem | ClientToolCallOutputItem,
    context: Any,
) -> AsyncIterator[Event]:
    widget = Card(
        children=[Text(
            id="description",
            value="Generated summary",
        )]
    )
    async for event in stream_widget(
        thread,
        widget,
        generate_id=lambda item_type: self.store.generate_item_id(item_type, thread, context),
    ):
        yield event
ChatKit ships with a wide set of widget nodes (cards, lists, forms, text, buttons, and more). See widgets guide on GitHub for all components, props, and streaming guidance.
See the Widget Builder to explore and create widgets in an interactive UI.
Use actions
Actions let the ChatKit UI trigger work without sending a user message. Attach an
ActionConfig to any widget node that supports it—buttons, selects, and other controls
can stream new thread items or update widgets in place. When a widget lives inside a
Form, ChatKit includes the collected form values in the action payload.
On the server, implement the action method on ChatKitServer to process the payload
and optionally stream additional events. You can also handle actions on the client by
setting handler="client" and responding in JavaScript before forwarding follow-up
work to the server.
See the actions guide on GitHub for patterns like chaining actions, creating strongly typed payloads, and coordinating client/server handlers.
Resources
Use the following resources and reference to complete your integration.
Design resources
- Download OpenAI Sans Variable.
- Duplicate the file and customize components for your product.
Events reference
ChatKit emits CustomEvent instances from the Web Component. The payload shapes are:
1
2
3
4
5
6
7
type Events = {
  "chatkit.error": CustomEvent<{ error: Error }>;
  "chatkit.response.start": CustomEvent<void>;
  "chatkit.response.end": CustomEvent<void>;
  "chatkit.thread.change": CustomEvent<{ threadId: string | null }>;
  "chatkit.log": CustomEvent<{ name: string; data?: Record<string, unknown> }>;
};
Options reference
| Option | Type | Description | Default |
|---|---|---|---|
apiURL | string | Endpoint that implements the ChatKit server protocol. | required |
fetch | typeof fetch | Override fetch calls (for custom headers or auth). | window.fetch |
theme | "light" | "dark" | UI theme. | "light" |
initialThread | string | null | Thread to open on mount; null shows the new thread view. | null |
clientTools | Record<string, Function> | Client-executed tools exposed to the model. | |
header | object | boolean | Header configuration or false to hide the header. | true |
newThreadView | object | Customize greeting text and starter prompts. | |
messages | object | Configure message affordances (feedback, annotations, etc.). | |
composer | object | Control attachments, entity tags, and placeholder text. | |
entities | object | Callbacks for entity lookup, click handling, and previews. |