
Use the OpenAI API and Agents SDK to create powerful, context-aware voice agents for applications like customer support and language tutoring. This guide helps you design and build a voice agent.
Choose the right architecture
OpenAI provides two primary architectures for building voice agents:


Speech-to-speech (realtime) architecture

The multimodal speech-to-speech (S2S) architecture directly processes audio inputs and outputs, handling speech in real time in a single multimodal model, gpt-4o-realtime-preview. The model thinks and responds in speech. It doesn’t rely on a transcript of the user’s input—it hears emotion and intent, filters out noise, and responds directly in speech. Use this approach for highly interactive, low-latency, conversational use cases.
| Strengths | Best for |
|---|---|
| Low latency interactions | Interactive and unstructured conversations |
| Rich multimodal understanding (audio and text simultaneously) | Language tutoring and interactive learning experiences |
| Natural, fluid conversational flow | Conversational search and discovery |
| Enhanced user experience through vocal context understanding | Interactive customer service scenarios |
Chained architecture
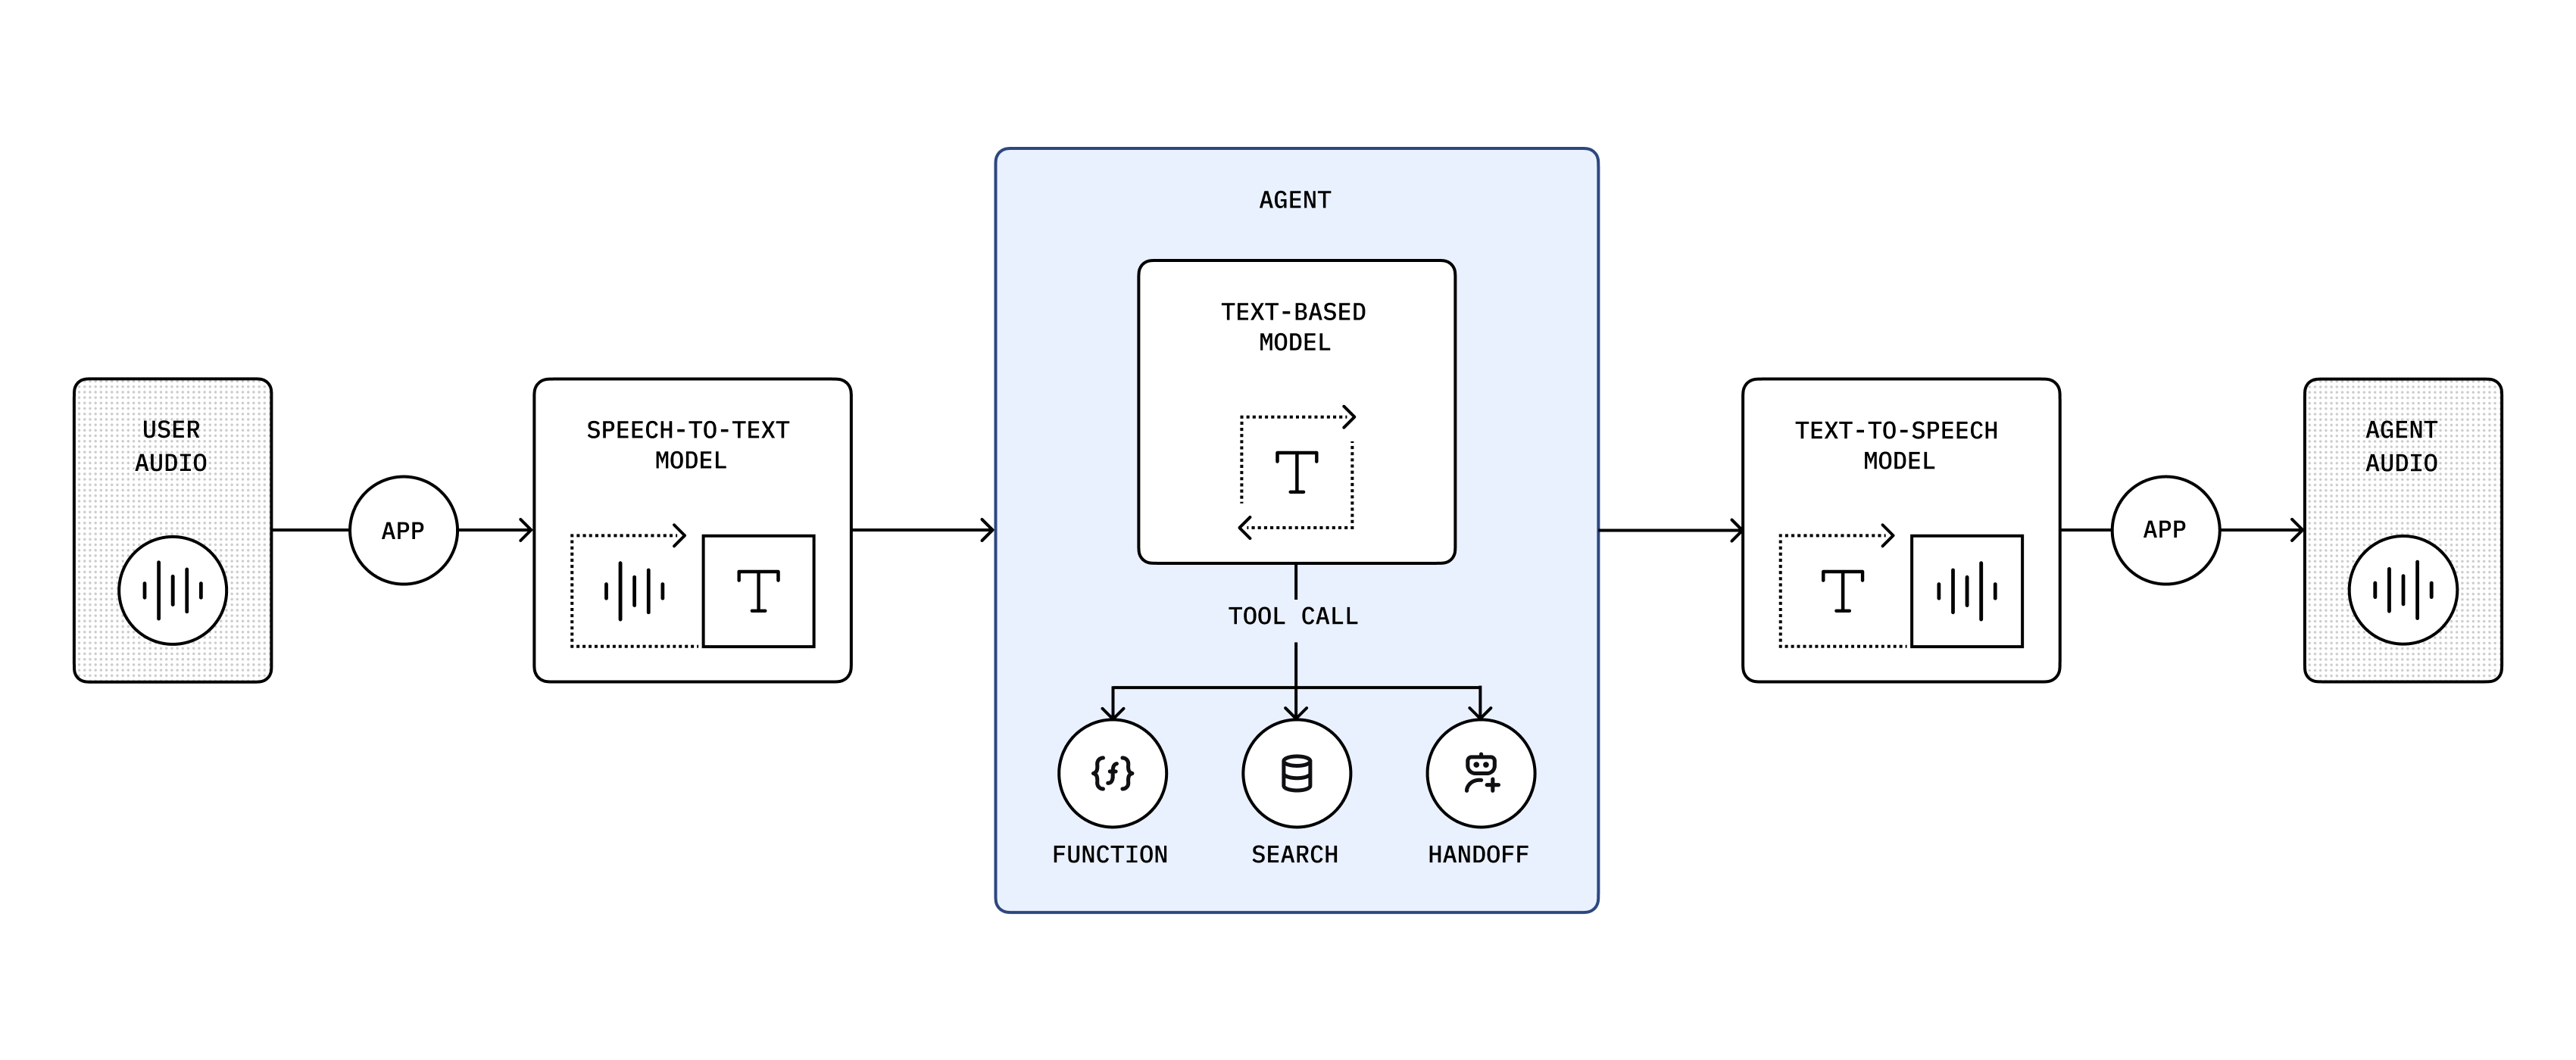
A chained architecture processes audio sequentially, converting audio to text, generating intelligent responses using large language models (LLMs), and synthesizing audio from text. We recommend this predictable architecture if you’re new to building voice agents. Both the user input and model’s response are in text, so you have a transcript and can control what happens in your application. It’s also a reliable way to convert an existing LLM-based application into a voice agent.
You’re chaining these models: gpt-4o-transcribe → gpt-4.1 → gpt-4o-mini-tts
| Strengths | Best for |
|---|---|
| High control and transparency | Structured workflows focused on specific user objectives |
| Robust function calling and structured interactions | Customer support |
| Reliable, predictable responses | Sales and inbound triage |
| Support for extended conversational context | Scenarios that involve transcripts and scripted responses |
The following guide below is for building agents using our recommended speech-to-speech architecture.
To learn more about the chained architecture, see the chained architecture guide.
The following guide below is for building agents using the chained architecture.
To learn more about our recommended speech-to-speech architecture, see the speech-to-speech architecture guide.
Build a voice agent
Use OpenAI’s APIs and SDKs to create powerful, context-aware voice agents.
Building a speech-to-speech voice agent requires:
- Establishing a connection for realtime data transfer
- Creating a realtime session with the Realtime API
- Using an OpenAI model with realtime audio input and output capabilities
If you are new to building voice agents, we recommend using the Realtime Agents in the TypeScript Agents SDK to get started with your voice agents.
npm install @openai/agentsIf you want to get an idea of what interacting with a speech-to-speech voice agent looks like, check out our quickstart guide to get started or check out our example application below.
A collection of example speech-to-speech voice agents including handoffs and reasoning model validation.
Choose your transport method
As latency is critical in voice agent use cases, the Realtime API provides two low-latency transport methods:
- WebRTC: A peer-to-peer protocol that allows for low-latency audio and video communication.
- WebSocket: A common protocol for realtime data transfer.
The two transport methods for the Realtime API support largely the same capabilities, but which one is more suitable for you will depend on your use case.
WebRTC is generally the better choice if you are building client-side applications such as browser-based voice agents.
For anything where you are executing the agent server-side such as building an agent that can answer phone calls, WebSockets will be the better option.
If you are using the OpenAI Agents SDK for TypeScript, we will automatically use WebRTC if you are building in the browser and WebSockets otherwise.
Design your voice agent
Just like when designing a text-based agent, you’ll want to start small and keep your agent focused on a single task.
Try to limit the number of tools your agent has access to and provide an escape hatch for the agent to deal with tasks that it is not equipped to handle.
This could be a tool that allows the agent to handoff the conversation to a human or a certain phrase that it can fall back to.
While providing tools to text-based agents is a great way to provide additional context to the agent, for voice agents you should consider giving critical information as part of the prompt as opposed to requiring the agent to call a tool first.
If you are just getting started, check out our Realtime Playground that provides prompt generation helpers, as well as a way to stub out your function tools including stubbed tool responses to try end to end flows.
Precisely prompt your agent
With speech-to-speech agents, prompting is even more powerful than with text-based agents as the prompt allows you to not just control the content of the agent’s response but also the way the agent speaks or help it understand audio content.
A good example of what a prompt might look like:
1
2
3
4
5
6
7
8
9
10
11
12
13
14
15
16
17
18
19
20
21
22
23
24
25
26
27
28
29
30
31
32
33
34
# Personality and Tone
## Identity
// Who or what the AI represents (e.g., friendly teacher, formal advisor, helpful assistant). Be detailed and include specific details about their character or backstory.

## Task
// At a high level, what is the agent expected to do? (e.g. "you are an expert at accurately handling user returns")

## Demeanor
// Overall attitude or disposition (e.g., patient, upbeat, serious, empathetic)

## Tone
// Voice style (e.g., warm and conversational, polite and authoritative)

## Level of Enthusiasm
// Degree of energy in responses (e.g., highly enthusiastic vs. calm and measured)

## Level of Formality
// Casual vs. professional language (e.g., “Hey, great to see you!” vs. “Good afternoon, how may I assist you?”)

## Level of Emotion
// How emotionally expressive or neutral the AI should be (e.g., compassionate vs. matter-of-fact)

## Filler Words
// Helps make the agent more approachable, e.g. “um,” “uh,” "hm," etc.. Options are generally "none", "occasionally", "often", "very often"

## Pacing
// Rhythm and speed of delivery

## Other details
// Any other information that helps guide the personality or tone of the agent.

# Instructions
- If a user provides a name or phone number, or something else where you need to know the exact spelling, always repeat it back to the user to confirm you have the right understanding before proceeding. // Always include this
- If the caller corrects any detail, acknowledge the correction in a straightforward manner and confirm the new spelling or value.
You do not have to be as detailed with your instructions. This is for illustrative purposes. For shorter examples, check out the prompts on OpenAI.fm.
For use cases with common conversation flows you can encode those inside the prompt using markup language like JSON
1
2
3
4
5
6
7
8
9
10
11
12
13
14
15
16
17
18
19
20
21
22
23
24
25
26
27
28
29
30
31
32
33
34
35
36
37
38
39
40
41
42
43
44
45
46
47
48
49
50
51
52
53
54
55
56
57
58
59
60
61
62
63
64
65
66
67
68
69
# Conversation States
[
  {
    "id": "1_greeting",
    "description": "Greet the caller and explain the verification process.",
    "instructions": [
      "Greet the caller warmly.",
      "Inform them about the need to collect personal information for their record."
    ],
    "examples": [
      "Good morning, this is the front desk administrator. I will assist you in verifying your details.",
      "Let us proceed with the verification. May I kindly have your first name? Please spell it out letter by letter for clarity."
    ],
    "transitions": [{
      "next_step": "2_get_first_name",
      "condition": "After greeting is complete."
    }]
  },
  {
    "id": "2_get_first_name",
    "description": "Ask for and confirm the caller's first name.",
    "instructions": [
      "Request: 'Could you please provide your first name?'",
      "Spell it out letter-by-letter back to the caller to confirm."
    ],
    "examples": [
      "May I have your first name, please?",
      "You spelled that as J-A-N-E, is that correct?"
    ],
    "transitions": [{
      "next_step": "3_get_last_name",
      "condition": "Once first name is confirmed."
    }]
  },
  {
    "id": "3_get_last_name",
    "description": "Ask for and confirm the caller's last name.",
    "instructions": [
      "Request: 'Thank you. Could you please provide your last name?'",
      "Spell it out letter-by-letter back to the caller to confirm."
    ],
    "examples": [
      "And your last name, please?",
      "Let me confirm: D-O-E, is that correct?"
    ],
    "transitions": [{
      "next_step": "4_next_steps",
      "condition": "Once last name is confirmed."
    }]
  },
  {
    "id": "4_next_steps",
    "description": "Attempt to verify the caller's information and proceed with next steps.",
    "instructions": [
      "Inform the caller that you will now attempt to verify their information.",
      "Call the 'authenticateUser' function with the provided details.",
      "Once verification is complete, transfer the caller to the tourGuide agent for further assistance."
    ],
    "examples": [
      "Thank you for providing your details. I will now verify your information.",
      "Attempting to authenticate your information now.",
      "I'll transfer you to our agent who can give you an overview of our facilities. Just to help demonstrate different agent personalities, she's instructed to act a little crabby."
    ],
    "transitions": [{
      "next_step": "transferAgents",
      "condition": "Once verification is complete, transfer to tourGuide agent."
    }]
  }
]
Instead of writing this out by hand, you can also check out this Voice Agent Metaprompter or copy the metaprompt and use it directly.
Handle agent handoff
In order to keep your agent focused on a single task, you can provide the agent with the ability to transfer or handoff to another specialized agent. You can do this by providing the agent with a function tool to initiate the transfer. This tool should have information on when to use it for a handoff.
If you are using the OpenAI Agents SDK for TypeScript, you can define any agent as a potential handoff to another agent.
1
2
3
4
5
6
7
8
9
10
11
12
13
14
import { RealtimeAgent } from "@openai/agents/realtime";

const productSpecialist = new RealtimeAgent({
  name: "Product Specialist",
  instructions:
    "You are a product specialist. You are responsible for answering questions about our products.",
});

const triageAgent = new RealtimeAgent({
  name: "Triage Agent",
  instructions:
    "You are a customer service frontline agent. You are responsible for triaging calls to the appropriate agent.",
  tools: [productSpecialist],
});
The SDK will automatically facilitate the handoff between the agents for you.
Alternatively if you are building your own voice agent, here is an example of such a tool definition:
1
2
3
4
5
6
7
8
9
10
11
12
13
14
15
16
17
18
19
20
21
22
23
24
25
26
27
28
29
30
31
32
33
34
35
36
37
const tool = {
  type: "function",
  function: {
    name: "transferAgents",
    description: `
Triggers a transfer of the user to a more specialized agent.
Calls escalate to a more specialized LLM agent or to a human agent, with additional context.
Only call this function if one of the available agents is appropriate. Don't transfer to your own agent type.

Let the user know you're about to transfer them before doing so.

Available Agents:
- returns_agent
- product_specialist_agent
  `.trim(),
    parameters: {
      type: "object",
      properties: {
        rationale_for_transfer: {
          type: "string",
          description: "The reasoning why this transfer is needed.",
        },
        conversation_context: {
          type: "string",
          description:
            "Relevant context from the conversation that will help the recipient perform the correct action.",
        },
        destination_agent: {
          type: "string",
          description:
            "The more specialized destination_agent that should handle the user's intended request.",
          enum: ["returns_agent", "product_specialist_agent"],
        },
      },
    },
  },
};
Once the agent calls that tool you can then use the session.update event of the Realtime API to
update the configuration of the session to use the instructions and tools available to the
specialized agent.
Extend your agent with specialized models
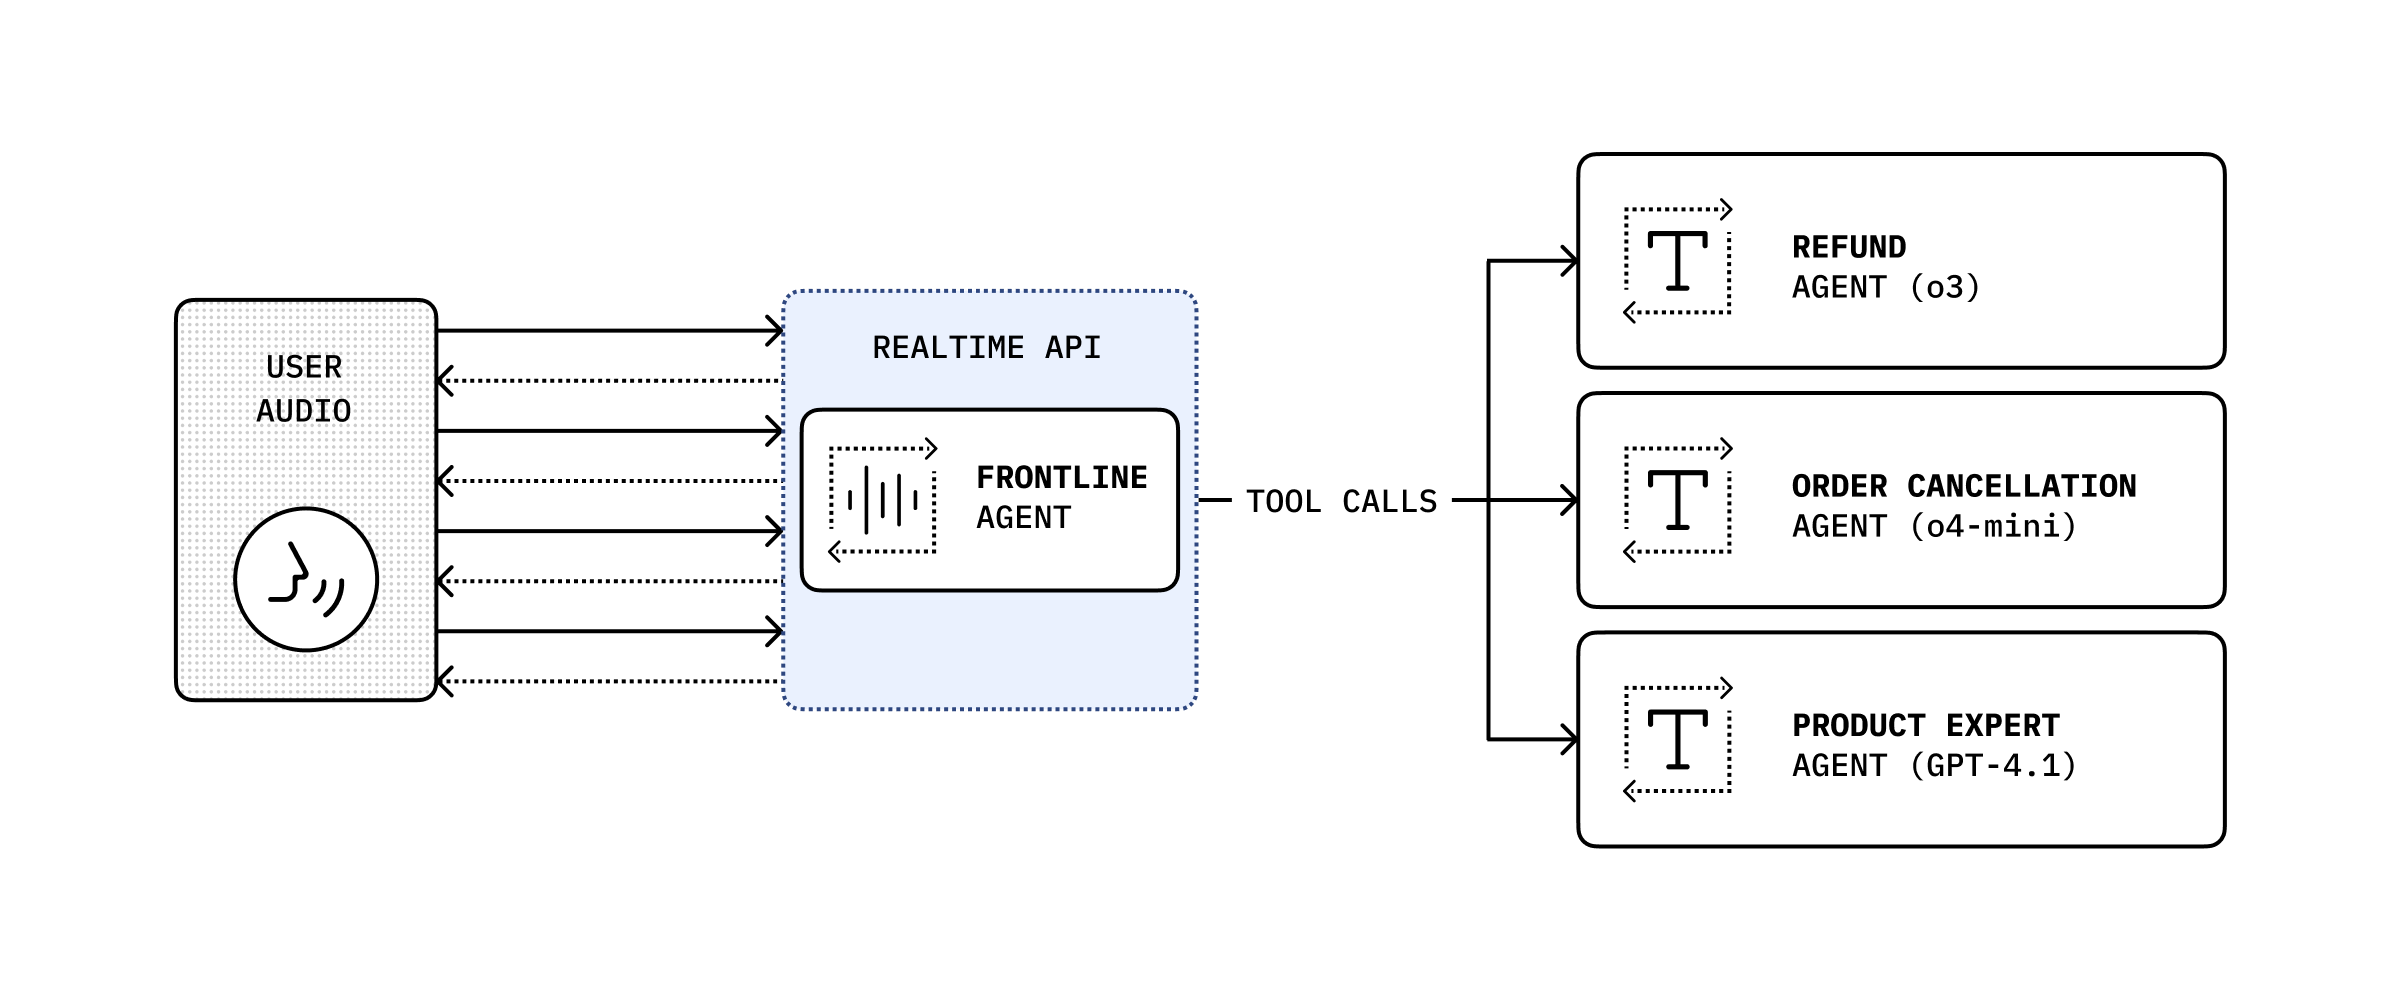
While the speech-to-speech model is useful for conversational use cases, there might be use cases where you need a specific model to handle the task like having o3 validate a return request against a detailed return policy.
In that case you can expose your text-based agent using your preferred model as a function tool call that your agent can send specific requests to.
If you are using the OpenAI Agents SDK for TypeScript,
you can give a RealtimeAgent a tool that will trigger the specialized agent on your server.
1
2
3
4
5
6
7
8
9
10
11
12
13
14
15
16
17
18
19
20
21
22
23
24
25
26
27
28
import { RealtimeAgent, tool } from "@openai/agents/realtime";
import { z } from "zod";

const supervisorAgent = tool({
  name: "supervisorAgent",
  description: "Passes a case to your supervisor for approval.",
  parameters: z.object({
    caseDetails: z.string(),
  }),
  execute: async ({ caseDetails }, details) => {
    const history = details.context.history;
    const response = await fetch("/request/to/your/specialized/agent", {
      method: "POST",
      body: JSON.stringify({
        caseDetails,
        history,
      }),
    });
    return response.text();
  },
});

const returnsAgent = new RealtimeAgent({
  name: "Returns Agent",
  instructions:
    "You are a returns agent. You are responsible for handling return requests. Always check with your supervisor before making a decision.",
  tools: [supervisorAgent],
});
One of the benefits of using a chained architecture is that you can use existing agents for part of your flow and extend them with voice capabilities.
If you are new to building agents, or have already been building with the OpenAI Agents SDK for Python, you can use its built-in VoicePipeline support to extend your existing agents with voice capabilities.
pip install openai-agents[voice]See the Agents SDK voice agents quickstart in GitHub to follow a complete example.
In the example, you’ll:
- Run a speech-to-text model to turn audio into text.
- Run your code, which is usually an agentic workflow, to produce a result.
- Run a text-to-speech model to turn the result text back into audio.
Transcribe audio and handle turn detection
When you build your voice agent, you’ll need to decide how you want to capture the audio input and transcribe it through a speech-to-text model. Part of this decision is choosing how you want to handle turn detection, or how you’ll signal to the model that the user has finished speaking.
There are generally two options:
- Manual turn detection: You determine when the user has finished speaking and pass the completed audio to the speech-to-text model. This works well for “push-to-talk” use cases where there is a clear “start speaking” and “stop speaking” signal or for situations where you want to use your own Voice Activity Detection (VAD) model.
- Automatic turn detection: You pass the raw audio data to our speech-to-text model and use one of our Voice Activity Detection (VAD) models to determine when the user has finished speaking. This is a good option in more conversational use cases where you don’t have a clear “start speaking” and “stop speaking” signal such as a phone call.
If you want to leverage our VAD model and automatic turn detection, you can use our
gpt-4o-transcribe and
gpt-4o-mini-transcribe models using the
Realtime Transcription API.
While you could use the Realtime Transcription API also for manual turn detection, you can use the
both gpt-4o-transcribe and gpt-4o-mini-transcribe with the
Audio Transcription API, without the need to establish and manage a
WebSocket connection.
If you are using the
OpenAI Agents SDK,
this decision is handled for you depending on whether you use the AudioInput() or the
StreamedAudioInput() class for your input into the VoicePipeline.
Design your text-based agent
While you can largely re-use your existing text-based agent inside a chained voice agent architecture, there are some changes that you should consider when using your agent as a voice agent.
Modifying the style of responses
By default most models will have a more chat like style of responses or maybe you’ve even used some prompting to adhere their response style to adhere to your brand policies. However, when turning that text into speech, certain stylistic choices might not translate well into audio and might actually confuse the model.
For that reason you should add some additional prompting when your agent is used as a voice agent to ensure that the responses are natural sounding and easy to understand.
The actual prompt that works best for you will depend on your use case and brand but here are some examples of things you might want to add to your prompt:
- Use a concise conversational tone with short sentences
- Avoid the use of any complex punctuation or emojis
- Don’t use any special formatting like bolding, italicizing or markdown formatting
- Don’t use any lists or enumerations
Streaming text
To decrease latency, you also want to make sure that your agent’s response tokens are streamed out as soon as they are available. This way you can start generating audio and start playing the first bits of audio back to the user and let the model catch up in the meantime.
Generate audio output
To turn your agent’s text responses into natural-sounding speech, use OpenAI’s
Speech API. The latest model, gpt-4o-mini-tts, delivers
high-quality, expressive audio output.
The Speech API is a synchronous HTTP-based service, so you’ll need to have the text you want to turn into audio ready before making a request. This means you’ll typically wait for your agent to finish generating a response before sending it to the API.
Reducing latency with chunking
To minimize perceived latency, you can implement your own chunking logic: gather tokens from your agent as they stream in, and send them to the Speech API as soon as you have a complete sentence (or another suitable chunk). This allows you to start generating and playing audio before the entire response is ready.
- The trade-off: Larger chunks (e.g., full paragraphs) sound more natural and fluid, but increase wait time before playback begins. Smaller chunks (e.g., single sentences) reduce wait time but may sound less natural when you transition from one chunk to the next.
- For sentence splitting, you can use a simple native implementation (see this example), or leverage more advanced NLP models for higher accuracy—though these may introduce additional latency.
Audio streaming and formats
The Speech API streams audio as soon as it’s ready. For the lowest latency, use the wav or pcm
output formats, as these are faster to generate and transmit than formats like mp3 or opus.
If you are using the
OpenAI Agents SDK,
both basic sentence chunking and using pcm are automatically handled for you.
Customizing voice and tone
You can use the instructions field in the Speech API to guide the model’s voice, tone, and
delivery. This allows you to match the agent’s personality to your use case. For inspiration, see
openai.fm.
Here are two example instruction prompts:
1
2
3
4
5
6
7
8
9
10
11
12
13
14
15
16
17
18
Accent/Affect: Warm, refined, and gently instructive, reminiscent
  of a friendly art instructor.

  Tone: Calm, encouraging, and articulate, clearly describing each
  step with patience.

  Pacing: Slow and deliberate, pausing often to allow the listener
  to follow instructions comfortably.

  Emotion: Cheerful, supportive, and pleasantly enthusiastic;
  convey genuine enjoyment and appreciation of art.

  Pronunciation: Clearly articulate artistic terminology (e.g.,
  "brushstrokes," "landscape," "palette") with gentle emphasis.

  Personality Affect: Friendly and approachable with a hint of
  sophistication; speak confidently and reassuringly, guiding
users through each painting step patiently and warmly.1
2
3
4
5
6
7
8
9
10
11
12
13
14
Voice: High-energy, upbeat, and encouraging, projecting
enthusiasm and motivation.
Punctuation: Short, punchy sentences with strategic pauses
to maintain excitement and clarity.
Delivery: Fast-paced and dynamic, with rising intonation to
build momentum and keep engagement high.
Phrasing: Action-oriented and direct, using motivational
cues to push participants forward.
Tone: Positive, energetic, and empowering, creating an
atmosphere of encouragement and achievement.For more details and advanced options, see the Text-to-Speech guide.