

I started with a simple brief for a house: minimalist but detailed furniture, a garden, and a cinematic atmosphere. I asked Astra in Codex to turn that brief into an editable 3D scene in Blender. We developed it into a furnished family home, explored a version in Unreal Engine 5, and kept refining the Blender scene until I could direct a camera tour through it.
The first scene centered on a furnished living pavilion. We later developed a floor plan for a larger family home before building its rooms. Along the way, I worked with Astra on the architecture, furniture, materials, and lighting, using each version to decide what to develop next. The latest pass added the everyday objects and warmer lighting that made the house feel lived in.
A camera tour of the house, rendered in Blender using Cycles.
I’ve included a few prompts from the project, edited for length and clarity. They show how the brief evolved as I saw what Astra could build.
Start with the house and the atmosphere
My first prompt described the result I wanted, without supplying a floor plan or a furniture catalog:
Design a beautiful house with minimalist but highly detailed furniture and a nice garden. Make the scene cinematic, with considered lighting, materials, and time of day.
Astra built an editable scene through the Blender Python API (bpy). It created the architecture, joinery, furniture, planting, materials, lights, and cameras. The first result already had the low roof, open living space, warm timber, pale stone, and connection to the garden that I was looking for. We named the house Solace.
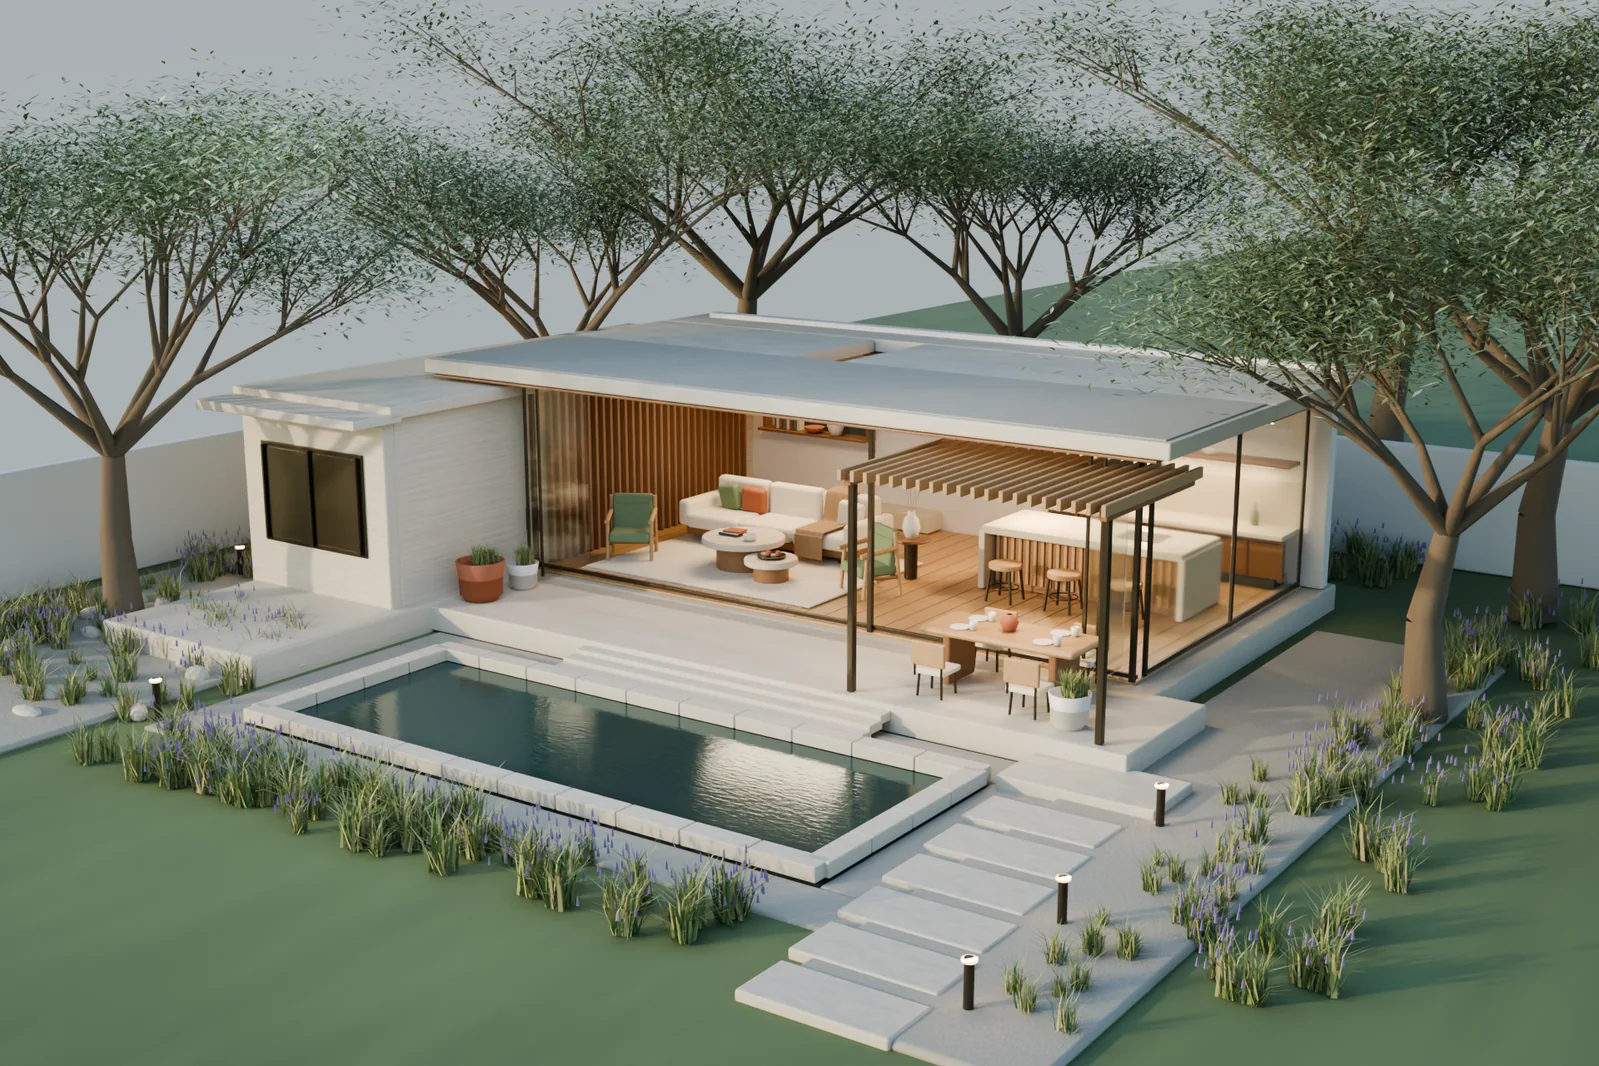
The original Courtyard House, delivered from the first design prompt.
That house came from one design prompt, but Astra still iterated on its own work before handing it back. It inspected preview renders, adjusted the composition and lighting, and corrected details such as planting intersections and the throw on the sofa. I didn’t have to describe every object or direct each of those changes.
At this stage, the furnished living pavilion was the focus. The private wing was still represented by an exterior volume. It gave us a visual direction to develop, rather than a complete family-house layout.
My next request changed the setting:
Make it golden hour. We should see the sun, and the house should be in the middle of a viridian forest.
Astra kept the house and built the forest around it. It added layers of trees and understory, placed the sun, and used atmospheric scattering to make the light visible through the woodland. The view now had depth beyond the edge of the garden, and the warm interior stood out against the trees.
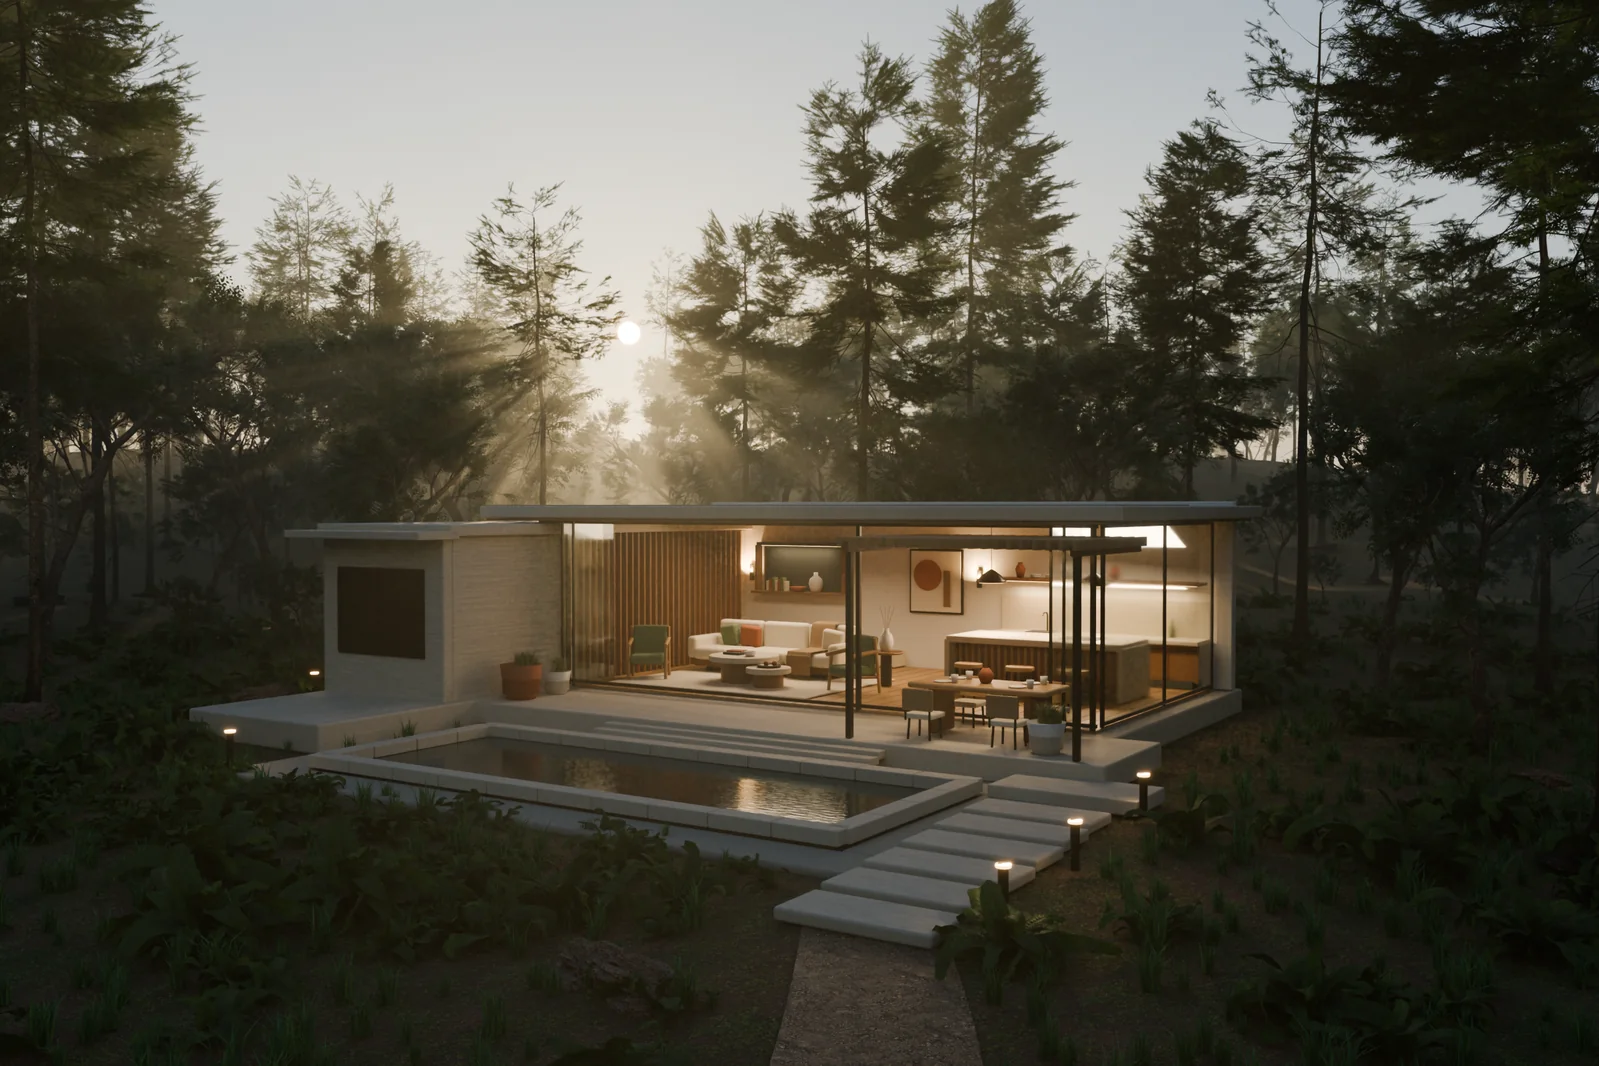
The same early house after the forest and golden-hour lighting pass.
The original house and its garden were modeled procedurally. For the larger forest, Astra used existing tree, fern, and rock assets from Poly Haven. That let the work focus on arranging the environment and getting the scene to feel right.
Draw the larger house before modeling it
Once I liked the direction, I wanted to go further. An intermediate version added a furnished bedroom suite and improved the geometry, kitchen, and furniture. Then I asked for a larger house that would make sense as a place for a family to live:
I like the minimalist, modern style, so keep that while we grow the house to be much more livable. Draw me a floor plan first. We’ll validate and evolve it from there.
This changed the work. We had to decide how rooms connected, where the private spaces belonged, and how someone would move through the house. Adding more furniture to the first scene wouldn’t answer those questions.
Astra proposed a single-story, U-shaped home around a planted courtyard. The living room, dining area, and kitchen formed the central pavilion. The wings added three bedrooms, an office, bathrooms, and a dressing room. A pantry, laundry, and storage spaces gave the kitchen and household their own supporting rooms.
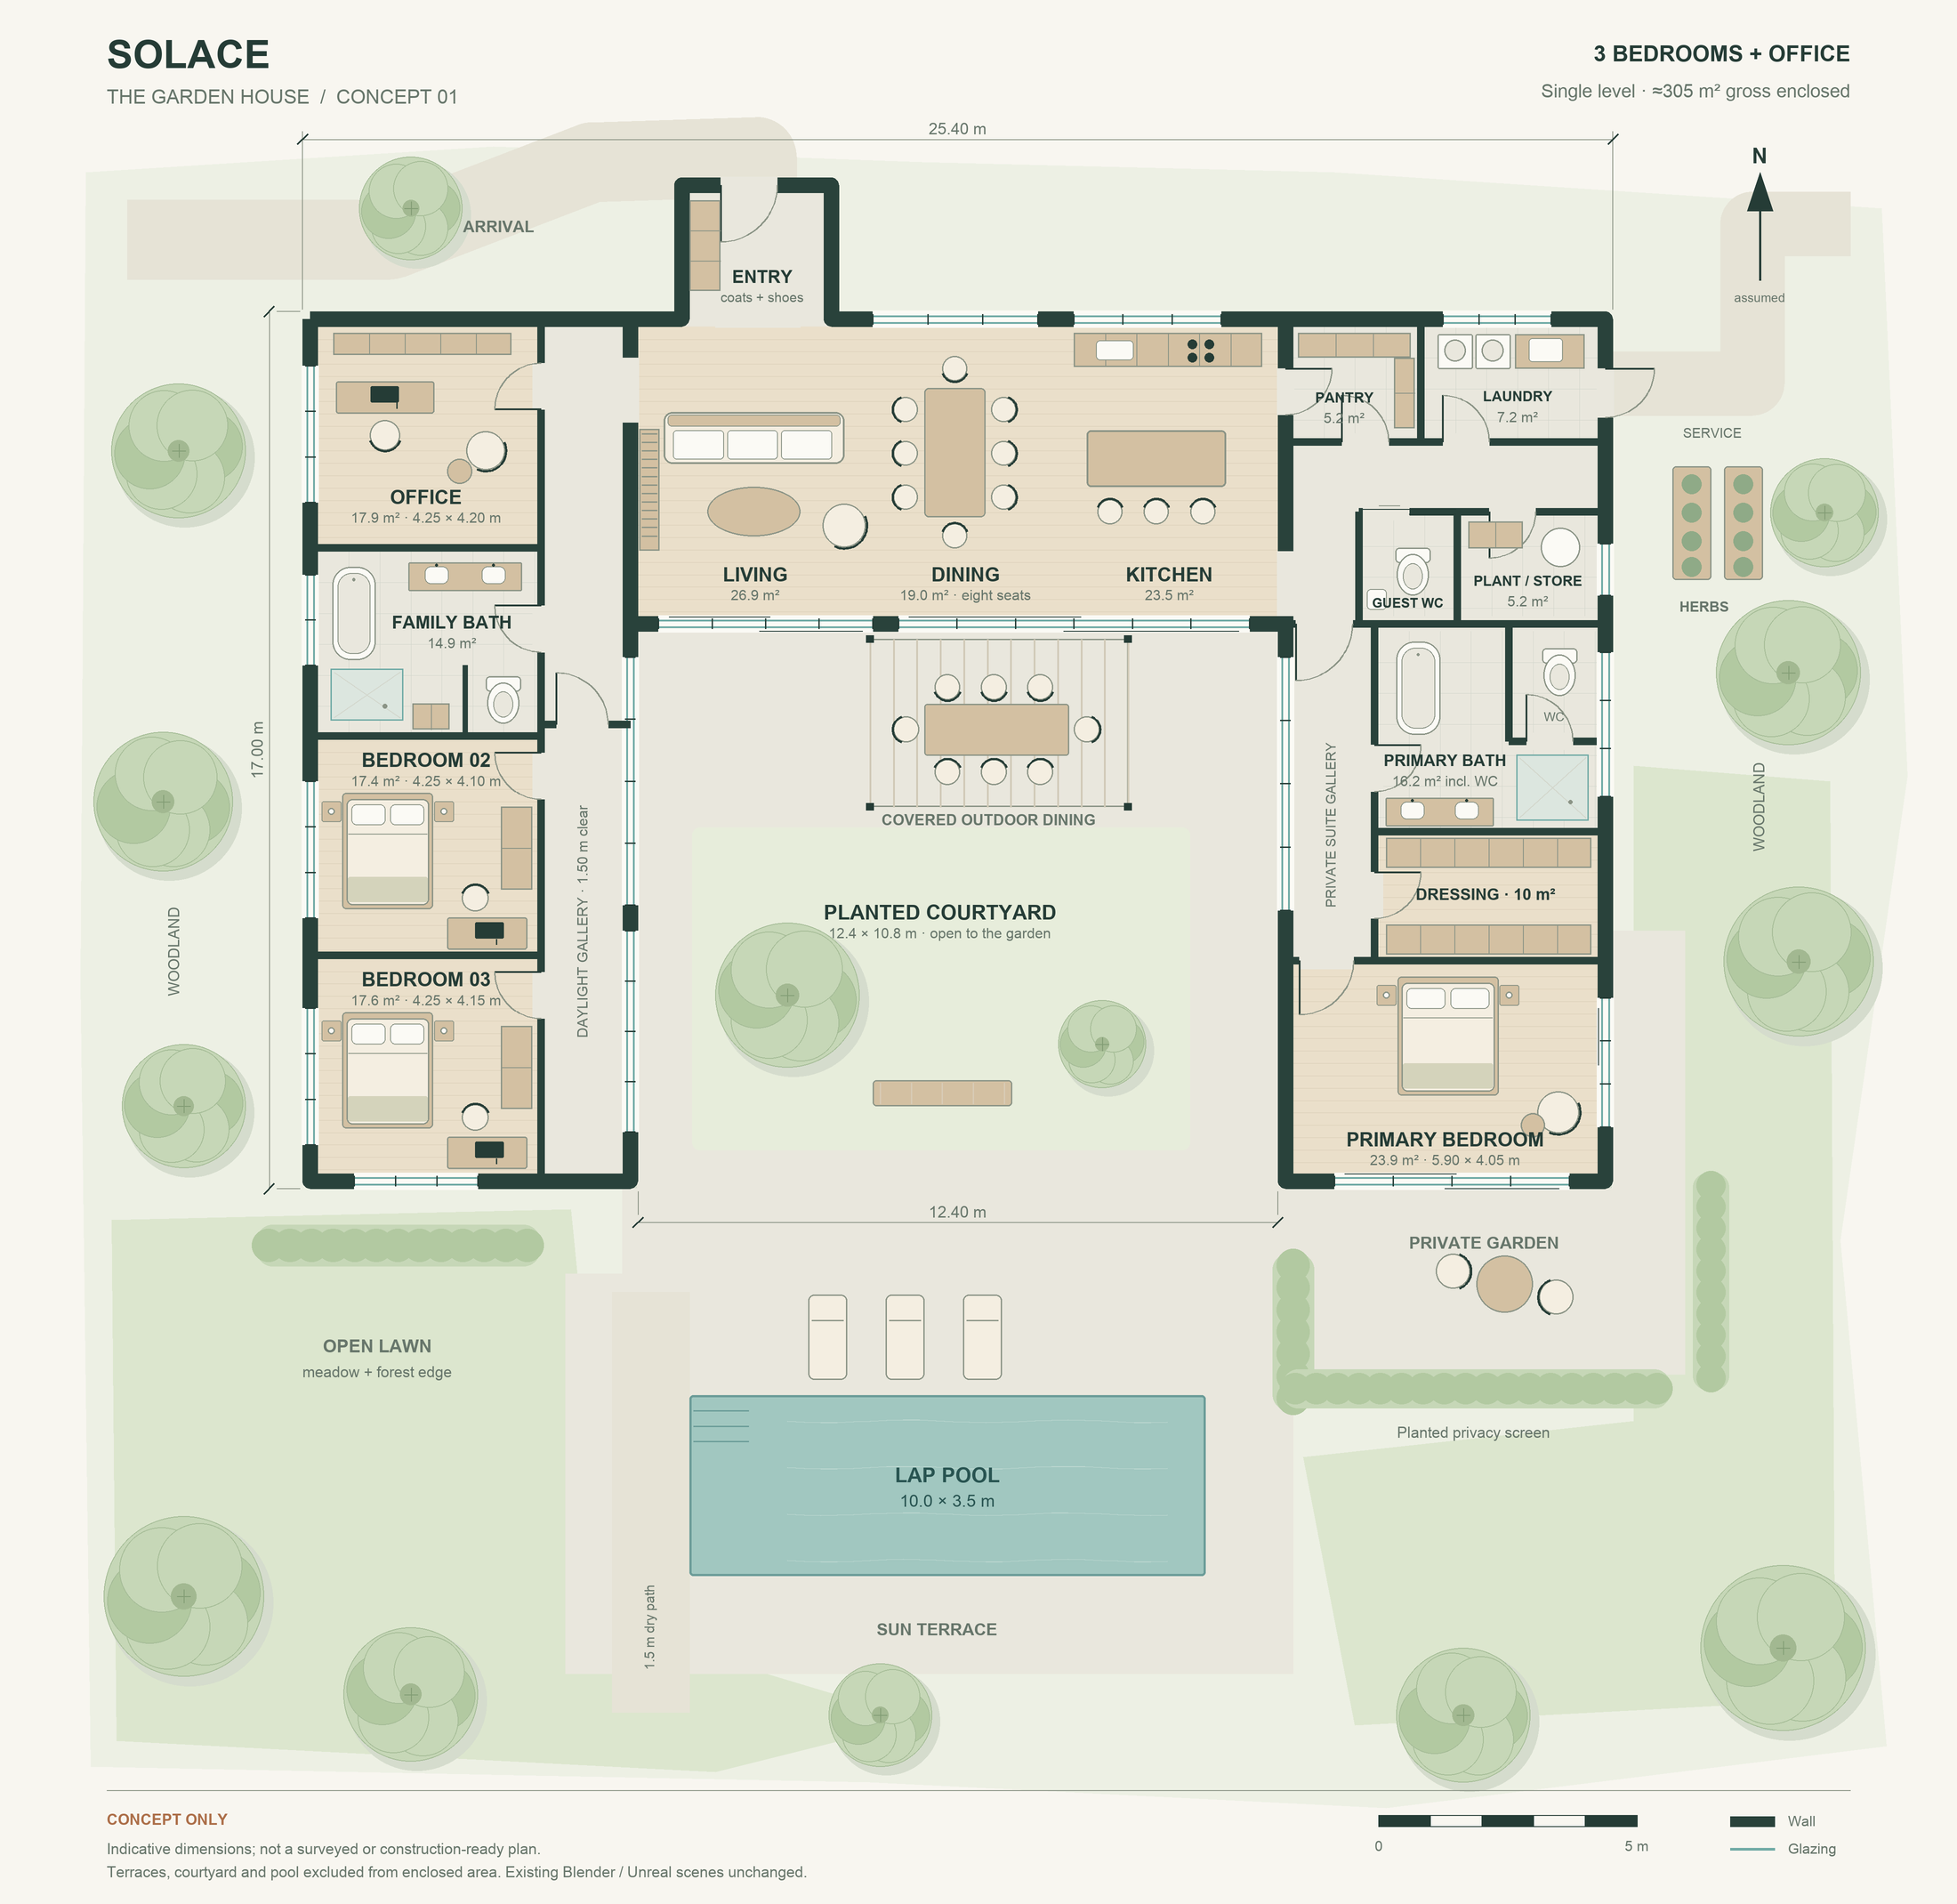
The concept floor plan we reviewed before rebuilding the house. Select the image to open it at full size.
The plan also gave us specific things to check. Bedrooms didn’t need to become passageways. A route around the courtyard kept movement between the wings out of the kitchen’s working aisle. Outdoor dining, the lawn, and the pool extended the living spaces without becoming enclosed rooms.
I approved the direction and asked Astra to preserve the existing scene before building the new version:
Keep the current scene as a backup, then build the updated house in Blender. Iterate until the house, furniture, and garden are detailed and the geometry is correct. Once we validate it in Blender, we’ll export it to Unreal Engine 5.
That order mattered. We could review the plan, then the model, before taking on the extra work of a real-time walkthrough. This remained a visualization project; the concept plan still needs professional review of the site, structure, and building requirements before it could inform construction.
Build the rooms and the furniture
The Garden House kept the forest setting and restrained palette, but expanded the architecture around the approved plan. The courtyard became the center of the composition, with views across it from the rooms on either side.
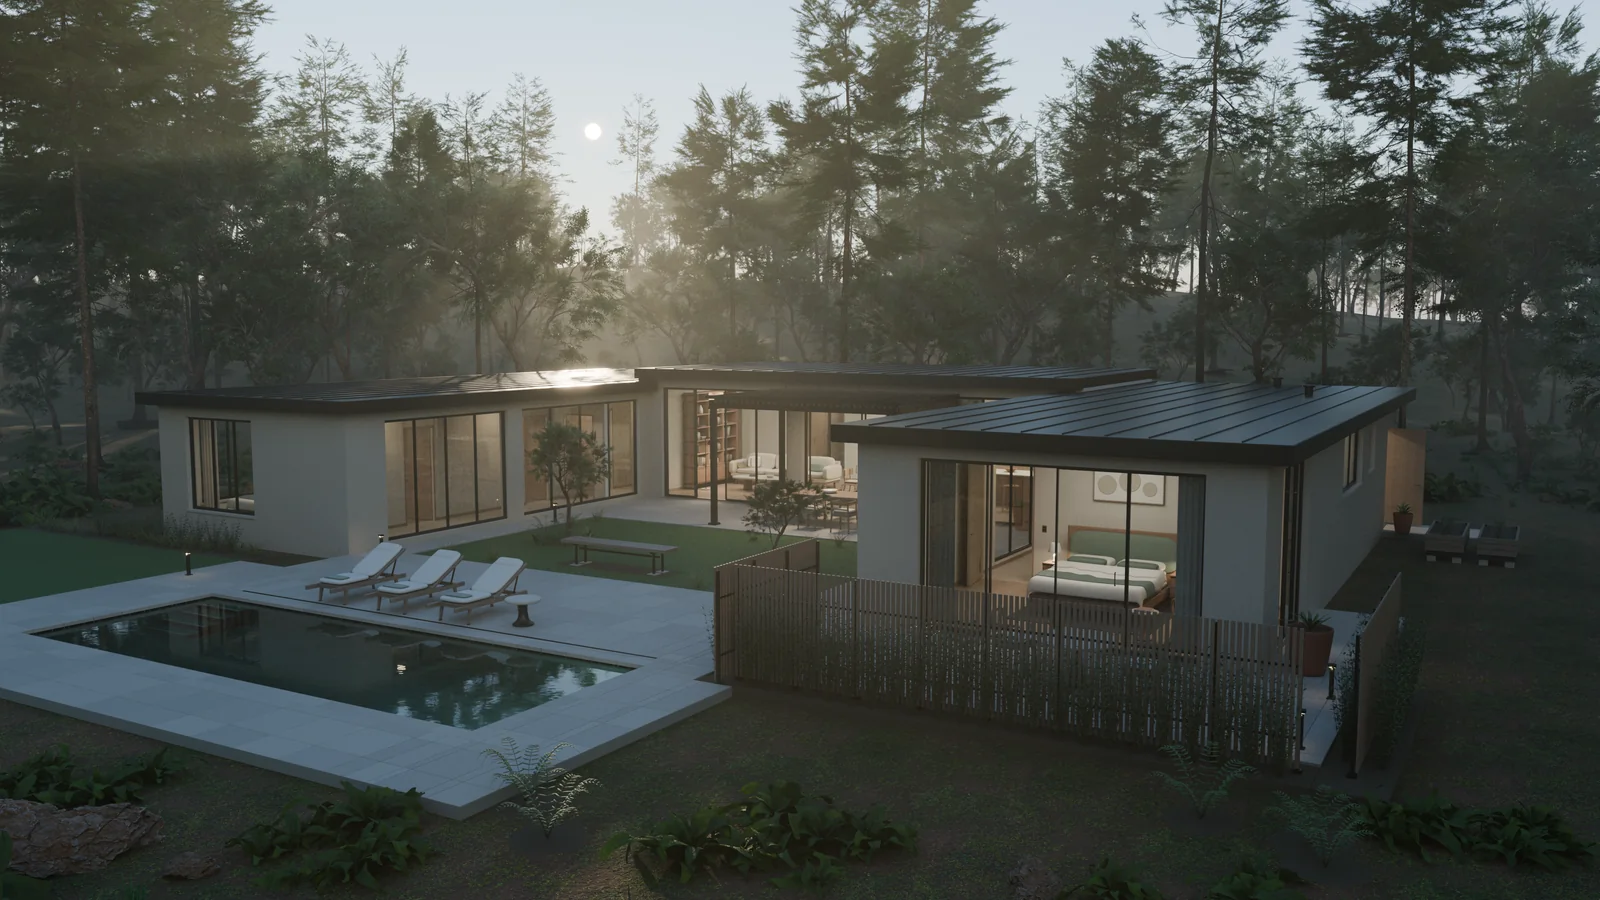
The expanded Garden House, rendered in Blender after the architectural and cinematic finishing passes.
The furniture was a large part of making those rooms convincing. Astra modeled sofa cushions and their piping, curved chair frames, books, and hollow ceramic objects. Beds had frames, slats, mattresses, and shaped bedding. Wardrobes had interiors, shelves, and hanging rails. The office had a desk with cable management, a monitor, a keyboard, and a chair with casters.
These details were geometry in the scene. They could be inspected from another angle and carried into the walkthrough. The cushions and bedding were authored shapes, so the result didn’t depend on running a cloth simulation.
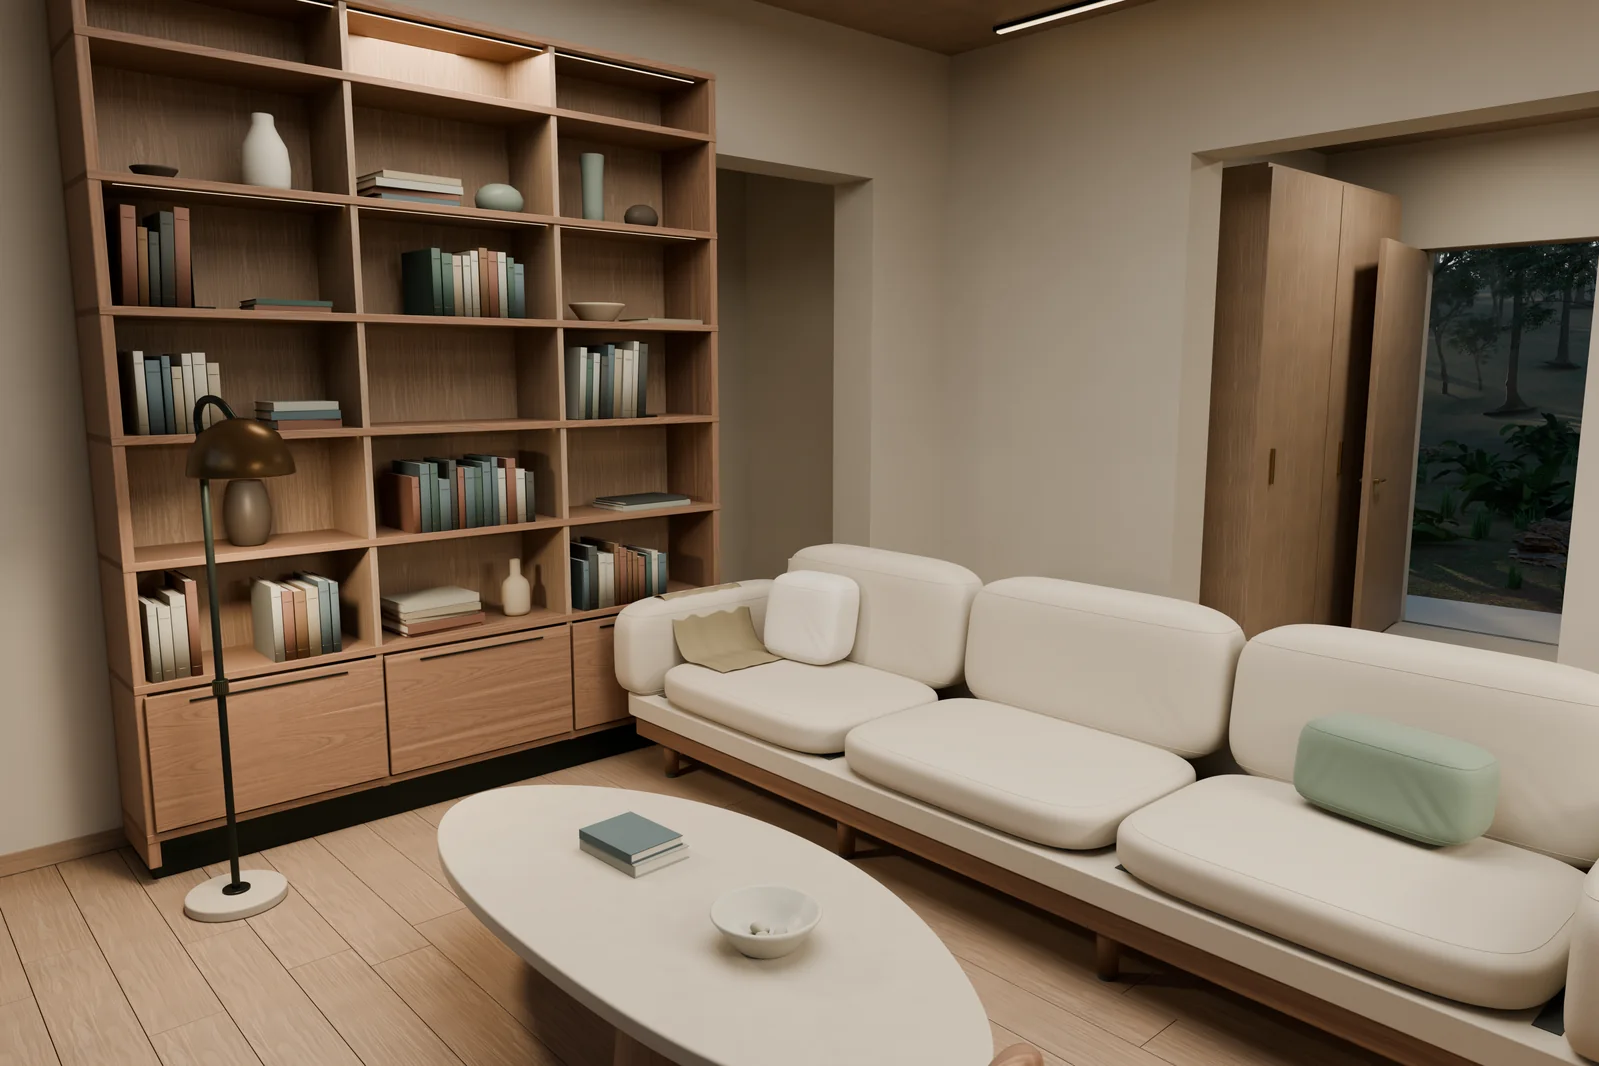
The living room, with modeled upholstery, furniture, books, and ceramics.
The same attention went into the kitchen and bathrooms. Sinks and basins had actual openings and hollow bowls. The kitchen included an oven cavity, racks, a cutlery drawer, and pantry shelves. Those are small things in a wide exterior render, but they start to matter when the camera is close enough to look at the countertop or into a room.
Materials needed to work at that distance too. The later scene combined authored finishes with scanned oak, walnut, and plaster textures from Poly Haven, including White Oak Veneer. Astra aligned the timber grain and kept the texture scale consistent with the dimensions of the furniture.
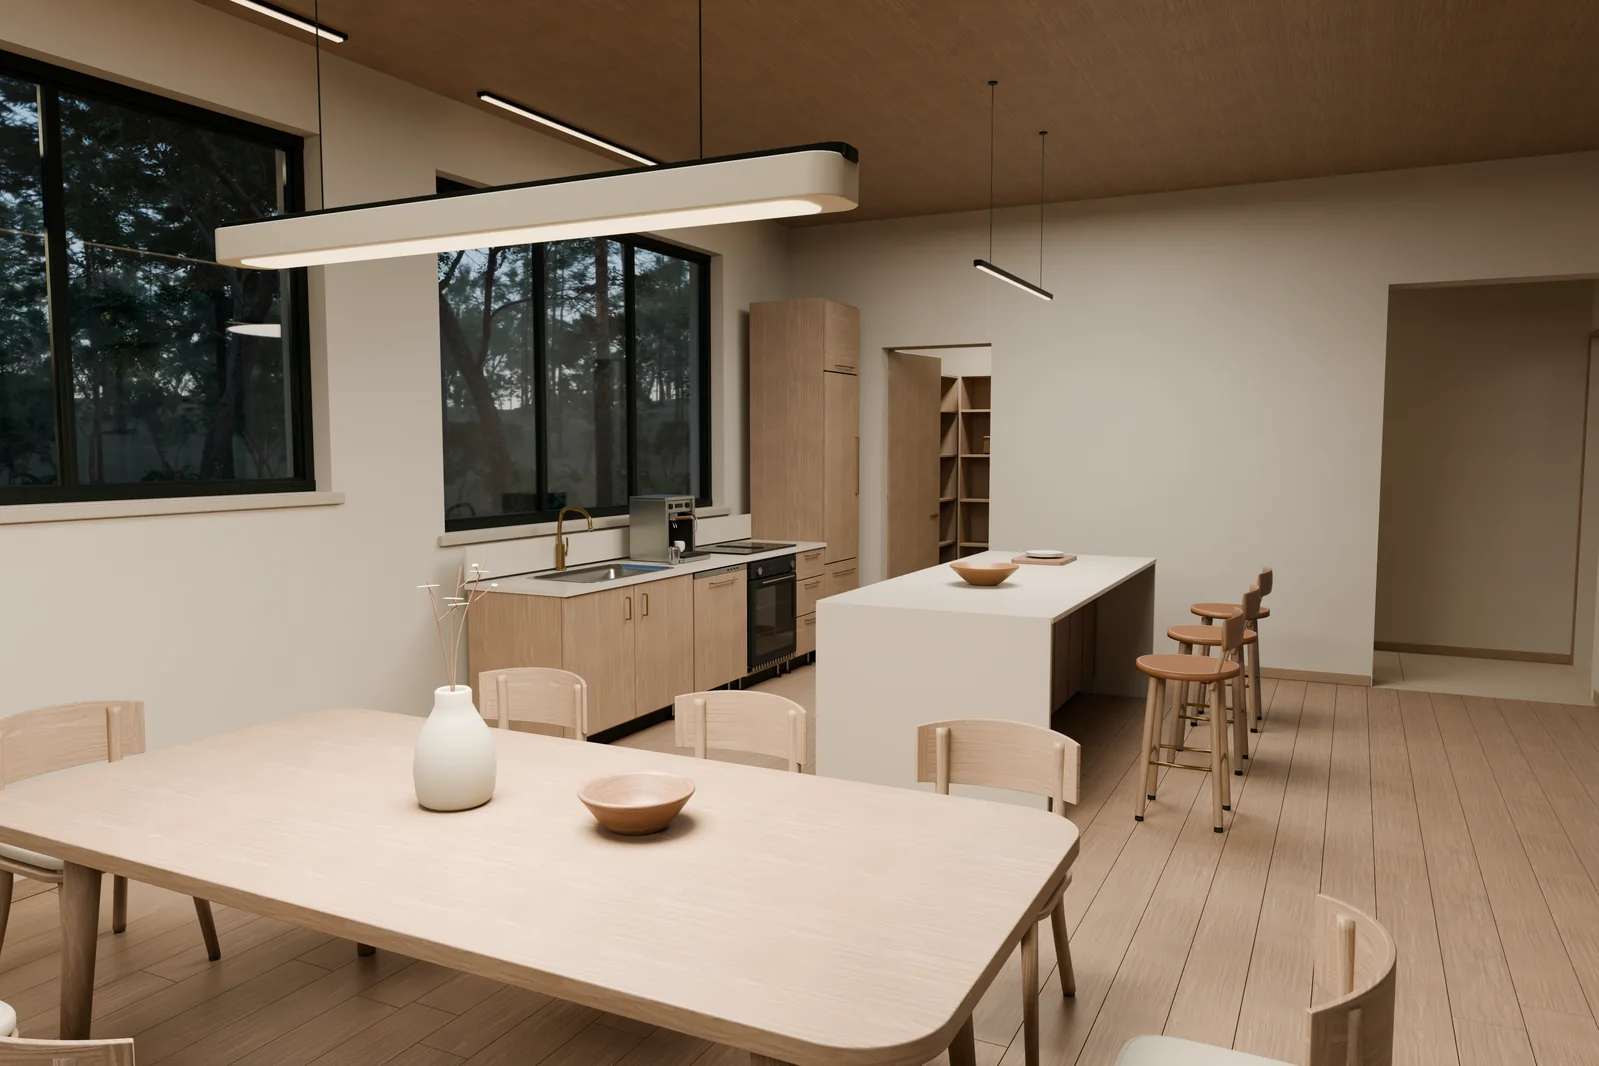
The kitchen and dining area, with the same restrained palette as the first house and more detail in the furniture and joinery.
For the cinematic studies, Astra ran scripts through Blender’s own executable in background mode, using its --python option. Those scripts placed the cameras, chose lenses, and rendered the views. Astra also opened and inspected the scene in Blender through computer use, checking the application alongside the saved renders.
We kept checking the model through renders. Astra produced views of the rooms and close studies of the materials, then used them to find and repair problems. One example was the steel sink: its surface normals, which determine how light shades the mesh, made a flat part of the bowl look pinched. Correcting them and refining the rounded edges produced a cleaner result without changing the kitchen’s design.
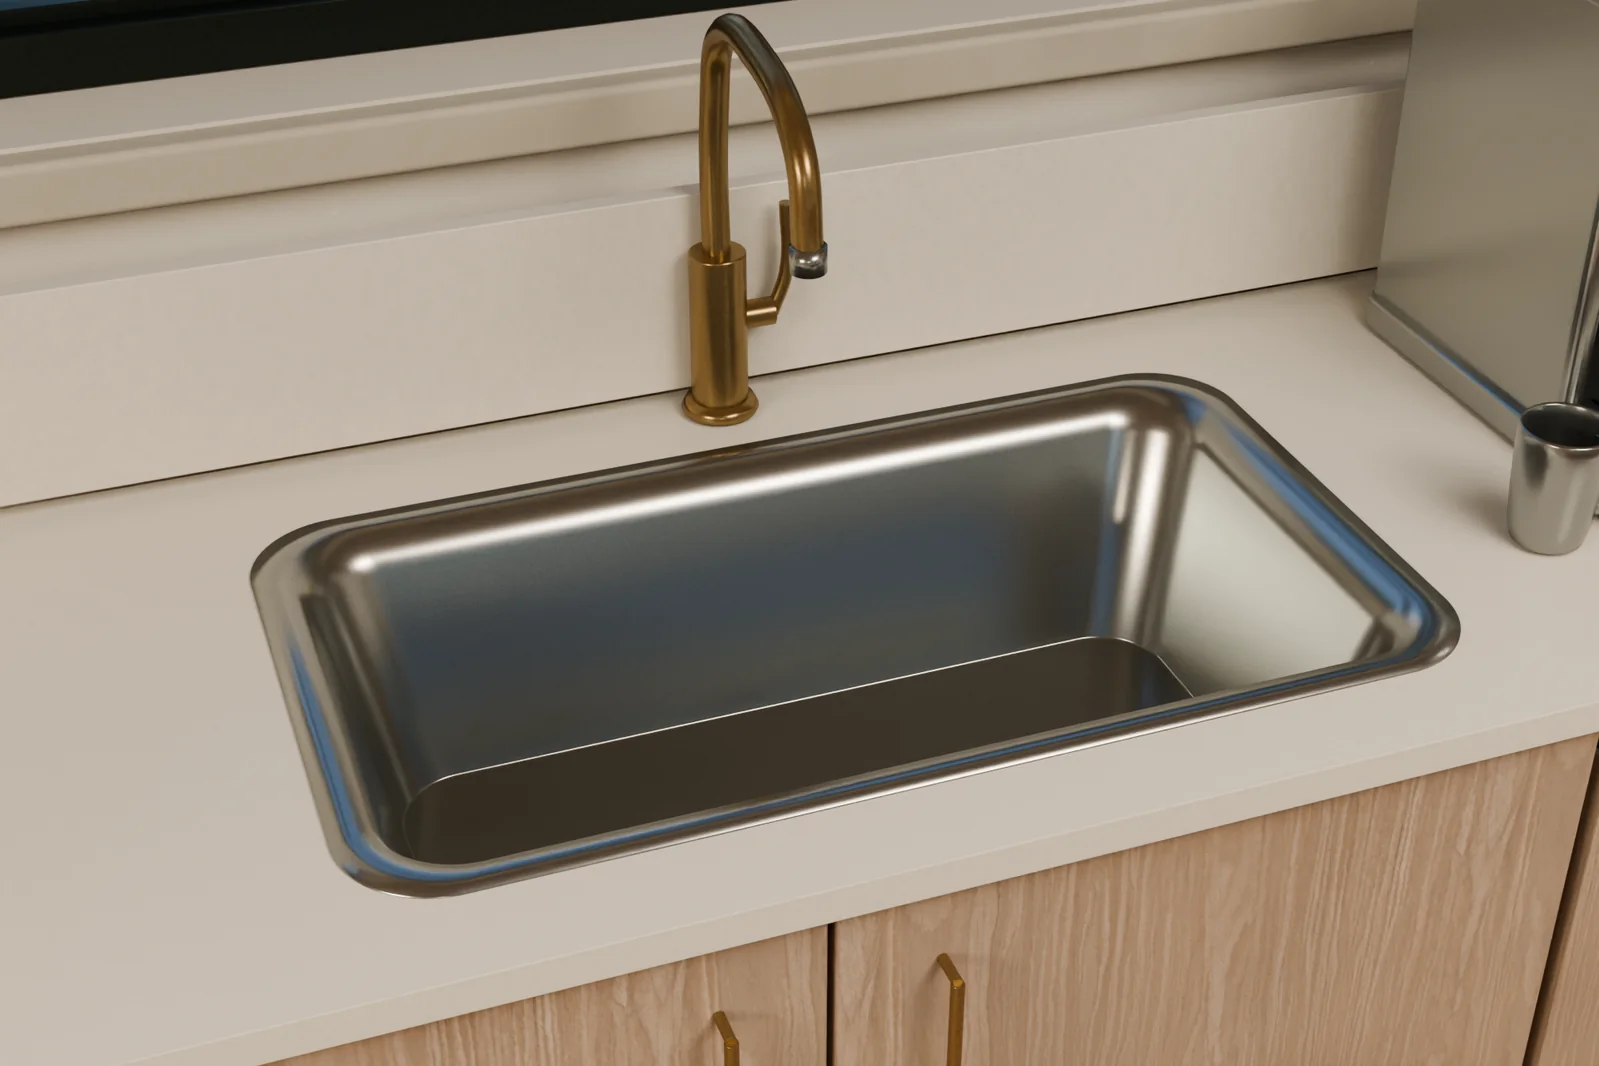
A close material study after the sink’s shading and edge refinement.
Inspect the geometry without the materials
A cinematic image is useful for judging the atmosphere. Turning off the materials gives another view of the work: the walls, openings, furniture, and room layout that produce the image.
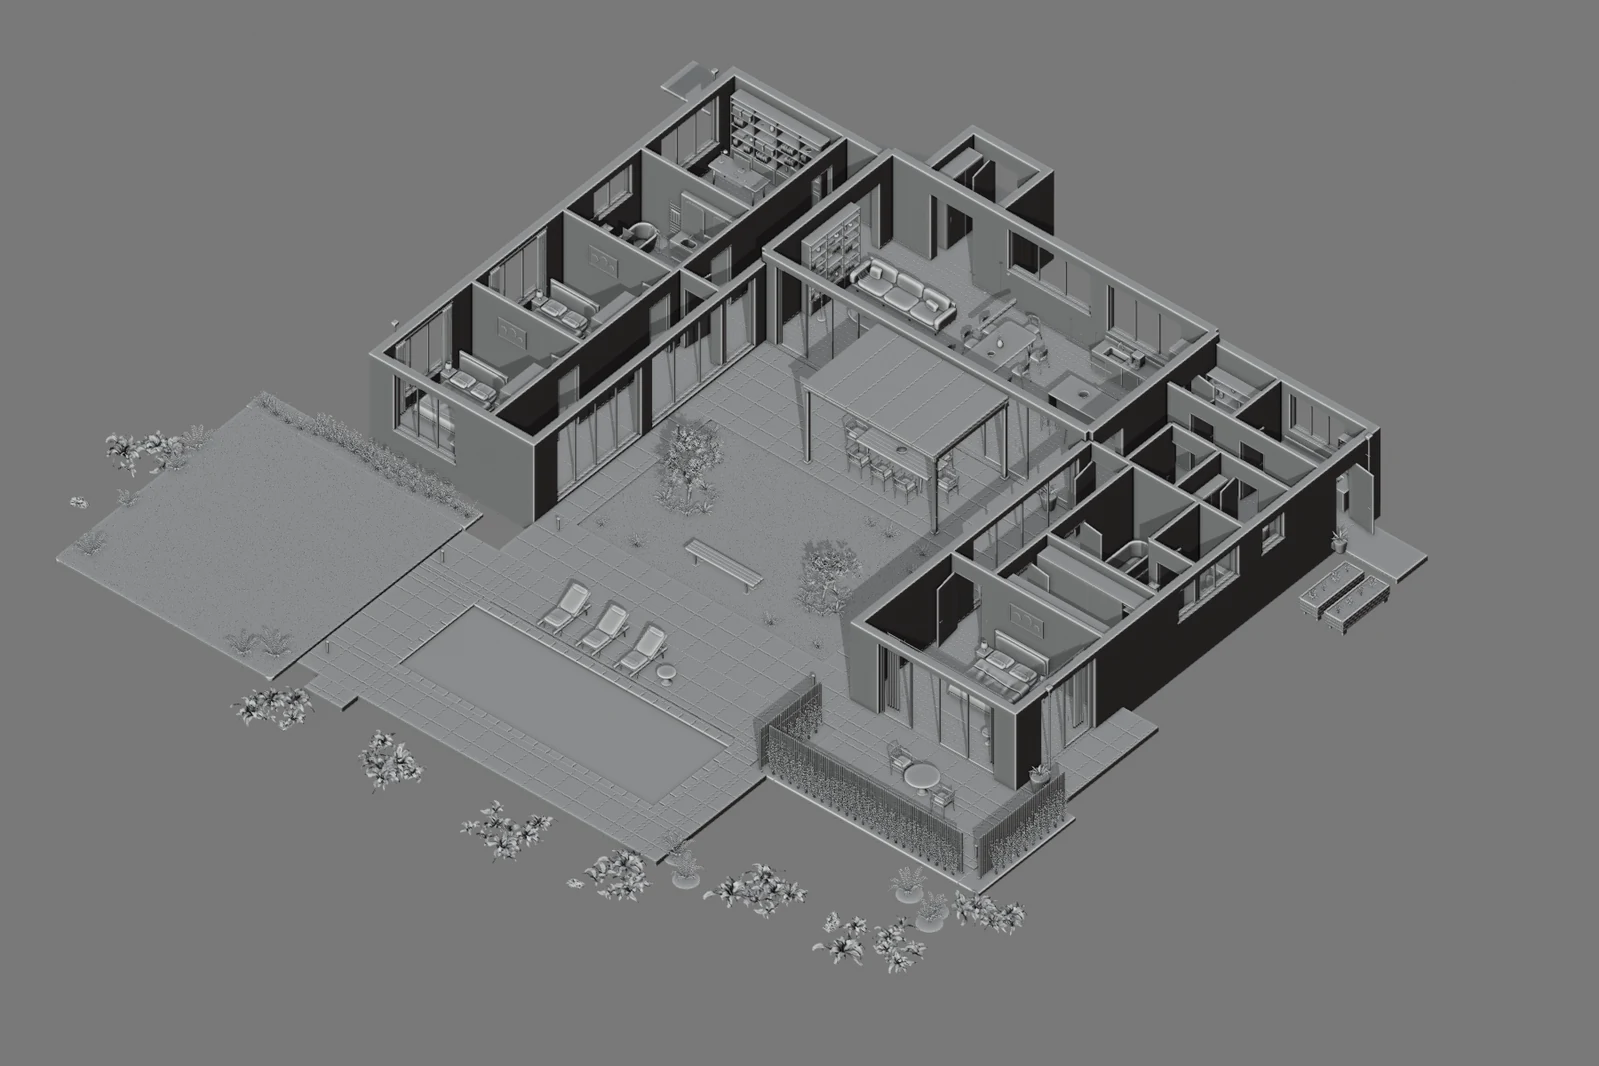
The actual Blender geometry in solid mode. The roof, surrounding forest, and window panes are hidden for this inspection view; the source model is unchanged.
This makes the progression from the first pavilion easier to see. The new house has a continuous layout, furnished rooms in both wings, and openings connecting them to the courtyard. Those elements remain editable in Blender, independently of the lighting and final camera view.
Astra also checked the geometry, including door openings and wall connections, and sampled routes through the scene. Those checks supported the visual reviews. They didn’t replace looking at the renders, and they weren’t a certification that every possible intersection or architectural detail was correct.
Make the house feel lived in
After exploring the furnished house, I returned to Blender to push the details further. The layout already worked; I wanted the rooms to feel occupied and the materials to hold up when the camera moved closer. My next brief focused on the light and the signs of everyday life:
Make the lighting quieter, warmer, and more accurate. Improve how the materials respond to light, and add dishes and everyday objects so the house feels lived in.
Astra kept the architecture and added objects where someone might use them. The dining table gained plates, cutlery, glasses, and folded napkins. The kitchen had bread, herbs, and bottles on the counter. An open journal, reading glasses, a mug, a phone, and keys made the coffee table feel less like a display. The office and bedrooms gained similar traces of use.
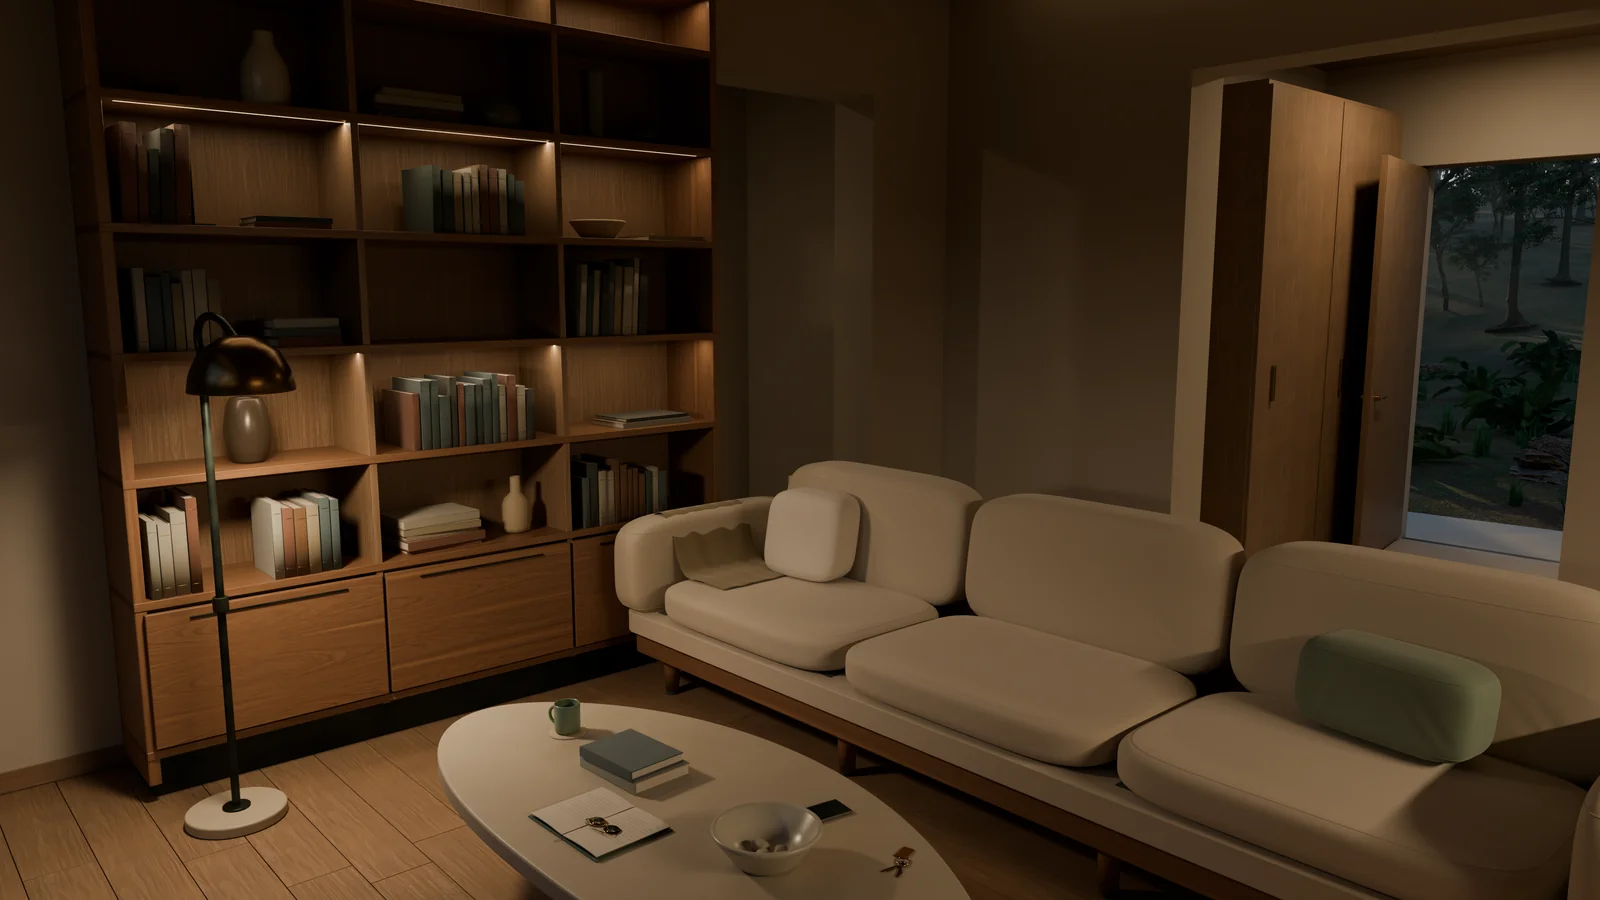
The living room after the detail and lighting pass, from a native 4K Cycles render.
These additions were modeled objects: hollow dishes, ribbed drinking glasses, and folded linen with stitched hems. Astra also refined how surfaces caught the light, combining scanned timber and plaster textures from Poly Haven with procedural detail in fabric, ceramics, and metal. Texture scale, roughness, and small surface variations helped the materials read at close range.
The lighting changed with them. Astra removed hidden fill lights that had been flattening the rooms, warmed the remaining light, and matched light sources to visible fixtures. It modeled ceiling lights and placed glowing bulbs inside lampshades that let light through. That gave the highlights and shadows a clearer relationship to the objects in the room.
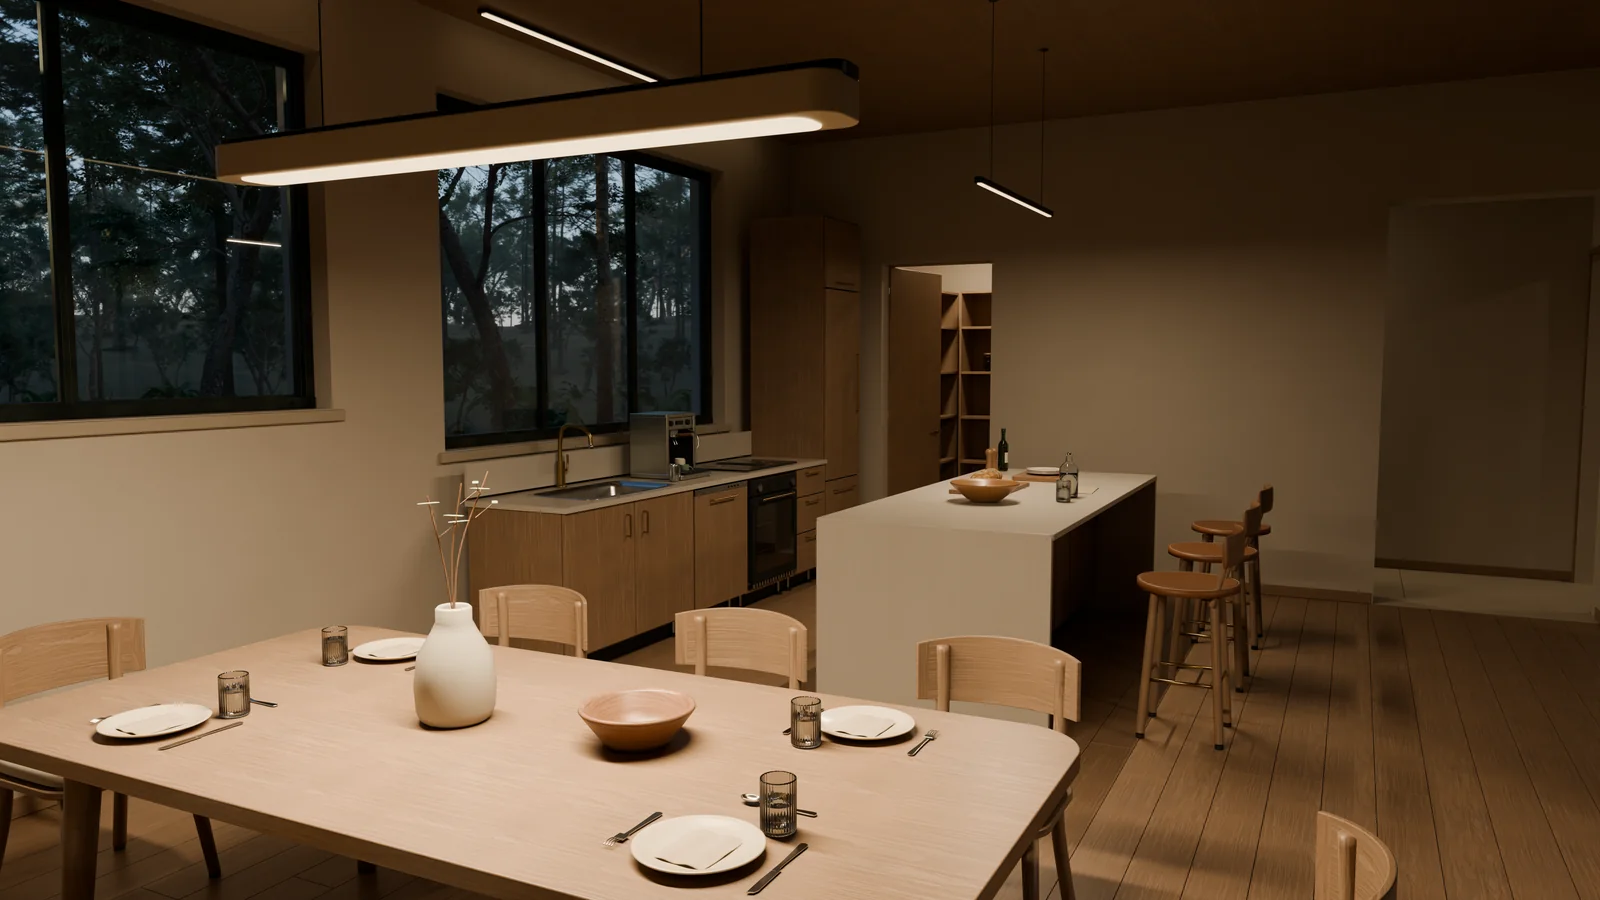
The dining table and kitchen after the same pass. The table settings and lighting fixtures are geometry in the editable scene.
Direct a Blender camera walkthrough
I also wanted to judge that detail in motion. I asked for a 30-second house tour at 1080p, with camera work that felt dynamic and human. We reviewed preview renders first, then adjusted the framing and movement before committing to the full render.
Astra translated that direction into four camera takes covering the main pavilion, office, bathroom, and bedroom, joined by cuts. Its Python scripts placed the camera about 1.65 meters above the floor with 24–26 mm lenses, eased its speed at the start and end of each take, and added restrained walking motion. It directed the camera’s gaze toward the furniture and views, and revised shots whose previews lingered on blank walls or ended awkwardly.
For a crisper view of the architecture, depth of field stayed off. Cycles rendered the 30-second tour as 900 individual 1080p frames at 30 frames per second, using adaptive sampling and OpenImageDenoise to control noise. Astra assembled those frames into a film without interpolating new ones. This was a rendered camera sequence, so it could spend much longer on each frame than an interactive walkthrough.
A poolside approach and a tour of the rooms, rendered in Blender using Cycles.
After watching the tour, I asked for five more seconds outside, showing the pool, water reflections, and loungers before entering the house. Astra rendered that approach and joined it to the existing film. It also produced five native 4K stills of the exterior, courtyard, living room, kitchen, and bedroom. The same scene could now support both a directed film and detailed still images.
Walk through the house in Unreal Engine 5
Earlier in the project, I also asked Astra to make the house playable in Unreal Engine 5. I wanted to move through it at a person’s height, look around freely, and get a better sense of how the spaces connected. This walkthrough shows an earlier version of the house, before the Blender detail and lighting pass shown in the opening film.
A recording of the earlier interactive Unreal walkthrough.
Astra wrote an export and import pipeline around the approved Blender file. It exported the evaluated geometry as FBX files, including detail produced by Blender’s curves and modifiers. Alongside those files, it wrote a JSON scene description recording where the parts belonged, which materials they used, and where the lights and cameras were placed.
That description let Unreal reconstruct the scene. The transfer handled Blender’s meters and Unreal’s centimeters, along with the change in coordinate orientation. Repeated trees remained instances of shared geometry, so the forest didn’t need a separate complete mesh for every occurrence.
The materials needed their own translation. Blender and Unreal use different material systems. Astra read the supported Blender material inputs, reused the source textures, and built corresponding Unreal materials for finishes such as timber, stone, fabric, glass, and water. It preserved how textures were positioned and scaled on the geometry, including the wood grain. Some shader behavior was approximated, so matching the appearance still required inspection.
Lighting was another part of that work. The sun direction and authored light placements provided a starting point, while Unreal’s sky and volumetric fog recreated the woodland atmosphere. Astra compared views against Blender and adjusted the exterior fill and haze. The aim was to carry the visual direction into real-time lighting while keeping the scene responsive to movement.
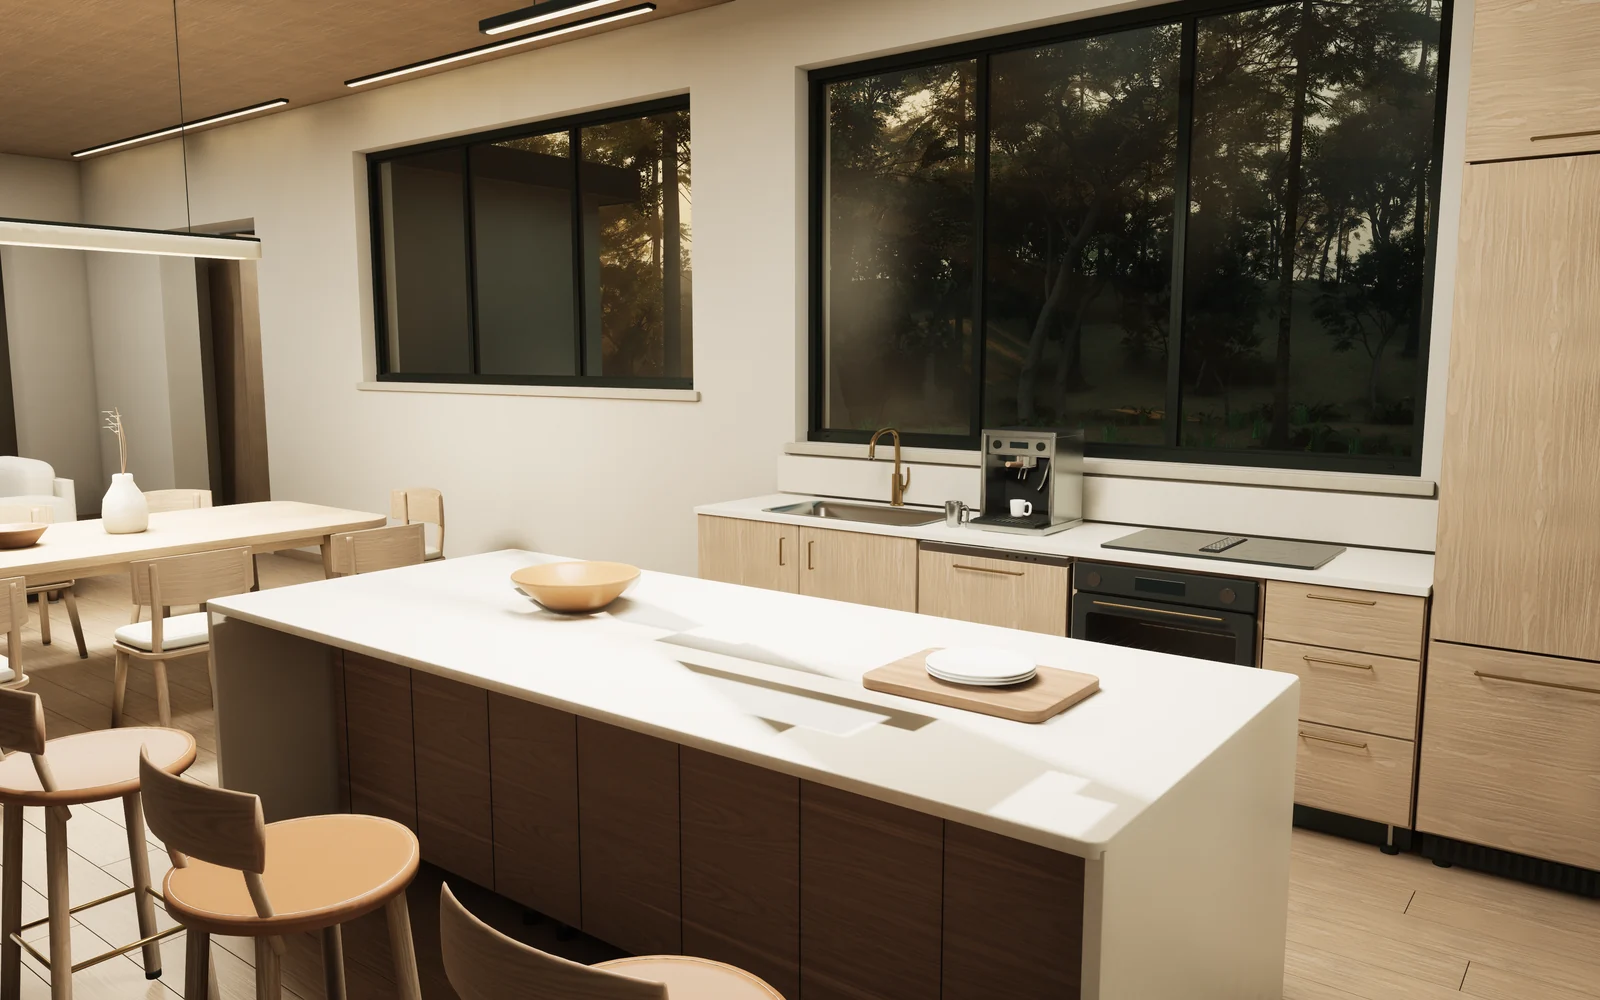
A closer Unreal view of the kitchen, showing the island, stools, appliances, and timber surfaces. Captured from the packaged application with settings chosen for still images.
Finally, the house needed a player and collision. Astra added a first-person character, walking controls, and a starting point. Floors needed to support the player; walls, furniture, and glass needed to block movement. Nearby tree trunks could be obstacles without making every fern an invisible wall. Astra packaged the result as a native Mac application and tested routes through it using the character’s normal movement.
Walking through Solace gave me another way to review the design. I could approach the house from the garden, enter the living space, and look into the rooms from positions that weren’t part of a composed render.
After the Blender detail and lighting pass, I asked Astra to bring the more lived-in house back into Unreal. It re-exported the updated geometry and materials into the existing project and added interactions to the model. The pipeline recorded which parts belonged to each door or drawer, where they hinged or slid, and which lights a switch should control. In Unreal, handles, drawer boxes, and their contents moved together with the assemblies they belonged to.
The biggest change was being able to use parts of the house. A contextual prompt and the E key let me open doors and kitchen storage, switch selected lights on and off, and operate the espresso machine. Its brewing sequence pressed the button, ran coffee into the cup, and raised the liquid level. The details we had modeled in Blender now had behavior I could try while walking through the rooms.
The updated house in Unreal Engine 5, including an interactive coffee machine.
Compare Blender and Unreal in storyboards
After the latest pass, I asked Astra to refresh the storyboards using the updated house and matching camera angles. It kept the individual shots and assembled separate storyboards for Blender and Unreal Engine 5. Each begins with a large exterior view, followed by six smaller views of the rooms and garden. Astra handled the numbered titles, short captions, typography, and spacing, while preserving each complete image without cropping it.
The updated boards use Cycles renders and Lumen still captures. They cover the same seven subjects in the same order, with matching camera positions, orientations, and fields of view. Each engine retains its own lighting, materials, and tone mapping. The Unreal bathroom mirrors still show some reflection artifacts. The shared layout makes the two versions easier to review together and turns the individual views into a presentation of the whole house. Select either storyboard to inspect its labels and images at a larger size.
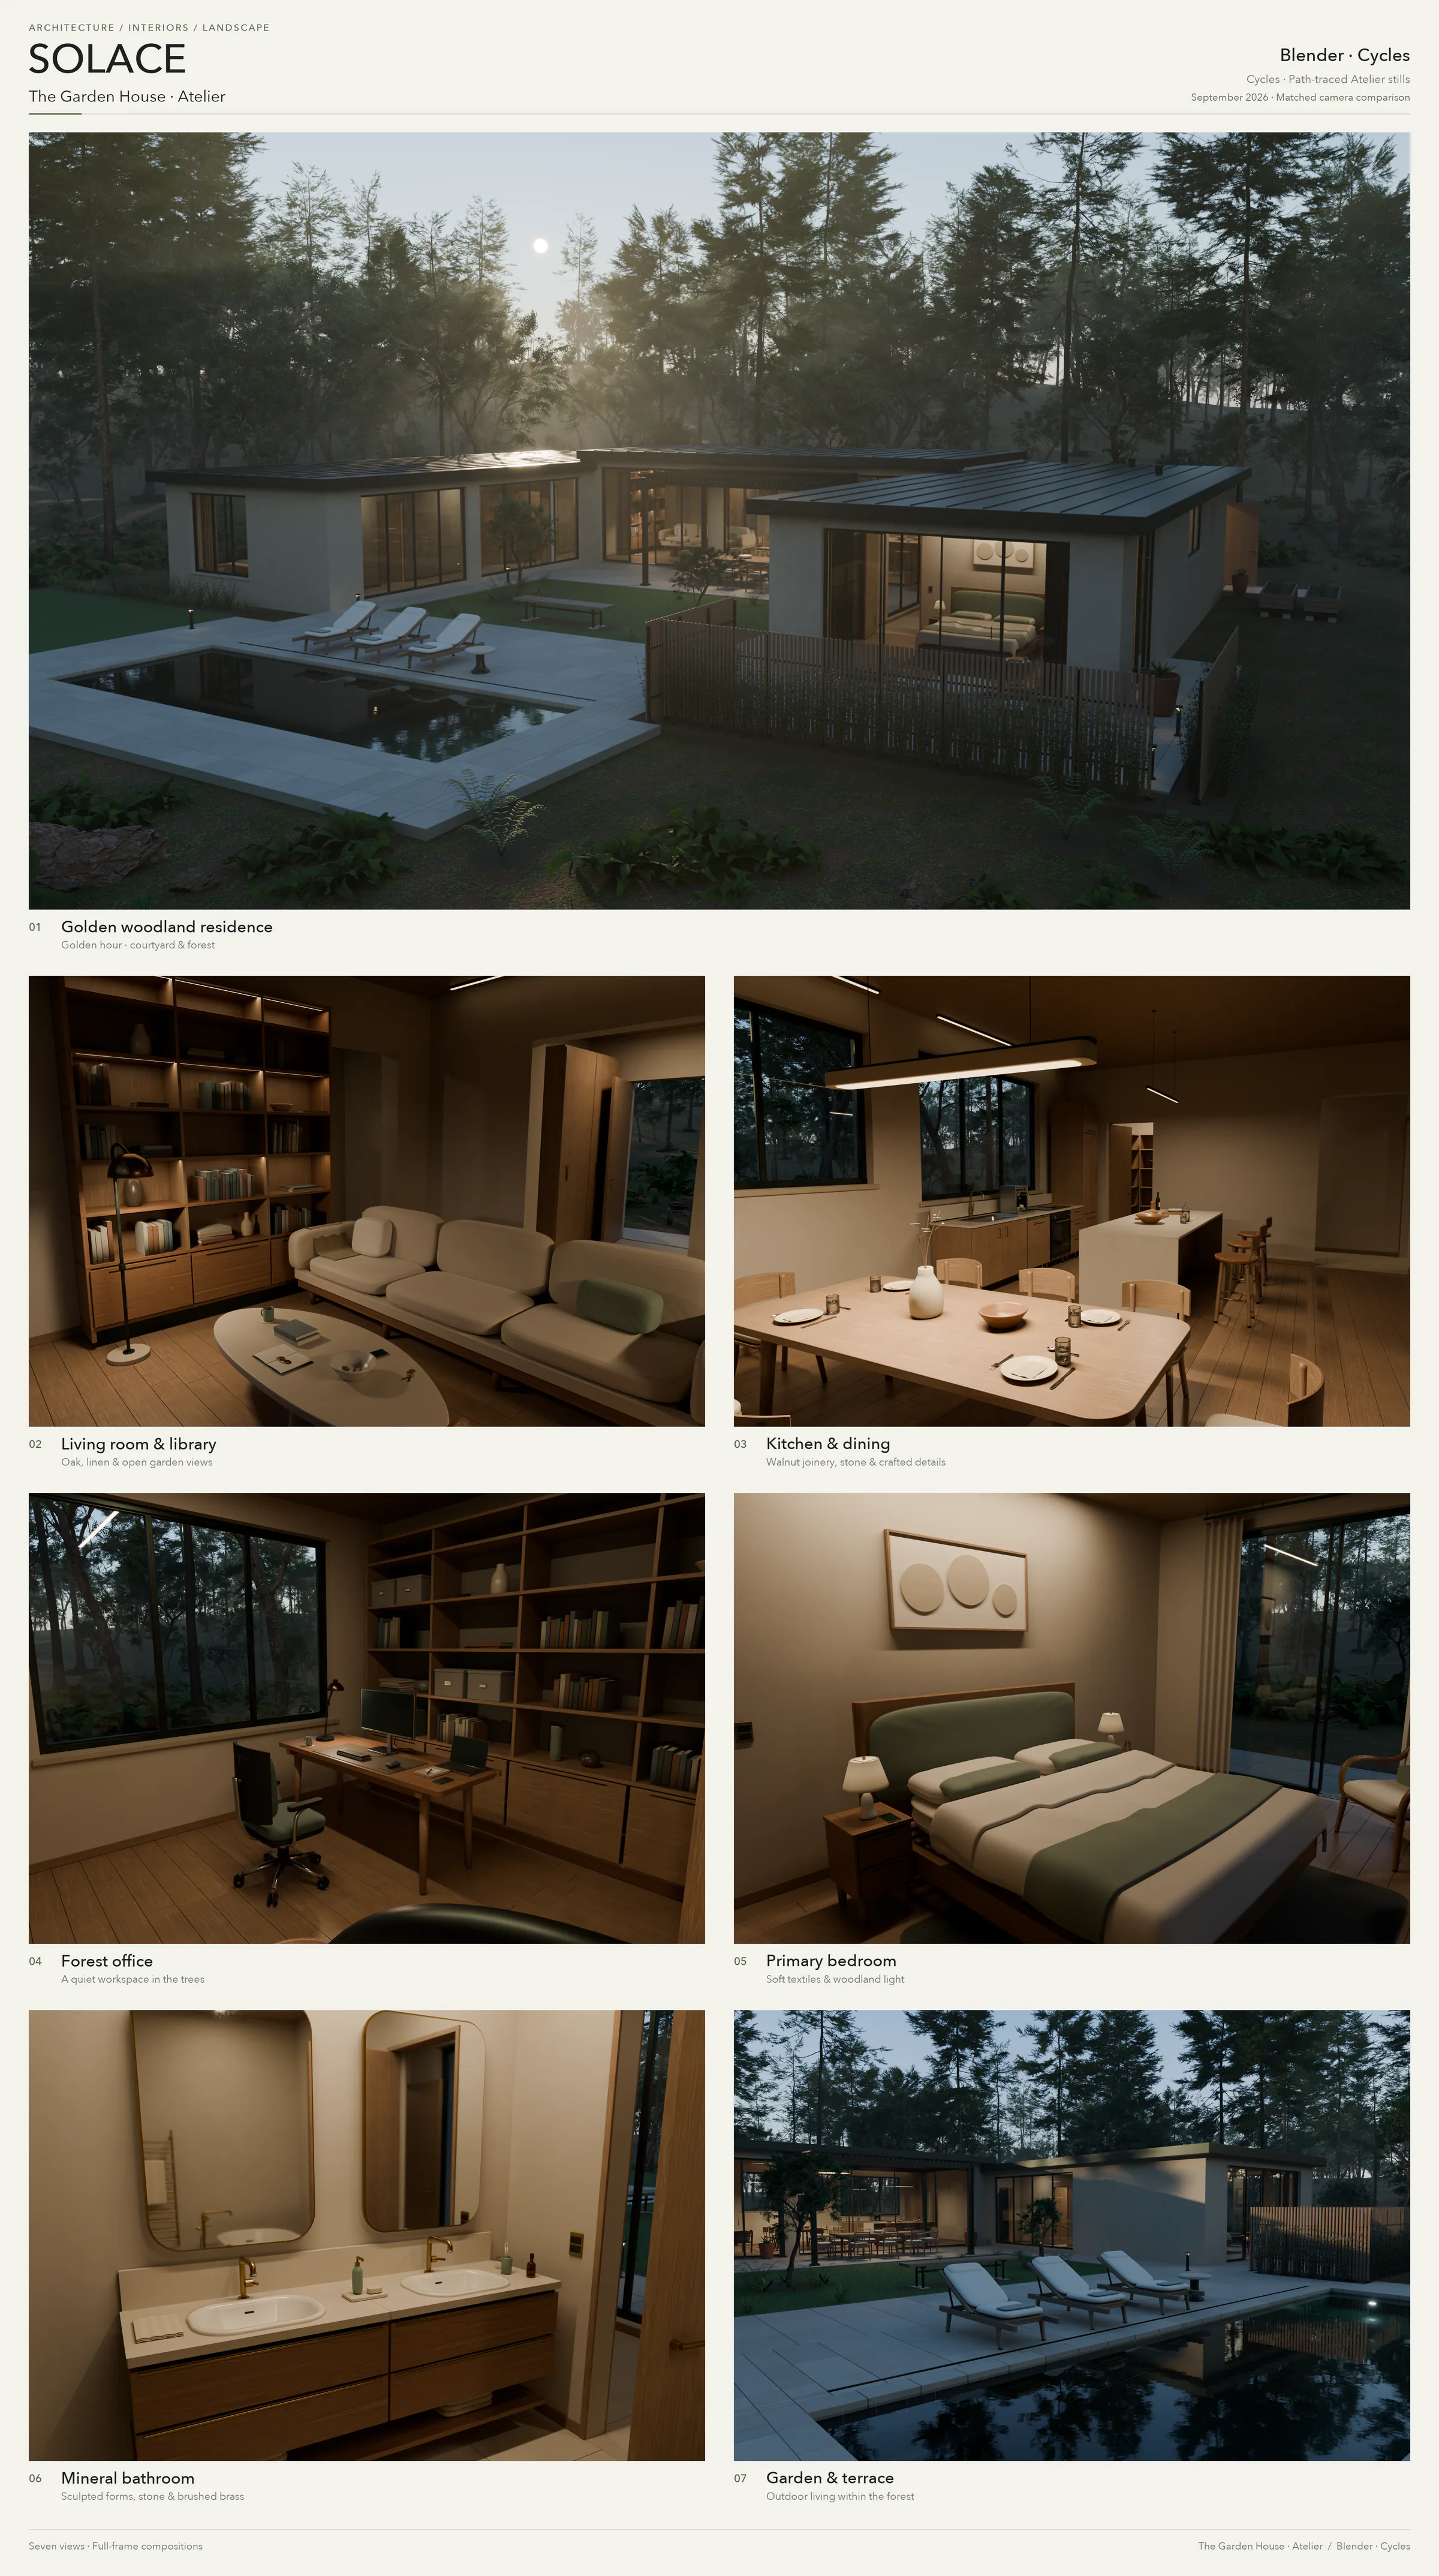
The Blender storyboard, assembled from Cycles renders.
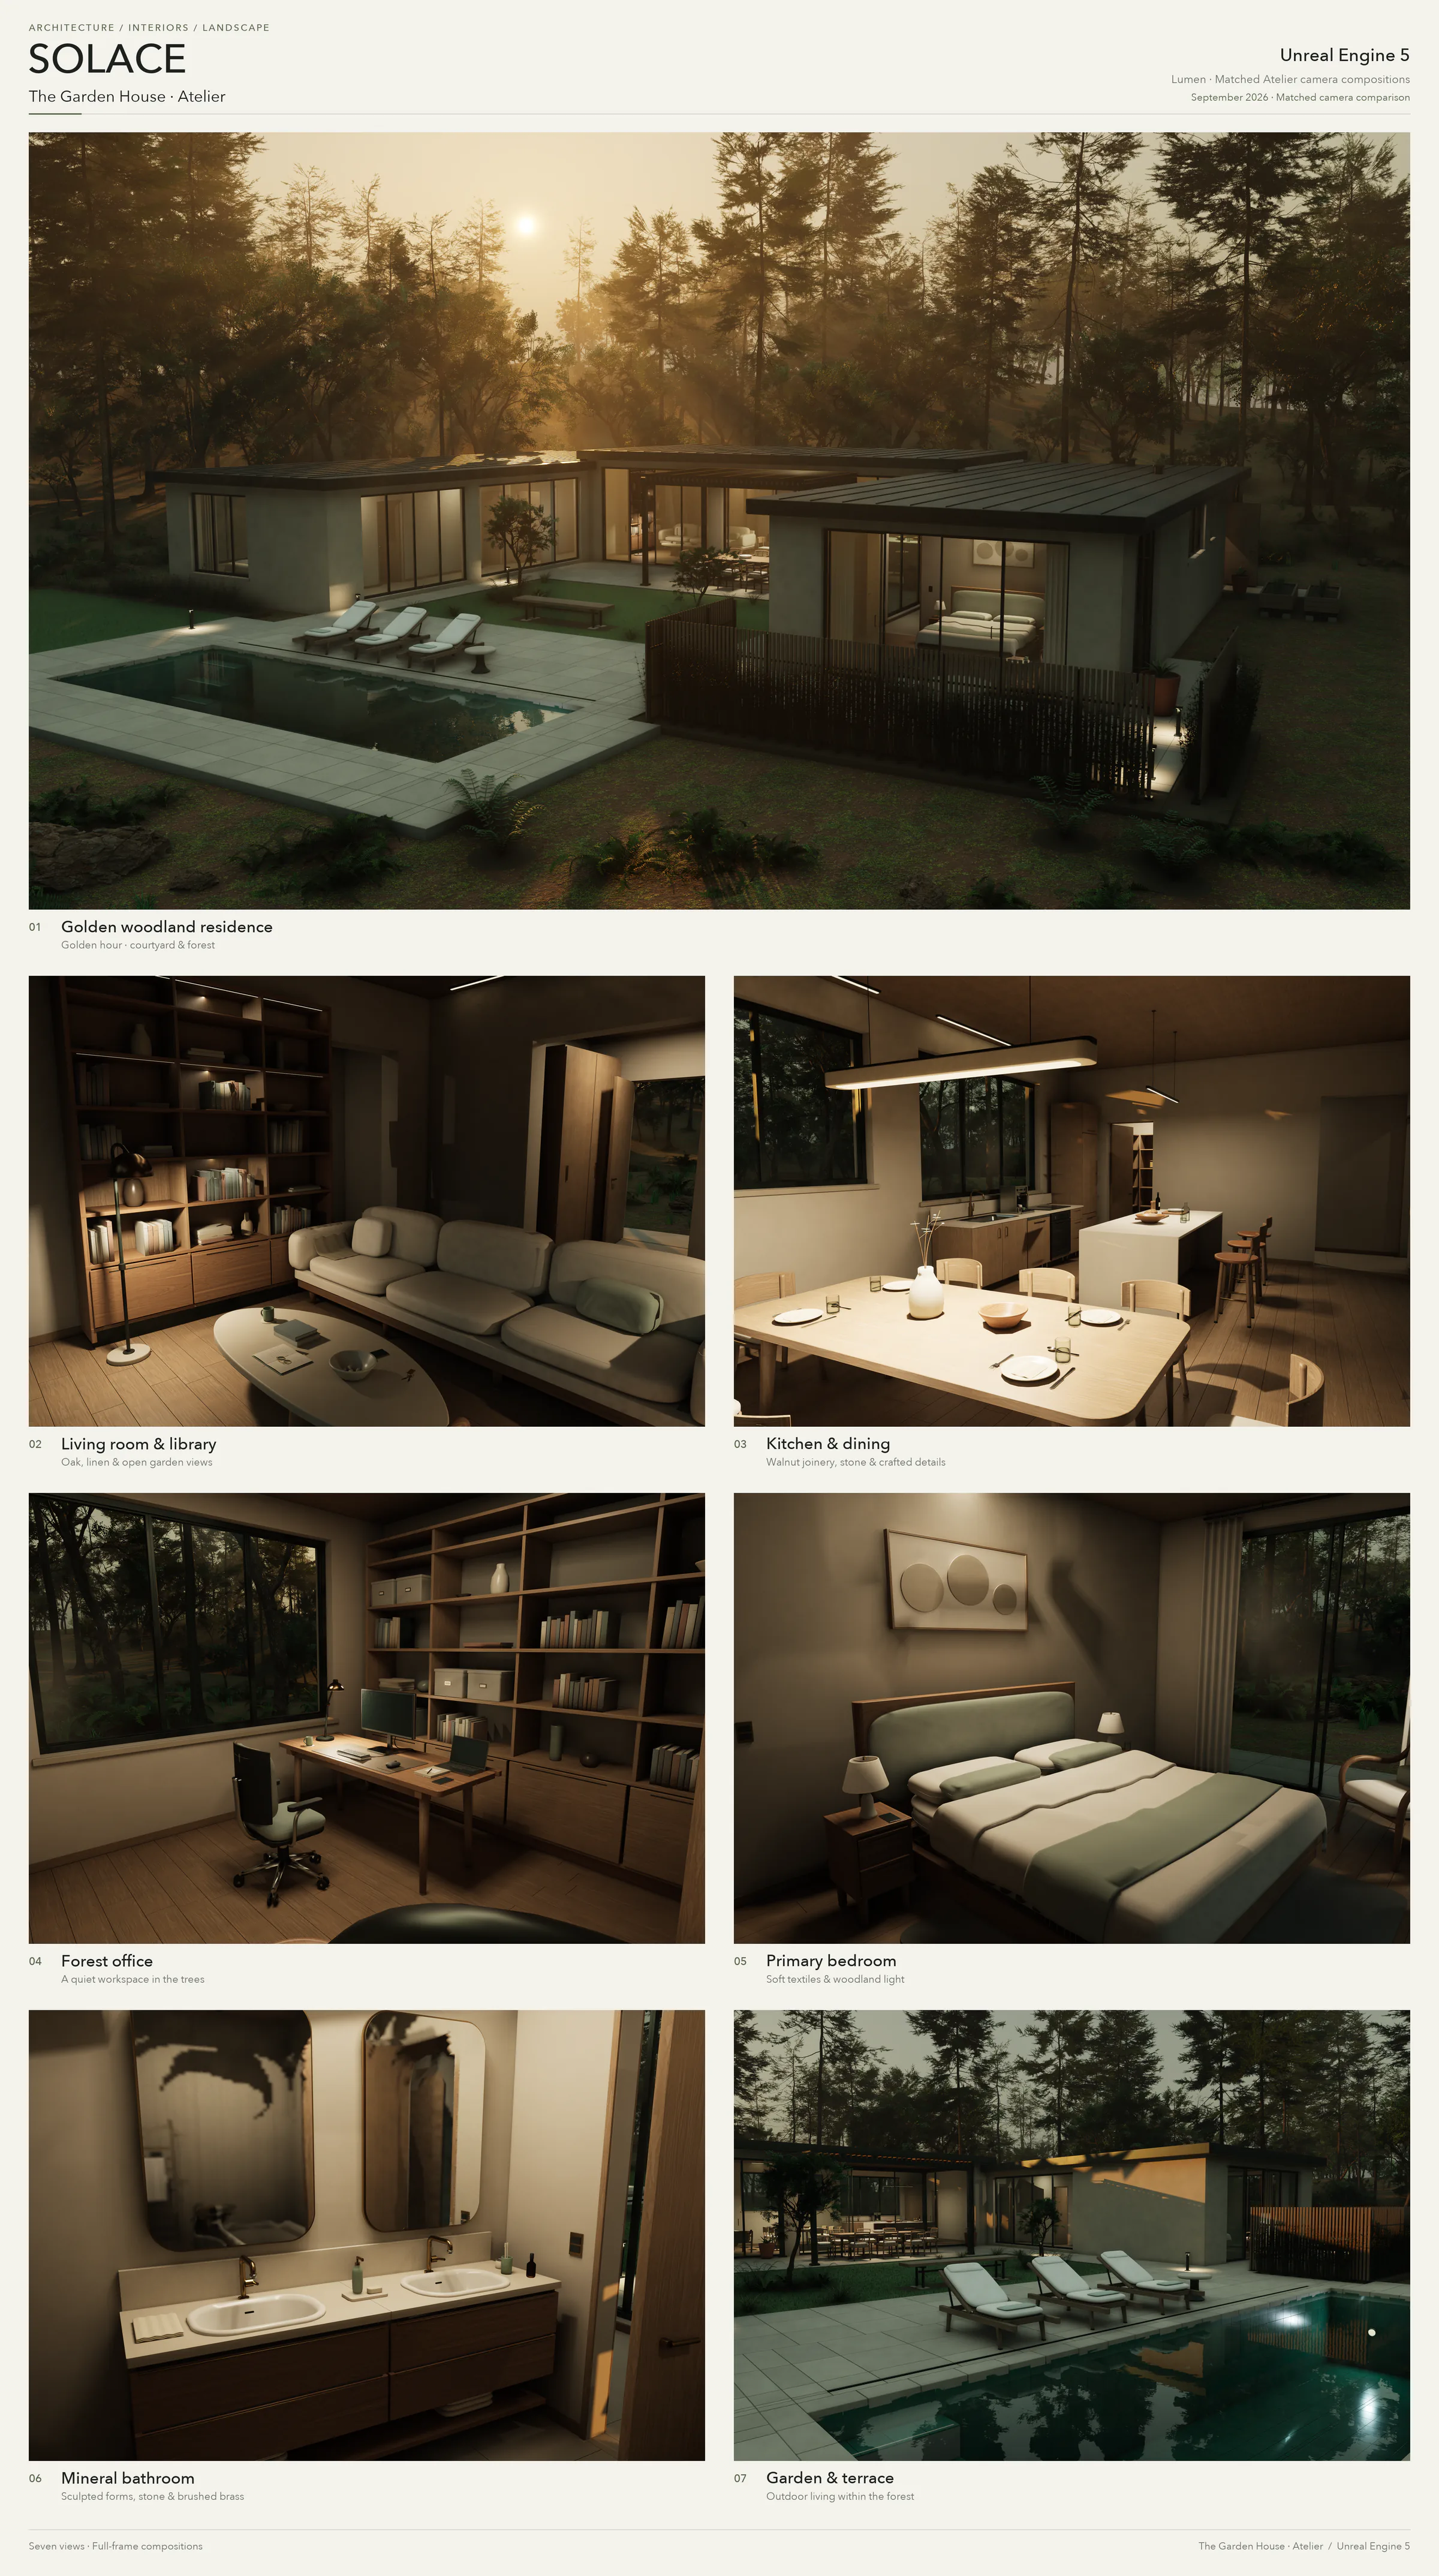
The Unreal Engine 5 storyboard, assembled from Lumen still captures.
Design beyond architecture
I’ve used the same approach for very different 3D scenes. In HELIOS, I asked Astra to build a solar system with a Dyson sphere around the Sun. The fictional collector grew into thousands of individual panels with recessed surfaces, cooling fins, braced service structures, and larger control hubs. Astra combined that geometry with materials and lighting that made the construction visible around the bright star.
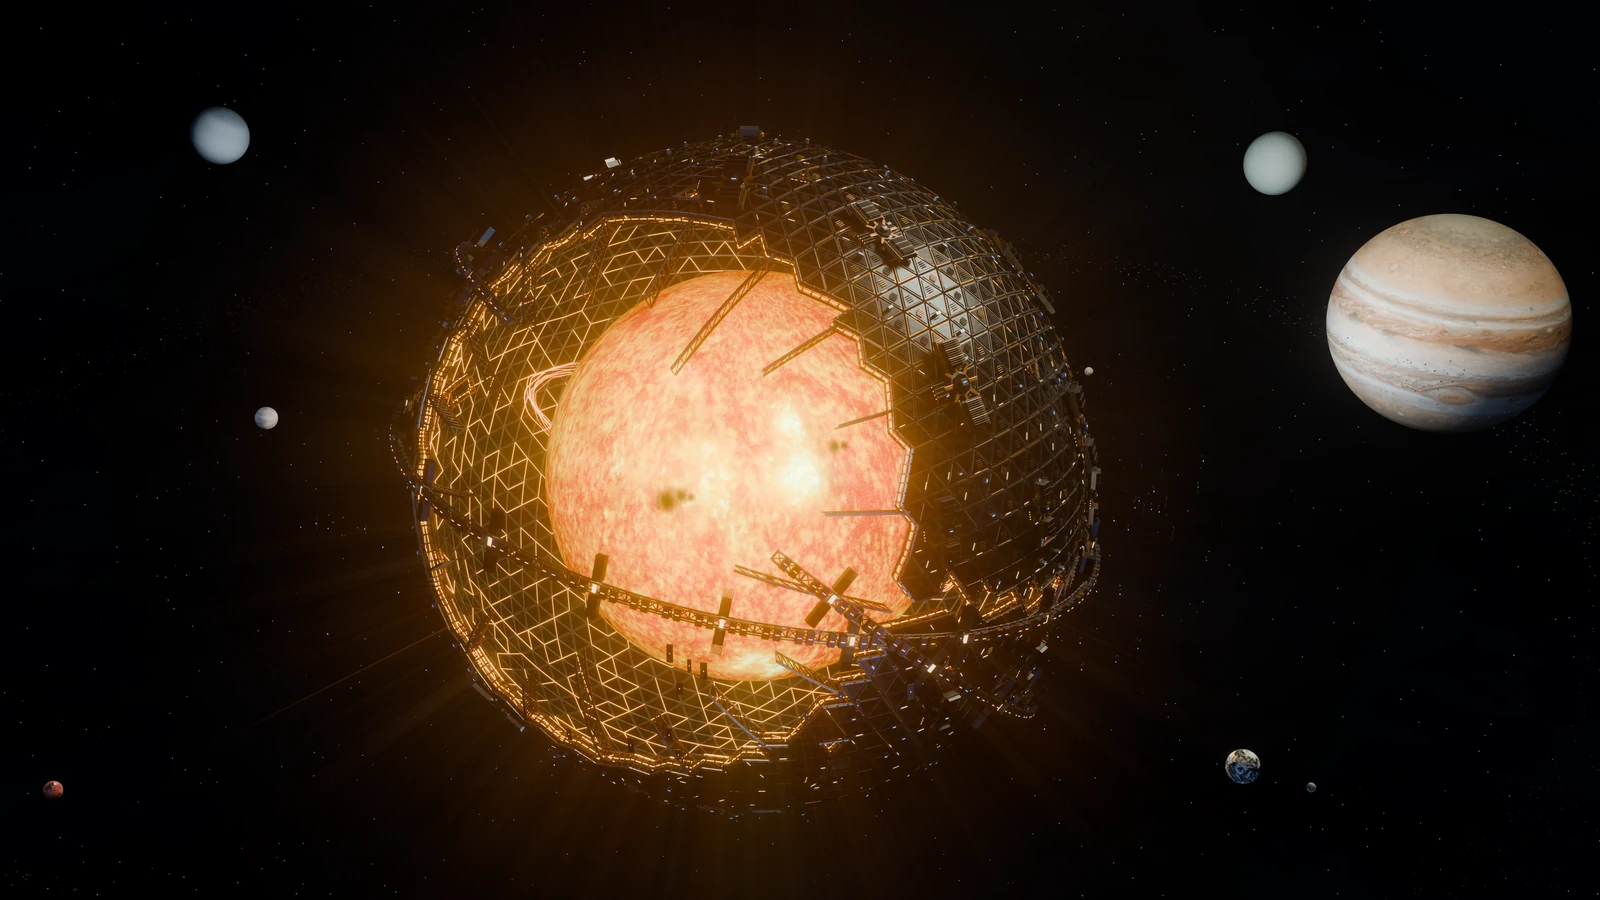
The original HELIOS collector, with an open shell revealing the Sun. The sizes and distances are composed for cinema rather than shown at a uniform astronomical scale.
Astra reviewed the renders as it worked. In the first previews, it noticed that the planets looked washed out and Saturn’s rings were clipped by the frame. It reduced the fill lighting and widened the composition. When I later asked for a view from Earth with the shell almost closed, it modeled a new version with three narrow openings. Only one shaft of light read clearly in the preview, so it moved the light-emitting surfaces closer to the openings. It also tested changes to the ocean material to soften a reflection that competed with the main subject.

The Earthward composition, with a nearly closed shell of 5,120 panels and three light openings. This view also uses cinematic scale and lighting.
The HELIOS renders use solar imagery from NASA JPL / STEREO and SDO, adapted from false-color ultraviolet observations, and Earth imagery from NASA Earth Observatory’s Blue Marble. The night lights are credited to NASA Earth Observatory / Robert Simmon, using Suomi NPP VIIRS data courtesy of Chris Elvidge, NOAA NGDC. Planetary and cloud maps from Solar System Scope / INOVE were adapted under CC BY 4.0.
In the Shipyard project, Astra built AURELION-07, a cruiser with a tapered hull, a segmented ring, and four detailed drives. The engines had containment bands, service lines, recessed nozzles, and concentric illuminated openings. Ceramic armor, machined metal, and glass had distinct materials. Procedural textures varied the color, roughness, and surface detail of the armor and metal. The geometry, materials, lights, and cameras remained editable in Blender.

AURELION-07, an individually modeled ship from the Shipyard project, rendered in Blender.
Here too, Astra used a preview to identify what needed work. It found the bow too plain and the background planet too prominent. The next pass fitted panels and seams to the tapered hull, added docking hardware and ring fasteners, and moved and darkened the planet. It then inspected the ship from several angles, including the engines. The review led to changes in the model and the composition before I had to point out each detail.

A second view of the same ship makes the engine construction and surface details visible.
Design a garden from reference
I also asked Astra to build a garden inspired by Monet’s garden at Giverny, with a lily pond, green bridge, and dense planting. When the early renders looked empty beyond the pond, I asked it to study real references and develop the surrounding garden and buildings.
My next feedback was about surfaces that still looked flat. Astra added textured gravel and masonry, refined the lily leaves and petals, and rendered new Cycles views for review. The result remained an editable Blender scene, with the real garden’s proportions adapted for the composition.
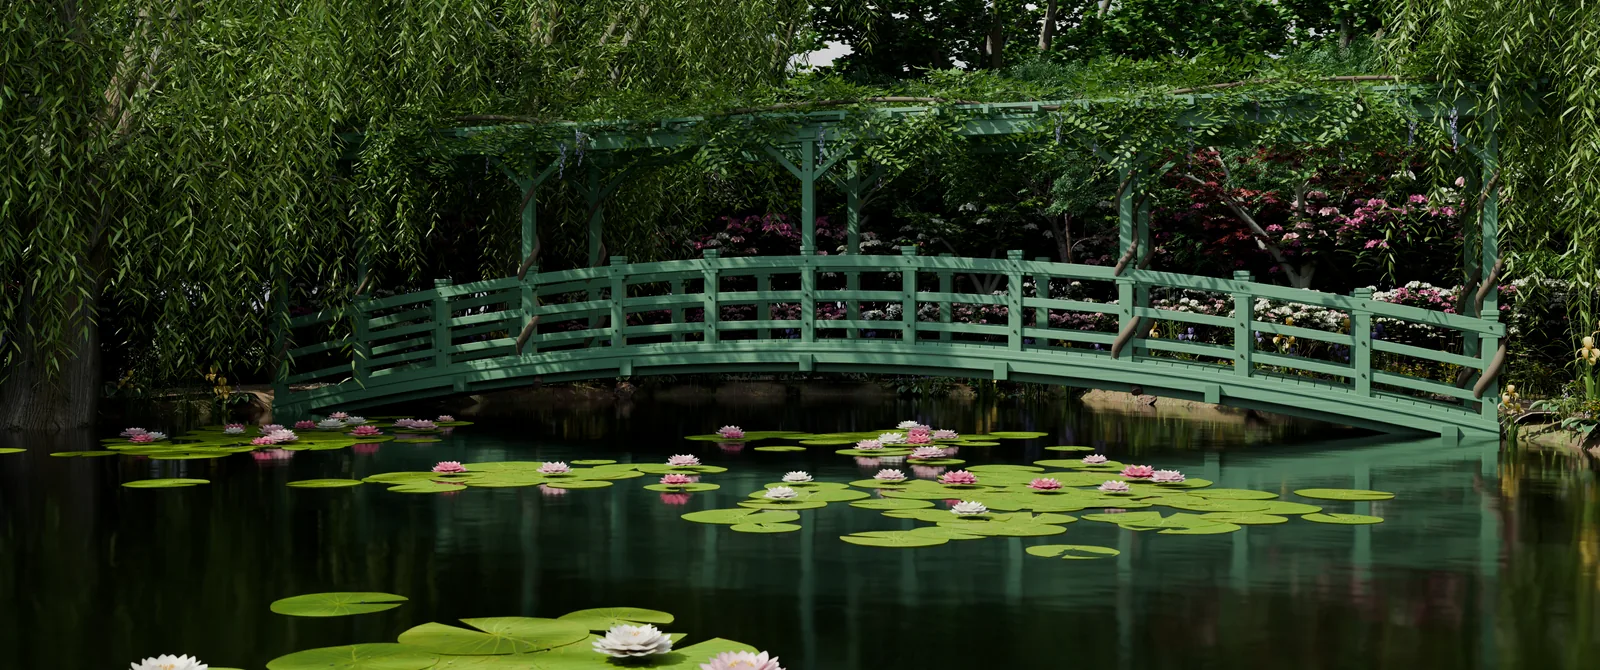
A Cycles render of the Giverny-inspired water garden. Selected plants, textures, and the sky environment come from Poly Haven.
Start with your own scene
What I liked about Solace was being able to keep developing the same idea across those stages. I could describe an atmosphere, review a floor plan, ask for more precise furniture, and then explore the result. Astra carried the work through the scene, the scripts, and the Unreal project, while I kept deciding what kind of place I wanted to build. HELIOS and Shipyard gave me the same room to work from the overall design down to individual parts, with Astra inspecting and improving the result along the way.
For your own experiment, start with a place or object you want to see: a room, a piece of furniture, a spacecraft, or an imagined landscape. Describe its purpose and atmosphere, then ask Astra for an editable scene and a few views to review. Look at the broad shape first, then move closer and ask what needs to change. Each render can be a starting point for the next design decision, whether you want to refine one object or eventually explore a whole world.